


Instruction Book
Memory Craft 350e

IMPORTANT SAFETY INSTRUCTIONS
This sewing machine is not a toy. Do not allow children to play with this machine.
The machine is not intended for use by children or mentally infirm persons without proper supervision.
This sewing machine is designed and manufactured for household use only.
Read all instructions before using this sewing machine.
DANGER— To reduce the risk of electric shock:
1.An appliance should never be left unattended when plugged in. Always unplug this sewing machine from the electric outlet immediately after using and before cleaning.
2.Always unplug before replacing a sewing machine bulb. Replace bulb with same type rated 12 Volts, 5 Watts.
WARNING— To reduce the risk of burns, fire, electric shock, or injury to persons:
1.Do not allow children to play with the machine. The machine is not intended for use by children or infirmed persons without proper supervision.
Do not allow to be used as a toy. Close attention is necessary when this sewing machine is used by or near children.
2.Use this appliance only for its intended use as described in this owner’s manual.
Use only attachments recommended by the manufacturer as contained in this owner’s manual.
3.Never operate this sewing machine if it has a damaged cord or plug, if it is not working properly, if it has been dropped or damaged, or dropped into water.
Return this sewing machine to the nearest authorized dealer or service center for examination, repair, electrical or mechanical adjustment.
4.Never operate the appliance with any air opening blocked. Keep ventilation openings of this sewing machine and foot controller free from accumulation of lint, dust and loose cloth.
5.Never drop or insert any object into any opening.
6.Do not use outdoors.
7.Do not operate where aerosol (spray) products are being used or where oxygen is being administered.
8.To disconnect, turn all controls to the off (“O”) position, then remove plug from outlet.
9.Do not unplug by pulling on cord. To unplug, grasp the plug, not the cord.
10.Keep fingers away from all moving parts. Special care is required around the sewing machine needle.
11.Always use the proper needle plate. The wrong plate can cause the needle to break.
12.Do not use bent needles.
13.Do not pull or push fabric while stitching. It may deflect the needle causing it to break.
14.Switch this sewing machine off (“O”) when making any adjustment in the needle area, such as threading the needle, changing the needle, threading the bobbin or changing the presser foot, and the like.
15.Always unplug this sewing machine from the electrical outlet when removing covers, lubricating, or when making any other adjustments mentioned in this owner’s manual.
SAVE THESE INSTRUCTIONS
The design and specifications are subject to change without a prior notice.
Please note that on disposal, this product must be safely recycled in accordance with relevant National legislation relating to electrical/electronic products. If in doubt please contact your retailer for guidance. (European Union only)
KNOW YOUR MACHINE................................................................................................ |
2-4 |
Names of Parts .................................................................................................................. |
2 |
Standard Accessories ........................................................................................................ |
3 |
Detachable Extension Table .............................................................................................. |
4 |
GETTING READY TO SEW ......................................................................................... |
5-18 |
Connecting the Power Supply ............................................................................................ |
5 |
Start/Stop Button ................................................................................................................ |
5 |
AutoThread Cutter Button .................................................................................................. |
5 |
Winding the Bobbin ............................................................................................................ |
6 |
Removing the bobbin .................................................................................................. |
6 |
Setting the spool of thread .......................................................................................... |
6 |
Additional spool pin ..................................................................................................... |
6 |
Winding the bobbin ..................................................................................................... |
7 |
Inserting the bobbin .................................................................................................... |
8 |
Raising the Presser Foot.................................................................................................... |
9 |
Threading the Machine ...................................................................................................... |
9 |
Needle Threader .............................................................................................................. |
11 |
Drawing up the Bobbin Thread ........................................................................................ |
12 |
Adjusting the Thread Tension .......................................................................................... |
13 |
Changing Needles............................................................................................................ |
14 |
Embroidery Hoops ........................................................................................................... |
15 |
Templates ........................................................................................................................ |
15 |
Stabilizers......................................................................................................................... |
16 |
Types of stabilizers ................................................................................................... |
16 |
Usage ........................................................................................................................ |
16 |
Setting the Fabric in an Embroidery Hoop ....................................................................... |
17 |
Attaching the Embroidery Hoop to the Machine............................................................... |
18 |
KEY OPERATIONS .................................................................................................... |
19-25 |
Pattern Selection Window ................................................................................................ |
19 |
Mode Setting .................................................................................................................... |
20 |
Macine Settings................................................................................................................ |
21 |
Language Selection ......................................................................................................... |
24 |
On-screen Help ................................................................................................................ |
24 |
Selecting Built-in Designs ........................................................................................... |
25-27 |
EMBROIDERY SEWING ................................................................................................. |
28 |
Starting to Sew Embroidery ............................................................................................. |
28 |
MONOGRAMMING..................................................................................................... |
29-45 |
Monogram Selection Window ..................................................................................... |
29-30 |
Monogram Embroidery................................................................................................ |
31-32 |
2-Letters Monogram ......................................................................................................... |
33 |
Correcting the Monogram ................................................................................................ |
34 |
OPTIONAL ITEMS...................................................................................................... |
35-36 |
PC Card ........................................................................................................................... |
35 |
USB Memory .................................................................................................................... |
35 |
EDITING MODE .......................................................................................................... |
37-41 |
Editing the Embroidery Designs ....................................................................................... |
38 |
SAVING AFILE ........................................................................................................... |
42-44 |
Creating a new file ........................................................................................................... |
43 |
Assigning the file name .................................................................................................... |
43 |
Deleting the file ................................................................................................................ |
44 |
CREATING AN ORIGINAL DESIGN .......................................................................... |
45-46 |
CARE AND MAINTENANCE...................................................................................... |
47-48 |
Cleaning the Hook Race .................................................................................................. |
47 |
Replacing the Light Bulb .................................................................................................. |
48 |
Troubleshooting ............................................................................................................... |
49 |
1

r
t
y
u
i o
!0
!1
!2
!3
!4
!5
!9
@0
@1
@2
@3
@4
@5
@6
@7
@8
@9 |
#0 |
|
#1 |
||
|
KNOW YOUR MACHINE
ew
Names of Parts
!8
!7
!6
#3
#2
q Visual touch screen w Bobbin winder spindle e Bobbin thread cutter r Spool holder (large)
qt Spool pin
y Bobbin winding thread guide u Thread guide plate
i Thread take-up lever
o Thread tension dial !0 Face plate
!1 Thread cutter & thread holder !2 Needle threader
!3 Needle plate !4 Hook cover plate
!5 Extension table (accessory box) !6 Hook cover plate release button !7 Start/stop button
!8 Auto thread cutter button !9 Needle clamp screw @0 Needle
@1 Embroidery foot
@2 Carrying handle
@3 Hole for additional spool pin @4 Bobbin winder stopper
@5 Handwheel @6 PC card slot
@7 PC card (optional item) @8 Card eject button
@9 USB socket (for usb memory) #0 Power switch
#1 Machine socket
#2 Carriage (for embroidery) #3 Presser foot lifter
2
q
w
e
r
t
y
u
!3
i
o
!4
!0
!5
!1 
!6
!2 
!7
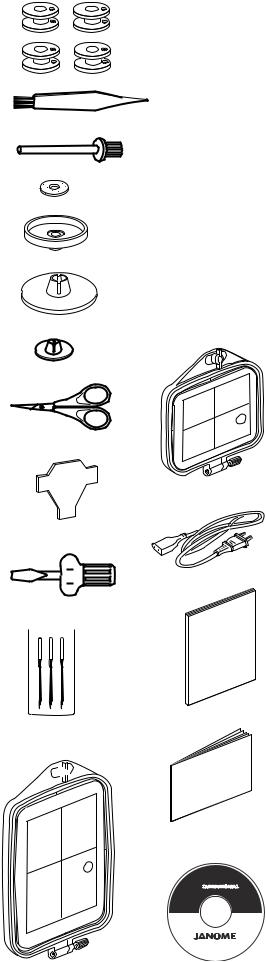
Standard Accessories
q Bobbins
w Lint Brush
e Additional Spool Pin r Spool Pin Felt
t Spool Stand
y Spool Holder (Large)
u Spool Holder (Small) i Scissors
o Screwdriver
!0 Screwdriver !1 Set of Needles
!2 Embroidery hoop B (with template) !3 Embroidery hoop A (with template) !4 Power Supply Cord
!5 Instruction Book
!6 Template Sheets (for Built-in Designs) !7 Instructional movie CD
3

Detachable Extension Table
q |
Deatch the extension table when you use the optional |
|
|
|
Free arm hoop C. |
|
To remove, lift out the extension table toward you as |
|
illustrated. |
To attach, position the tabs on the base tab holes and push down gently.
q Extension table w Tabs
e Base tab holes
w
e
Accessories are stored in the extension table.
q
4
q
w |
t |
|
e
r
Operating Instructions:
“The symbol "O" of a switch indicates the "off" position of a switch.”
“For appliances with a polarized plug (one blade wider than the other). To reduce the risk of electric shock, this plug is intended to fit in a polarized outlet only one way. If it does not fit fully in the outlet, reverse the plug. If it still does not fit, contact a qualified electrician to install the proper outlet. Do not modify the plug in any way.” (for the USA ans Canada only)
START |
w |
STOP |
|
q
GETTING READY TO SEW
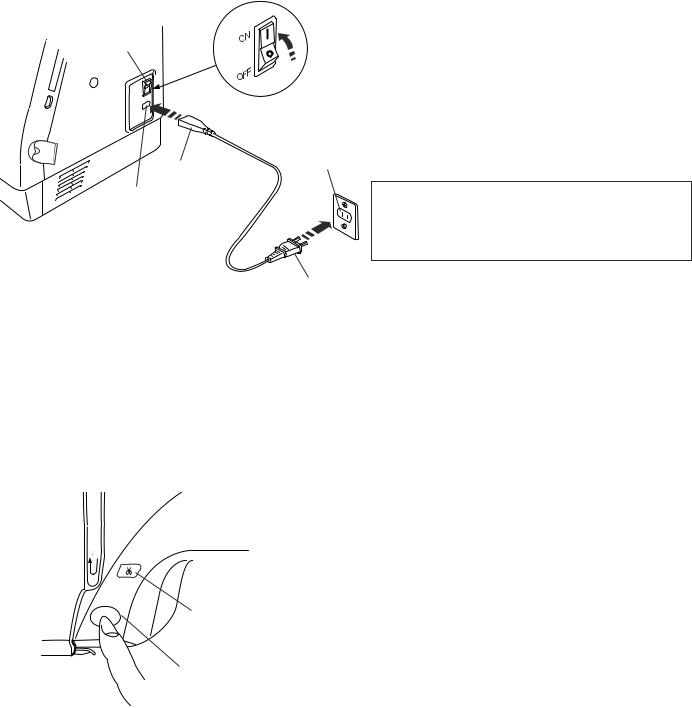
Connecting the Power Supply
Turn off the power switch and insert the machine plug into the machine socket.
Insert the power supply plug into the wall outlet and turn the power switch on.
q Power switch w Machine plug e Machine socket
r Power supply plug t Wall outlet
NOTE:
After turning on the power, it takes approximately six seconds for the pattern selection window to be displayed on the visual touch screen.
(This is the required boot up time and is not a defect)
For Your Safety:
While in operation, always keep your eyes on the sewing area, and do not touch any moving parts such as the thread take-up lever, handwheel or needle.
Always turn off the power switch and unplug the power supply:
-when leaving the machine unattended.
-when attaching or removing parts.
-when cleaning the machine.
Start/Stop Button
Press this button to start or to stop the machine. The color of the button changes each time you press it— red when the machine is running, and green when it is stopped.
q Start/stop bbutton
NOTE:
The Memory Craft 350E is equipped with an automatic shutdown safety feature to prevent overheating when the machine is running overloaded. Follow safety instructions that appear on the visual touch screen if it happens.
Auto Thread Cutter Button
Press this button to trim the threads after sewing is finished (refer to page 28).
w Auto thread cutter button
5
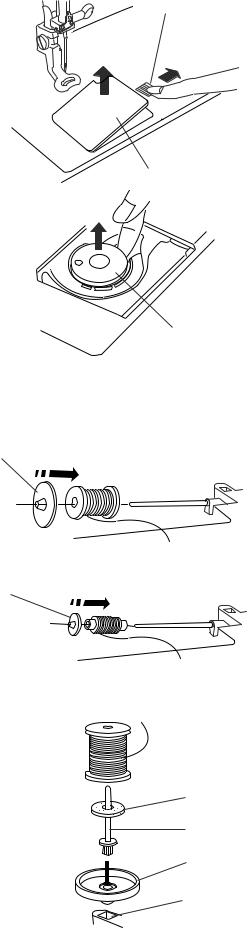
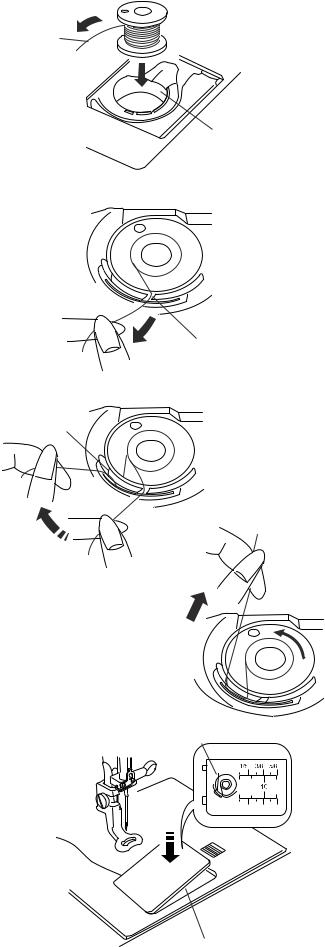
|
Winding the Bobbin |
q |
Removing the bobbin |
|
Slide the hook cover plate release button to the right, |
|
and remove the hook cover plate. Lift out the bobbin |
|
from the bobbin holder. |
q Hook cover plate release button w Hook cover plate
e Bobbin
w
e
Setting the spool of thread
q
|
Place the spool of thread on the spool pin with the |
|
thread coming off the spool as shown. Attach the large |
|
spool holder, and press it firmly against the spool of |
|
thread. |
|
NOTE: |
|
Use the small spool holder to hold narrow or small |
w |
spools of thread. |
|
q Large spool holder |
|
w Small spool holder |
Additional spool pin
Use the additional spool pin when you need to wind the bobbin without unthreading the machine while working on a sewing project.
r
|
Insert the additional spool pin into the spool stand then |
|
q |
into the hole besides the horizontal spool pin. |
|
Place the felt on the spool pin and place a spool of |
||
|
||
w |
thread on it as shown. |
|
|
||
|
q Additional spool pin |
|
e |
w Spool stand |
|
|
e Hole |
|
|
r Felt |
6
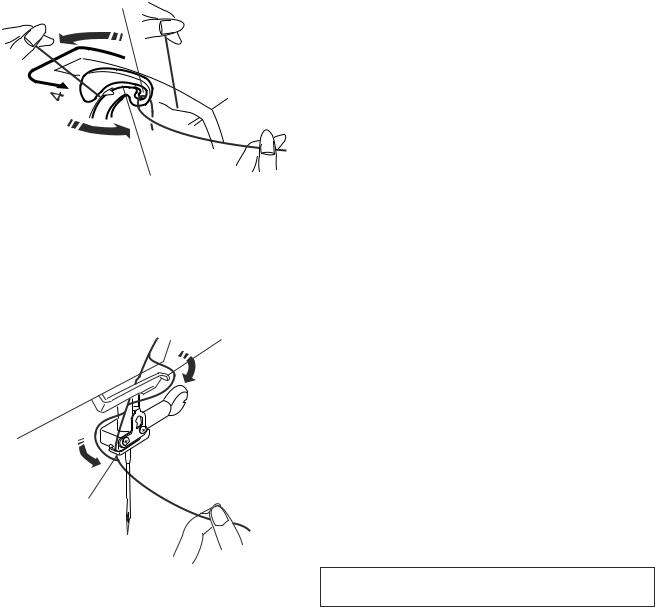
Winding the bobbin
q
w
z |
z Guide the thread around the bobbin winder thread |
|
guide while holding the thread at the spool. |
||
|
||
|
q Bobbin winder thread guide |
q
|
x Thread through the hole in the bobbin from the |
x |
inside to the outside. Put the bobbin on the bobbin |
|
winder spindle. |
|
w Bobbin winder spindle |
w
c
v e
cPush the spindle to the right. Press the Start/Stop button while holding the end of the thread. Stop the machine after the bobbin has made a few turns. Cut the thread close to the hole in the bobbin.
vPress the Start/Stop button again. When the bobbin is fully wound it will stop automatically. Press the Start/Stop button to stop the machine then return the bobbin winder spindle to the left. Remove the bobbin and cut the thread with the bobbin thread cutter.
e Bobbin thread cutter
NOTES:
Do not move the bobbin winder spindle while the machine is running.
For safety purposes, the motor will stop automatically after running for two minutes.
7
|
Inserting the bobbin |
z |
z Place the Bobbin in the Bobbin Holder with the |
|
|
q |
thread running off in the counterclockwise |
|
direction. |
|
q Thread |
|
w Bobbin holder |
w
x |
x Guide the thread into front notch on the front of |
|
the bobbin holder. |
||
|
||
|
Draw the thread to the left, sliding it between the |
|
|
tension spring blades. |
|
|
e Front notch |
|
e |
c |
c Continue to draw the thread lightly until the |
r |
thread slips into side notch. |
Pull out about 10 cm (4") of thread to the rear. |
|
|
r Side notch |
|
y |
v |
v Refer to the threading chart shown on the hook |
|
cover plate. |
|
Reattach the hook cover plate. |
|
t Hook cover plate |
|
y Threading chart |
t
8
Raising the Presser Foot
The presser foot lifter raises and lowers the presser foot.
You can raise the presser foot about 6 mm (1/4") higher than the normal up position by exerting more pressure when lifting the presser foot lifter.
z |
Threading the Machine |
c |
z Raise the presser foot lifter. Turn the handwheel |
|
|
|
to bring the needle to its highest position. Draw |
|
the thread around and under the thread guide |
|
while holding the thread at the spool. Then draw |
|
the thread down through the right channel of the |
|
thread guide plate. |
|
q Presser foot lifter |
|
w Thread guide |
q
v |
x |
|
|
b |
|
w
z
x
xFirmly draw the thread around the thread guide plate and up to the thread take-up lever.
e Thread guide plate
e
9
c |
|
c Slip the thread through the slit and down into the |
|
eye of the take-up lever as shown. Draw the |
|
|
t |
thread down through the left channel. |
|
|
|
|
|
r Slit |
|
|
t Eye of the take-up lever |
r
y
v b
u
vSlip the thread behind the lower thread guide from the right.
y Lower thread guide
bSlip the thread in the needle bar thread guide from the left.
u Needle bar thread guide
Thread the needle from front to back by hand or use the built-in needle threader.
NOTE:
Refer to page 11 for built-in needle threader
10

z
Needle Threader
zLower the presser foot. Depress the needle threader knob as far as it will go. The hook comes out through the needle eye from behind.
q Needle threader knob w Hook
q
x |
w |
x Draw the thread down around the threader guide |
|
|
and under the hook. |
|
|
e Threader guide |
w
e
c
v
cRelease the threader knob slowly while holding the thread end with your hand. A loop of the thread is pulled up through the needle eye.
vRemove the loop from the threader and pull out the thread end from the needle eye.
NOTES:
The needle threader works well with the threads #50-90 and needles #11-16, the blue tipped needle as well.
If the needle stops too low to use the needle threader after the automatic thread cutting, raise the needle to its highest position by turning the handwheel.
11
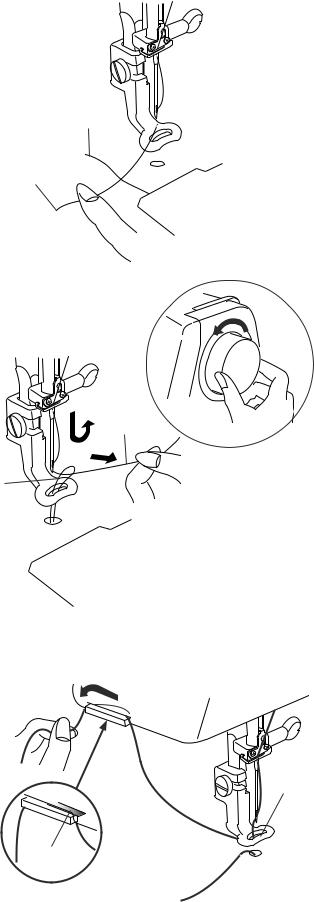
|
|
Drawing up the Bobbin Thread |
z |
|
z Raise the presser foot lifter. Hold the needle |
|
|
thread with your finger. |
|
|
q Needle thread |
|
w |
w Bobbin thread |
|
|
q
x Turn the handwheel one complete turn toward x you. Draw the needle thread to bring up a loop of
the bobbin thread.
q
w
c |
c Pass the needle thread through the hole in the |
|
embroidery foot and draw it up to the thread |
|
holder leaving an inch of free thread. |
|
e Hole |
|
r Thread holder |
e
r
12

Adjusting the Thread Tension
Balanced thread tension:
Small amount of the needle thread shows on the wrong side of the fabric.
q
When the needle thread tension is too tight:
The bobbin thread shows on the right side of the fabric. Reduce the tension by turning the tension dial to a lower number.
q Bobbin thread
When the needle tension is too loose:
The needle thread forms loops and the stitches look shaggy.
Increase the tension by turning the dial to a higher number.
13
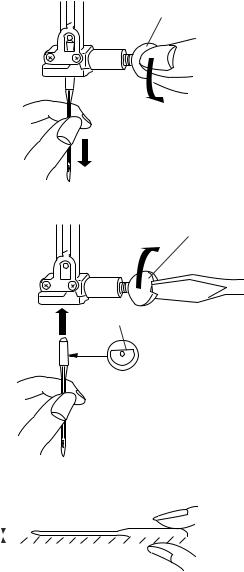
Changing Needle
Turn off the power switch. Raise the needle by turning q the handwheel and lower the presser foot.
Loosen the needle clamp screw by turning it counterclockwise.
Remove the needle from the clamp.
q
Insert a new needle into the needle clamp with the flat side of the needle to the rear.
|
q Needle clamp screw |
w |
w Flat side of the needle |
When inserting the needle into the needle clamp, push it up as far as it will go and tighten the needle clamp screw firmly.
|
|
|
|
|
|
|
|
|
|
|
To check needle straightness, place the flat side of the |
|
|
|
|
|
|
|
|
|
|
|
|
needle onto something flat (a needle plate, glass etc.) |
|
|
|
|
|
|
|
|
|
|
|
|
The gap between the needle and the flat surface should |
|
e |
|
|
|
|
|
|
|
|
|
|
be consistent. |
|
|
|
|
|
|
|
|||||||
|
|
|
|
|
|
|
|
|
||||
|
|
|
|
|
|
|
|
|
|
|
e Gap |
|
|
|
|
|
|
|
|
|
|
|
|||
|
|
|
|
|
|
|
|
|
|
|
Never use a blunt needle. |
|
|
|
|
|
|
|
|
|
|
|
|
|
|
|
|
|
|
|
|
|
|
|
|
|
NOTES: |
|
|
|
|
|
|
|
|
|
|
|
|
Use the size 11 Blue Tipped Needles for fine fabrics. |
|
|
|
|
|
|
|
|
|
|
|
|
For medium to heavy weight fabrics, use the size 14 |
|
|
|
|
|
|
|
|
|
|
|
|
needles. |
|
14
 Loading...