


Instruction Manual
PORTABLE STORAGE DEVICE & MULTI - CODEC JUKE BOX
Model H140
Model H140

Thank you for your purchase. Please read this manual carefully before using your new player.
http://www.iRiverAmerica.com |
http://www.iRiverAmerica.com |

THIS DEVICE COMPLIES WITH PART 15 OF THE FCC RULES. OPERATION IS SUBJECT TO THE FOLLOWING TWO CONDITIONS:
(1)THIS DEVICE MAY NOT CAUSE HARMFUL INTERFERENCE, AND
(2)THIS DEVICE MUST ACCEPT ANY INTERFERENCE, RECEIVED, INCLUDING INTERFERENCE THAT MAY CAUSE UNDESIRED OPERATION.
Note : This equipment has been tested and found to comply with the limits for a Class B digital device, pursuant to part 15 of the FCC Rules. These limits are designed to provide reasonable protection against harmful interference in a residential installation.
This equipment generates, uses and can radiate radio frequency energy and, if not installed and used in accordance with the instructions, may cause harmful interference to radio communications. However, there is no guarantee that interference will not occur in a particular installation. If this equipment does cause harmful interference to radio or television reception, which can be determined by turning the equipment off and on, the user is encouraged to try to correct the interference by one or more of the following measures :
-Reorient or relocate the receiving antenna.
-Increase the separation between the equipment and receiver.
-Connect the equipment into an outlet on a circuit different from that to which the receiver is connected.
-Consult the dealer or an experienced radio/TV technician for help.
NOTE: THE MANUFACTURER IS NOT RESPONSIBLE FOR ANY RADIO OR TV INTERFERENCE CAUSED BY UNAUTHORIZED MODIFICATIONS TO THIS EQUIPMENT. SUCH MODIFICATIONS COULD VOID THE USER'S AUTHORITY TO OPERATE THE EQUIPMENT.
1

 Portable Storage Device (40GB)
The H140 can be used as a portable storage device to transfer files to any PC.
 USB 2.0 is supported
The H140 supports USB 2.0 with maximum transfer speed of 480 Mbit/Sec.
 Multi-Codec Player
Supports MP3, Ogg Vorbis, WMA, ASF, and WAV formats as a multi-Codec player.
The H140 supports WAV types of 11/22/44/48KHz, 16bit, Mono/Stereo.
 Firmware Upgrade
Provides the latest updated features via firmware upgrade.
 Graphic LCD supporting Multiple Languages
The H140 comes with a graphic LCD which can support multiple languages, including: English, French, Spanish, German, Italian, other alphabet-oriented fonts, Korean, Japanese (Katakana, Hiragana, Kanji), Chinese (Traditional, Simplified) and others. A total of 38 languages are supported.
 FM Tuner
Auto scanning and station memory functions make it easy for you to enjoy listening to the FM Radio.
 Supports 6 Equalizer Patterns
Normal, Rock, Jazz, Classic, Ultra Bass, User EQ
 This player supports 3D Surround Sound developed by SRS Lab.
 Easy Navigation
The simple navigation with tree configuration makes it easy to find or save any song.
 H140 can recognize up to 2000 folders and 9999 files.
 Graphic User Interface Menu
 Voice recording and recording (Line-In/Optical In) from an external audio source is supported.
When voice recording, recording level is automatically controlled at voice recording mode.
 Line-Out / Optical-Out
 The H140 can not be formatted using the Disc Management Utility or the Format Commander Utility in Windows 2000 and Windows XP since 32GB is the maximum HDD size enabling to be formatted.
Because this is not supported at Windows O.S. and the player is not malfunction. You can still use a HDD which is formatted as FAT 32 system on Windows 98 SE or ME.
 The H140 can be formatted using Windows Explorer in Windows 98 SE and Me.
 The H140 can be formatted using the HDD Management Utility in Windows 2000 and XP.
The information, artwork, text, video, audio, pictures, software and other intellectual property are protected by copyright and international laws.
You may not reproduce, distribute, publicly perform, publicly display, modify or create derivative works of the intellectual property, unless authorized by the appropriate copyright owner(s). iRiver does not encourage any of our customers to use copy-righted Intellectual property illegally by using this product.
2 |
3 |
1. Locating the Controls |
|
Front View, Side View....................................................... |
5 |
Up/ Down Side, LCD Window........................................... |
6 |
Remote Control................................................................. |
7 |
2. Getting started |
|
Using AC Power Adapter.................................................. |
8 |
Software Installation.......................................................... |
9 |
Connecting the H140 to the Host PC................................ |
10 |
Installing the H140 Device Driver...................................... |
11 |
Using as a Portable Storage Device................................. |
12 |
Disconnecting the H140 to the Host PC........................... |
13 |
Listening to Music............................................................. |
14~15 |
Basic Operation................................................................ |
16~19 |
3. Useful Features |
|
Navigation Mode / Menu / Mode....................................... |
19 |
Playback Mode................................................................. |
20 |
Navigation......................................................................... |
21~23 |
Upgrading DB................................................................... |
24 |
Adding DB......................................................................... |
25 |
Using TEXT Files.............................................................. |
26~29 |
Operating the FM Tuner.................................................... |
30~32 |
Recording.......................................................................... |
33~35 |
Playback Mode................................................................. |
36 |
EQ/SRS............................................................................ |
37 |
Menu................................................................................. |
38~46 |
Using Winamp Playlist...................................................... |
47~48 |
Firmware Upgrade/Homepage.......................................... |
49 |
4. Additional Information |
|
Reference......................................................................... |
50 |
Precautions....................................................................... |
51 |
Trouble Shooting............................................................... |
52 |
Accessories....................................................................... |
53 |
Product Specifications...................................................... |
54 |
Regulatory information...................................................... |
55 |
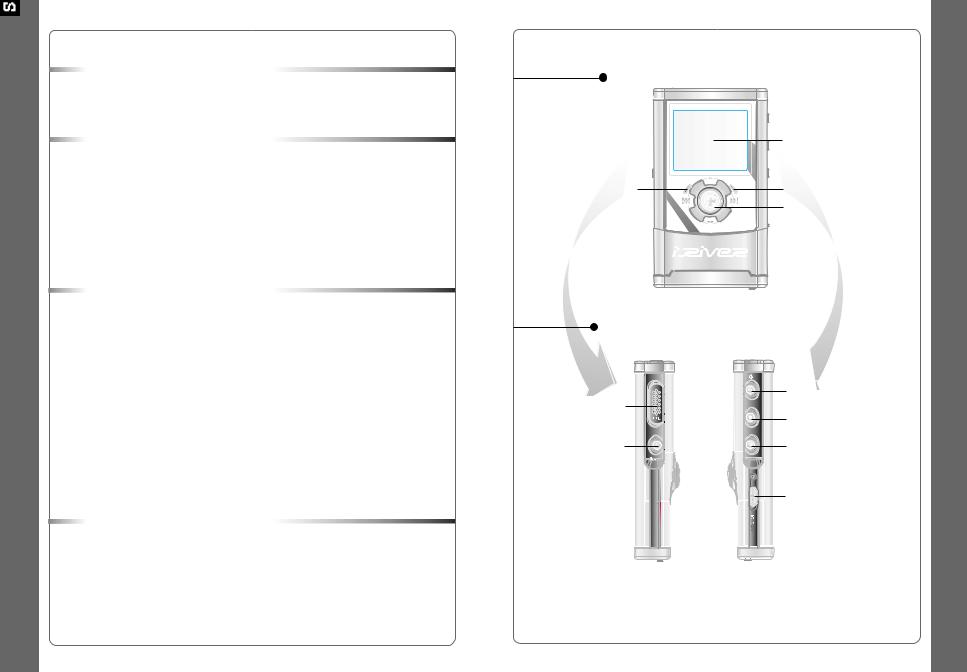
FRONT VIEW
|
LCD Window |
Charging Indicator |
HDD Operating Indicator |
|
Jog Handle for Multi |
|
Function Control |
SIDE VIEW
|
Power ON/ / FM |
|
Mic |
HDD(Play / Pause) |
|
(Stop)/ Power OFF |
||
|
||
Rec Button |
A-B (Interval Repeat) / |
|
|
MODE |
|
|
HOLD |
4 |
5 |
UP/ DOWN SIDE
LINE INPUT
(Optical / Analog)
RESET
|
|
|
|
|
|
|
|
|
|
|
|
|
|
|
|
|
|
|
|
|
|
|
|
|
|
|
|
|
|
|
|
|
|
|
|
|
|
|
|
|
|
|
|
|
|
|
|
|
|
|
|
|
|
|
|
|
|
|
|
|
|
|
|
|
|
|
|
|
|
|
|
|
|
|
|
|
|
|
|
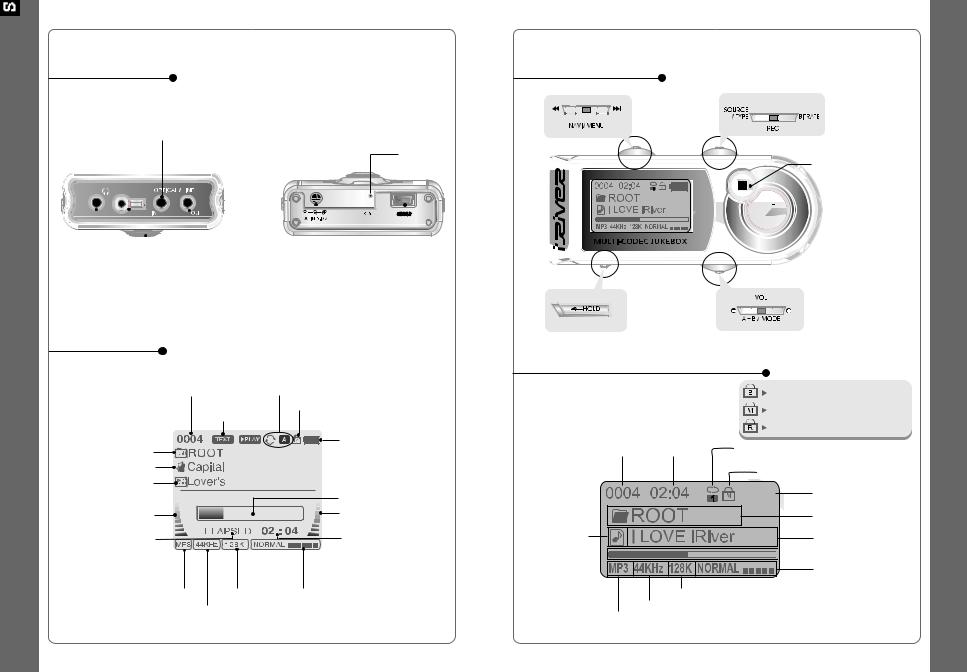
REMOTE |
|
LINE OUTPUT |
|
|
|
|
|
|
|
|
|||||
DC IN 5.0 V |
USB Connection |
||||||||||||||
CONTROL/ |
|
(Optical / Analog) |
|||||||||||||
EARPHONES |
|
|
|
|
|
|
|
|
|
Port |
|||||
LCD WINDOW
TRACK |
PLAYBACK |
|
NUMBER |
|
MODE |
TEXT FILE |
|
HOLD |
LOAD |
|
|
FOLDER NAME |
|
|
ARTIST NAME |
|
|
TITLE NAME |
|
PROGRESSIVE BAR |
|
|
|
LEVEL METER |
|
LEVEL METER |
PLAYBACK |
|
PLAY TIME |
INFORMATION |
|
|
FILE FORMAT BIT RATE |
EQ/SRS |
|
SAMPLE RATE |
|
|
6
REMOTE CONTROL
(STOP) / Power OFF


 Power ON /
  / FM
/ FM  HDD
HDD
(PLAY / PAUSE)
LCD WINDOW (REMOTE CONTROL)
PLAYBACK INFORMATION
|
|
|
|
|
|
|
|
|
|
|
|
|
|
|
|
|
Main unit and Remote control both |
|
|
|
|
|
|
|
|
|
|
|
|
|
|
|
|
|
locked. |
|
|
|
|
|
|
|
|
|
|
|
|
|
|
|
|
|
Only Main unit is locked. |
THE ORDER |
|
|
|
|
|
|
|
|
|
|
|
Only Remote control is locked. |
|||||
|
|
|
|
|
|
|
|
|
|
|
|
||||||
OF SONGS PLAY TIME |
|
|
|
|
|
|
|
|
|
|
|
|
|||||
PLAYBACK MODE |
|||||||||||||||||
|
|
|
|
|
|
|
|
|
|
|
|
|
HOLD |
||||
|
|
|
|
|
|
|
|
|
|
|
|
|
|
|
|
|
BATTERY INDICATOR |
|
|
|
|
|
|
|
|
|
|
|
|
|
|
|
|
|
|
|
|
|
|
|
|
|
|
|
|
|
|
|
|
|
|
|
|
|
|
|
|
|
|
|
|
|
|
|
|
|
|
|
|
|
|
FOLDER NAME
TITLE NAME

 PROGRESSIVE BAR
EQ/SRS
BIT RATE
SAMPLE RATE
FILE FORMAT
7
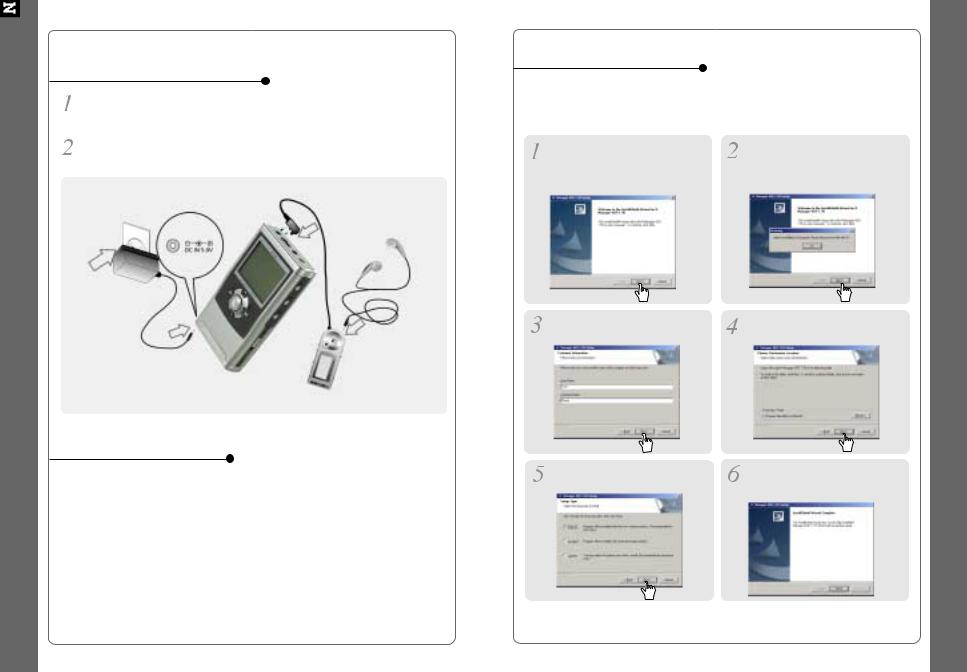
USING AC POWER ADAPTER
Use only the AC Power Adapter supplied with the player.
The AC operating voltage of this player is 100~240V, 50~60Hz.
Connect the adapter to the 5.0V DC jack on the player and into an AC outlet.
RECHARGING METHOD
 The player will charge automatically when the AC adapter is connected to the player.
 When fully charged, charge indicator light turns off.
Charging : Approx. 3 hours (At full discharge)
Discharging (Playback time) : Approx. 16 hours (At full charge)
 Playtime is measured under playback of MP3 128Kbps at full charge.
SOFTWARE INSTALLATION
Windows ME, Windows 2000 and Windows XP will recognize the H140 as a USB drive automatically and you can use the player with out installing H Manager. For Windows 98 SE users, the H Manager must be installed for the computer to recognize the player. All users must install H Manager to use the Database function.
Insert the installation CD in the |
If the player has been connected |
PC. Locate and execute the file |
to the PC, disconnect it. |
"H140Manager 1.70.exe". The |
Click "OK" to install the |
installation screen will appear. |
installation program. |
Enter |
Select installation folder, click |
"Next". |
"Next". |
Select installation type (Typical, |
Installation is progressing. |
Minimal, or Custom), click "Next". |
Click "Finish". The installation is |
|
completed. |
Note: the H Manager software will not install an icon on the computer desktop and it does not have a user interface screen. H Manager adds the ability to create the DB file as described on page 24."
8 |
9 |

TO CONNECT THE H140 TO THE HOST PC
Click  to turn on the player.
Connect the USB cable to the player and the host PC.
|
|
To PC |
Type “A” |
|
|
|
|
Type “A” |
|
Type “B” USB cable |
To H140 |
|
USB port on |
|
USB port on the PC |
the player |
Type “B” |
Windows XP and Windows 2000 will display a "Device Attached" icon.
 Note
Note
Windows may ask to install a driver for the H140. Please follow the provided driver installation guide on the following page.
Once installed, open Windows Explorer and an additional drive should be listed called “H140”.
TO INSTALL THE H140 DEVICE DRIVER |
(Note: Windows 98SE |
|
and Windows Me only.) |
|
Complete the driver installation after installing the H Manager software.
Connect the player to your PC, |
Chose "Search for the best driver |
||
Windows will display the "Add New |
for your device (Recommended)." |
||
Hardware Wizard. Click Next. |
Click Next. |
||
|
|
|
|
Place a checkmark next to |
Locate the following path on your |
||
"Specify a location"and click |
computer. C:\Program Files\ |
||
Browse. |
iRiver\H140\drivers, click “OK”. |
||
|
|
|
|
|
|
|
|
Once the path has been located, |
Click “Next” |
|
Click “Next”. |
|
|
|
|
|
Click “Finish”
The installation of the Device Driver is complete.
10 |
11 |
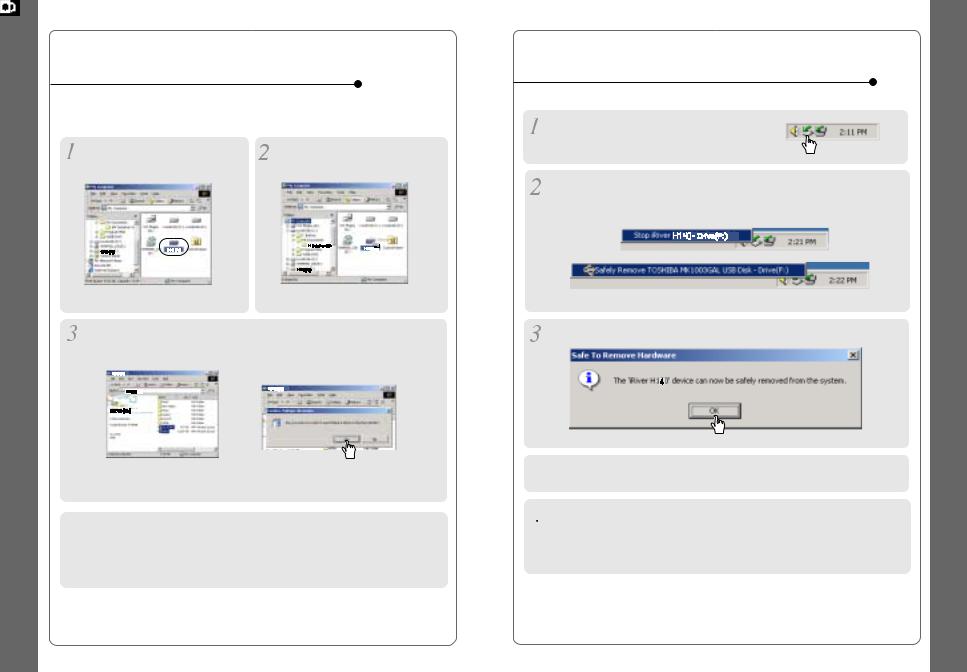
TO USE AS A PORTABLE STORAGE DEVICE
If the player is not connected to the host PC, connect it to the host PC. (Refer to page 10)
The player will show up as a new |
Click and Drag files from the PC |
||||||||||||
drive in Windows Explorer. |
to the H140 player. |
||||||||||||
|
|
|
|
|
|
|
|
|
|
|
|
|
|
|
|
|
|
|
|
|
|
|
|
|
|
|
|
|
|
|
|
|
|
|
|
|
|
|
|
|
|
|
|
|
|
|
|
|
|
|
|
|
|
|
|
To delete files or folders from the H140, select the files (folders) to be deleted and press "Delete"on the keyboard. Click “Yes”when asked to confirm the delete.
The H140 operates just like an additional hard drive in Windows Explorer. Files can be copied, deleted, etc.
 Note
Note
When the H140 is attached to a computer for an extended
period of time, be sure to plug in the AC adapter. Low batteries can prevent the proper functioning of the H140.
TO DISCONNECT THE PLAYER FROM THE HOST PC
Click the 'Safely Remove Hardware" icon in
the System Tray.
Click “Stop iRiver H140-Driver(X)”or “Safely Remove TOSHIBA MK1 3GAL USB Disk
  Drive(X:)”. (Where X is the drive letter assigned to the H140)
Click OK after confirming the “Safe To Remove Hardware”massage.
 Disconnect the USB cable between the H140 and host PC.
 Caution
Do not disconnect the player while the drive is in use.
Complete any file copying or DB creation activity before attempting to disconnect the H140 from your PC.
12 |
13 |

Connect the headphones and remote control as shown below.
Press the PLAY/STOP button to turn on the player.
Press it again to play.
To adjust the volume

 : To increase volume : To decrease volume
 Put the HOLD switch to “OFF”.
select music
: To select previous track 
 : To select next track
NOTE
-When "Hold"is ON, the buttons on the player will not function.
-When the player is stopped, it will automatically shut off according to the "STOP POWER OFF"setting (Refer to page 43).
 Power ON
  To fast forward
 To play / Pause
To fast reverse
 To stop
 To play previous track
 To play next track
 To play next folder
 To turn off the player
 To play previous folder
File playback FM receiving
File Format displayed as below |
|
MP3 |
WMA |
OGG |
WAV |
ASF |
|
14 |
15 |
 Loading...