


 Loading...
User Guide
Model 8560 Display Phone
Model 8660 IP Phone
AXXESS MODEL 8000 SERIES
QUICK REFERENCE GUIDE TO
FREQUENTLY USED FEATURES
These are the basic instructions for the most frequently used telephone system and voice mail features. For detailed information on these and other features, refer to the complete instructions in the User Guide.
PLACING AN INTERCOM CALL
1.With or without the handset lifted, dial an extension number.
2.If your call goes through handsfree to the called phone's speaker, speak after you hear a double tone.
If you hear continuous ringing, wait for the call to be answered.
ANSWERING AN INTERCOM CALL
To answer an intercom call that comes in through your speakerphone:
EITHER, Respond handsfree. OR, Lift the handset for privacy.
To answer a ringing (non-handsfree) intercom call:
EITHER, Lift the handset for privacy.
OR, Press (Speaker) or |
|
|
|
|
to respond handsfree. |
|
ANSWER |
||||||
OR, Press the flashing |
|
|
|
|
(Intercom) key. |
|
IC |
|
|
|
|||
PLACING AN OUTSIDE CALL
1.With or without the handset lifted, press OUTGOING .
2.Dial the desired number. (If you see a request for an account code and hear a single progress tone, you must dial an account code before you can place your call.)
MAKING AN EMERGENCY CALL
Dial 9 
 1
1 
 1 to automatically place a call to the system’s programmed emer-
gency number (usually 911). You do not have to press OUTGOING first.
CAUTION
If using an IP Phone, consult your System Administrator and your local Inter-Tel servicing company for important information about dialing emergency services from your phone before you begin using it.
©Inter-Tel, Inc. January 2003, Printed in US |
Part no. 835.2616-1 |
1

ANSWERING AN OUTSIDE CALL
EITHER, Lift the handset. OR, Press ANSWER . OR, Press the flashing key.
REDIALING AN OUTSIDE NUMBER
While on a call or after selecting a line, press REDIAL . A line is selected automatically, and the number is dialed.
PLACING A CALL ON HOLD
Press  (Hold) and hang up or place another call.
To return to the call, lift the handset and press the flashing key.
RESPONDING TO A WAITING CALL
If you hear a “call waiting” tone through your handset and/or you see a flashing lamp, end your current call or place it on hold. Then press ANSWER or the flashing key.
PAGING
1. Lift the handset and press PAGE 
 , or dial 7 .
2.Dial the desired zone number (0-9).
3.After the tone, make your announcement and hang up.
PICKING UP A CALL FROM ANOTHER EXTENSION
1.Lift the handset and dial 4 .
2.Dial the extension number where the call is ringing or holding.
TRANSFERRING A CALL TO ANOTHER EXTENSION
1.Press TRANSFER .
2.Dial the desired extension number.
3.Wait for an answer, announce the call, and then hang up.
If the number is busy, there is no answer, or the transfer is refused, press the flashing key to return to the caller.
TRANSFERRING A CALL TO VOICE MAIL
1.Press TRANSFER .
2.Dial the voice mail extension number.
3.EITHER, Dial the desired mailbox number and then hang up.
OR, Hang up to send the call to the voice mail menu (so that the caller can enter the mailbox number).
2

TRANSFERRING A CALL TO AN OUTSIDE NUMBER
1.Press TRANSFER and select an outside line.
2.Dial the desired telephone number.
3.Wait for an answer, announce the call, and then hang up.
If the number is busy, there is no answer, or the transfer is refused, press the flashing key to return to the caller.
FORWARDING CALLS
1.Press FWD 

 . (Model 8560 and 8660 users must then select a menu key.)
2.Do one of the following:
•To forward to an outside telephone number: Select an outside line and dial a telephone number.
•To forward to an extension number: Dial the extension number.
•To forward to your voice mailbox: Dial the voice mail extension.
CANCELING CALL FORWARD
Press FWD 

 . (Model 8560 and 8660 users must then press the FWD OFF menu key.)
PLACING CONFERENCE CALLS
1. |
While on the first call, press |
|
. The call is now on hold. |
||||||||
CNF |
|||||||||||
2. |
Place an intercom or outside call, then press the flashing |
|
|
|
to place the |
||||||
CNF |
|
|
|||||||||
|
call on hold. (If necessary, repeat this step to place a third call on hold.) |
||||||||||
3. |
Press the flashing |
|
|
|
to join all of the calls together in the conference. |
||||||
CNF |
|
|
|||||||||
CHANGING VOLUME LEVELS
Press  (the high end) or
  (the low end) of the Volume key. To save your change:
EITHER, Press both ends of the Volume key at the same time. OR, Press the middle of the key.
ACCESSING YOUR VOICE MAILBOX
If your MSG key is lit and you have a message from voice mail:
1.Lift the handset or press  .
.
2.Press MSG


 .
.
3.Enter your personal password and press # .
3

If your MSG key is not lit, access your mailbox by following these steps:
1.Dial the voice mail extension number. (You hear the main menu.)
2.During or after the greeting, press 


 to identify yourself as a subscriber.
3.Enter your mailbox number and your personal password (if programmed). Then press # .
LISTENING TO VOICE MAIL MESSAGES
1.Access your mailbox as described on page 3.
2.Press 1 to listen to your new messages. While you are listening to a message, you can use the following options:
• |
Press |
|
to skip to the end of the recording. |
# |
|||
• |
Press |
|
to back up. |
1 |
|||
• |
Press |
|
to pause. (Press any key to continue.) |
2 |
|||
• |
Press |
|
to skip ahead. |
3 |
|||
• |
Press |
|
to lower the volume. |
4 |
|||
• |
Press |
|
to play the message envelope. |
5 |
|||
• |
Press |
|
to raise the volume. |
6 |
|||
• |
Press |
|
to save the new message in your mailbox. |
7 |
|||
• |
Press |
|
to delete the message from your mailbox. |
9 |
3. When the message has finished playing, you have the following options:
• |
Press |
|
to replay the message from the beginning. |
1 |
|||
• |
Press |
|
to reply to the message (or make a return call, if enabled). |
2 |
|||
• |
Press |
|
to forward a copy of the message to another subscriber. |
3 |
|||
• |
Press |
|
to listen to the previous message. |
4 |
|||
• |
Press |
|
to play the introductory message envelope. |
5 |
|||
• |
Press |
|
to listen to the next message. |
6 |
|||
• |
Press |
|
to save the new message in your mailbox. |
7 |
•Press 9 to delete the message from your mailbox.
SENDING VOICE MAIL MESSAGES
1.Access your mailbox as described on page 3.
2.Press 2 .
3.Dial the mailbox number where you want to leave the message.
4. Press # to accept the subscriber’s name.
5.Record your message after the tone.
6.When finished, hang up or press # and listen for more options.
4

VOICE MAIL OPTIONS
Below is a summary of the options you can use when listening to messages, after the message has played, and when leaving a message.
# |
LISTENING TO MSG |
AFTER MSG PLAYS |
LEAVING MSG |
1 |
Back Up |
Replay the |
Replay Your |
|
|
Message |
Message |
|
|
|
|
2 |
Pause |
Reply to the |
Add to Your |
|
|
Message |
Message |
|
|
|
|
3 |
Skip Forward |
Forward a Copy |
Erase and |
|
|
|
Re-record |
|
|
|
|
4 |
Lower |
Listen to |
— |
|
Volume |
Previous Msg |
|
|
|
|
|
5 |
Play Envelope |
Play Envelope |
— |
|
|
|
|
6 |
Increase |
Listen to Next |
— |
|
Volume |
Message |
|
|
|
|
|
7 |
— |
Save the |
— |
|
|
Message |
|
|
|
|
|
8 |
— |
— |
— |
|
|
|
|
9 |
— |
Delete the |
Delivery |
|
|
Message |
Options |
|
|
|
|
* |
— |
— |
Cancel |
|
|
|
|
# |
Skip to End |
— |
Send Message |
|
|
|
and Exit |
|
|
|
|
FEATURE CODES
CODE |
FEATURE NAME |
CODE |
FEATURE NAME |
391 |
Account Code – All Calls |
324 |
Hunt Group Remove/Replace |
|
|
|
|
390 |
Account Code – Optional |
303 |
LCD Contrast Control |
|
|
|
|
326 |
ACD Agent Log In |
365 |
Message |
|
|
|
|
327 |
ACD Agent Log Out |
366 |
Message – Cancel Msg Left |
|
|
|
|
328 |
ACD Agent Log In/Out |
368 |
Message – Cancel Msg on Phone |
|
|
|
|
329 |
ACD Agent Wrap-up Term. |
367 |
Message – Silent |
|
|
|
|
375 |
Agent Help Request |
314 |
Microphone Mute |
|
|
|
|
376 |
Agent Help Reject |
7 |
Page |
|
|
|
|
361 |
Automatic Intercom Access |
325 |
Page Remove/Replace |
|
|
|
|
360 |
Automatic Line Access |
397 |
Program Keys |
|
|
|
|
350 |
Automatic Line Answer |
392 |
Program Station Password |
|
|
|
|
313 |
Background Music |
6 |
Queue (Callback) Request |
|
|
|
|
355 |
Call Forward All Calls |
385 |
Record-A-Call |
|
|
|
|
357 |
Call Forward If Busy |
380 |
Redial |
|
|
|
|
356 |
Call Forward If No Answer |
331 |
Redirect Call |
|
|
|
|
358 |
Call Fwd. If No Answer/Busy |
305 |
Reminder Message |
|
|
|
|
5 |
Conference |
306 |
Reminder Message Cancel |
|
|
|
|
301 |
Change Language |
359 |
Remote Programming |
|
|
|
|
394 |
Default Station |
4 |
Reverse Transfer |
|
|
|
|
307 |
Directory |
396 |
Review Keys |
|
|
|
|
300 |
Display Time And Date |
377 |
Ring Intercom Always On/Off |
|
|
|
|
372 |
Do-Not-Disturb On/Off |
398 |
Ring Tone Selection |
|
|
|
|
373 |
Do-Not-Disturb Override |
321 |
Station Monitor |
|
|
|
|
395 |
Feature Key Default |
382 |
Station Speed Dial |
|
|
|
|
312 |
Group Listen |
383 |
Station Speed Dial Program |
|
|
|
|
319 |
Handsfree On/Off |
354 |
System Forward On/Off |
|
|
|
|
317 |
Headset On/Off |
381 |
System Speed Dial |
|
|
|
|
336 |
Hold – Individual |
399 |
Switch Keymap |
|
|
|
|
335 |
Hold – System |
346 |
Transfer To Hold |
|
|
|
|
330 |
Hookflash |
345 |
Transfer To Ring |
|
|
|
|
PHONE SYSTEM AND
VOICE MAIL FEATURE GUIDE
USING VOICE MAIL
To access your voice mailbox:
1.Dial the Voice Mail extension number.
2.Press  and enter your mailbox number.
3.Enter your password and press # .
4.You have the following options:
• |
Press |
1 |
to listen to new messages. |
• |
Press |
|
to leave a message. |
2 |
|||
• |
Press |
|
to listen to saved messages. |
3 |
•Press 4 to program personal options and remote message notification (if enabled).
•Press 5 for message options (undelete messages or cancel unheard sent mes-
sages).
Voice Mail will guide you through the options with voice prompts. For your convenience, the table inside this guide summarizes the options available when listening to messages, after the message, and when leaving a message.

REMOTE FEATURE ACCESS
Remote Feature Access allows you to place your phone in Do-Not-Disturb mode or forward calls, either from another phone or through a special dial-up line.
If you do not hear a tone after each step, or if you hear repeating tones, you have made a mistake or the feature is restricted. Start over.
To use Remote Feature Access:
1.EITHER, call _______________ (number provided by your system administrator). If required, enter your password.
OR, use any phone on the system.
2.Enter 3 
 5
5 
 9 .
9 .
3.Enter your extension number.
4.Enter your password followed by # .
5.You can now use the features described below and at right.
To change Station Password:
1.Enter 3 
 9
9 
 2 .
2 .
2.Enter your current password and press # .
3.Enter the new password and press # .
4.Enter the new password again for verification and press # .
To turn on Do-Not-Disturb:
1.Enter 3 
 7
7 
 0 .
0 .
2.Enter message number 01-20 (see default message list below).
3.If desired, enter the optional second-line message text (see keypad character chart on next page).
4.Hang up.
To turn off Do-Not-Disturb:
Enter 3 
 7
7 
 1 and hang up.
Do-Not-Disturb Messages
01 |
DO-NOT-DISTURB |
11 |
OUT OF TOWN ’TIL |
02 |
LEAVE A MESSAGE |
12 |
OUT OF OFFICE |
03 |
IN MEETING UNTIL |
13 |
OUT UNTIL |
04 |
IN MEETING |
14 |
WITH A CLIENT |
05 |
ON VACATION ’TIL |
15 |
WITH A GUEST |
06 |
ON VACATION |
16 |
UNAVAILABLE |
07 |
CALL ME AT |
17 |
IN CONFERENCE |
08 |
AT THE DOCTOR |
18 |
AWAY FROM DESK |
09 |
ON A TRIP |
19 |
GONE HOME |
10 |
ON BREAK |
20 |
OUT TO LUNCH |
|
|
|
|
Keypad Key Characters
|
|
NUMBER OF TIMES KEY IS PRESSED |
|
||||
KEY |
1 |
|
2 |
3 |
4 |
|
5 |
1 |
- |
|
& |
( |
) |
|
1 |
2 |
A |
|
B |
C |
' |
|
2 |
3 |
D |
|
E |
F |
! |
|
3 |
4 |
G |
|
H |
I |
* |
|
4 |
5 |
J |
|
K |
L |
# or / |
|
5 |
6 |
M |
|
N |
O |
Ñ or # |
|
6 |
7 |
P |
|
Q |
R |
S |
|
7 |
8 |
T |
|
U |
V |
? |
|
8 |
9 |
W |
|
X |
Y |
Z |
|
9 |
NOTE: The characters under the 4 digit are dependent on the software version.
To turn on Call Forward:
1.Enter one of the following Call Forward feature codes:
All Calls |
355 |
If No Answer |
356 |
If Busy |
357 |
If No Answer/Busy |
358 |
2.Enter an extension number or enter a line access code followed by an outside telephone number.
3.Hang up.
To turn off Call Forward:
1.Enter 3 
 5
5 
 5 .
5 .
2.Press # and hang up.

Table of Contents
CONTENTS PAGE
FINDING YOUR WAY . . . . . . . . . . . . . . . . . . . . . . . . . . . . . . . . . . . . . . . . . . . . . . . . . . . 1
Welcome . . . . . . . . . . . . . . . . . . . . . . . . . . . . . . . . . . . . . . . . . . . . . . . . . . . . . . . . . . . . . . . . 2
About This Guide . . . . . . . . . . . . . . . . . . . . . . . . . . . . . . . . . . . . . . . . . . . . . . . . . . . . . . . . . 2
About Your Phone . . . . . . . . . . . . . . . . . . . . . . . . . . . . . . . . . . . . . . . . . . . . . . . . . . . . . . . . 3
About Voice Mail . . . . . . . . . . . . . . . . . . . . . . . . . . . . . . . . . . . . . . . . . . . . . . . . . . . . . . . . . . 7
What You See and Hear . . . . . . . . . . . . . . . . . . . . . . . . . . . . . . . . . . . . . . . . . . . . . . . . . . . . 8
Software Compatibility . . . . . . . . . . . . . . . . . . . . . . . . . . . . . . . . . . . . . . . . . . . . . . . . . . . . 9
GETTING STARTED . . . . . . . . . . . . . . . . . . . . . . . . . . . . . . . . . . . . . . . . . . . . . . . . . . 11
Introduction . . . . . . . . . . . . . . . . . . . . . . . . . . . . . . . . . . . . . . . . . . . . . . . . . . . . . . . . . . . . 12 Adjusting Your Phone’s Viewing Angle . . . . . . . . . . . . . . . . . . . . . . . . . . . . . . . . . . . . . . 12 Adjusting Your Phone’s LCD Contrast . . . . . . . . . . . . . . . . . . . . . . . . . . . . . . . . . . . . . . . 12 Setting up voice mail . . . . . . . . . . . . . . . . . . . . . . . . . . . . . . . . . . . . . . . . . . . . . . . . . . . . . 13 Making and Receiving Calls . . . . . . . . . . . . . . . . . . . . . . . . . . . . . . . . . . . . . . . . . . . . . . . 16 Placing Calls On Hold . . . . . . . . . . . . . . . . . . . . . . . . . . . . . . . . . . . . . . . . . . . . . . . . . . . . 21 Placing Conference Calls . . . . . . . . . . . . . . . . . . . . . . . . . . . . . . . . . . . . . . . . . . . . . . . . . 22 Transferring Calls . . . . . . . . . . . . . . . . . . . . . . . . . . . . . . . . . . . . . . . . . . . . . . . . . . . . . . . . 23 Forwarding Calls . . . . . . . . . . . . . . . . . . . . . . . . . . . . . . . . . . . . . . . . . . . . . . . . . . . . . . . . 25 Redialing a Number . . . . . . . . . . . . . . . . . . . . . . . . . . . . . . . . . . . . . . . . . . . . . . . . . . . . . . 27 Displaying Information on Your Phone . . . . . . . . . . . . . . . . . . . . . . . . . . . . . . . . . . . . . . 28 Using a Headset . . . . . . . . . . . . . . . . . . . . . . . . . . . . . . . . . . . . . . . . . . . . . . . . . . . . . . . . . 29 Using the Speaker and Microphone . . . . . . . . . . . . . . . . . . . . . . . . . . . . . . . . . . . . . . . . . 30 Using the Message Key . . . . . . . . . . . . . . . . . . . . . . . . . . . . . . . . . . . . . . . . . . . . . . . . . . . 32 Accessing Your Mailbox . . . . . . . . . . . . . . . . . . . . . . . . . . . . . . . . . . . . . . . . . . . . . . . . . . 33 Using Voice Mail Messages . . . . . . . . . . . . . . . . . . . . . . . . . . . . . . . . . . . . . . . . . . . . . . . . 34 Using Do-Not-Disturb Mode . . . . . . . . . . . . . . . . . . . . . . . . . . . . . . . . . . . . . . . . . . . . . . . 39 Using Reminder Messages . . . . . . . . . . . . . . . . . . . . . . . . . . . . . . . . . . . . . . . . . . . . . . . . 41
MOVING ON . . . . . . . . . . . . . . . . . . . . . . . . . . . . . . . . . . . . . . . . . . . . . . . . . . . . . . . . . 43
Introduction . . . . . . . . . . . . . . . . . . . . . . . . . . . . . . . . . . . . . . . . . . . . . . . . . . . . . . . . . . . . 44
Setting Preferences . . . . . . . . . . . . . . . . . . . . . . . . . . . . . . . . . . . . . . . . . . . . . . . . . . . . . . 44
Speed Dialing . . . . . . . . . . . . . . . . . . . . . . . . . . . . . . . . . . . . . . . . . . . . . . . . . . . . . . . . . . . 52
Using Record-A-Call . . . . . . . . . . . . . . . . . . . . . . . . . . . . . . . . . . . . . . . . . . . . . . . . . . . . . 54
Paging . . . . . . . . . . . . . . . . . . . . . . . . . . . . . . . . . . . . . . . . . . . . . . . . . . . . . . . . . . . . . . . . . 55
Performing a “Hookflash” During a Call. . . . . . . . . . . . . . . . . . . . . . . . . . . . . . . . . . . . . . 55
Programming Your Feature Keys . . . . . . . . . . . . . . . . . . . . . . . . . . . . . . . . . . . . . . . . . . . 56
STARTED GETTING WAY YOUR FINDING
ON MOVING
MORE LEARNING
Model 8560 Display Phone and Model 8660 IP Phone User Guide |
i |
|

CONTENTS |
PAGE |
Programming Direct Station Selection Keys . . . . . . . . . . . . . . . . . . . . . . . . . . . . . . . . . . 57
Programming Secondary Extension Keys . . . . . . . . . . . . . . . . . . . . . . . . . . . . . . . . . . . . 58
Using Account Codes . . . . . . . . . . . . . . . . . . . . . . . . . . . . . . . . . . . . . . . . . . . . . . . . . . . . 59
Screening Calls . . . . . . . . . . . . . . . . . . . . . . . . . . . . . . . . . . . . . . . . . . . . . . . . . . . . . . . . . 60
Using the Directories . . . . . . . . . . . . . . . . . . . . . . . . . . . . . . . . . . . . . . . . . . . . . . . . . . . . . 60
Programming Remote Feature Access . . . . . . . . . . . . . . . . . . . . . . . . . . . . . . . . . . . . . . 63
Requesting Agent Help . . . . . . . . . . . . . . . . . . . . . . . . . . . . . . . . . . . . . . . . . . . . . . . . . . . 65
Working in Hunt Groups . . . . . . . . . . . . . . . . . . . . . . . . . . . . . . . . . . . . . . . . . . . . . . . . . . 66
LEARNING MORE . . . . . . . . . . . . . . . . . . . . . . . . . . . . . . . . . . . . . . . . . . . . . . . . . . . . 69
Introduction . . . . . . . . . . . . . . . . . . . . . . . . . . . . . . . . . . . . . . . . . . . . . . . . . . . . . . . . . . . . 70 What the Administrators Can Do for You . . . . . . . . . . . . . . . . . . . . . . . . . . . . . . . . . . . . . 70 Frequently Asked Questions (FAQs) . . . . . . . . . . . . . . . . . . . . . . . . . . . . . . . . . . . . . . . . 71 Default Feature Codes . . . . . . . . . . . . . . . . . . . . . . . . . . . . . . . . . . . . . . . . . . . . . . . . . . . . 73
INDEX . . . . . . . . . . . . . . . . . . . . . . . . . . . . . . . . . . . . . . . . . . . . . . . . . . . . . . . . . . . . . . 77
For sales, service, or technical support, contact your local authorized Inter-Tel dealer.
If you have questions or comments about this User Guide, contact Inter-Tel Technical Publications at:
Tech_Pubs@inter-tel.com
ii
Model 8560 Display Phone and Model 8660 IP Phone User Guide
Finding Your Way
SECTION CONTENTS |
PAGE |
Welcome . . . . . . . . . . . . . . . . . . . . . . . . . . . . . . . . . . . . . . . . . . . . . . . . . . 2
About This Guide . . . . . . . . . . . . . . . . . . . . . . . . . . . . . . . . . . . . . . . . . . . 2
About Your Phone. . . . . . . . . . . . . . . . . . . . . . . . . . . . . . . . . . . . . . . . . . . 3
Feature Key Functions . . . . . . . . . . . . . . . . . . . . . . . . . . . . . . . . . . . . 4
LCD Menu Keys . . . . . . . . . . . . . . . . . . . . . . . . . . . . . . . . . . . . . . . . . 5
Message Indicator Lamp . . . . . . . . . . . . . . . . . . . . . . . . . . . . . . . . . . 6
DSS/BLF and Mini-DSS . . . . . . . . . . . . . . . . . . . . . . . . . . . . . . . . . . . 6
IP Phone Exceptions . . . . . . . . . . . . . . . . . . . . . . . . . . . . . . . . . . . . . 7
About Voice Mail . . . . . . . . . . . . . . . . . . . . . . . . . . . . . . . . . . . . . . . . . . . . 7
What You See and Hear . . . . . . . . . . . . . . . . . . . . . . . . . . . . . . . . . . . . . . 8
Software Compatibility . . . . . . . . . . . . . . . . . . . . . . . . . . . . . . . . . . . . . . . 9
WAY YOUR FINDING
Model 8560 Display Phone and Model 8660 IP Phone User Guide |
1 |
|

FINDING YOUR WAY
WELCOME
It’s time to get connected with the future using your new Model 8560 Display Phone and Model 8660 IP (Internet Protocol) Phone. The About This Guide section lists the different sections of this user guide, along with a brief explanation of the information covered in each section.
NOTE: Because the Axxess telephone system is very flexible and programmable, the procedures for using the features might vary slightly from the descriptions in this guide. If so, your trainer or System Administrator can tell you how your system differs and how to use the features.
ABOUT THIS GUIDE
This guide contains instructions for using the 8560 Display Phone and 8660 IP Phone on the Inter-Tel Axxess and voice mail systems. To help you find information more quickly, this guide is divided into four separate sections, as indicated by the tabs.
These sections include the following:
•Finding Your Way: This section provides the map for your phone and this guide. It includes figures and general information designed to help you find what you need.
•Getting Started: If you need to make a call, this is the section for you. It not only includes basic phone and voice mail information, but it provides instructions on how to perform everyday tasks, such as answering calls, making calls, accessing voice mail, etc.
•Moving On: Once you’ve got the basics down, it’s time to move on to the advanced features. In this section, you’ll learn how to program speed-dial numbers, use remote messaging, define secondary extensions, and access other helpful features.
•Learning More: This is the place where the answers are. With a Frequently Asked Question (FAQ) section and additional information about the phone and voice mail systems, you can perform basic troubleshooting and learn more about the system.
In addition, this guide contains an index, a list of default feature codes, and a voice mail flow chart for easy reference.
NOTE: If you need to access information quickly, refer to the Quick Reference Guide attached to the front of this guide. You can also tear out the pocket guide to keep as a handy reference for features you are likely to use while away from the office (Remote Feature Access and Voice Mail).
2 |
Model 8560 Display Phone and Model 8660 IP Phone User Guide |
|
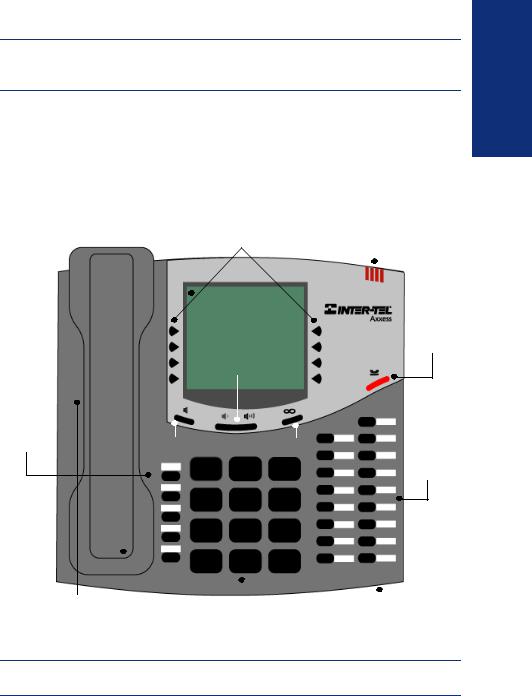
ABOUT YOUR PHONE
NOTE: The Model 8660 IP Phone is very similar to the Model 8560 Display Phone. Because they are so similar, the information in this user guide applies to both phones unless otherwise indicated. For IP Phone exceptions, see page 7.
The buttons on your phone are called “keys,” which is why the phone is sometimes called a “Keyset.” Your phone has three basic types of keys.
•Keypad keys: Allow you to enter numbers and letters.
•Feature keys: Provide quick access to various phone and voice mail features.
•Liquid Crystal Display (LCD) Menu Keys: Allow you to scroll through displays and make selections based on the active feature.
LCD With Six |
|
Message Indicator Lamp |
||
16-Character Lines |
Eight LCD Menu Keys |
|
||
|
||||
|
|
|
||
|
|
|
|
|
|
|
|
|
|
Hold Key
Ring and Voice
Volume Control
Feature |
Speaker Key |
Special Key |
Keys |
Feature
Keys
Internal Speaker |
|
12-Key |
|
Keypad |
Handsfree |
|
Microphone |
|
|
|
|||||
|
|
|
|||||
|
|
|
|||||
Hearing Aid Compatible |
(Underneath Edge) |
||||||
(HAC) Handset |
|
|
|
|
|
|
|
NOTE: This is the default configuration. Your keys may have been programmed differently. If you are uncertain about the configuration, ask your System Administrator.
WAY YOUR FINDING
Model 8560 Display Phone and Model 8660 IP Phone User Guide |
3 |
|
FINDING YOUR WAY
Feature Key Functions
The feature keys are designed to automate some of the commonly-used functions, such as dialing an outside number. Each of these is described in the table below.
|
|
KEY |
|
|
|
|
|
|
|
|
IF YOU... |
YOU CAN... |
PG. |
|||||
|
|
|
|
|
|
|
|
|
|
|
|
|
|
|
|
|
|
|
|
|
ANSWER |
|
Press |
ANSWER |
|
|
|
Answer a call. |
17, 20 |
||||||||
|
|
|
|
|
|
|
|
|
|
|
|
|
|
|
|
|
|
|
|
|
|
|
|
|
Press |
|
|
|
|
|
|
|
and dial the number |
Place an outgoing call. |
19 |
||
|
OUTGOING |
|
OUTGOING |
|||||||||||||||
|
|
|
|
|
|
|
|
|
|
|
|
|
|
|
|
|
|
|
|
|
|
|
|
Press an unlit |
|
|
|
|
|
|
key or the flashing |
Select an outside line or answer a |
19, 20 |
||||
|
|
CALL |
|
|
|
|
|
CALL |
||||||||||
|
|
or LINE |
|
|
key |
|
|
|
|
|
|
|
|
|
|
call. |
|
|
|
|
|
|
|
|
|
|
|
|
|
|
|
|
|
|
|
|
|
|
|
|
|
|
Press |
|
|
|
|
|
|
|
|
|
Access an intercom call. |
17 |
||
|
|
IC |
|
|
|
IC |
|
|
|
|
|
|
|
|||||
|
|
|
|
|
|
|
|
|
|
|
|
|
|
|
|
|
|
|
|
|
|
|
|
Press unlit or lit |
|
|
|
Enable/disable Do-Not-Disturb mode. |
39 |
||||||||
|
|
DND |
|
|
DND |
|||||||||||||
|
|
|
|
|
|
|
|
|
|
|
|
|
|
|
|
|
|
|
|
|
|
|
|
Press |
|
|
and dial the numbers you |
Place a conference call. |
22 |
||||||||
|
|
CNF |
|
|
CNF |
|
||||||||||||
|
|
|
|
|
|
would like to add to the conference |
|
|
||||||||||
|
|
|
|
|
|
Press |
(International Hold Symbol) |
Put a call on hold. |
21 |
|||||||||
|
|
|
|
|
|
|
|
|
|
|
|
|
|
|
|
|
|
|
|
|
|
|
|
Press |
|
|
and dial the destination |
Transfer a call. |
23 |
||||||||
|
TRANSFER |
|
|
TRANSFER |
||||||||||||||
|
|
|
|
|
|
number |
|
|
|
|
|
|
|
|
|
|||
|
|
|
|
|
|
|
|
|
|
|
|
|
|
|
|
|
|
|
|
|
|
|
Press |
|
|
|
|
|
|
|
View or access System Speed-Dial |
53 |
|||||
|
|
SYS SPDL |
|
|
|
SYS SPDL |
|
|
|
|
|
|
||||||
|
|
|
|
|
|
|
|
|
|
|
|
|
|
|
|
|
numbers. |
|
|
|
|
|
|
|
|
|
|
|
|
|
|
|
|
|
|
|
|
|
|
|
|
Press |
|
|
|
|
|
|
|
View or access Speed-Dial numbers. |
52 |
|||||
|
|
STN SPDL |
|
|
|
STN SPDL |
|
|
|
|
|
|
||||||
|
|
|
|
|
|
|
|
|
|
|
|
|
|
|
|
|
|
|
|
|
|
|
Press |
|
|
|
|
|
|
|
|
Choose a page zone to place a page. |
55 |
||||
|
|
PAGE |
|
|
|
PAGE |
|
|
|
|
|
|
|
|||||
|
|
|
|
|
|
|
|
|
|
|
|
|
|
|
|
|
|
|
|
|
|
|
Press |
|
|
|
|
|
|
|
|
Redial a telephone number or save |
27 |
||||
|
|
REDIAL |
REDIAL |
|
|
|
|
|
|
|
||||||||
|
|
|
|
|
|
|
|
|
|
|
|
|
|
|
|
|
the last number dialed. |
|
|
|
|
|
|
|
|
|
|
|
|
|
|
|
|
|
|
|
|
|
|
|
|
|
|
Press |
and hang up |
Put a call on the speaker. |
30 |
|||||||||
|
|
|
|
|
|
|
|
|
|
|
|
|
|
|
|
|
|
|
|
|
|
|
Press |
|
|
|
|
|
|
|
|
Leave or listen to a message. |
32 |
||||
|
|
MSG |
|
MSG |
|
|
|
|
|
|
|
|||||||
|
|
|
|
|
|
|
|
|
|
|
|
|
|
|
|
|
|
|
|
|
|
|
Press |
|
|
|
|
|
|
|
|
Mute the microphone. |
30 |
||||
|
|
MUTE |
|
|
|
MUTE |
|
|
|
|
|
|
|
|||||
|
|
|
|
|
|
|
|
|
|
|
|
|
|
|
|
|
|
|
|
|
|
|
Press |
|
|
and dial the destination num- |
Forward calls to the specified num- |
25 |
|||||||||
|
|
FWD |
FWD |
|
||||||||||||||
|
|
|
|
|
|
ber |
|
|
|
|
|
|
|
|
|
|
ber. |
|
|
|
|
|
|
|
|
|
|
|
|
|
|
|
|
|
|
|
|
|
|
|
|
|
|
Press the high or low end of the Volume key |
Adjust volume during a call. |
44 |
||||||||||
|
|
|
|
|
|
|
|
|
|
|
|
|
|
|
|
|
|
|
In addition to the keys identified in the preceding table, your phone has a Special key ( ). Depending on how your telephone system is configured, you may need to press this key before you dial a feature code.
NOTE: Because the Axxess telephone system allows customized feature keys, your phone may have been reprogrammed so that the feature keys do not match those described in this guide.
4 |
Model 8560 Display Phone and Model 8660 IP Phone User Guide |
|
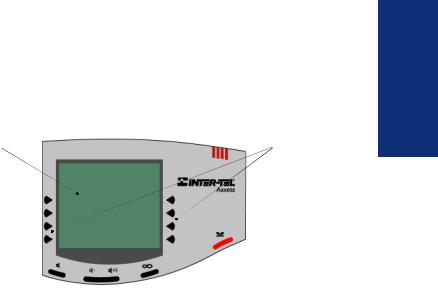
LCD Menu Keys
In addition to the various feature keys, your phone contains an LCD with six different lines. The top two lines show call information and messages; the remaining four lines display a menu, which changes according to the feature you are using.
To select an option, press the menu selection key closest to it. If there is only one option on a line, such as DO-NOT-DISTURB, you can press the key on either side.
DISPLAY WITH SIX |
MENU |
16-CHARACTER |
SELECTION |
LINES |
KEYS |
Because the display can only support 16 characters, you may see a few abbreviations. The most commonly used abbreviations are provided in the table below.
ACCT CODE |
Account Code |
CNF |
Conference |
|
|
DEST |
Destination |
DIR |
Directory |
|
|
DND |
Do-Not-Disturb |
|
|
EXT |
Extension |
MSG |
Message |
|
|
RCL |
Recall |
|
|
SPKR |
Speaker |
SPKRPHN |
Speakerphone |
|
|
STN SPD |
Station Speed Dial |
|
|
SYS SPD |
System Speed Dial |
TFR |
Transfer |
|
|
TG |
Trunk Group (a group of outside lines) |
|
|
TRNK |
Trunk (an outside line) |
WAY YOUR FINDING
Model 8560 Display Phone and Model 8660 IP Phone User Guide |
5 |
|

FINDING YOUR WAY
Message Indicator Lamp
The Message Indicator lamp (located at the top, right-hand corner of the phone) shows the same indications as the Message key. The Message Indicator lamp flashes whenever there is a waiting message.
NOTE: Because the telephone system allows for customization, you phone’s Message Indicator lamp may have been reprogrammed to indicate a different feature.
DSS/BLF and Mini-DSS
Generally, the Model 8450 Direct Station Selection/Busy Lamp Field (DSS/BLF) unit is used by individuals that handle a high volume of incoming calls, such as receptionists. The DSS/BLF provides one-key access to up to 50 extension numbers or a programmable feature. For more information about programming and using the DSS, refer to the current Axxess Administrator’s Guide (part no. 550.8001).
The Model 8416 Mini-DSS unit is a scaled-down version of the full-sized DSS/BLF unit. This optional unit adds 16 user-programmable keys to your phone. These keys can be programmed as any of the following:
•DSS keys: Provide one-key access to extension numbers and display the status of the extension associated with the key (see page 57).
•Feature keys: Provide quick access to frequently-used features (see page 56).
•Secondary extensions: Allow one-key access to calls ringing or holding at another station (see page 58).
NOTE: Instructions for attaching the Mini-DSS to your phone are included with the unit.
The DSS/BLF and Mini-DSS lamps indicate the status of the extension or feature assigned to the key. These indications are shown in the table below.
If the lamp is... |
Then... |
Solidly lit |
The associated extension is busy, or the associated feature is on. |
|
|
Flashing slowly |
The extension is in Do-Not-Disturb. |
|
|
Flashing rapidly |
The extension has a call ringing in. |
|
|
Fluttering continuously |
The extension is causing a STATION OFF-HOOK system alarm. |
|
|
6 |
Model 8560 Display Phone and Model 8660 IP Phone User Guide |
|

IP Phone Exceptions
The 8660 IP Phone looks and functions almost identically to the 8560. The only exceptions are:
•The 8660 does not support the Off-Hook Voice Announce feature (see page 18).
•The 8660 does not support the Enhanced Speakerphone Mode feature (see page 31).
•The 8660 has additional jacks on the phone that are used for Internet connections.
CAUTION
Consult your System Administrator and your local Inter-Tel servicing company for important information about dialing emergency services from your IP Phone before you begin using it.
ABOUT VOICE MAIL
Voice mail is an application that is part of the Inter-Tel Voice Processor. With the voice mail application, you and other callers can send and receive recorded messages from any station or touchtone telephone. To use this and other features, each user (you included) is assigned a “voice mailbox,” which usually corresponds to a valid extension number. You can, however, have an “unassociated” mailbox that does not correspond to an extension. Unassociated mailboxes are typically used for agents or other personnel who don’t have a permanent office.
With your voice mailbox, you can use personal or system greetings to let callers know if you are out of town, on a call, etc. (see page 34). If a caller reaches your voice mailbox, they can leave a message, hang up, or access an attendant.
In addition, the Voice Mail Administrator can program the name for “group lists” of mailboxes. With these lists, you can send a message to a group of people by entering one number instead of everyone’s individual mailbox number.
NOTE: You cannot cancel unheard (unretrieved) messages that are sent using group lists (see page 38).
WAY YOUR FINDING
Model 8560 Display Phone and Model 8660 IP Phone User Guide |
7 |
|

FINDING YOUR WAY
WHAT YOU SEE AND HEAR
As you can see, your 8560 Display Phone, 8660 IP Phone, and Axxess system come equipped with a lot of “bells and whistles.” To help you understand what everything means, it is recommended that you read the following information before you use your phone.
•Your telephone system may be programmed for one or two dial tones. Systems with two dial tones have one for intercom calls and one for outside calls.
•Many features “time out” if you wait too long before performing the next step. If this happens, you must hang up and start again.
•If you hear four fast tones or repeating fast tones, you have pressed an invalid key combination, tried to select a restricted line, dialed a restricted or invalid number, dialed too slowly between digits, or waited too long before performing the next step. Hang up and try again.
•Some Model 8560 Display Phones and 8660 IP Phones have red and green lamps in the feature keys. Green indicates a call is ringing, holding, or active on your phone. Red means the call is on another phone. If the keys only light red, either your phone does not have the green lamps, or the system may not be programmed to support the two lamp colors.
NOTE: Your phone may be programmed to always use red lamps for calls ringing directly to your phone. If you are uncertain about the configuration, ask your System Administrator.
•The key lamps may be solidly lit or flashing to indicate the status of a call or feature. To avoid confusion, this guide uses different icons to signify that a lamp is
unlit ( CNF 

 ), lit ( CNF
 ), or flashing ( CNF


 ).
).
•“Off-hook” means that either the handset is lifted or the speakerphone is on (is lit). “On-hook” indicates that the handset is in the cradle or the speakerphone is off. For example, you must first go “off-hook” to make a call, but you must go “on-hook” to end a call.
• If the MSG 
 key and the Message Indicator Lamp are lit when using a directory or entering a message, you are in alphanumeric mode, which allows you to enter letters. If the MSG

 key and the Message Indicator Lamp are unlit, you are in numeric mode and can only enter numbers and special characters.
•“Handsfree” mode indicates that a call is connected through the speakerphone (i.e., you don’t have to lift the handset to speak). While in handsfree mode, you can make or receive calls.
8 |
Model 8560 Display Phone and Model 8660 IP Phone User Guide |
|

SOFTWARE COMPATIBILITY
Your phone is fully compatible with Axxess system software versions 7.0 and later. Phones using system software versions 3.0 to 6.x have limited functionality in the following areas:
•The Station Speed-Dial key will not work; however, you can still use this feature by dialing the Station Speed-Dial feature code (see page 52).
•The Page key will not work; however, you can still use this feature by dialing the Page feature code (see page 55).
•The Message Indicator lamp will not work; however, the Message key will still function properly (see page 32).
•The dedicated headset audio jack will not work; however, you can still use the headset by plugging the headset into the handset jack and dialing the Headset On/ Off feature code (see page 29).
•The optional Mini-DSS will not work.
•The Transfer, Answer, Outgoing, System Speed-Dial and Redial lamps will not light.
The 8560 and 8660 Phones are not supported by software versions 3.0 and earlier.
NOTE: This information about compatibility applies to phones programmed to use the default key locations. Your keys may have been programmed differently. If you are uncertain about the configuration, ask your System Administrator.
WAY YOUR FINDING
Model 8560 Display Phone and Model 8660 IP Phone User Guide |
9 |
|

FINDING YOUR WAY
10 |
Model 8560 Display Phone and Model 8660 IP Phone User Guide |
|
Getting Started
SECTION CONTENTS |
PAGE |
Introduction . . . . . . . . . . . . . . . . . . . . . . . . . . . . . . . . . . . . . . . . . . . . . . . 12 Adjusting Your Phone’s Viewing Angle . . . . . . . . . . . . . . . . . . . . . . . . 12 Adjusting Your Phone’s LCD Contrast . . . . . . . . . . . . . . . . . . . . . . . . . 12
Setting up voice mail . . . . . . . . . . . . . . . . . . . . . . . . . . . . . . . . . . . . . . . 13
Initializing Your Mailbox . . . . . . . . . . . . . . . . . . . . . . . . . . . . . . . . . . 13
Making and Receiving Calls. . . . . . . . . . . . . . . . . . . . . . . . . . . . . . . . . . 16
Intercom Calls . . . . . . . . . . . . . . . . . . . . . . . . . . . . . . . . . . . . . . . . . |
16 |
Outside Calls . . . . . . . . . . . . . . . . . . . . . . . . . . . . . . . . . . . . . . . . . . 19 Emergency Calls . . . . . . . . . . . . . . . . . . . . . . . . . . . . . . . . . . . . . . . 20
Call Waiting . . . . . . . . . . . . . . . . . . . . . . . . . . . . . . . . . . . . . . . . . . . 20
Placing Calls On Hold. . . . . . . . . . . . . . . . . . . . . . . . . . . . . . . . . . . . . . . 21 Placing Conference Calls. . . . . . . . . . . . . . . . . . . . . . . . . . . . . . . . . . . . 22
Transferring Calls . . . . . . . . . . . . . . . . . . . . . . . . . . . . . . . . . . . . . . . . . . 23
To Another Extension. . . . . . . . . . . . . . . . . . . . . . . . . . . . . . . . . . . . 23 To Voice Mail . . . . . . . . . . . . . . . . . . . . . . . . . . . . . . . . . . . . . . . . . . 23
To an Outside Number . . . . . . . . . . . . . . . . . . . . . . . . . . . . . . . . . . . 24 To Pick Up (Reverse Transfer) a Call . . . . . . . . . . . . . . . . . . . . . . . 24
Forwarding Calls. . . . . . . . . . . . . . . . . . . . . . . . . . . . . . . . . . . . . . . . . . . 25
Manual Call Forwarding . . . . . . . . . . . . . . . . . . . . . . . . . . . . . . . . . . 25
Automatic System Forwarding . . . . . . . . . . . . . . . . . . . . . . . . . . . . . 26 Redirect Calls . . . . . . . . . . . . . . . . . . . . . . . . . . . . . . . . . . . . . . . . . . 26
Redialing a Number . . . . . . . . . . . . . . . . . . . . . . . . . . . . . . . . . . . . . . . . .27
Displaying Information on Your Phone. . . . . . . . . . . . . . . . . . . . . . . . . 28
Date, Time, Name, and Extension Number . . . . . . . . . . . . . . . . . . . 28 Outside Party’s Name/Number. . . . . . . . . . . . . . . . . . . . . . . . . . . . . 28
Using a Headset . . . . . . . . . . . . . . . . . . . . . . . . . . . . . . . . . . . . . . . . . . . 29
Using the Speaker and Microphone . . . . . . . . . . . . . . . . . . . . . . . . . . . 30
Mute Key . . . . . . . . . . . . . . . . . . . . . . . . . . . . . . . . . . . . . . . . . . . . . 30 Group Listen Using the Speaker . . . . . . . . . . . . . . . . . . . . . . . . . . . 30 Enhanced Speakerphone Mode. . . . . . . . . . . . . . . . . . . . . . . . . . . . 31
Using the Message Key . . . . . . . . . . . . . . . . . . . . . . . . . . . . . . . . . . . . . 32
Leaving Messages . . . . . . . . . . . . . . . . . . . . . . . . . . . . . . . . . . . . . . 32 Retrieving Messages . . . . . . . . . . . . . . . . . . . . . . . . . . . . . . . . . . . . 32
Accessing Your Mailbox. . . . . . . . . . . . . . . . . . . . . . . . . . . . . . . . . . . . . 33
Using Voice Mail Messages . . . . . . . . . . . . . . . . . . . . . . . . . . . . . . . . . . 34
Listening to Messages . . . . . . . . . . . . . . . . . . . . . . . . . . . . . . . . . . . 34
Undeleting Messages. . . . . . . . . . . . . . . . . . . . . . . . . . . . . . . . . . . . 36 Sending Messages. . . . . . . . . . . . . . . . . . . . . . . . . . . . . . . . . . . . . . 37 Canceling Unheard Messages . . . . . . . . . . . . . . . . . . . . . . . . . . . . . 38
Using Do-Not-Disturb Mode. . . . . . . . . . . . . . . . . . . . . . . . . . . . . . . . . . 39 Using Reminder Messages . . . . . . . . . . . . . . . . . . . . . . . . . . . . . . . . . . 41
STARTED GETTING
Model 8560 Display Phone and Model 8660 IP Phone User Guide |
11 |
|

GETTING STARTED
INTRODUCTION
Now that you know what your 8560/8660 Phone can do, it’s time to start using it. In this section, you’ll learn how to make and receive calls, transfer calls, retrieve voice mail messages, and much more.
ADJUSTING YOUR PHONE’S VIEWING ANGLE
Your 8560/8660 Phone has an adjustable base that allows you to tilt your phone to enhance the viewing angle.
To adjust your phone’s viewing angle:
1.Place the phone (with the keys facing up) on a flat surface.
2.Locate the buttons on the back of either side of the phone.
3.While ensuring that the base remains in contact with the surface, press both buttons on the phone simultaneously to disengage the base’s locking mechanism.
4.Tilt the phone to the desired angle.
5.Release the buttons to lock the adjustable base in place.
NOTE: If you position your phone’s viewing angle to 60 degrees or greater, it is recommended that you flip the handset hanger down to the horizontal position.
ADJUSTING YOUR PHONE’S LCD CONTRAST
Your phone has a feature that allows you to adjust the LCD contrast. This feature is only available when the phone is in the idle state. You can choose from eight different contrast levels by using the volume key, using the LCD menu keys, or by using the keypad digits.
To adjust your phone’s LCD contrast:
1.With the handset in the cradle, dial 3 
 0
0 
 3 .
3 .
2.Adjust the contrast level of the LCD screen by one of the following methods:
EITHER, use the Volume key ( = darker, = lighter). OR, use the LCD menu keys.
OR, press a number on the keypad (1=lightest through 8=darkest) that corresponds to your desired contrast level.
3.Accept and save the contrast level by one of the following methods:
EITHER, press  .
.
OR, lift and replace the handset.
OR, press the ACCEPT menu key on the LCD screen.
12 |
Model 8560 Display Phone and Model 8660 IP Phone User Guide |
|

SETTING UP VOICE MAIL
To begin using your voice mail box you will need to complete a few basic set-up procedures to initialize your mailbox, customize your personal greetings, and record you voice mail directory name. See page 47 for additional voice mail options.
Initializing Your Mailbox
The first thing you should do is initialize your mailbox. This allows you to:
•Change the default password number to a personal password.
•Record a name to identify yourself in the company directory.
•Listen to the voice mail introduction.
To initialize your mailbox:
1.Dial the voice mail extension number. (You hear the main menu.)
NOTE: If you don’t know what the voice mail extension number is, check with your System Administrator.
2.Press 


 to identify yourself as a subscriber.
3.Enter your mailbox number and default password.
NOTE: Your mailbox number is your default password.
4.If you want a password, enter a new password using digits 0-9 (up to 12 digits). Then press # . Voice mail plays back your password.
If you do not want to use a password, just press # .
5.Press # to accept the entry or press 3 to re-enter your password. The system prompts you to record your directory name.
6.After the tone, record your first and last name. When finished, press # .
7.Do one of the following:
• |
Press |
|
again to accept the name. |
# |
|||
• |
Press |
|
to replay the name you just recorded. |
1 |
|||
• |
Press |
|
to add to your name. |
2 |
•Press 3 to erase and re-record your name.
The system then plays a prompt that introduces you to the basic voice mail features. You can skip this introduction by pressing # , if desired.
STARTED GETTING
Model 8560 Display Phone and Model 8660 IP Phone User Guide |
13 |
|

Recording Your Personal Greetings
You can store two different personal greetings in your voice mailbox: a primary and an alternate. You can then select which greeting you want played when a caller reaches your voice mailbox. Because the purpose of this greeting is to tell callers why they have reached your voice mailbox, you should include the following information:
•Whether or not you are in the office and where you can be reached
•When you will be returning calls
•For callers who do not wish to leave a message, how to exit voice mail (press 0 to return to the operator)
The following are some sample greetings to help you plan your message:
STARTED |
• |
message, and I will return your call as soon as possible. Thank you. |
|
Primary Greeting: Hello, this is __________. I am either on another line or |
|
|
|
away from my desk and cannot take your call at this time. If you need to speak to |
GETTING |
|
someone immediately, please dial zero now. Otherwise, please leave a detailed |
• |
return your call when I return. Thank you. |
|
|
Alternate Greeting: Hello, this is __________. I will be away from the office |
|
|
|
from day/date until day/date. If you need to speak to someone immediately, |
|
|
please dial zero now. Otherwise, please leave a detailed message, and I will |
To change your personal greeting:
1. Access your mailbox as described on page 33. 2. Press 4 to select the Personal Options Menu.
3.Press 1 .
4.Do one of the following:
• |
Press |
|
to record and/or enable your primary greeting. |
1 |
|||
• |
Press |
|
to record and/or enable your alternate greeting. |
2 |
|||
• |
Press |
|
to enable the system default mailbox greeting. |
3 |
5.If you pressed 3 , continue to the next step.
If you pressed 1 or 2 , the current greeting is played (if one exists). You can then do one of the following:
• |
Press |
|
to accept the greeting. |
# |
|||
• |
Press |
|
to replay the greeting. |
1 |
|||
• |
Press |
|
to add to the greeting. |
2 |
|||
• |
Press |
|
to erase and re-record the greeting. |
3 |
|||
• |
Press |
|
to exit without changing your greeting. |
|
6. Hang up.
14 |
Model 8560 Display Phone and Model 8660 IP Phone User Guide |
|

Recording Your Voice Mail Directory Name
Your recorded name is used to identify you in the voice mail directory and to verify your mailbox number when messages are addressed to you.
To change your directory name:
1. |
Access your mailbox as described on page 33. |
||||
2. |
Press |
|
to select the Personal Options Menu. |
||
4 |
|||||
3. |
Press |
|
. Your current name is played. (Press |
|
to replay your recorded name.) |
2 |
1 |
||||
4.Press 3 to erase and re-record your name.
5.When you hear a tone, record your first and last name, then press # .
6.Do one of the following:
• |
Press |
|
again to accept your recorded name. |
# |
|||
• |
Press |
|
to replay your recorded name. |
1 |
|||
• |
Press |
|
to add to your name. |
2 |
•Press 3 to erase and re-record your name.
7.Hang up.
STARTED GETTING
Model 8560 Display Phone and Model 8660 IP Phone User Guide |
15 |
|

GETTING STARTED
MAKING AND RECEIVING CALLS
Making and receiving calls is the basic purpose of any phone. With your Display Phone, you can make/receive intercom and outside calls and make emergency calls.
Intercom Calls
Your extension number allows other people to place intercom calls to you, without dialing any extra codes. And, because every phone in your phone system is assigned an extension number, you can call other people in your system quickly and easily.
NOTE: Ask your System Administrator for a list of extensions.
Placing Intercom Calls
To place an intercom call:
1.With or without the handset lifted, dial an extension number.
2.If your call goes through handsfree to a phone’s speaker, speak after you hear a double tone.
If you hear continuous ringing, wait for the call to be answered.
To place a non-handsfree call that will ring at the other phone until answered:
Press # before dialing the extension number.
To program your phone to always send non-handsfree calls using the Ring Intercom Always feature:
With the handset in the cradle, dial 3 
 7
7 
 7 . The current status is shown.
If there is no answer or the phone is busy when you place an intercom call, you can do any of the following:
•To leave a message: Press MSG 

 or the LEAVE MESSAGE menu key. Then hang up or wait for their message center to answer. (See page 32 for more message options.)
•To leave voice mail: Press the LEAVE VOICE MAIL menu key to call the phone’s mailbox. This option appears only if the called phone has a voice mailbox.
16 |
Model 8560 Display Phone and Model 8660 IP Phone User Guide |
|

If the phone is busy when you place an intercom call, you can do any of the following:
•To stay on the line and wait for the phone to become available: Do not hang up. After a system timer expires, you hear music until the phone is available. (You cannot do this if the called phone is in DND mode.)
•To request a callback (queue on to the phone): Press the QUEUE menu key and hang up. When the phone is available, your phone rings. (To cancel the queue
request before the callback, press 6 .)
•To use the Off-Hook Voice Announce feature (if the called phone is programmed for it): Do not hang up. After the busy signals stop, you are automatically connected and may speak. (If you hear music or if the phone is in DND mode, your off-hook voice announce call will not go through.) This allows you to talk to the phone user on his or her handsfree speakerphone, even though the user already has a call in progress on the handset. This feature is not available if your phone has the Ring Intercom Always feature enabled.
Receiving Intercom Calls
To receive an intercom call that comes in through your speakerphone:
EITHER, Respond handsfree. OR, Lift the handset for privacy.
To receive a ringing (non-handsfree) intercom call:
EITHER, Lift the handset for privacy.
OR, Press or |
|
|
|
to respond handsfree. |
IC |
|
|
NOTE: You must lift the handset if the caller has the Ring Intercom Always feature enabled.
STARTED GETTING
Model 8560 Display Phone and Model 8660 IP Phone User Guide |
17 |
|

GETTING STARTED
To disable your phone’s handsfree answering feature:
With the handset in the cradle, dial 3 
 1
1 
 9 . (Repeat this step if you want to enable this feature again.)
Instead of answering a ringing call, you can press one of the following menu keys:
•SEND TO V-MAIL: Sends the call directly to your voice mailbox. You will not see this option if you do not have a mailbox.
•IC CALL TO DND: Places your phone in DND mode and blocks the call. (See page 39 for more information about DND mode.)
•SEND TO DEST: Redirects the call to the intercom or outside number that you enter. (See page 26 for more information about the Redirect Call feature).
To receive an Off-Hook Voice Announce call (a call through your speaker) while you are on a call:
When you hear a single tone and see an incoming call display, you can do the following:
•To accept the call on the speakerphone without ending your current call: When you hear a double tone, you may talk handsfree with the caller through the speakerphone. (The caller on the handset will be able to hear both you and the party on the speakerphone.)
•To block the call from coming through the speaker: Press one of the following menu keys:
—SEND TO BUSY: Returns a busy signal to the caller.
—SEND TO V-MAIL: Sends the call to your voice mailbox (if you have one).
—IC CALL TO DND: Blocks the call by placing your phone in DND mode. (See page 39 for more information about DND mode.)
NOTE: To use this feature, the installer or System Administrator must program your phone to receive Off-Hook Voice Announce Calls. This feature is not available on the 8660 Phone.
18 |
Model 8560 Display Phone and Model 8660 IP Phone User Guide |
|
Loading...