


1.800.558.5700
www.insinkerator.com
Point-of-Use Water Heater
Owner’s Manual
Installation, Care & Use
Instalacion, Cuidado & Uso
Installation, Sion & Utilisation
The Emerson logo is a trademark and service mark of Emerson Electric Co.
|
|
© 2007 InSinkErator, a division of |
43969 Rev. A |
Printed in USA |
Emerson Electric Co. All Right Reserved. |
W152
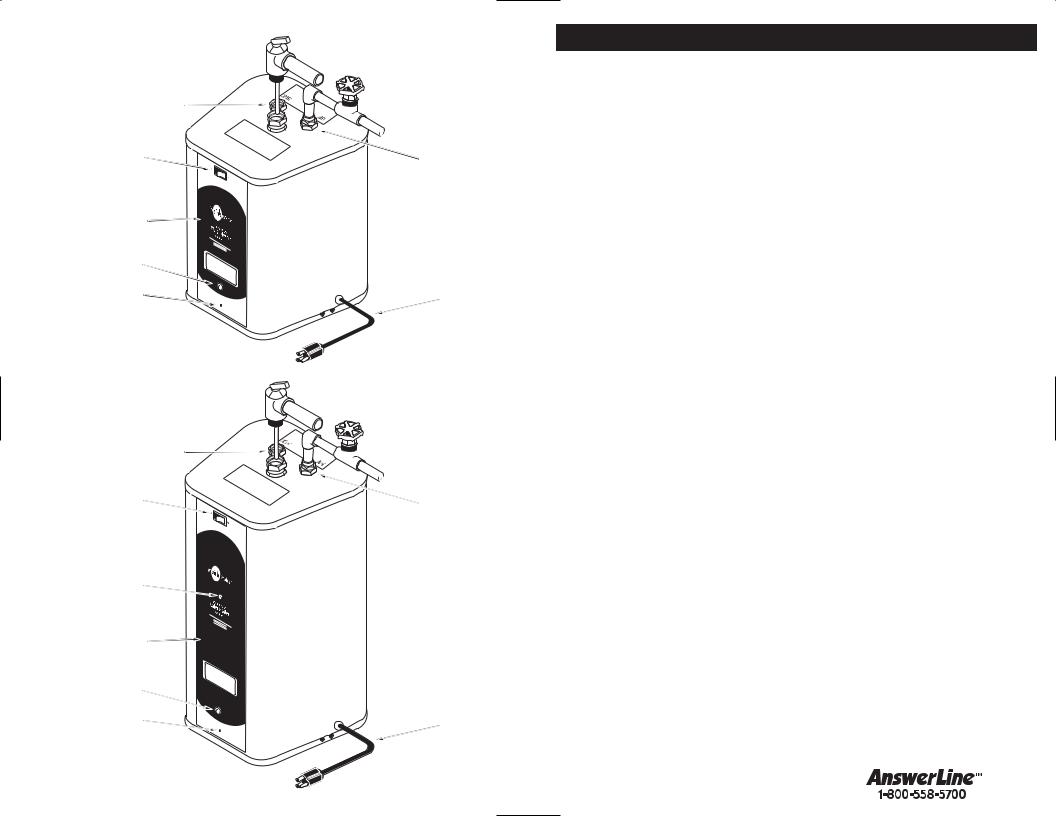
HOT WATER OUTLET (½" NPT FEMALE)
ON-OFF
SWITCH
ACCESS COVER
DRAIN SCREW
ACCESS SCREW
W154
HOT WATER OUTLET (½" NPT FEMALE)
ON-OFF
SWITCH
ACCESS SCREW
ACCESS COVER
DRAIN SCREW
ACCESS SCREW
 T & P VALVE (PRE-INSTALLED ON SOME MODELS)
 COLD WATER INLET VALVE (NOT SUPPLIED)
COLD WATER INLET (½" NPT FEMALE)
3½' CORD
 T & P VALVE (PRE-INSTALLED ON SOME MODELS)
 COLD WATER INLET VALVE (NOT SUPPLIED)
COLD WATER INLET (½" NPT FEMALE)
3½' CORD
SPECIFICATIONS
|
|
W152 |
|
W154 |
Tank Construction |
|
|
Bronze |
|
|
|
|
|
|
Tank Volume |
|
2.5 gallons |
|
4 gallons |
|
|
|
|
|
Voltage |
|
|
120 volts |
|
|
|
|
|
|
Heating Capacity |
|
|
1500 watts |
|
|
|
|
|
|
Element Type |
|
Replaceable copper/bronze* |
||
|
|
|
|
|
Temperature Range |
|
|
110˚F - 170˚F |
|
|
|
|
|
|
Operating Pressure |
|
|
150 psi (max.) |
|
|
|
|
|
|
Thermostat Type |
|
|
Resettable |
|
|
|
|
|
|
Power Cord |
|
3 1/2 ft. cord and grounded plug |
||
|
|
|
|
|
Water Connections |
|
|
1/2" NPT female |
|
|
|
|
|
|
Pressure Relief Connection |
|
3/4" NPT female |
||
|
|
|
|
|
Drain |
|
1/4" Screw Fitting |
||
|
|
|
|
|
Insulation |
|
High Efficiency EPS meets U.L. 94 HF-1 |
||
|
|
|
|
|
Overall Dimesions |
|
13.5" H |
|
20.2" H |
|
10.4" D |
|
10.4" D |
|
|
|
|
||
|
|
10.7" W |
|
10.7" W |
|
|
|
|
|
Shipping Weight |
|
18 lb. |
|
23 lb. |
|
|
|
|
|
|
|
|
|
|
Standby Heat Loss |
|
0.25 KWHr |
|
0.50 KWHr |
120˚F (75˚F Ambiet) |
|
|
||
|
|
|
|
|
|
|
|
|
|
First Hour Rating |
|
8.6 gallon |
|
10.4 gallon |
80˚F Rise |
|
|
||
|
|
|
|
|
|
|
|
|
|
Usable Hot Water |
1/2 GPM |
2.0 gallon |
|
3.0 gallon |
(25% Temp. Drop) |
1 GPM |
1.62 gallon |
|
3.0 gallon |
|
|
|||
|
2 GPM |
1.25 gallon |
|
3.0 gallon |
|
|
|
|
|
*must be InSinkErator compatible copper with bronze base
Definitions:
Standby Heat Loss. Measure of how well the tank is insulated. Use a Kilowatt Hour meter and measure power consumed in a 24 hour period for a full tank at normal operating temperature and no water being added.
First Hour Rating. Measure how much hot water can be delivered over a one hour period, with a 140˚F tank water temperature and 60˚F incoming water temperature.
Usable Hot Water. Measure of how cold incoming water mixes with the stored hot water. Start with hot tank. Draw water at 1/2 GPM until water temperature drops 25%. Measure amout of water drawn. Repeat for
1 GPM and 2 GPM.
2 |
3 |

WHAT YOU SHOULD KNOW BEFORE YOU BEGIN
When using electrical appliances, basic safety precautions to reduce the risk of fire, electric shock or injury to person should be followed, including:
■This heater must only be installed or serviced by qualified persons with ability equivalent to that of a licenced tradesman in the field involved.
■For your satisfaction and safety, read all instructions, cautions, warnings and dangers before installing or using this water heater.
■Unit must be installed indoors.
■Make sure that all electrical wiring and plumbing connections conform to local codes. Consult local code and national electrical code for proper installation.
■This water hearter is an electrical device and must be properly grounded, fused and connected to the correct line voltage. Connect only to properly grounded outlet (see page 10).
■Install or locate this water heater only in accordance with the provided installation instructions. Do not operate the heater in rooms, garages or other areas where gasoline or other flammable liquids or engine driven vehicles or eqipment are stored, operate or repaired. Flammable vapors are heavy and travel along the floor and may be ignited by the electric heater causing fire or explosion.
■Use this water heater only for its intended use as described in this manual.
■This heater is a pressure vessel and must have a T & P (Temperature & Pressure) valve installed.
■Do not use an extension cord set with this water heater. If no receptacle is available adjacent to the water heater, contact a qualified electrician to have one properly installed.
■Do not operate this water heater if it has a damaged cord or plug, if it is not working properly or if it has been damaged or dropped.
■Flammable items, pressurized containers or any other potential fire hazardous articles must never be placed on or adjacent to the heater. Open containers of flammable material should not be stored or used in the same room with the heater.
■Protect heater from freezing. Water left in the tank allowed to freeze will expand and damage the tank. Disconnect power and drain tank to prevent damage (see page 11).
■Do not attempt to operate this heater with cold water shutoff valve closed. Disconnect power if shutoff valve is closed.
■This water heater should be serviced only by qualified service personnel. Contact nearest authorized service facility for examination, repair or adjustments.
Definition of symbols in this instruction manual:


 An imminently hazardous situation, which, if not avoided, will result in death or serious injury.


 A potentially hazardous situation, which, if not avoided, could result in death or serious injury.
A potentially hazardous situation, which, if not avoided, may result in minor or moderate injury.
Keep this warranty and manual near the heater for future reference whenever maintenance adjustment or service is required.
Personal Injury: Failure to follow these instructions can result in serious personal injury or death.
The installation must conform to these instructions, the local code authority having jurisdiction and the requirements of power company. In the absence of code requirements follow NFPA-70, The National Electrical Code, which may be ordered from: American Standards Institute, 1430 Broadway, New York, NY 10018.
WHAT YOU NEED TO GET STARTED
Equipment Required:
■ Adjustable wrench |
■ Tape Measure |
■ Level |
■ Phillips and flat blade screwdrivers |
■ Pencil |
■ T & P valve |
|
(Pre-installed on some models) |
Equipment You May Need:
■ Support blocks |
■ Teflon tape |
■ Drain pan |
|
INSTALLATION PROCESS STARTS HERE
1 APREPARATION
Minimum
Clearance
4"
■Ensure power switch located at the front-top of tank is in off position.
■Identify location for water heater tank.
■Check to make sure there is proper clearance in front of heater to allow for draining the tank and for access to replaceable parts such as the thermostat, heater and relief valve.
B
Property Damage: If the heater becomes immersed in water, the heater should be examined by a competent service person before it is placed back in operation.
■Locate heater in an area where leakage of the tank or connections will not result in damage to the area adjacent or to lower floors of the structure.
■When such locations cannot be avoided, a suitable drain pan piped to an adequate drain should be installed under the heater (available from your distributor).
4 |
5 |
 Loading...