


User Guide | Guide de l’utilisateur | Guía del Usuario
AV Digital Home Theater Receiver | Récepteur numérique AV pour cinéma maison | Receptor Digital de AV para Teatro en Casa
NS-R5100
Insignia NS-R5100
AV Digital Home
Theater Receiver
Contents
Introduction . . . . . . . . . . . . . . . . . . . . . . . . . . . . . .1 Safety information . . . . . . . . . . . . . . . . . . . . . . . . .1 Features. . . . . . . . . . . . . . . . . . . . . . . . . . . . . . . . .3 Setting up your receiver . . . . . . . . . . . . . . . . . . . . .4 Using your receiver . . . . . . . . . . . . . . . . . . . . . . . .9 Modifying the settings . . . . . . . . . . . . . . . . . . . . .17 Maintaining. . . . . . . . . . . . . . . . . . . . . . . . . . . . . .20 Troubleshooting . . . . . . . . . . . . . . . . . . . . . . . . . .20 Specifications. . . . . . . . . . . . . . . . . . . . . . . . . . . .21 Warranty. . . . . . . . . . . . . . . . . . . . . . . . . . . . . . . .23
Français. . . . . . . . . . . . . . . . . . . . . . . . 24 Español . . . . . . . . . . . . . . . . . . . . . . . . 48
Introduction
Congratulations on your purchase of a high-quality Insignia product. Your NS-R5100 represents the state of the art in digital home theater receiver design and is designed for reliable and trouble-free performance.
Safety information
Electric shock warning
CAUTION
Risk of Electric Shock
Do Not Open
Warning
To reduce the risk of electric shock, do not remove the cover or back. There are no user-serviceable parts inside. Refer servicing to qualified service personnel.
This lightning flash with arrowhead symbol within an equilateral triangle is intended to alert the user to the presence of uninsulated dangerous voltage
within your receiver’s enclosure that may be of sufficient magnitude to constitute a risk of electric shock to persons.
The exclamation point within an equilateral triangle is intended to alert the user to the presence of important operating and maintenance (servicing) instructions in the literature accompanying your receiver.
Warning
To prevent fire or electric shock hazard, do not expose this receiver to rain or moisture.
Caution
Your receiver should not be exposed to water (dripping or splashing) and no objects filled with liquids, such as vases, should be placed on your receiver.
Ventilation
Caution
Do not block any ventilation openings. Install in accordance with these instructions.
Slots and openings in the cabinet are provided for ventilation and to ensure reliable operation of your receiver and to protect it from over-heating.
The openings should never be blocked by placing your receiver on a bed, sofa, rug, or other similar surface. This receiver should not be placed in a built-in installation such as a bookcase or rack unless correct ventilation is provided or these instructions have been adhered to.
Power cord
Caution
We recommend that most appliances be placed upon a dedicated circuit—a single outlet circuit which powers only that appliance and has no additional outlets or branch circuits. Check the specification page of this manual for power requirements.
Do not overload wall outlets. Overloaded wall outlets, loose or damaged wall outlets, extension cords, frayed power cords, or damaged or cracked wire insulation are dangerous. Any of these conditions could result in electric shock or fire.
Periodically examine your receiver cord, and if its appearance indicates damage or deterioration, unplug it, discontinue use of your receiver, and have the cord replaced with an exact replacement part by an authorized service provider.
Protect the power cord from physical or mechanical abuse, such as being twisted, kinked, pinched, closed in a door, or walked upon. Pay particular attention to plugs, wall outlets, and the point where the cord exits your receiver.
To disconnect power from the outlet, pull out the plug. When installing your receiver, make sure that the plug is easily accessible.
Important safety instructions
Caution
Read and observe all warnings and instructions in this manual and those marked on your receiver. Retain this manual for future reference.
This receiver has been designed and manufactured to assure personal safety. Improper use can result in electric shock or fire hazard. The safeguards incorporated in this receiver will protect you if you observe the following procedures for installation, use, and servicing. This receiver does not contain any parts that can be repaired by you.
Do not remove the cabinet cover or you may be exposed to dangerous voltage. Refer servicing to qualified service personnel only.
•All of these safety and operating instructions should be read before your receiver is operated.
•The safety, operation, and use instructions should be retained for future reference.
•All warnings on your receiver and in the operating instructions should be adhered to.
•All operation and use instructions should be followed.
•Do not use this receiver near water. For example, do not use this receiver near a bath tub, wash bowl, kitchen sink, laundry tub, in a wet basement, near a swimming pool, and other areas located near water.
•Clean only with dry cloth. Unplug this receiver from the wall outlet before cleaning. Do not use liquid cleaners.
www.insignia-products.com |
1 |
Insignia NS-R5100 AV Digital Home Theater Receiver
• Do not block any ventilation openings. Install |
|
Reference |
Grounding component |
|||
in accordance with these instructions. Slots |
|
|||||
|
|
|
||||
and openings in the cabinet are provided for |
|
|
|
|||
2 |
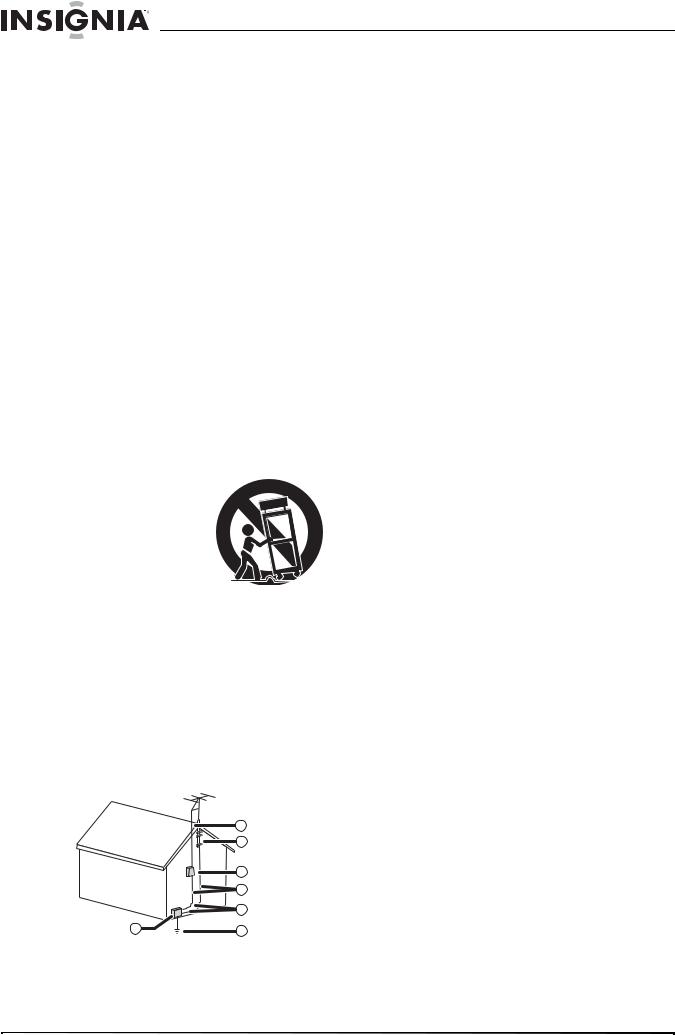
Power service grounding |
|||||
ventilation, to ensure reliable operation of |
||||||
|
|
electrode system |
||||
your receiver, and to protect it from |
|
|
||||
|
|
(NEC Art 250, Part H) |
||||
over-heating. The openings should never be |
|
|
||||
|
|
|
||||
blocked by placing your receiver on a bed, |
3 |
Ground clamp |
||||
sofa, rug or other similar surface. This |
|
|
|
|||
4 |
Grounding conductors (NEC |
|||||
receiver should not be placed in a built-in |
||||||
installation such as a bookcase or rack |
|
|
Section 810-21) |
|||
unless correct ventilation is provided or these |
|
|
|
|||
5 |
Antenna discharge unit (NEC |
|||||
instructions have been adhered to. |
||||||
|
|
Section 810-20) |
||||
• Do not install near any heat sources such as |
|
|
|
|||
6 |
Ground clamp |
|||||
radiators, heat registers, stoves, or other |
||||||
electronic devices (including amplifiers) that |
|
|
|
|||
7 |
Antenna lead-in wire |
|||||
produce heat. |
||||||
|
|
|
||||
• Do not defeat the safety purpose of the |
• Use No. 10AWG (5.3 mm2) copper, |
|||||
polarized or grounding-type plug. A polarized |
|
No. 8AWG (8.4 mm2) aluminum, |
||||
plug has two blades with one wider than the |
|
No. 17AWG (1.0 mm2) copper-clad steel |
||||
other. A grounding type plug has two blades |
|
|||||
|
or bronze wire, or larger, as a ground wire. |
|||||
and a third grounding prong. The wide blade |
|
|||||
or the third prong are provided for your safety. |
• Secure the antenna lead-in and ground |
|||||
If the provided plug does not fit into your |
|
wires to the house with stand-off |
||||
outlet, consult an electrician for replacement |
|
insulators spaced from 4-6 feet |
||||
of the obsolete outlet. |
|
(1.22-1.83 meter) apart. |
||||
• Protect the power cord from being walked on |
• Mount the antenna discharge unit as |
|||||
or pinched particularly at plugs, receptacles, |
|
close as possible to where the lead-in |
||||
and the point where they exit from your |
|
enters the house. |
||||
receiver. |
• Use a jumper wire not smaller than |
|||||
• Use only attachments or accessories |
|
No. 6AWG (13.3 mm2) copper, or the |
||||
specified by Insignia. |
|
equivalent, when a separate |
||||
• Use only with the cart, |
|
antenna-grounding electrode is used. See |
||||
stand, tripod, bracket, or |
|
ANSI/NFPA70. |
||||
table specified by |
• Unplug this receiver during lightning storms |
|||||
Insignia, or sold with this |
or when unused for long periods of time. |
|||||
receiver. When a cart is |
• Refer all servicing to qualified service |
|||||
used, use caution when |
||||||
personnel. Servicing is required when your |
||||||
moving the cart/receiver |
||||||
receiver has been damaged in any way, such |
||||||
combination to avoid |
|
|
||||
as power-supply cord or plug is damaged, |
||||||
injury from tip-over. |
||||||
liquid has been spilled or objects have fallen |
||||||
• If an outside antenna or cable system is |
into your receiver, your receiver has been |
|||||
connected to your receiver, make sure that |
exposed to rain or moisture, does not operate |
|||||
the antenna or cable system is grounded to |
normally, or has been dropped. |
|||||
provide some protection against voltage |
• When replacement parts are required, be |
|||||
surges and built-up static charges. Article |
sure the service technician uses replacement |
|
810 of the National Electrical Code, |
||
parts specified by the manufacturer or have |
||
ANSI/NFPA 70, provides information with |
||
the same characteristics as the original part. |
||
regard to proper grounding of the mast and |
||
Unauthorized substitutions may result in fire, |
||
supporting structure, grounding of the lead-in |
||
electric shock, or other hazards. |
||
wire to an antenna discharge unit, size of |
||
• Upon completion of any service or repairs to |
||
grounding conductors, location of |
||
this receiver, ask the service technician to |
||
antenna-discharge unit, connection to |
||
perform safety checks to determine that your |
||
grounding electrodes, and requirements for |
||
receiver is in proper operation condition. |
||
the grounding electrode. |
||
|
|
7 |
|
6 |
|
5 |
|
4 |
|
3 |
1 |
2 |
|
Reference |
Grounding component |
|
|
|
|
|
1 |
Electric service equipment |
||
2 |
|
|
|
|
www.insignia-products.com |
||
Insignia NS-R5100 AV Digital Home Theater Receiver
Features
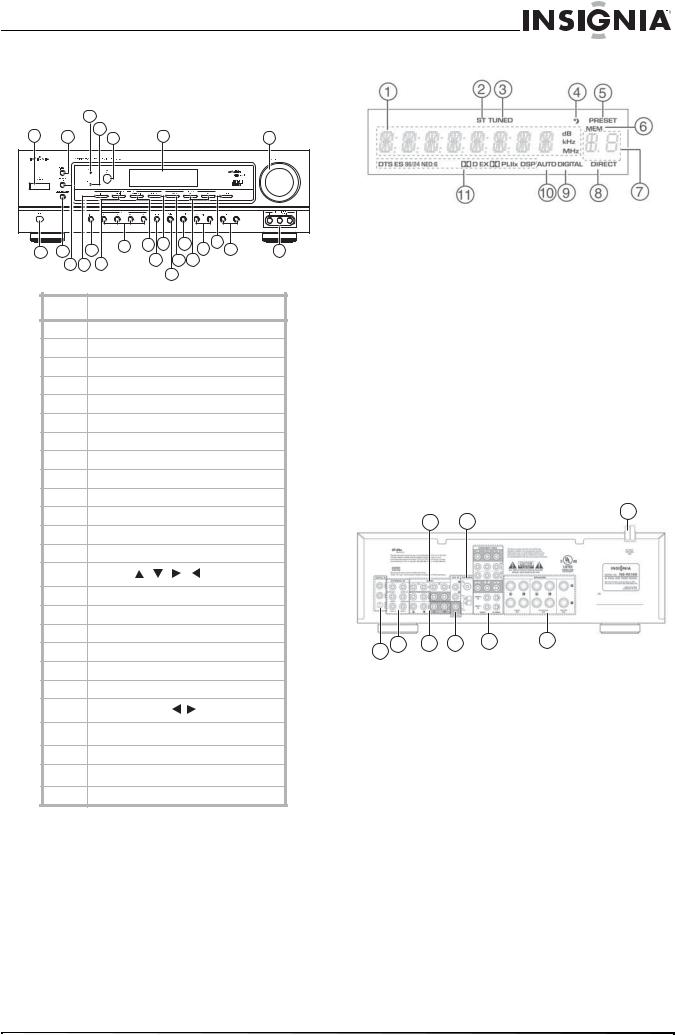
Florescent display
Front controls
|
|
3 |
|
|
|
|
|
|
|
|
1 |
2 |
|
4 |
5 |
6 |
|
|
|
7 |
|
|
|
|
|
|
||||||
8 |
9 |
12 |
14 |
15 17 |
20 |
22 |
23 |
25 |
||
|
16 |
|
19 21 |
24 |
||||||
|
10 |
11 |
13 |
|
|
|
|
|
||
|
|
|
18 |
|
|
|
||||
|
|
|
|
|
|
|
|
|
||
|
Item |
|
Description |
|
|
|
|
|
||
|
1 |
|
POWER button |
|
|
|
|
|
||
|
2 |
|
DIGITAL INPUTS button |
|
|
|||||
|
3 |
|
STANDBY indicator |
|
|
|
||||
|
4 |
|
SPEAKER indicator |
|
|
|
||||
|
5 |
|
Remote sensor |
|
|
|
|
|
||
|
6 |
|
Florescent display |
|
|
|
||||
|
7 |
|
MASTER VOLUME control knob |
|
||||||
|
8 |
|
HEADPHONE jack |
|
|
|
||||
|
9 |
|
STANDBY/POWER ON button |
Back |
||||||
|
10 |
|
SPEAKER button |
|
|
|
|
|||
|
11 |
|
VIDEO input button |
|
|
|
||||
|
12 |
|
DISPLAY button |
|
|
|
|
|||
|
13 |
|
AUDIO input button |
|
|
|
||||
|
14 |
|
SELECT |
, |
, |
, |
buttons |
|
||
|
|
|
|
|||||||
|
15 |
|
EXTERNAL IN button |
|
|
|
||||
|
16 |
|
SETUP button |
|
|
|
|
|
||
|
17 |
|
AM/FM button |
|
|
|
|
|
||
|
18 |
|
CHANNEL LEVEL button |
|
4 |
|||||
|
19 |
|
AUTO/MANUAL button |
|
|
|||||
|
20 |
|
MEMORY/ENTER button |
|
|
|||||
|
21 |
|
Surround mode |
/ |
buttons |
|
||||
|
|
|
|
|||||||
22TUNING  /
/ buttons
23STEREO button
24PRESET  /
/ buttons
25VIDEO 3 INPUT jacks
Item |
Description |
|
|
1 |
Input, frequency, volume level, |
|
operating information |
|
|
2 |
STEREO indicator |
|
|
3 |
TUNED indicator |
|
|
4 |
SLEEP indicator |
|
|
5 |
PRESET indicator |
|
|
6 |
MEMORY indicator |
|
|
7 |
Preset number, sleep time display |
|
|
8 |
DIRECT indicator |
|
|
9 |
DIGITAL input indicator |
|
|
10 |
AUTO indicator |
|
|
11 |
Surround mode indicators |
|
|
3
1 2
5 |
6 |
7 |
8 |
9 |
Item |
Description |
|
|
1 |
Audio jacks |
|
|
2 |
AM and FM antenna jacks |
|
|
3 |
AC power cord |
|
|
4 |
Digital In jacks |
|
|
5 |
External In jacks |
|
|
6 |
Video jacks |
|
|
7 |
Subwoofer Pre Out jack |
|
|
8 |
Video jacks |
|
|
9 |
Speaker jacks |
|
|
www.insignia-products.com |
3 |

Remote control
PRESETS
Insignia NS-R5100 AV Digital Home Theater Receiver
Item |
Description |
|
|
19 |
DISPLAY button |
|
|
20 |
DIGITAL INPUTS button |
|
|
21 |
PRESETS SCAN button |
|
|
22 |
Numeric keypad |
|
|
23 |
POWER ON button |
|
|
Setting up your receiver
Unpacking your receiver
Your box includes the following:
•One receiver
•One remote control with two batteries
•This User Guide
•AM and FM antennas
Item Description
1STANDBY button
2SLEEP button
3DIMMER button
4VOLUME  /
/ buttons
5MUTE button
6CHANNEL LEVEL button
7SETUP button
8MEMORY/ENTER button
9SELECT  button
10Surround mode </> buttons
11SELECT  button
12Input selector buttons
13TONE MODE button
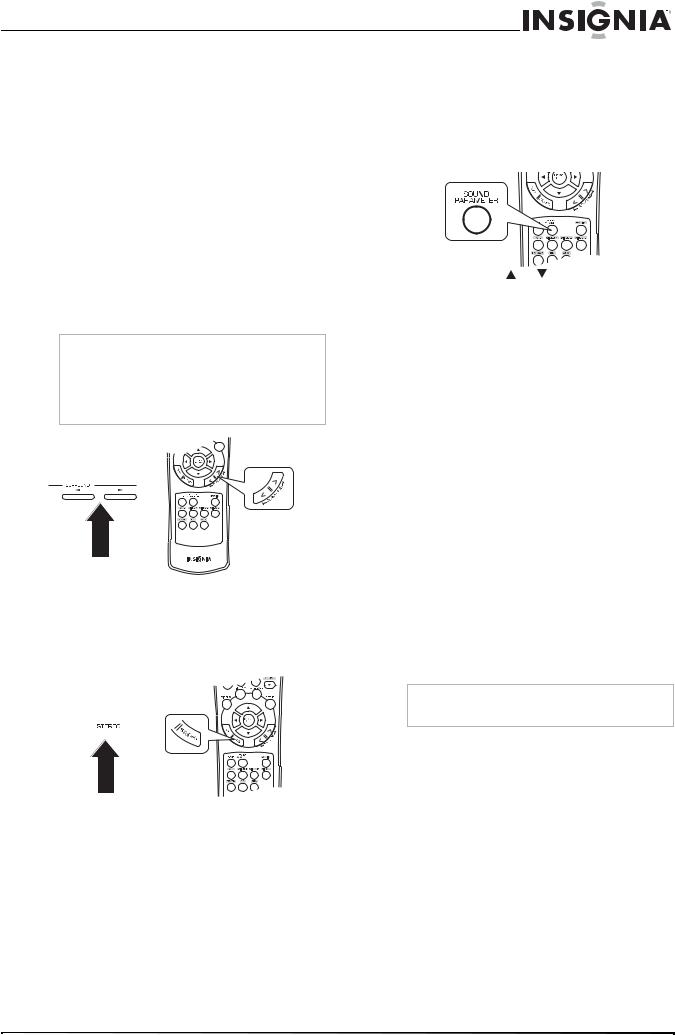
14SOUND PARAMETER button
15STEREO button
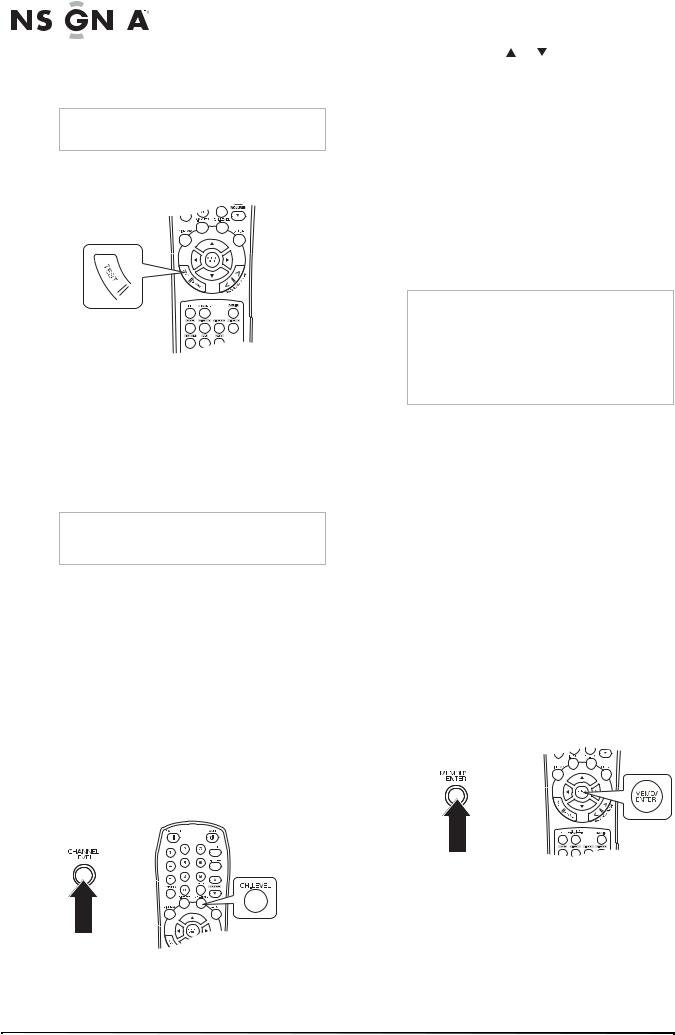
16TEST tone button
17SELECT  button
18SELECT  button
Warning
Do not plug the AC cord into the AC outlet until all connections are completed.
Note
Be sure to observe the color coding when connecting audio, video, and speaker cords.
Note
Make connections firmly and correctly. Failure to do this can cause loss of sound, add noise to the sound, or damage your receiver.
Locating your receiver
•Install your receiver on a stable flat surface. Position your receiver so that it can have a direct line of sight to the remote control.
•Do not expose your receiver to extremes of temperature or humidity.
•Avoid placing your receiver on a hot surface such as on top of other hot running equipment. Make sure that there is adequate ventilation to your receiver.
Caution
Do not install this receiver in a confined space such as a bookcase.
Note
Connect the AC cord only after the speakers, antenna, and all optional equipment have been connected. Never make or change any connections with the power turned on.
4 |
www.insignia-products.com |
Insignia NS-R5100 AV Digital Home Theater Receiver
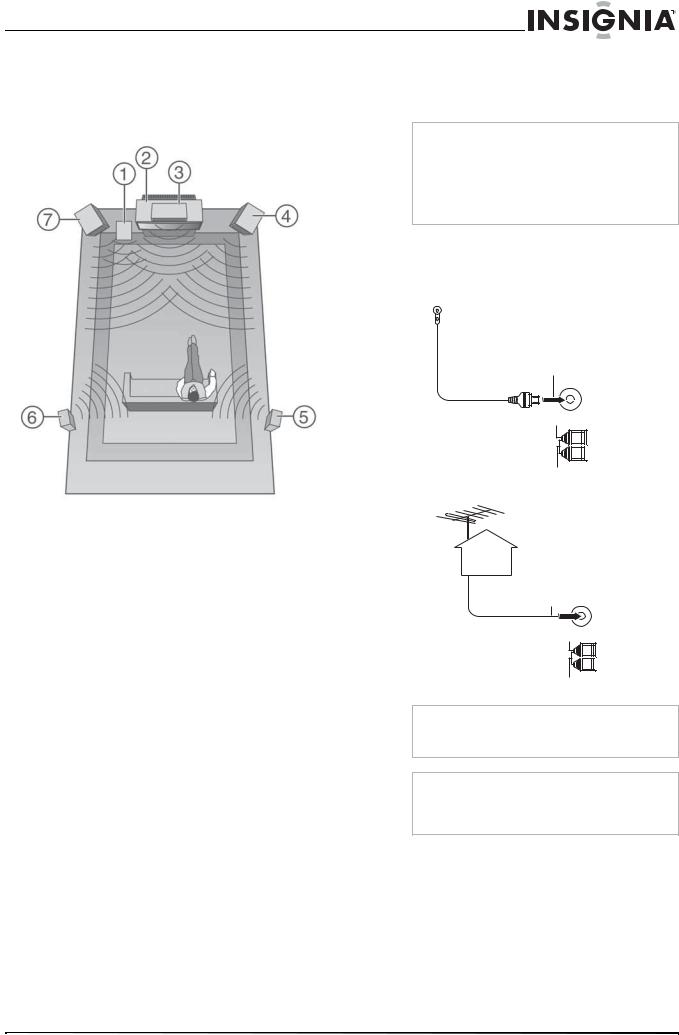
Locating your speakers
Ideal speaker placement varies depending on the size of your room and the wall coverings. A typical example of speaker placement and recommendations are as follows.
Item |
Description |
|
|
1 |
Subwoofer |
|
|
2 |
Television or monitor |
|
|
3 |
Center speaker |
|
|
4 |
Front right speaker |
|
|
5 |
Surround right speaker |
|
|
6 |
Surround left speaker |
|
|
7 |
Front left speaker |
|
|
Front left and right speakers and center speaker
Subwoofer
The subwoofer reproduces powerful deep bass sounds. Place a subwoofer anywhere in the front as desired.
Notes
•When using a conventional TV, to avoid interference with the TV picture, use only magnetically shielded front left and right and center speakers.
•To obtain the best surround effects, the speakers except the subwoofer should be full range speakers.
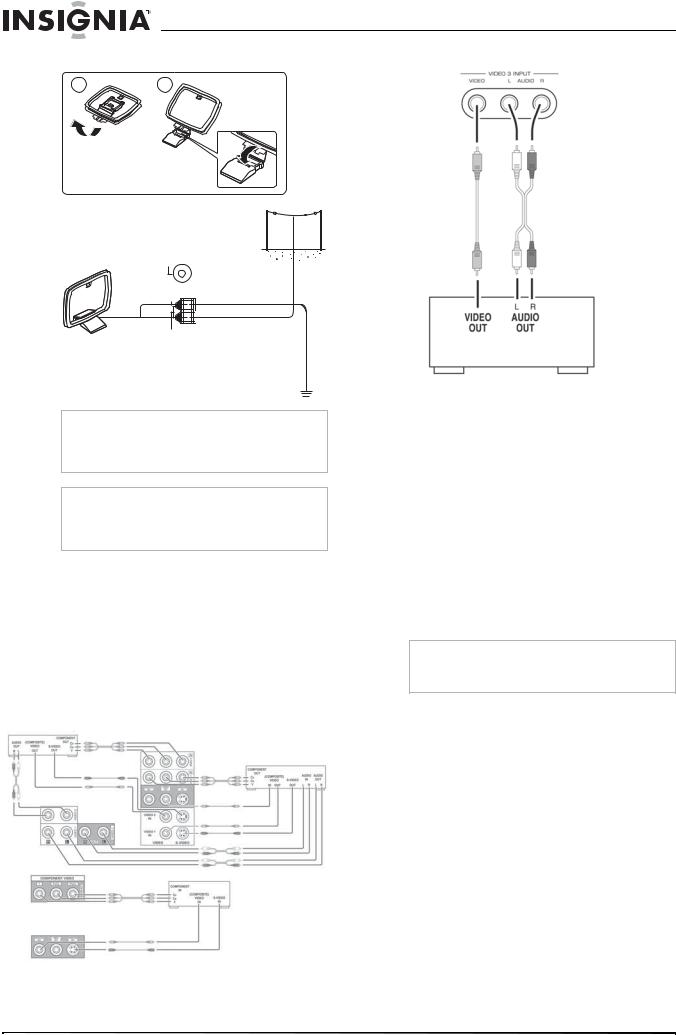
Connecting the antennas
To connect the antennas:
1 Connect the FM antenna to your receiver.
FM Indoor Antenna |
FM 75Ω |
Ground |
AM Loop |
FM Outdoor Antenna |
FM 75Ω
Ground
AM Loop
•Place the front speakers with their front surfaces as flush with the TV or monitor screen as possible.
•Place the center speaker between the front left and right speakers and no further from the listening position than the front speakers.
•Place each speaker so that sound is aimed at the location of the listener’s ears when at the main listening position.
Surround left and right speakers
Note
If you are using an indoor FM antenna, change the position of the antenna until you get the best reception of your favorite FM stations.
Note
To improve reception, you may use a 75 Ω outdoor antenna instead of an indoor antenna. Disconnect the indoor antenna before replacing it with an outdoor antenna.
Place the surround speakers approximately 40 inches (1 meter) above the ear level of a seated listener on the direct left and right of them or slightly behind.
www.insignia-products.com |
5 |
Insignia NS-R5100 AV Digital Home Theater Receiver
2 Connect the AM loop antenna to the receiver.
1 |
2 |
AM Loop Antenna
AM Outdoor Antenna
FM 75Ω
Ground
AM Loop
Note
Place the AM loop antenna as far as possible from the receiver, television, speaker cords, and the AC cord. Change the position of the antenna until you get the best reception of your favorite AM stations.
Note
To improve reception, you may use an outdoor AM antenna instead of a loop AM antenna. Disconnect the indoor antenna before replacing it with an outdoor antenna.
Connecting video components
About video connections
Connector type |
Quality |
|
|
Composite (RCA type plug) |
Good |
|
|
S-Video |
Better |
|
|
Component (Y, PB/CB, PR/CR) |
Best |
|
|
To connect your video components:
1Connect your video cable to the receiver based on the type of device you are connecting.
Jack |
Device |
|
|
VIDEO 1 |
VCR, DVD recorder or other digital |
|
recorder. |
|
|
VIDEO 2 |
Cable or satellite box, DVD player, or LD |
|
player. |
MONITOR |
Television, projector, or LCD monitor. |
|
|
VIDEO 3 |
Camcorder or video game player. This jack |
|
is located on the front of the receiver. |
2Connect the other end of the cable to the device.
Note
If you are using the component video connections, make sure that you are connecting Y to Y, PB/CB to CB, PB, or B-Y and PR/CR to CR, PR, or R-Y.
Connecting components
|
Note |
VIDEO 2 |
When recording video sources through the |
|
VIDEO 1 OUT jacks or viewing video sources |
VIDEO 1 |
through the MONITOR OUT jack, you must use |
the same type of video jacks that you used to |
|
|
connect to the video playback components. |
|
|
Monitor
6 |
www.insignia-products.com |
Insignia NS-R5100 AV Digital Home Theater Receiver
Connecting audio components
CD
AUX
TAPE
To connect your audio components:
1Connect your audio cable to the receiver based on the type of device you are connecting.
Jack |
Device |
|
|
TAPE |
Tape deck or MD recorder. |
|
|
CD |
CD player. |
|
|
AUX |
Additional CD player or tape deck. |
|
|
2Connect the other end of the cable to the device.
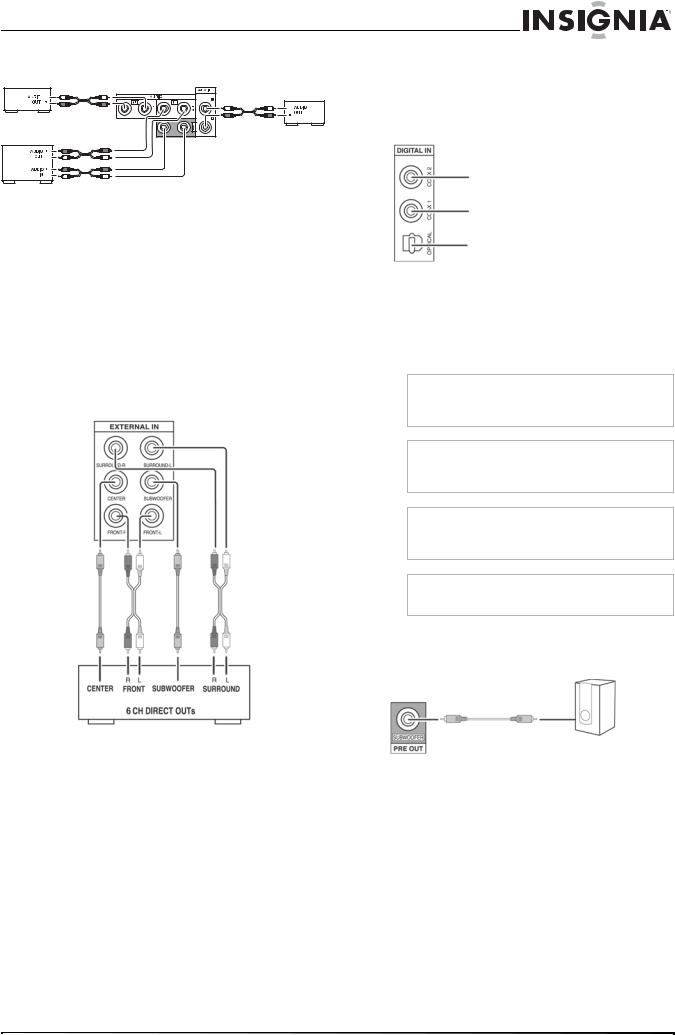
Connecting six channel components
To connect your six channel components:
1Connect your audio cables to the receiver.
2Connect the other ends of the cables to the corresponding analog outputs of a six channel decoder or DVD player with six channel Dolby Digital (DTS) output.
Connecting digital audio devices
Devices that use the VIDEO 1 or VIDEO 2 jacks for video can use the DIGITAL IN jacks for audio. These devices must be able to output DTS Digital Surround, Dolby Digital, or PCM format digital signals.
Component with coaxial digital out
Component with coaxial digital out
Component with optical digital out
To connect your digital audio devices:
1Connect your optical or coaxial digital audio cable to the receiver.
2Connect the other end of the cable to the corresponding digital output jack on your audio device.
Caution
Some optical fiber cords may not work with this receiver. Consult your dealer if the optical cord does not fit into the receiver.
Note
When making a coaxial connection, use a 75 Ω coaxial cable instead of a conventional audio cable.
Note
Use only one digital audio connection for each device. Do not connect one device using more than one connection.
Note
For more information, read the user guide that came with your device.
Connecting a powered subwoofer
Use a powered subwoofer to empathize deep bass sounds.
Powered subwoofer
To connect your subwoofer:
1Connect your subwoofer cable to the receiver.
2Connect the other end of the cable to the powered subwoofer.
www.insignia-products.com |
7 |

Insignia NS-R5100 AV Digital Home Theater Receiver
Connecting speakers |
Connecting headphones |
Front right |
Front left |
Center |
Surround Surround right left
Caution
Use speakers with an impedance of 6 Ω or more.
Caution
Do not let the bare speaker wires touch each other or any metal part of this receiver. Doing so may damage the receiver or speaker.
Note
Before connecting the speakers, refer to “Locating your speakers” on page 5.
To connect your speakers:
To connect your headphones:
•Insert the headphone plug into the headphone jack on the receiver.
Notes
•To hear sound from the headphones, make sure the SPEAKER button is set to off.
•When listening to a DTS or Dolby Digital program source, if the headphones are plugged in and the SPEAKER button is set to off, the receiver enters the 2CH downmix mode automatically. For more information, see “2CH downmix mode” on page 13.
•When EXTERNAL IN is selected as an input source, only the front left and front right channel signals can be reproduced through the headphones.
Connecting the power
To connect your receiver to power:
•Plug the power cord into an AC outlet.
Installing batteries
•Connect your speaker cables to the receiver.
Be sure to connect the speakers firmly and correctly according to the channel (left and right) and the polarity (+ and -). If you do not make the connections correctly, you will not hear any sounds from the speakers.
If the sound is unnatural and lacks bass, the speaker polarity is incorrect.
After installing the speakers, adjust the speaker settings according to your environment and speaker layout. For more information, see “Modifying the speaker settings” on page 19.
Caution
Do not use Ni-Cd rechargeable batteries in this remote control.
To install the batteries: 1 Remove the cover.
8 |
www.insignia-products.com |
Insignia NS-R5100 AV Digital Home Theater Receiver
2 Load two type AAA batteries into the |
Using your receiver |
|
compartment matching the polarity indicated. |
||
|
After connecting power for the first time, set |
|
|
up your receiver for optimum performance by |
|
|
following the instructions in “Modifying the |
|
|
settings” on page 17. |
|
|
Tip |
|
|
The following settings are stored in memory |
|
|
before the receiver is turned off: |
|
|
• |
INPUT SELECTOR settings |
|
• |
Surround mode settings |
|
• |
Preset stations. |
Listening to a program
3 Replace the cover.
Note
Remove the batteries if they are not to be used for a long period of time.
To listen to a program:
1Press the POWER button on the receiver to put the receiver in Standby mode. The STANDBY indicator lights up.
Using the remote control
Use the remote control by pointing it towards the receiver’s remote sensor window. Objects between the remote control and sensor window may prevent proper operation.
23’ (7m)
Use the remote control within about 23 feet
(7 meters) of the receiver and within 30 degrees of perpendicular to the front of the receiver.
Caution
•Do not expose the remote control to shock. In addition, do not expose the remote control to liquids, and do not place in an area with high humidity.
•Do not place the remote control under direct sunlight. The heat may cause deformation of the remote control.
•The remote control may not work properly if the remote sensor window of the receiver is under direct sunlight or strong lighting. In such a case, change the angle of the lighting or receiver, or operate the remote control closer to the remote sensor window.
Tip
You can turn the receiver off by pressing the POWER button on the receiver while it is in Standby mode.
2Press the POWER ON button on the remote control to turn the receiver on.
PRESETS
Tip
You can put the receiver in Standby mode by pressing the STANDBY button on the remote control when the receiver is on.
Tip
With the receiver in Standby mode, you can also turn the power on by pressing an Input Selector button.
3 To hear sound from the speakers, press the SPEAKER button to turn the speakers on. The SPEAKER indicator lights up and sound can be heard from the speakers.
-OR-
To heard sound from headphones, press the SPEAKER button to turn the speakers off. The SPEAKER indicator turns off and sound can be heard from the headphones.
Note
•When listening to a DTS or Dolby Digital program source, if the headphones are plugged in and the SPEAKER button is set to off, the receiver enters the 2CH downmix mode automatically. For more information, see “2CH downmix mode” on page 13.
•When EXTERNAL IN is selected as an input source, only front left and front right channel signals can be reproduced through the headphones.
www.insignia-products.com |
9 |
Insignia NS-R5100 AV Digital Home Theater Receiver
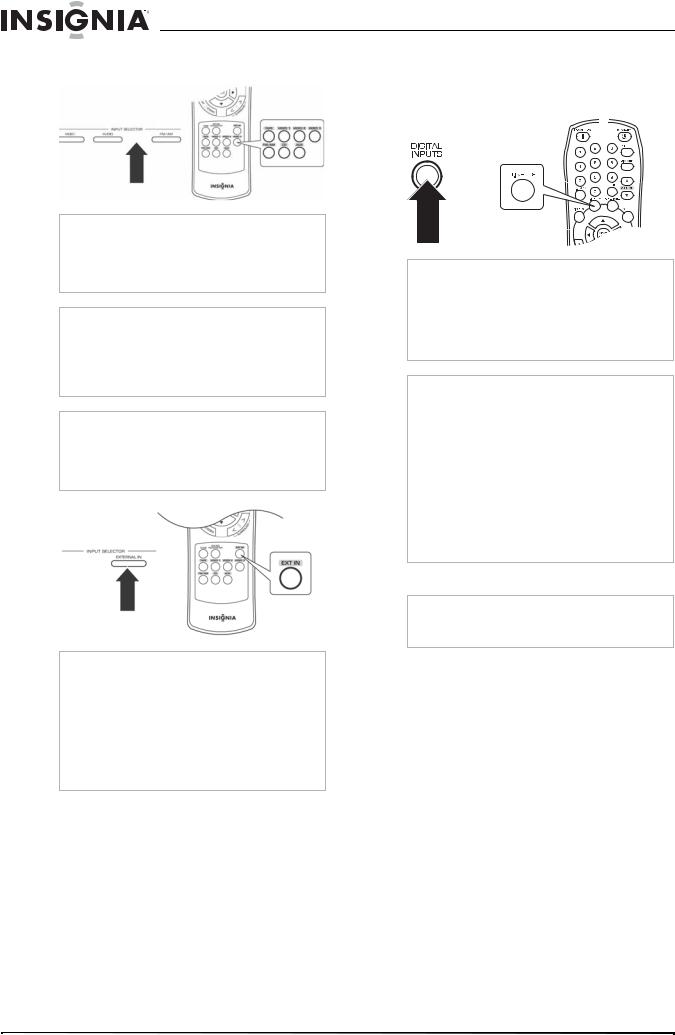
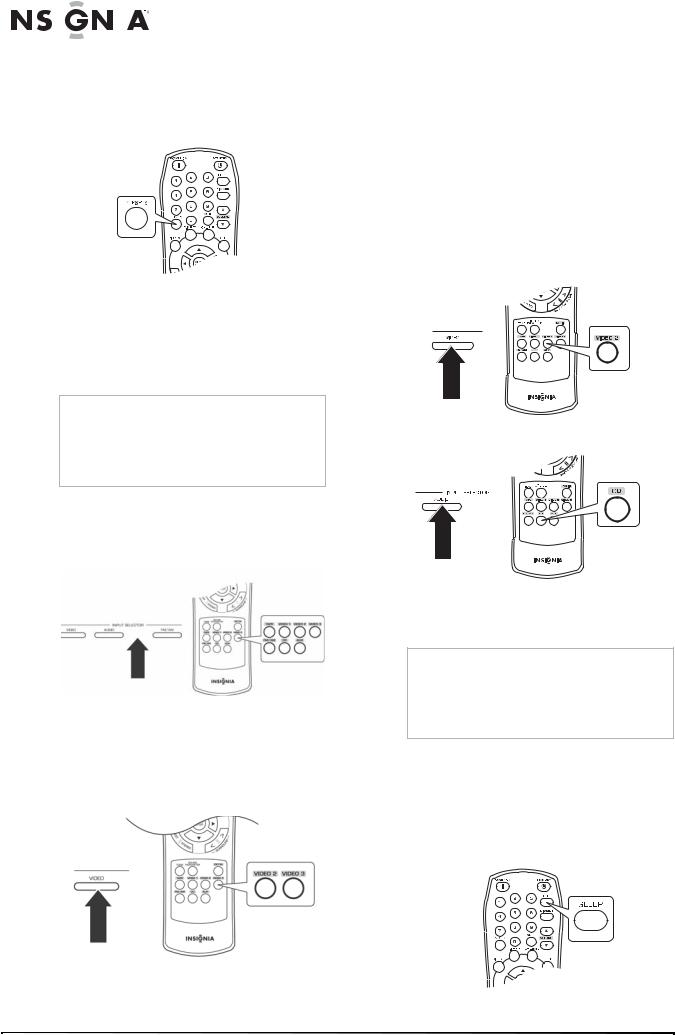
4Press an Input Selector button to select the input source.
OR
Note
Each time the VIDEO button is pressed, the input source changes as follows:
•VIDEO1
•VIDEO2
•VIDEO3
Note
Each time the AUDIO button is pressed, the input source changes as follows (when EXTERNAL IN is selected as the input source):
•CD
•AUX
•TAPE
Note
Each time the FM/AM button is pressed, the band changes as follows:
•FM ST
•FM MONO
•AM
OR
Note
•If you press EXTERNAL IN on the receiver or EXT IN on the remote control, EXT IN appears on the display and six separate analog signals from the component connected to this input pass through the tone and volume circuits and can be heard from the speakers.
•These analog signals can be heard only. They cannot be recorded.
•To cancel this function, press a different input source button.
5If you selected CD, VIDEO1, or VIDEO2 as the input source, you can press the DIGITAL INPUTS button to select the digital or analog audio input.
OR
Note
Each time the DIGITAL INPUTS button is pressed, the audio input source changes as follows:
•Optical1
•Coaxial1
•Coaxial2
•Analog
Notes
•When TUNER, AUX, TAPE, EXTERNAL IN, or VIDEO3 is selected as an input source, the analog input is selected automatically.
•If the selected digital input is not connected, the DIGITAL indicator flickers and the analog input is automatically selected.
•The selected digital or analog input is automatically assigned to the corresponding input source on the INPUT setup menu. For more information, see “Modifying the input settings” on page 18.
•The sound from the component connected to the selected digital input can be heard regardless of the selected input source.
6 Run the component for playback.
Note
When playing back a program source with surround sound, refer to “Enjoying surround sound” on page 12.
10 |
www.insignia-products.com |
Insignia NS-R5100 AV Digital Home Theater Receiver
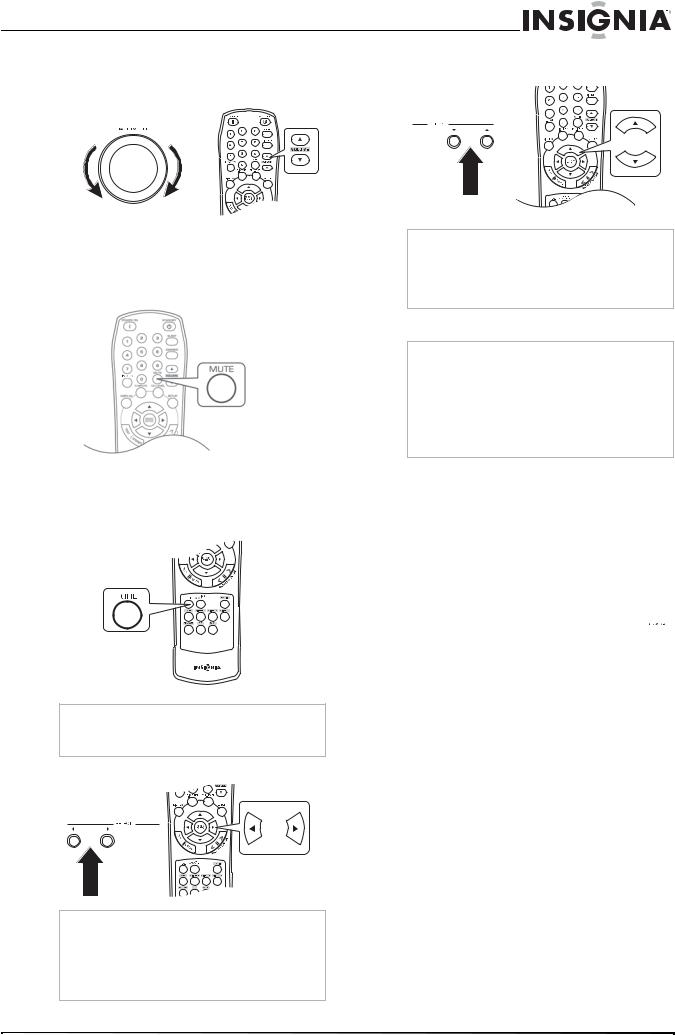
7Turn the MASTER VOLUME dial or press the VOLUME  /
/ buttons to adjust the sound level.
OR
-OR-
Press the MUTE button to turn the sound off. MUTE flickers on the display. Press the MUTE button again to turn the sound back on.
To adjust the tone:
1Press the TONE MODE button to enter the tone mode. The tone mode is displayed for several seconds.
Note
When EXTERNAL IN is selected as an input source, you can not select the tone mode or adjust the tone.
2 Press  or
or to select the tone mode.
OR
Note
Each time you press these buttons, the tone mode changes as follows:
•OFF: To listen to a program source without the tone effect. DIRECT appears on the display.
•ON: To adjust the tone to your taste. DIRECT disappears from the display.
3With the Tone mode set to ON, press the  or
or  .
.
OR
Note
Each time you press these buttons, the tone mode changes as follows:
•BASS
•TRBL
•TONE ON
4 Press  or
or  to adjust the tone.
Notes
•The tone level can be adjusted within the range of -10 ~ +10 dB.
•In general, we recommend the bass and treble to be adjusted to 0 dB (flat level).
•Extreme settings at high volume may damage your speakers.
•To complete tone adjustment, or if the tone display disappears, repeat this procedure.
Surround sound
This receiver incorporates a sophisticated digital signal processor that allows you to create optimum sound quality and sound atmosphere in your personal home theater.
Surround modes
DTS Digital Surround
DTS Digital Surround (also called simply DTS) is a multi-channel digital signal format which can handle higher data rates. Discs bearing the  include the recording of up to 5.1 channels of digital signals, which can be generally thought to provide better sound quality due to the lower audio compression required.
It also provides wide dynamic range and separation, resulting in magnificent sound.
DTS and DTS Digital Surround are registered trademarks of DTS, Inc.
Dolby Digital
Dolby Digital is the multi-channel digital signal format developed by Dolby Laboratories. Discs bearing the 
 includes the recording of up to 5.1 channels of digital signals, which can reproduce much better sound quality, spatial expansion, and dynamic range characteristics than the previous Dolby Surround effect.
www.insignia-products.com |
11 |

Insignia NS-R5100 AV Digital Home Theater Receiver
Dolby Pro Logic II surround |
Enjoying surround sound |
This mode applies conventional 2-channel signals such as digital PCM or analog stereo signals as well as Dolby Surround signals to surround processing to offer improvements over conventional Dolby Pro Logic circuits. Dolby Pro Logic ll surround includes two modes as follows:
•Dolby Pro Logic ll MOVIE
When enjoying movies, this mode allows you to further enhance the cinematic quality by adding processing that emphasizes the sounds of the action special effects.
•Dolby Pro Logic ll MUSIC
When listening to music, this mode allows you to further enhance the sound quality by adding processing that emphasizes the musical effects.
Dolby Pro Logic
Dolby Pro Logic is a specially encoded two channel surround format which consists of four channels (front left, center, front right and surround). Sources bearing the 
 provide the theater-like surround sound.
The surround channel is monaural, but is played through two surround speakers.
Manufactured under license from Dolby Laboratories. Dolby, Pro Logic, and the double-D symbol are trademarks of Dolby Laboratories.
The following modes apply conventional 2-channel signals such as digital PCM or analog stereo signals to high performance Digital Signal Processor to recreate sound fields artificially.
MATRIX
This mode reproduces delayed signals from the surround channels to emphasize the sense of expansion for music sources.
CHURCH
This mode provides the ambience of a church for baroque, string orchestral, or choral group music.
THEATER
This mode provides the effect of being in a movie theater when watching a movie source.
HALL
This mode provides the ambience of a concert hall for classical music sources such as orchestral, chamber music, or an instrumental solo.
STADIUM
This mode provides the expansive sound field to achieve the true stadium effect when watching baseball or soccer games.
Note
When the EXTERNAL INs are connected to the 6 CH decoder for a surround sound such as DTS or Dolby Digital, you can enjoy the corresponding surround sound too. (For details, see the operator’s manual of the component to be connected.)
Before surround playback, first perform the speaker setup procedure on the SETUP menu for optimum performance. (For details, refer to “Modifying the speaker settings” on page 19.)
When the EXTERNAL IN is selected as an input source, the surround modes cannot be selected.
Press the AUTO/MANUAL button to select the surround mode as follows:
•Auto Surround mode—The optimum surround mode is automatically selected depending on the signal format
being input. The Auto indicator lights up.
•Manual Surround mode—You can select a different surround mode for the signal being input using the surround mode </> buttons. The Auto indicator turns off.
When the SPEAKER button is set to off, the auto surround mode is invalid.
Even when the auto surround mode is selected and the same type of digital signal format is being input, the optimum surround mode may vary depending on whether the speaker type is set to “N (None)” or not.
When the auto surround mode is selected and the PCM (2 channel) digital signal or the analog stereo signal is being input, only the stereo mode will be selected.
When the auto surround mode is selected, the surround modes other than the optimum surround mode cannot be selected.
When 96 kHz PCM signal is being input, only the stereo mode will be selected regardless of selecting either the auto surround mode or the manual surround mode.
12 |
www.insignia-products.com |
Insignia NS-R5100 AV Digital Home Theater Receiver
Each time the surround mode </> buttons are |
Adjusting the sound parameters |
|||
pressed, the surround mode changes depending |
While playing digital signals from a Dolby Digital |
|||
on the input signal format as follows: |
||||
or DTS program source or listening in Dolby Pro |
||||
|
|
|
||
|
|
|
Logic II Music mode, you can adjust their |
|
|
Signal format |
|
||
|
Selectable surround mode |
parameters for optimum surround effect. |
||
|
being input |
|||
|
|
To adjust the sound parameters: |
||
|
|
|
||
|
Dolby Digital EX |
DOLBY DIGITAL |
||
|
1 Press the SOUND PARAMETER button. |
|||
|
6.1 channel |
|
||
|
sources. Dolby |
|
|
|
|
Digital 5.1 |
|
|
|
|
channel sources |
|
|
|
|
|
|
|
|
|
Dolby Digital 2 |
[DOLBY PLII MOVIE, DOLBY PLII |
|
|
|
channel sources |
MUSIC, DOLBY PRO LOGIC] or |
|
|
|
|
<DOLBY DIGITAL> |
|
|
|
|
|
|
|
|
DTS sources |
DTS |
|
|
|
|
|
2 Press the select or buttons to select the |
|
|
PCM (2channel) |
[DOLBY PLII MOVIE, DOLBY PLII |
||
|
sources, Analog |
MUSIC, DOLBY PRO LOGIC, MATRIX, |
parameter. |
|
|
stereo sources |
CHURCH, THEATER, HALL, STADIUM] |
Each time these buttons are pressed, the |
|
|
|
or <STEREO> |
||
|
|
|
parameter mode changes as follows: |
|
|
|
|
||
Note
Depending on the speaker setting, some surround modes can be selected or not as follows:
•[ ]—Possible only when CENTER and/or SURR (Surround) are not set to “N (None)”.
•< >—Possible only when CENTER and SURR (Surround) are set to “N (None)”.
OR
To cancel the surround mode for stereo operation:
1Press the STEREO button. Depending on the signal format being input, either the stereo mode or the 2CH downmix mode is selected.
 OR
OR
•NIGHT—Night mode. This mode can be selected only while playing digital signals from Dolby Digital or DTS source.
•PANO—Panorama mode.This mode can be selected only while listening in Dolby Pro Logic II Music mode.
•C.WIDTH—Center width control. This mode can be selected only while listening in Dolby Pro Logic II Music mode.
•DIMEN—Dimension control. This mode can be selected only while listening in Dolby Pro Logic II Music mode.
3Press the select  or
or buttons to adjust the parameter.
If you select the Night mode, then this function compresses the dynamic range of previously specified parts of Dolby Digital or DTS sound track (with extremely high volume) to minimize the difference in volume between the specified and non-specified parts. This makes it easy to hear all of the sound track when watching movies at night at low levels. The night mode can be set in 11 steps from 0.0 to 1.0 (default value is 0.0).
Note
In some Dolby Digital or DTS software, the night mode may not be valid.
If you select the Panorama mode, then this mode extends the front stereo image to include the surround speakers for an exciting “wraparound” effect with side wall imaging. Select “OFF” or “ON” (default value is OFF).
2To cancel either the stereo mode or the 2CH downmix mode, select the surround mode using the surround mode </> buttons.
2CH downmix mode
•This mode allows the multi-channel signals encoded in DTS or Dolby Digital format to be mixed down into two front channels and to be reproduced through only two front speakers or through headphones.
•When the SPEAKER button is set to OFF to listen with headphones while playing the multi-channel digital signals from DTS or Dolby Digital sources, it will enter the 2CH downmix mode automatically.
If you select the Center Width control, then this control adjusts the center image so it may be heard only from the center speaker, only from the left/right speakers as a phantom image, or from all three front speakers to varying degrees. The control can be set in eight steps from 0 to 7 (default value is 3).
If you select the Dimension control, then this control gradually adjusts the soundfield either towards the front or towards the rear. The control can be set in seven steps from -3 to +3 (default value is 0).
4Repeat the above procedure to adjust the other parameters.
www.insignia-products.com |
13 |
|
|
|
|
|
|
|
Insignia NS-R5100 AV Digital Home Theater Receiver |
Adjusting each channel level with test tone |
2 Press the select or buttons to select the |
||||||
|
The volume level of each channel can be |
channel. |
|||||
|
The corresponding channel is selected as |
||||||
|
adjusted easily with the test tone function. |
||||||
|
|
|
|
|
|
|
follows: |
Note
When the SPEAKER button is set to off, the test tone function does not work.
To adjust each channel level: 1 Press the TEST button.
The test tone mode is displayed and is heard from each channel’s speaker for two seconds as follows:
•FL—Front Left
•C—Center
•FR—Front Right
•SR—Surround Right
•SL—Surround Left
•SW—Subwoofer
Note
When the speaker setting is “N (None or No)”, the test tone of the corresponding channel is not available.
2At each channel, press the select  or
or  buttons to adjust the level as desired until the sound level of each speaker sounds equally loud.
3Press TEST to cancel the test tone function.
Adjusting the current channel level
After adjusting each channel level with test tone, adjust the channel levels either according to the program sources or to suit your tastes.
You can adjust the current channel levels as desired. These adjusted levels are memorized into user’s memory (CAL), not into preset memory (REF 1 and REF 2).
To adjust the current channel level: 1 Press the CHANNEL LEVEL button.
OR
The memory mode (CAL) is displayed for several seconds. Wen the memory mode or channel level disappears, you can press this button again.
•REF 1, 2 (or CAL)
•FL
•C
•FR
•SR
•SL
•SW
•DTS or DD—Only when the digital signals from Dolby Digital or DTS program sources are input, these levels can be displayed.
Note
•Depending on the speaker settings (“N (None or No)”) and surround mode, some channels cannot be selected.
•When the SPEAKER button is set to off, only the Front Left and Front Right channels can be selected.
•The LFE level (DD and DTS) is applied after exiting the menu.
3Press the select  or
or  button to adjust the level of the channel.
The LFE level can be adjusted within the range of -10~0 dB and other channel levels within the range of -15 ~ +15 dB.
In general, we recommend the LFE level to be adjusted to 0 dB.(However, the recommended LFE level for some early DTS software is -10 dB.) If the recommended levels seem too high, lower the setting as necessary.
4Repeat this procedure to adjust each channel level.
Memorizing the adjusted channel levels
You can memorize the adjusted channel levels into preset memory (REF 1 or REF 2) and recall the memorized levels whenever you want.
To memorize the adjusted channel levels:
1After completing the steps under “Adjusting the current channel level” on page 14, press the MEMORY/ENTER button.
OR
The 1 of the REF 1 indicator flickers for several seconds.
2Press the select  or
or  buttons to select REF 1 or REF 2.
If the preset memory disappears, repeat step 1 above.
3Press the MEMORY/ENTER button to confirm your selection. The adjusted channel levels have now been memorized into the selected memory.
14 |
www.insignia-products.com |
Insignia NS-R5100 AV Digital Home Theater Receiver
Recalling the memorized channel levels |
2 Press the TUNING / buttons repeatedly |
|
To recall the memorized channel levels: |
until the right frequency has been reached. |
|
|
||
1 Press the CHANNEL LEVEL button. CAL or |
TUNING |
|
|
REF 1 is displayed for several seconds. |
|
|
|
|
|
|
|
|
Note |
|
|
If the channel level mode display disappears, |
|
|
press this button again. |
|
|
|
|
2Press the select  or
or  button to select REF 1 or REF 2. The channel levels memorized into the selected preset memory are recalled.
Listening to radio broadcasts
Auto tuning
To auto tune a radio station:
1 Press FM/AM to select the band.
Auto presetting
The Auto Presetting function automatically searches for FM stations only and stores them in the memory.
To auto preset a radio station:
1While listening to a radio station, press and hold the MEMORY/ENTER button for more than two seconds.
The AUTO MEM flickers and the receiver starts auto presetting.
OR |
Notes |
• Up to 30 FM stations can be stored. |
|
|
• Weak FM stations cannot be stored. To store |
|
weak stations or AM stations, perform “Manual |
|
presetting” on page 15 along with using |
|
“Manual tuning” on page 15. |
Each time this button is pressed, the band changes as follows:
•FM ST
•FM MONO
•AM
When FM stereo broadcasts are poor because of weak broadcast signals, select the FM mono mode to reduce the noise. FM broadcasts are then reproduced in monaural sound.
2Press and hold the TUNING  /
/ buttons for more than 0.5 seconds.
The tuner searches until a station of sufficient strength has been found. The display shows the tuned frequency and TUNED.
If the station found is not the station you want to listen to, repeat this procedure.
Weak stations are skipped during auto tuning.
Manual tuning
Manual tuning is useful when you already know the frequency of the station you want to listen to.
To manually tune a radio station:
1Press FM/AM to select the band.
Each time this button is pressed, the band changes as follows:
•FM ST
•FM MONO
•AM
When FM stereo broadcasts are poor because of weak broadcast signals, select the FM mono mode to reduce the noise. FM broadcasts are then reproduced in monaural sound.
Manual presetting
To manually preset a radio station:
1Tune to the station with auto or manual tuning.
2Press the MEMORY/ENTER button. MEM flickers for several seconds.
3Select a preset number between 1 and 30, then press the MEMORY/ENTER button again.
Notes
•When using the numeric keypad on the remote control, press the number you want. If your number is greater than nine, enter the first digit, then enter the second digit within two seconds.
•The station has been stored in memory. When using the numeric keypad, the station is stored automatically without pressing the
MEMORY/ENTER button.
•A stored frequency is erased from memory by storing another frequency in its place.
•If MEM goes off, start again from step 2.
4Repeat this procedure to memorize additional stations.
Tuning to preset stations
To tune to a preset station:
1Select the tuner as the input source.
2Press the PRESET  /
/ buttons on the receiver.
-OR-
Enter the preset number using the numeric keypad.
Notes
When using the numeric keypad on the remote control, press the number you want. If your number is greater than nine, enter the first digit, then enter the second digit within two seconds.
www.insignia-products.com |
15 |
|
|
|
|
|
|
|
Insignia NS-R5100 AV Digital Home Theater Receiver |
|
Scanning preset stations in sequence |
3 Start play on your input device. |
|||||||
|
To scan preset stations: |
|
|
|||||
|
|
Note |
||||||
1 |
Select the tuner as the input source. |
|
||||||
|
The audio and video signals from the input are |
|||||||
2 |
Press the PRESETS button on the remote |
|
dubbed onto the VIDEO1 recorder. You can view |
|||||
|
them at the same time on the television and hear |
|||||||
|
|
control. |
|
them from the speakers. |
||||
|
|
|
|
|
|
|
|
|
The receiver starts scanning the stations in the preset sequence. Each station is sampled for five seconds.
3Press the PRESETS button again to stop scanning.
Recording
Notes
•Analog signals from the EXTERNAL INs as well as the digital signals from the coaxial or optical digital input can be heard but cannot be recorded.
•The volume and tone (bass and treble) settings have no effect on the recording signals.
Recording on tape
To record on tape:
1Select the recording input source (this cannot be TAPE).
OR
2Start recording on the tape recorder.
3Start play on your input device.
Dubbing from video components onto VIDEO1
To dub from video components onto VIDEO1:
1Select the video source (VIDEO2 or VIDEO3).
Dubbing from audio and video signals separately onto VIDEO1
Use this procedure if yo are dubbing the video from VIDEO2 and mixing it with the audio from the CD audio onto VIDEO1.
To dub from video components onto VIDEO1:
1Select VIDEO2 as the video recording source.
OR
2 Select CD as the audio recording source.
OR
3Start recording on the video recorder.
4Start play on the video source and on the CD source.
Notes
•The audio and video signals from the inputs are dubbed onto the VIDEO1 recorder. You can view them at the same time on the television and hear them from the speakers.
•Make sure that you follow the order of steps 1 and 2.
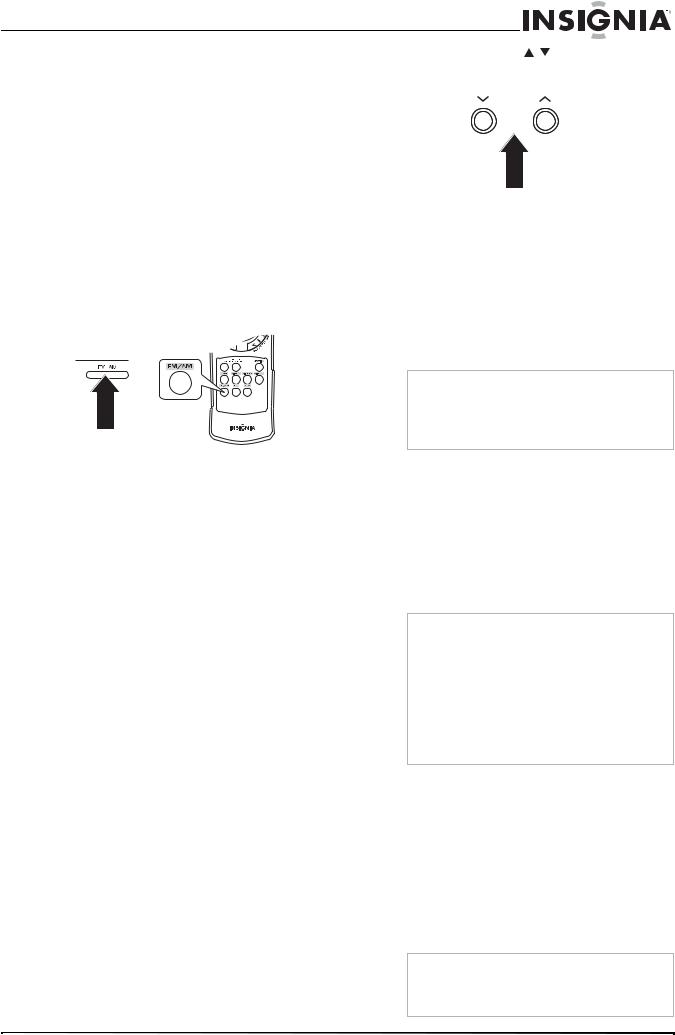
Using the sleep timer
The sleep timer automatically turns the receiver off after a specified period of time.
To use the sleep timer:
•Press the SLEEP button to specify the amount of time you want the receiver to play.
OR
2 Start recording on the video recorder.
16 |
www.insignia-products.com |
Insignia NS-R5100 AV Digital Home Theater Receiver
changes as follows: |
|
Modifying the settings |
|
Each time this button is pressed, the time |
|
||
• |
10 minutes |
|
The setup menu is displayed on the fluorescent |
• |
20 minutes |
|
display and allows you to perform the setup |
|
procedures. In most situations, you will only |
||
• |
30 minutes |
|
|
|
need to set this once during the installation and |
||
• ... |
|
||
|
layout of your home theater, and it rarely needs |
||
• |
90 minutes |
|
to be changed later. |
• |
OFF |
|
The setup menu consists of five main menus: |
|
|
|
system, input, speaker setup, CH level, and |
|
Note |
|
parameter. These menus are then divided into |
|
While operating the sleep timer, the |
lights up. |
various sub-menus. |
Adjusting the display brightness
To adjust the display brightness:
•Press the DIMMER button to specify the brightness of the display.
Each time this button is pressed, the brightness changes as follows:
•ON
•dimmer
•OFF
Note
If the display is off, pressing any button turns the display on.
Displaying the receiver status
To display the receiver status:
•Press the DISPLAY button during playback to view the receiver status.
Each time this button is pressed, the display mode changes as follows:
•Surround Mode
•Volume
•Input source
Note
If the input source is EXTERNAL IN, the surround mode is not displayed.
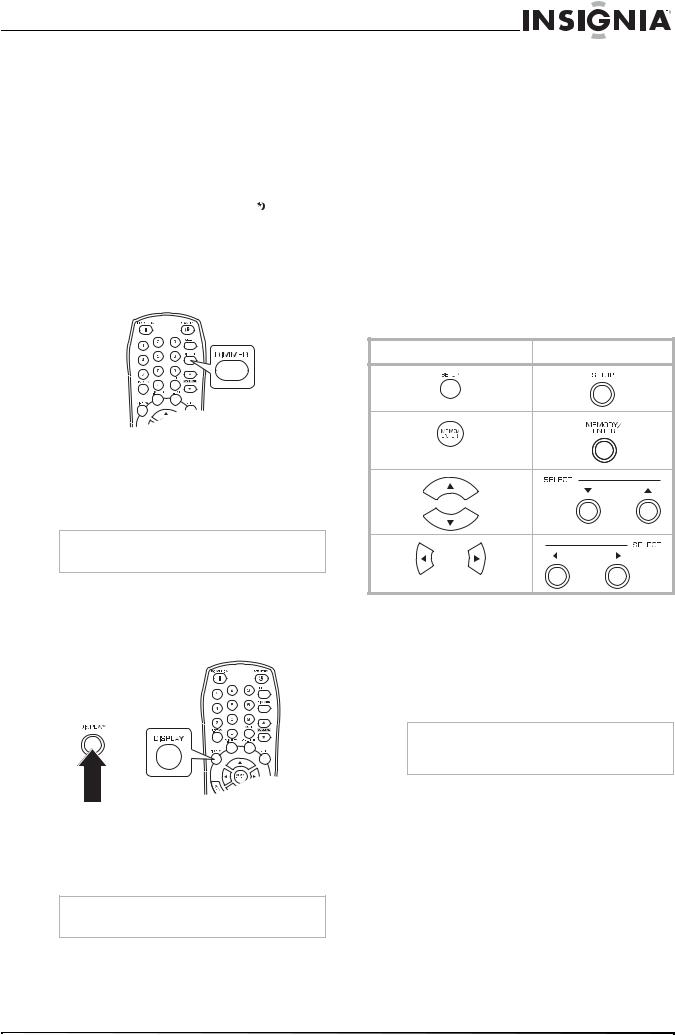
Navigating through the setup menu
The explanations here assume you are using the buttons on the remote control when performing the setup menu operation. However, you can use the buttons on the front panel as well. The buttons on the front panel correspond to those on the remote control as shown.
Button on the remote control Button on the front panel
To use the setup menu:
1Press the SETUP button to open the setup menu.
2Press the select  or
or  buttons to select the menu.
3Press the MEMORY/ENTER button to confirm your selection.
Note
During setup menu operation, only the STANDBY(/POWER ON) button and the buttons required for system setup will function.
Receiver setup menu
Menu |
Submenu |
||
|
|
|
|
SYSTEM |
• |
SW |
|
|
• |
TONE |
|
|
|
• |
BASS |
|
|
• |
TRBL |
|
|
|
|
INPUT |
• |
VID 1 CFG |
|
|
|
• |
D.IN |
|
|
• |
AUTO |
|
• |
VID 2 CFG |
|
|
|
• |
D.IN |
|
|
• |
AUTO |
|
• |
CD CFG |
|
|
|
• |
D.IN |
|
|
• |
AUTO |
www.insignia-products.com |
17 |

|
|
|
|
|
|
|
|
|
|
|
|
Insignia NS-R5100 AV Digital Home Theater Receiver |
|
|
|
|
|
|
|
|
|
|
|
|
|
Modifying the tone |
|
|
|
|
|
Menu |
|
Submenu |
|||||||
|
|
|
|
|
Tone settings include: |
||||||||
|
|
|
|
|
|
|
|
|
|
|
|
||
|
|
|
|
SPK SET |
|
• |
CONFIG |
||||||
|
|
|
|
|
• OFF—To listen to a program source without |
||||||||
|
|
|
|
|
|
|
|
|
|
• |
FRONT |
||
|
|
|
|
|
|
|
|
|
|
• |
CENTER |
|
the tone effect. The DIRECT indicator lights |
|
|
|
|
|
|
|
|
|
|
• |
SURR |
|
up. |
|
|
|
|
|
|
|
|
|
• |
• |
SUB-W |
• ON—To adjust the tone for your taste. The |
|
|
|
|
|
|
|
|
|
|
DISTANCE |
|
DIRECT indicator goes off. |
||
|
|
|
|
|
|
|
|
|
|
• |
UNIT |
|
|
|
|
|
|
|
|
|
|
|
|
|
|
||
|
|
|
|
|
|
|
|
|
|
• |
FL |
|
|
|
|
|
|
|
|
|
|
|
|
• |
C |
|
Note |
|
|
|
|
|
|
|
|
|
|
• |
FR |
|
When EXTERNAL IN is selected as an input |
|
|
|
|
|
|
|
|
|
|
• |
SR |
|
source, the TONE cannot be set to ON. |
|
|
|
|
|
|
|
|
|
|
|
|
||
|
|
|
|
|
|
|
|
|
|
• |
SL |
|
When TONE is set to ON, you can adjust the |
|
|
|
|
|
|
|
|
|
|
• |
SW |
|
|
|
|
|
|
|
|
|
|
|
|
|
tone (bass and treble). |
||
|
|
|
|
|
|
|
|
|
• |
X-OVER |
|
||
|
|
|
|
|
|
|
|
|
|
|
|||
|
|
|
|
|
|
|
|
|
|
• |
FC |
|
The tone level can be adjusted within the |
|
|
|
|
|
|
|
|
|
|
|
|
|
range of -10 ~ +10 dB. In general, we |
|
|
|
|
CH LEVEL |
|
• |
MODE |
|
|||||
|
|
|
|
|
|
recommend the bass and treble to be |
|||||||
|
|
|
|
|
|
|
|
|
|
• |
UNIT |
|
|
|
|
|
|
|
|
|
|
|
|
• |
FL |
|
adjusted to 0 dB (flat level). |
|
|
|
|
|
|
|
|
|
|
• |
C |
|
|
|
|
|
|
|
|
|
|
|
|
• |
FR |
|
|
|
|
|
|
|
|
|
|
|
|
|
Caution |
||
|
|
|
|
|
|
|
|
|
|
• |
SR |
|
|
|
|
|
|
|
|
|
|
|
|
|
Extreme settings at high volume may damage |
||
|
|
|
|
|
|
|
|
|
|
• |
SL |
|
your speakers. |
|
|
|
|
|
|
|
|
|
|
• |
SW |
|
|
|
|
|
|
|
|
|
|
|
|
|
|
||
|
|
|
|
|
|
|
|
|
|
• |
OD |
Modifying the input settings |
|
|
|
|
|
|
|
|
|
|
|
• |
DTS |
Input settings include setting the digital in and |
|
|
|
|
|
PARAMTR |
|
• |
NIGHT M |
||||||
|
|
|
|
|
auto surround for the VIDEO1, VIDEO2, and CD |
||||||||
|
|
|
|
|
|
|
|
|
|
• |
NIGHT |
||
|
|
|
|
|
|
|
|
|
|
inputs. |
|||
|
|
|
|
|
|
|
|
|
• |
PLII MSC |
|||
|
|
|
|
|
|
|
|
|
|
• |
PANO |
Modifying digital in |
|
|
|
|
|
|
|
|
|
|
|
• |
C.WIDTH |
||
|
|
|
|
|
|
|
|
|
|
|
|
||
|
|
|
|
|
|
|
|
|
|
• |
DIMEN |
For details about digital in, refer to “Connecting |
|
|
|
|
|
|
|
|
|
|
|
|
|
digital audio devices” on page 7. |
|
Modifying the system settings |
|
||||||||||||
|
You can select: |
||||||||||||
|
System settings include the settings for the |
• |
OPT (optical) |
||||||||||
|
subwoofer and tone. |
|
|
|
• COX 1 (coaxial 1) |
||||||||
Modifying the subwoofer |
|
|
|
• COX 2 (coaxial 2) |
|||||||||
|
SW mode is effective only when FRONT, |
• |
ANL (analog) |
||||||||||
|
|
|
|||||||||||
|
CENTER, or SURR is set to L and SUB-W is set |
|
|
||||||||||
|
|
Note |
|||||||||||
|
to Y on the SPK SET menu. (For details, refer to |
|
|||||||||||
|
|
If DIGITAL IN is assigned to two input sources or |
|||||||||||
|
“Modifying the speaker settings” on page 19.) |
|
|||||||||||
|
|
more, when these input sources are selected, the |
|||||||||||
|
While playing the two channel source in |
|
digital audio signals can be heard from the same |
||||||||||
|
MATRIX, CHURCH, THEATER, HALL, or |
|
DIGITAL IN. |
||||||||||
|
STADIUM mode, the low frequency signals can |
Modifying surround |
|||||||||||
|
be reproduced from the subwoofer regardless of |
||||||||||||
|
Depending on how to select a surround mode, |
||||||||||||
|
the subwoofer mode setting. |
|
|
|
|||||||||
|
Subwoofer mode settings include: |
|
you can select the auto surround mode or the |
||||||||||
|
|
manual surround mode. |
|||||||||||
|
• NORM—The low frequency signals of |
||||||||||||
|
• OFF (Manual surround mode)—You can |
||||||||||||
|
|
channels set to L are reproduced from those |
|||||||||||
|
|
|
select from the different surround modes |
||||||||||
|
|
channels only. In this mode, the low |
|
||||||||||
|
|
|
selectable for the signal being input by using |
||||||||||
|
|
frequency signals that are reproduced from |
|
||||||||||
|
|
the subwoofer channel is only the low |
|
the SURROUND MODE ( / or >/<) |
|||||||||
|
|
frequency signals of LFE (Low Frequency |
|
buttons. (For details, refer to “Enjoying |
|||||||||
|
|
Effects) (from the multi-channel sources that |
|
surround sound” on page 12.) |
|||||||||
|
|
contains LFE channel, also called the .1 |
|
|
|||||||||
|
|
channel) and the channels set to S. |
|
|
|||||||||
•SW+—The low frequency signals of channels set to L are reproduced simultaneously from those channels and the subwoofer channel. In this mode, the low frequency range expands more uniformly through the room, but depending on the size and shape of the room, interference may result in a decrease of the actual volume of the low frequency range.
18 |
www.insignia-products.com |
Insignia NS-R5100 AV Digital Home Theater Receiver
•ON (Auto surround mode)—The optimum surround mode will be automatically selected depending on the signal format being input.
Notes
•When the SPEAKER button is set to off, the auto surround mode is invalid.
•Even when the auto surround mode is selected and the same type of digital signal format is being input, the optimum surround mode may vary depending on whether the speaker type is set to “N (None)” or not.
•When the auto surround mode is selected and the PCM (2 channel) digital signal or the analog stereo signal is being input, only the stereo mode will be selected.
•When the auto surround mode is selected, the surround modes other than the optimum surround mode cannot be selected.
•When 96 kHz PCM signal is being input, only the stereo mode will be selected regardless of selecting either the auto surround mode or the manual surround mode.
Modifying the speaker settings
After you have installed this receiver and connected all the components, you should adjust the speaker settings for the optimum sound acoustics according to your environment and speaker layout.
When you change speakers, speaker positions, or the layout of your listening environment, you should also adjust the speaker settings.
Modifying the speaker configuration
Use the speaker configuration menu to select the size of each speaker. Select large or small not according to the actual size of the speaker but according to the speaker's capacity for playing low frequency (bass sound below frequency set on the “X-OVER” menu) signals.
If you do not know, try comparing the sound at both settings (setting the volume to a level low enough so as not to damage the speakers) to determine the proper setting.
Depending on the speaker type, you can select one of the following:
•L (Large)—Select this when connecting speakers that can fully reproduce sounds below crossover frequency.
•S (Small)—Select this when connecting speakers that cannot fully reproduce sounds below crossover frequency. When this is selected, sounds below crossover frequency are sent to the subwoofer or speakers which are set to L when not using a subwoofer.
•N (None)—Select this when no speakers are connected. When this is selected, sounds are sent to the speakers which are not set to N.
•Y (Yes)/N (No)—Select depending on whether a subwoofer is connected or not.
Notes
•When speakers are set to S, you should set their crossover frequency correctly according to their frequency characteristics. (For details, refer to “Modifying the crossover” on page 19.)
•When SUB-W is set to N, FRONT is automatically set to L.
•When the FRONT is set to S, CENTER and SURR cannot be set to L.
Modifying the speaker distance
Use the speaker distance menu to select the distance between the listening position and each speaker to set the delay time for optimum surround playback.
Note
•You cannot select the speakers set to N.
•You can select either M (Meters) or FT (Feet).
•Once a unit is selected, the distances are automatically changed in the selected unit. When setting the distance, you can set the distance within the range of 0.0 ~ 9.0 meters in 0.3 meter intervals (or 0 ~ 30 feet in 1 foot intervals).
•When enjoying multi-channel surround playback with Dolby Digital and DTS sources, it is ideal that the center, surround, and subwoofer speakers should be the same distance from the main listening position as the front speakers. By entering the distance between the listening position and each speaker, the delay times of center, surround, and subwoofer speakers are automatically adjusted to create an ideal listening environment virtually as if the center, surround, and subwoofer speakers were at their ideal locations respectively.
Modifying the crossover
You can adjust the crossover frequency within the range of 40 ~ 200 Hz in 10 Hz intervals.
When speakers are set to S, low frequencies in those channels that are below the crossover frequency to output from the subwoofer or front speakers which are set to L (when not using a
subwoofer).
Refer to the operating instructions of the speakers to be connected. If the frequency range of your speaker is 100 Hz~20 kHz, the crossover frequency should be set to 100 Hz (or slightly higher).
Modifying channel level settings
Note
Depending on the speaker settings, (N), some channels cannot be selected.
Modifying the current channel level
You can adjust the current channel levels as desired. These adjusted levels are memorized into user’s memory (CAL) and not into preset memory (REF 1 or REF 2).
After adjusting each channel level with test tone, adjust the channel levels either according to the program sources or to suit your tastes. (For details, refer to “Adjusting each channel level with test tone” on page 14.)
Note
The LFE level can be adjusted within the range of - 10 ~ 0 dB and other channel levels within the range of -15 ~ +15 dB. In general, we recommend the LFE level to be adjusted to 0 dB. (However, the recommended LFE level for some early DTS software is -10 dB.) If the recommended levels seem too high, lower the setting as necessary.
Memorizing the adjusted channel levels
You can memorize the adjusted channel levels into preset memory (REF 1 and REF 2) and recall the memorized levels whenever you want.
www.insignia-products.com |
19 |

Insignia NS-R5100 AV Digital Home Theater Receiver
To memorize the adjusted channel levels:
1After modifying the current channel level, press the MEMORY/ENTER button.
2Press the select  or
or  buttons to select REF 1 or REF 2, then press the
MEMORY/ENTER button.
To recall the memorized channel levels:
1Press the select  or
or  buttons to select the
MODE CAL, MODE REF1, or MODE REF2.
2Press the select  or
or  buttons to select REF 1 or REF 2. The channel levels memorized into the selected preset are recalled.
Modifying the parameter
Modifying the night mode
This function compresses the dynamic range of previously specified parts of Dolby Digital or DTS sound track (with extremely high volume) to minimize the difference in volume between the specified and non-specified parts.
This makes it easy to hear all of the sound track when watching movies at night at low levels.
Notes
•The night mode setting is valid only when the digital signals from Dolby Digital or DTS program source are being input.
•In some Dolby Digital or DTS software, the night mode setting may not be valid.
Valid values for the night mode are 0.0 to 1.0.
Modifying the DOLBY PLII music
You can adjust the various surround parameters for optimum surround effect.
Note
The parameter settings are valid only when listening in Dolby Pro Logic II Music mode.
You can adjust the parameters as follows:
•PANO (Panorama)—This mode extends the front stereo image to include the surround speakers for an exciting “wraparound” effect with side wall imaging. Select OFF or ON (default value: OFF).
•C. WIDTH (Center width)—This adjusts the center image so it may be heard only from the center speaker, only from the left/right speakers as a phantom image, or from all three front speakers to varying degrees. The control can be set in 8 steps from 0 to 7 (default value: 3).
•DIMEN (Dimension)—This gradually adjusts the soundfield either towards the front or towards the rear. The control can be set in 7 steps from -3 to +3 (default value: 0).
Maintaining
To clean this receiver, wipe with a soft, dry cloth. If the surfaces are extremely dirty, use a soft cloth dipped in a soap and water solution or a weak detergent solution.
•Never use alcohol, paint thinner, or benzine to clean this receiver.
•Before using a chemically treated cloth, read the instructions that came with the cloth carefully.
Troubleshooting
If a problem occurs, run through the table below before contacting Insignia.
If the problem persists, attempt to solve it by switching the receiver off and on again. If this fails to resolve the problem, contact Insignia.
Under no circumstances should you attempt to repair the receiver yourself as this could void the warranty.
Category |
Problem |
Possible Solution |
||
|
|
|
|
|
No power |
1 |
The AC power cord |
1 |
Connect the cord |
|
|
is disconnected. |
|
securely. |
|
2 |
Poor connection at |
2 |
Check the outlet |
|
|
AC wall outlet or |
|
using a lamp or |
|
|
the outlet is |
|
another appliance. |
|
|
inactive. |
|
|
|
|
|
|
|
No sound |
1 |
The speaker cords |
1 |
Check the speaker |
|
|
are disconnected. |
|
connections. |
|
2 |
The master volume |
2 |
Adjust the master |
|
|
is adjusted too low. |
|
volume. |
|
3 |
The MUTE button |
3 |
Press the MUTE |
|
|
on the remote |
|
button to cancel the |
|
|
control is pressed |
|
muting effect. |
|
|
to ON. |
4 |
Press the SPEAKER |
|
4 |
Speakers are not |
|
button to ON. |
|
|
switched on. |
5 |
Select the desired |
|
5 |
Incorrect selection |
|
input source |
|
|
of the input source. |
|
correctly. |
|
6 |
Incorrect |
6 |
Make connections |
|
|
connections |
|
correctly. |
|
|
between the |
|
|
|
|
components. |
|
|
|
|
|
|
|
No sound |
1 |
Surround mode is |
1 |
Select a surround |
from the |
|
switched off (stereo |
|
mode. |
surround |
|
mode). |
2 |
Adjust master |
speakers |
2 |
Master volume and |
|
volume and |
|
|
surround level are |
|
surround level. |
|
|
too low. |
3 |
Select a stereo or |
|
3 |
A monaural source |
|
surround source. |
|
|
is used. |
4 |
Select the desired |
|
4 |
Surround speaker |
|
surround speaker |
|
|
setting is “N”. |
|
setting. |
|
|
|
|
|
No sound |
1 |
Surround mode is |
1 |
Select the desired |
from the |
|
switched off (stereo |
|
surround. |
center |
|
mode). |
2 |
Select the desired |
speaker |
2 |
Center speaker |
|
center speaker |
|
|
setting is “N”. |
|
setting. |
|
3 |
Master volume and |
3 |
Adjust master |
|
|
center level are too |
|
volume and center |
|
|
low. |
|
level. |
|
|
|
|
|
Stations |
1 |
No antenna is |
1 |
Connect an |
cannot be |
|
connected. |
|
antenna. |
received |
2 |
The desired station |
2 |
Tune in the desired |
|
|
frequency is not |
|
station frequency. |
|
|
tuned in. |
3 |
Move the antenna |
|
3 |
The antenna is in |
|
and retry tuning. |
|
|
wrong position. |
|
|
|
|
|
|
|
Preset |
1 |
An incorrect station |
1 |
Memorize the |
stations |
|
frequency has been |
|
correct station |
cannot be |
|
memorized. |
|
frequency. |
received |
2 |
The memorized |
2 |
Memorize the |
|
|
stations are |
|
stations again. |
|
|
cleared. |
|
|
20 |
www.insignia-products.com |

Insignia NS-R5100 AV Digital Home Theater Receiver
Category |
Problem |
Possible Solution |
||
|
|
|
|
|
Poor FM |
1 |
No antenna is |
1 |
Connect an |
reception |
|
connected. |
|
antenna. |
|
2 The antenna is not |
2 |
Change the position |
|
|
|
positioned for the |
|
of the antenna. |
|
|
best reception. |
|
|
|
|
|
|
|
Continuous |
Weak signals. |
1 |
Change the position |
|
hissing |
|
|
|
of the antenna. |
noise during |
|
|
2 |
Install an outdoor |
FM |
|
|
|
FM antenna. |
reception, |
|
|
|
|
especially |
|
|
|
|
when a |
|
|
|
|
stereo |
|
|
|
|
broadcast is |
|
|
|
|
received. |
|
|
|
|
|
|
|
|
|
Continuous |
Noise is caused by |
1 |
Keep the receiver |
|
or |
motors, fluorescent |
|
away from noise |
|
intermittent |
lamps, or lightning. |
|
sources. |
|
hissing |
|
|
2 |
Install an outdoor |
noise during |
|
|
|
AM antenna. |
AM |
|
|
|
|
reception, |
|
|
|
|
especially at |
|
|
|
|
night. |
|
|
|
|
|
|
|
|
|
Remote |
1 |
Batteries are not |
1 |
Replace the |
control unit |
|
loaded or are |
|
batteries. |
does not |
|
exhausted. |
2 |
Remove the |
operate. |
2 |
The remote sensor |
|
obstacle. |
|
|
is obstructed. |
|
|
|
|
|
|
|
Specifications
|
|
Note |
|
|
|
• Design and specifications are subject to |
|
|
|
change without notice. |
|
|
|
• Weight and dimensions shown are |
|
|
|
approximate. |
|
|
|
• Specifications and external appearance may |
|
|
|
be changed for the sake of improvement. |
|
|
|
|
|
|
|
||
Amplifier |
Power output, stereo mode, 6 Ω, THD 0.7%, |
||
|
40 Hz~20 kHz: 2×100 W |
||
|
|
||
|
Total harmonic distortion, 6 Ω, 100 W, 1 kHz: 0.09% |
||
|
|
||
|
Intermodulation distortion, 60 Hz, 7 kHz= 4:1 SMPTE, |
||
|
6Ω, 100 W: 0.1 % |
||
|
Input sensitivity, 47 kΩ, Line (CD, TAPE, VIDEO): |
||
|
280 mV |
||
|
|
||
|
Signal to noise ratio, IHF “A” weighted, Line (CD, TAPE, |
||
|
VIDEO): 92 dB |
||
|
|
||
|
Frequency response Line (CD, TAPE, VIDEO), |
||
|
20 Hz~50 kHz: +0 dB, -3 dB |
||
|
|
||
|
Output level |
||
|
|
TAPE REC, 2.2 kΩ: 280 mV |
|
|
|
PRE OUT (Subwoofer), 1 kΩ:1.0 V |
|
|
|
||
|
Bass/Treble control, 100 Hz/10 kHz: ±10 dB |
||
|
|
||
|
Surround mode, only channel driven |
||
|
|
Front power output, 6Ω, 1 kHz, THD 0.7%: 125 W / |
|
|
|
125 W |
|
|
|
Center power output, 6Ω, 1 kHz, THD 0.7%: 125 W |
|
|
|
Surround power output, 6Ω, 1 kHz, THD 0.7%: |
|
|
|
125 W / 125 W |
|
Digital |
Sampling frequency: 32, 44.1, 48, 96 kHz |
||
Audio |
|
|
|
Digital input level |
|||
|
|||
|
|
Coaxial, 75Ω: 0.5 Vp-p |
|
|
|
Optical, 660 nm: -15~-21 dBm |
|
|
|
|
|
Video |
Video format: NTSC |
|
Input sensitivity (=Output level), 75Ω |
|
Video (Composite (normal)): 1 Vp-p |
|
S-Video (luminance signal): 1 Vp-p |
|
(chrominance signal): 0.286 Vp-p |
|
Component video (R-Y signal): 0.5 Vp-p |
|
(B-Y signal): 0.5 Vp-p |
|
(Y signal): 1.0 Vp-p |
FM Tuner Tuning frequency range: 87.5~108 MHz
|
Usable sensitivity, THD 3%, S/N 30 dB: 12.8 dBf |
|
|
46 dB quieting sensitivity, mono/stereo: 20.2 / 45.3 dBf |
|
|
|
|
|
Signal to noise ratio, 65 dBf, mono/stereo: 55 / 50 dB |
|
|
|
|
|
Total harmonic distortion, 65 dBf,1 kHz, mono/stereo: |
|
|
0.5 / 1.0% |
|
|
|
|
|
Frequency response, 30 Hz~12 kHz: ±3.0 dB |
|
|
|
|
|
Stereo separation, 1 kHz: 30 dB |
|
|
|
|
|
Capture ratio: 4 dB |
|
|
|
|
|
IF rejection ratio: 80 dB |
|
|
|
|
AM |
Tuning frequency range: 520~1710 kHz |
|
Tuner |
|
|
Usable sensitivity: 500 µV/m |
||
|
||
|
|
|
|
Signal to noise ratio: 40 dB |
|
|
|
|
|
Selectivity: 25 dB |
|
|
|
|
General |
Power supply: 120 V ~ 60 Hz |
|
|
|
|
|
Power consumption: 3.8 A |
|
|
|
|
|
Dimensions (W×H×D, including protruding parts): |
|
|
17-3/8×5-1/2×14-3/4 inches (440×141×376 mm) |
|
|
|
|
|
Weight (Net): 20.5 lbs (9.3 kg) |
Legal notices
FCC Part 15
This device complies with Part 15 of the FCC Rules. Operation of this product is subject to the following two conditions: (1) this device may not cause harmful interference, and (2) this device must accept any interference received, including interference that may cause undesired operation.
This equipment has been tested and found to comply within the limits for a class B digital device, pursuant to Part 15 of the FCC Rules. These limits are designed to provide reasonable protection against harmful interference in a residential installation. This equipment generates, uses, and can radiate radio frequency energy and, if not installed and used in accordance with the instructions, may cause harmful interference to radio communications. However, there is no guarantee that interference will not occur in a particular installation. If this equipment does cause harmful interference to radio or television reception, which can be determined by turning the equipment off and on, the user is encouraged to try to correct the interference by one or more of the following measures:
•Reorient or relocate the receiving antenna.
•Increase the separation between the equipment and receiver.
•Connect the equipment into an outlet on a circuit different from that to which the receiver is connected.
•Consult the dealer or an experienced technician for help.
FCC warning
Changes or modifications not expressly approved by the party responsible for compliance with the FCC Rules could void the user’s authority to operate this equipment.
Canada ICES-003 statement
This Class B digital apparatus complies with Canadian ICES-003.
www.insignia-products.com |
21 |
 Loading...