


 Loading...
USER’S
GUIDE

User’s Guide
Copyright © 1996 by In Focus Systems, Inc.
Wilsonville, Oregon. All rights reserved.

FCC Warning
This equipment has been tested and found to comply with the limits for a Class B digital device, pursuant to Part 15 of FCC Rules. These limits are designed to provide reasonable protection against harmful interference in a residential installation.
DOC (Canada)
This Class B digital apparatus meets all requirements of the Canadian Interfer- ence-Causing Equipment Regulations. Cet appareil numerique de la classe B respecte toutes les exigences du Reglement sur le materiel brouilleur du Canada.
Instructions to User
This equipment generates, uses and can radiate radio frequency energy and, if not installed and used in accordance with the instructions, may cause harmful interference to radio communications. However, there is no guarantee that interference will not occur in a particular installation. If this equipment does cause harmful interference to radio or television reception, which can be determined by turning the equipment off and on, the user is encouraged to try to correct the interference by one or more of the following measures:
•Reorient or relocate the receiving antenna.
•Increase the separation between the equipment and receiver.
•Connect the equipment into an outlet on a circuit different from that to which the receiver is connected.
•Consult the dealer or an experienced radio/TV technician for help.
Any and all modifications to this unit other than those made by approved service personnel are prohibited.
Safety Certifications
UL, CUL, and TÜV
Trademarks
Apple, Macintosh, and PowerBook are trademarks or registered trademarks of Apple Computer, Inc. IBM and PS/2 are trademarks or registered trademarks of International Business Machines, Inc. MicroSaver and Kensington are trademarks or registered trademarks of Kensington Microware Limited. JBL is a trademark or registered trademark of Harman Interantional. Windows is a trademark or registered trademark of Microsoft Corporation. CableWizard, In Focus Systems and LitePro are trademarks or registered trademarks of In Focus Systems, Inc.

 Icon copyrighted by and used with the permission of Apple Computer, Inc. All Rights Reserved.

Declaration of Conformity
Manufacturer: In Focus Systems, Inc.
27700B SW Parkway Ave. Wilsonville, Oregon 97070 USA
European Office: Plantenweg 91, 2132 HL Hoofddorp, The Netherlands
We declare under our sole responsibility that the LitePro 210 and 220 LCD Projectors conform to the following directives and norms:
Directive 89/336/EEC
EMI: EN 55022 (1992) Class B
EMC: EN 50082-1 (1992)
IEC 801-2, IEC 801-3, IEC 801-4
Directive 73/23/EEC
Safety: EN 60950: 1992 + A1 + A2 + A3: 1995
May, 1996

TABLE OF CONTENTS |
|
Safety Summary |
iii |
Introduction |
1 |
Image Resolution |
1 |
Compatibility |
2 |
Unpacking the Projector |
2 |
Usage Guidelines |
4 |
If You Need Assistance |
4 |
Warranty |
4 |
Setting up the Projector |
5 |
Connecting the CableWizard to the Projector |
6 |
Selecting Connectors on the CableWizard |
6 |
Preparing to Connect Your Equipment to the Projector |
8 |
Connecting an IBM-Compatible Desktop Computer |
9 |
Connecting an IBM-Compatible Laptop Computer |
11 |
Connecting a Macintosh Desktop Computer |
13 |
Connecting an Apple PowerBook Computer |
15 |
Connecting a Video Player |
17 |
Connecting an External Speaker and a Subwoofer |
19 |
Connecting a Microphone |
20 |
Connecting a PS/2-Compatible Mouse. |
20 |
Connecting the Remote Control Cable |
21 |
Powering up the Projector and Adjusting the Image |
21 |
Turning Off the Projector |
23 |
Using the Projector |
25 |
Basic Image Adjustment |
25 |
Using the Remote Control |
25 |
Adjusting the Projector |
26 |
Using the Remote and Keypad Buttons |
28 |
Using the Disk Mouse |
32 |
Using the On-Screen Menus |
32 |
Display Menu Functions |
33 |
Audio Menu Functions |
35 |
Image Menu Functions |
37 |
Controls Menu Functions |
39 |
i
T a b l e |
o f |
C o n t e n t s |
|
|
|
Maintenance |
41 |
Cleaning the Lens |
41 |
Removing and Replacing a Lens |
41 |
Using the Zoom Lens |
42 |
Replacing the Projection Lamp |
43 |
Resetting the Lamp Monitor Light |
44 |
Replacing the Batteries in the Remote Control |
45 |
Replacing the Fuse |
45 |
Using the Kensington Lock |
47 |
Troubleshooting |
49 |
Solutions to Common Problems |
50 |
Appendix |
55 |
Specifications |
55 |
Accessories |
57 |
Portable and Laptop Activation Chart |
59 |
Using Video Mirroring with a PowerBook Computer |
63 |
Projected Image Size |
64 |
Index |
67 |
ii

SAFETY SUMMARY
Please read these instructions carefully before using your LitePro 210 or 220. Failure to comply with them could result in fire, electrical shock, personal injury or damage to equipment.
These graphics are used throughout this manual to draw your attention to important information about the projectors.
NOTE: Additional useful details or tips.
 CAUTION: Steps to take to avoid damage to your equipment.
WARNING: Steps to take to avoid personal injury.
These graphics are used on LitePro labels.
 Attention - Refer to this User’s Guide for important safety information.
 Hot Surfaces - Avoid touching hot surfaces. Do not touch until the LitePro has cooled.
 Lamp Explosion Hazard - If you continue to use the lamp after the lamp monitor light comes on, it may explode, severely damaging your LitePro. Be sure to replace the lamp when the lamp monitor light comes on as described in this User’s Guide. Refer to the section titled “Replacing the Projection Lamp” for information about changing the bulb.
Do Not Look Into The Lens!
Be extremely careful not to look into the projection lens when the LitePro is turned on. The bright light may harm your eyes. Be especially careful to keep children from looking into the lens.
iii

S a f e t y |
S u m m a r y |
|
|
CAUTION: Be sure to replace the projection bulb when the lamp monitor light comes on as described on page 43. If the lamp remains in use too long, there is a danger of bulb explosion. If this happens, your LitePro will be severely damaged.
Power Source
Use only a three-wire grounding type power source. The power source should not exceed 250 volts rms between the supply conductors or between either conductor and the ground.
Power Cord
Use only the power cord that was shipped with the LitePro. Although other power cords might be similar in appearance, they have not been safety-tested with the 210 or 220. Do not use a power cord if it has become damaged or frayed. Contact your In Focus dealer or call In Focus if you need to replace your power cord.
Grounding
The projector is grounded through the grounding conductor on the power cord. To avoid electric shock, plug the power cord into a properly wired receptacle. Do not defeat the purpose of the grounding-type plug.
Fuse
For continued protection against the risk of fire, use only the specified fuse. It must be a time delay, high breaking capacity 5x20mm fuse with the following amperages: for 6.3amp use T6.3AH, for 8amp use T8AH. Refer to page 55 for more information about fuse specifications and to page 45 for instructions on replacing the fuse.
Lamp
To avoid overheating and unacceptable image quality, replace the projection lamp with a lamp of the specified type. Refer to page 56 for lamp specifications and to page 43 for instructions on replacing the lamp.
Lamp Compartment
To avoid burns or an explosion hazard, do not open the lamp module door until the projector is turned off and the lamp has cooled. The hot lamp contains high pressure and can explode if damaged or old. Follow the instructions in this manual for lamp replacement carefully.
iv

Hot Surfaces
Allow the projector to cool at least 45 minutes before replacing a lamp. When you open the lamp housing, be very careful not to touch the hot surfaces inside.
Ventilation and Overheating
Openings in the projector case provide ventilation to protect it from overheating. Keep loose papers and other objects well away from the bottom, top and side grills. Do not place the projector on top of or close to a computer or other heat-producing equipment.
Liquid Spills
Do not set drinks on top of the projector. Spilled liquids can flow inside and cause damage.
Do Not Disassemble
All LitePro service must be performed by an authorized In Focus service center. The only user-serviceable part in the LitePro is the projection lamp, which you can replace by opening the lamp cover on the bottom of the projector (see page 43). Do not open any other part of the LitePro. If your LitePro needs repair, call In Focus Technical Support as described on page 4. Before you call Technical Support, you may want to refer to “Troubleshooting” starting on page 49 to see if you can resolve the problem yourself.
Don’t Set the LitePro on its Lens
To protect the lens when you are transporting the LitePro, adjust the lens so it is fully retracted (turn it clockwise) before you pack it.
Place the LitePro in its carrying case with the lens facing upwards. You may damage the LitePro if you set it on its lens.
NOTE: If you open the LitePro
case, you will void the warranty.
v
Introduction

INTRODUCTION
The In Focus Systems LitePro® 210 and 220 multimedia projectors combine powerful and sophisticated features with easy-to- use, intuitive controls. Built-in multimedia features include audio by JBL™, a palette of 16.7 million colors and active matrix liquid crystal display (LCD) technology. The 200 series projectors are ideal for high-performance business, training and imaging applications that demand exceptional color quality. The 210 has VGA graphics, the 220 has SVGA graphics. The user interfaces of the two products are identical; information in this User’s Guide applies to both products.
Image Resolution
LitePro 210
The VGA resolution of the 210’s projected image is 640x480. It displays computer images just as they appear on your computer’s monitor. Screen resolutions between 640x480 and 800x600 are compressed to 640x480. The 210 cannot compress screen resolutions above 800x600. If your computer’s screen resolution is higher than 800x600, reset it to a lower resolution before you connect the 210.
LitePro 220
The SVGA resolution of the 220’s projected image is 800x600. It displays computer images just as they appear on your computer’s monitor. Screen resolutions between 800x600 and 1024x768 are compressed to 800x600. The 220 cannot compress screen resolutions above 1024x768. If your computer’s screen resolution is higher than 1024x768, reset it to a lower resolution before you connect the 220.
NOTE: The 220 automatically expands 640x480 images to 800x600. You can display these images at 640x480 by turning off the Auto Resize feature. See “Auto Resize” on page 37 for more information.
1

I n t r o d u c t i o n
Compatibility
The projector is compatible with a wide variety of computers and video devices, including:
•IBM-compatible computers, including laptops, up to 800x600 resolution (LitePro 210) or 1024x768 resolution (LitePro 220) at 75Hz.
•IBM PS/2 in VGA and MCGA modes.
•Apple Macintosh and PowerBook computers up to 800x600 resolution (LitePro 210) or 1024x768 resolution (LitePro 220).
•Various VCRs, camcorders and laser disc players.
The projector is not compatible with these systems:
•IBM-compatible computers in CGA or EGA graphics mode.
•Macintosh 128, 512, Plus, SE, SE/30 or Classic.
Unpacking the Projector
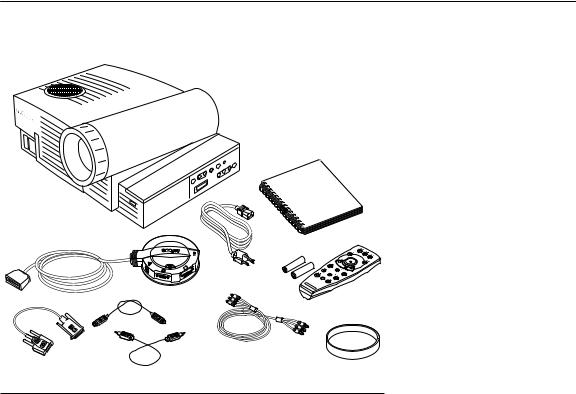
The projector comes with the items shown in Figure 1. Check to make sure all are included. Contact your In Focus dealer immediately if anything is missing.
If you are experienced in setting up presentation systems, use the LitePro 210/220 Quick Start card that was included in the shipping box. For complete details on connecting and operating the projector, refer to this User’s Guide.
NOTE: The contents of your
shipping box may vary depending
on the LitePro configuration you’ve
ordered.
2
1 |
|
2 |
|
|
3 |
7 |
|
4 |
|
9 |
6 |
|
|
|
8 |
|
5 |
|
|
|
10 |
|
|
FIGURE 1
Shipping box contents
1. |
LitePro 210 or 220 projector |
6. |
RCA audio/video (A/V) cable |
2. |
LitePro 210/220 User’s Guide |
7. |
CableWizard |
3. |
power cord |
8. |
CableWizard computer cable |
4. |
remote and batteries |
9. |
CableWizard mouse cable |
5. |
lens cap |
10. |
CableWizard audio cable |
|
|
|
Not shown: Quick Start card, |
|
|
|
remote cable |
3

I n t r o d u c t i o n
NOTE: If the LitePro overheats and turns off, you must wait about 45 seconds before you attempt to turn it back on.
Usage Guidelines
•Do not look directly into the projection lens when the projector is turned on. The bright light may harm your eyes.
•The top and bottom of the projector can be very hot to the touch after use. Use extreme care or let it cool before lifting it.
•Do not block the grills at the front or top of the projector. Restricting the air flow can cause it to overheat and turn off.
•Handle the projector as you would any product with glass components. Be especially careful not to drop it.
•Avoid leaving the projector in direct sunlight or extreme cold for extended periods of time. If this happens, allow it to reach room temperature before use.
•Transport the projector in a vendor-approved hard or soft case. Part numbers for these cases are listed on page 57. Call your In Focus dealer to order.
If You Need Assistance
The first place to look for help is in this manual. Be sure to check the guidelines in “Troubleshooting” on page 49.
If this manual doesn’t answer your question, call your In Focus dealer. You can also call In Focus Customer Service directly at 1-800-799-9911. Call between 6 a.m. and 5 p.m. PST, Monday through Friday. In Europe, call In Focus in The Netherlands at (31) 23-5623200. In Singapore, call (65) 334-9005. Or, send us an e-mail at techsupport@infs.com.
The In Focus World Wide Web address is http://www.infs.com.
Warranty
These products are backed by a limited one-year warranty. The details of the warranty are printed at the back of this manual. Longer term warranties can be purchased from your In Focus dealer. Refer to page 58 for part numbers.
4

Setting up the Projector
SETTING UP THE PROJECTOR
1Place the projector on a flat surface.
•The projector must be within 10 feet of your power source and within 10 feet of your computer.
•If you want to project from behind a translucent screen, set up the projector behind your screen. See “Rear Projection” on page 40 to reverse the image.
•If you are installing the projector on the ceiling, refer to the
LitePro 200 Series Ceiling Mount Installation Guide for more information. To turn the image upside down, see “Ceiling” on page 39. The Ceiling Mount Kit is sold separately; see page 58.
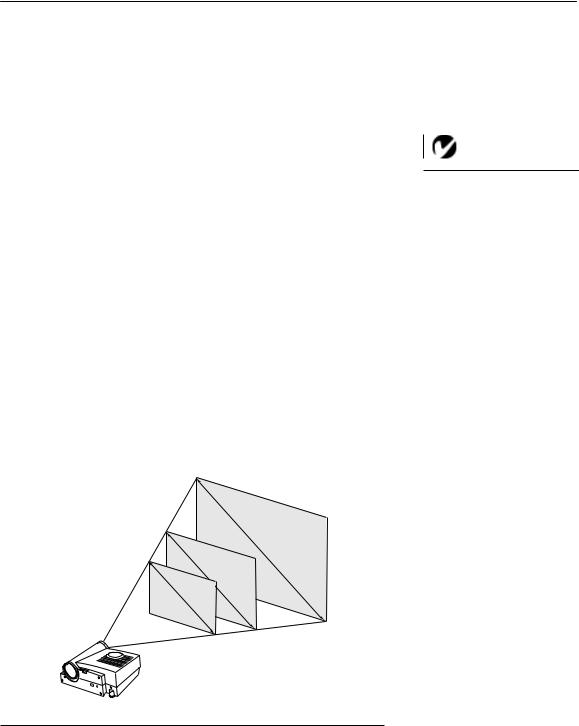
2Position the projector the desired distance from the screen.
•The distance from the lens of the projector to the screen determines the size of the projected image. Figure 2 shows three projected image sizes using the varifocal lens or the zoom lens at minimum focusing distance. For more information about image size, see “Projected Image Size” on page 64.
3Make sure the projector and your computer are turned off.
NOTE: An optional extension cable, sold separately, lets you increase the distance between the projector and your computer to 50 feet. See “Accessories” on
page 57.
25 ft.
4 ft. |
10 ft. |
|
FIGURE 2
Projected image size (varifocal lens, zoom lens at minimum focusing distance)
5
S e t t i n g |
u p |
t h e |
P r o j e c t o r |
|
|
|
|
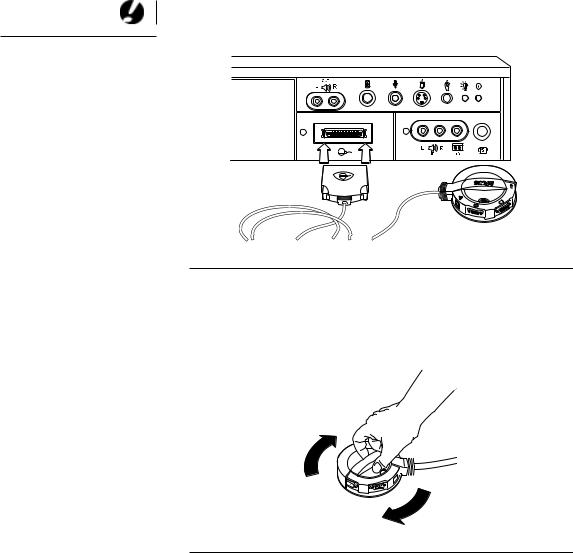
Connecting the CableWizard to the Projector
The CableWizard simplifies the connection process by providing a central hub for all the connections between the projector and your computer. The connectors on the CableWizard are labeled with icons.
Connect the  end of the CableWizard cord to the
  connector on the projector’s connector panel (Figure 3).
CAUTION: Turn off the
computer, monitor and projector
whenever you connect or
disconnect cables.
FIGURE 3
Connecting the CableWizard cable to the projector
Selecting Connectors on the CableWizard
Turn the selector on the top of the CableWizard to reveal the correct connectors for your computer.
FIGURE 4
Selecting connectors on the CableWizard
6
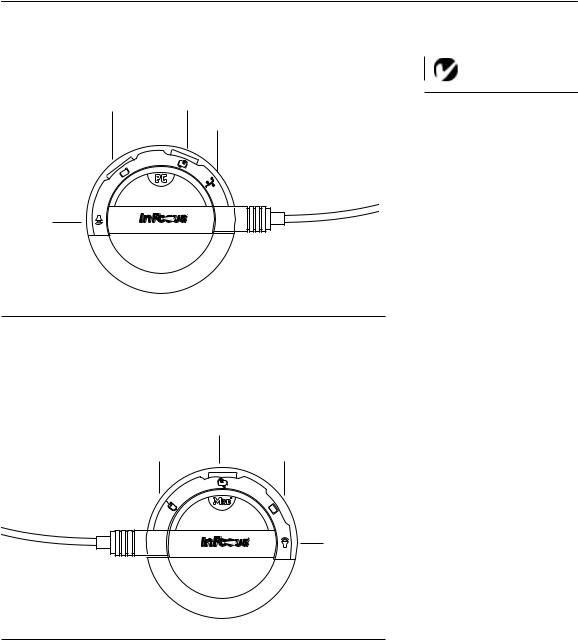
• If you’re connecting an IBM-compatible desktop or laptop computer, turn the selector until the window displays “PC.”
computer |
monitor |
|
NOTE: You must disconnect all |
|
|
|
|
|
|
mouse |
cables before turning the selector |
|
|
|
|
|
|
|
on the CableWizard. |
audio
FIGURE 5
Selecting the IBM-compatible connectors on the CableWizard
•If you’re connecting a Macintosh desktop or an Apple PowerBook computer, turn the selector until the window displays “Mac™.”
monitor
computer
mouse
audio
FIGURE 6
Selecting the Macintosh connectors on the CableWizard
7

S e t t i n g |
u p |
t h e |
P r o j e c t o r |
|
|
|
|
NOTE: Before you continue, make sure the projector and your equipment are turned off. If you’re connecting a computer, make sure the distance between it and the projector is 10 feet or less and you’ve selected the appropriate connectors on the CableWizard.
Preparing to Connect Your Equipment to the Projector
Now you’re ready to connect your equipment. Computers are connected to the Cable Wizard. Video players and other equipment, such as external speakers, are connected directly to the projector.
Steps for connecting the different types of equipment are given on the pages listed below.
Equipment you want to connect |
Page |
|
|
IBM-compatible desktop computer |
page 9 |
IBM-compatible laptop computer |
page 11 |
Macintosh desktop computer |
page 13 |
Apple PowerBook |
page 15 |
Video player |
page 17 |
External speakers or subwoofer |
page 19 |
Microphone |
page 20 |
PS/2-compatible mouse |
page 20 |
Remote control cable |
page 20 |
|
|
8
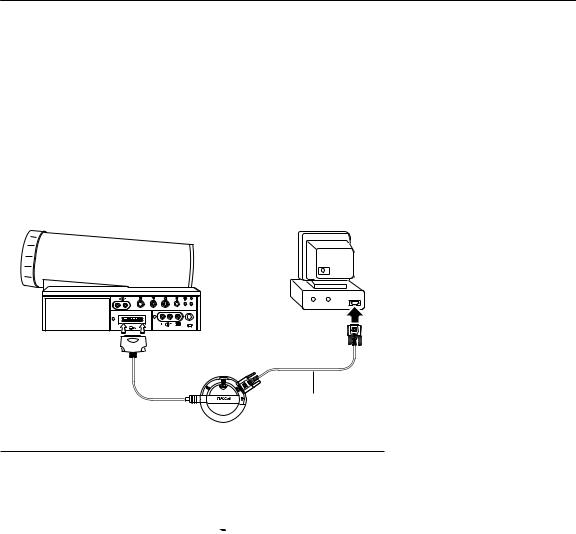
Connecting an IBM-Compatible Desktop Computer
1Locate the cable that connects your monitor to your computer. Unplug it from the computer.
2Plug the  end of the CableWizard computer cable into the monitor connector on your computer.
3Plug the  end of the computer cable into the
  connector on the CableWizard.
computer cable |
FIGURE 7
Connecting the CableWizard computer cable to an IBM-compatible desktop computer
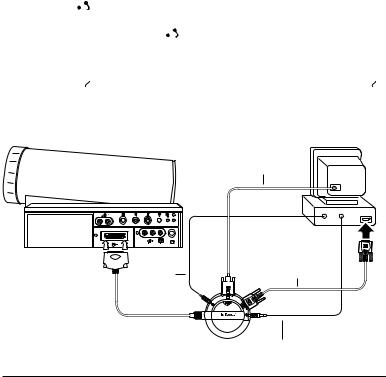
Do you want to display the image on your computer’s monitor as well as on the projection screen?
1Plug your monitor’s cable into the 
 connector on the CableWizard.
Do you want to play your computer’s audio on the projector?
1Unplug the audio cable, if present, from your computer.
2Plug either end of the CableWizard audio cable into the audio connector on your computer.
3Plug the other end of the audio cable into the 
 connector on the CableWizard.
9

S e t t i n g |
u p |
t h e |
P r o j e c t o r |
|
|
|
|
Do you want to control your computer’s mouse from the projector’s remote or keypad?
1Unplug the mouse cable from your computer.
2Plug the  end of the CableWizard mouse cable into the mouse connector on your computer.
3Plug the 
 end of the CableWizard mouse cable into the
 connector on the CableWizard.
monitor cable
mouse cable
computer cable
audio cable
FIGURE 8
Connecting the CableWizard monitor, audio and mouse cables to an IBM-compatible desktop computer
Now you’re ready to power up the projector and your computer. Skip to “Powering up the Projector and Adjusting the Image” on page 21.
10
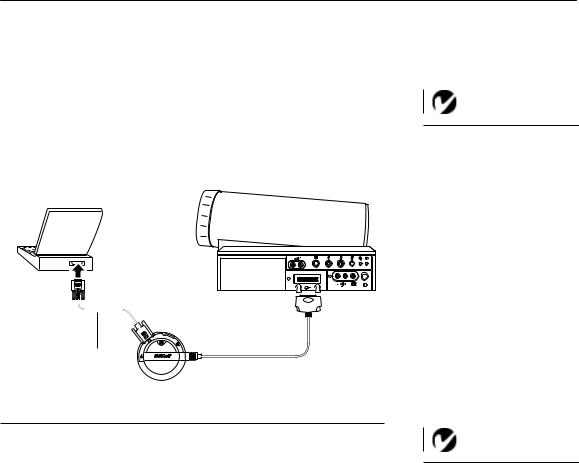
Connecting an IBM-Compatible Laptop Computer
1Plug the  end of the CableWizard computer cable into the video connector on your computer.
2Plug the  end of the CableWizard computer cable into the
 connector on the CableWizard.
computer cable
FIGURE 9
Connecting the CableWizard computer cable to an IBM-compatible laptop computer
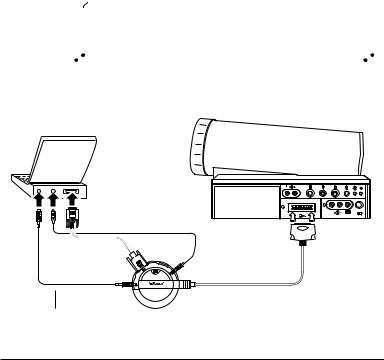
Do you want to play your computer’s audio on the projector?
1Plug either end of the CableWizard audio cable into the audio connector on your computer.
2Plug the other end of the audio cable into the 
 connector on the CableWizard.
NOTE: Many laptop computers do not automatically turn on their external video port when a secondary display device such as a projector is connected. Refer to your computer manual for the command that activates the external video port. Activation commands for some laptop computers are listed in the Appendix of this manual on page 59.
NOTE: If you don’t want audio or mouse control, you can use the CableWizard Lite. CableWizard Lite is ordered separately. See “Accessories” on page 57.
11
S e t t i n g |
u p |
t h e |
P r o j e c t o r |
|
|
|
|
Do you want to control the computer’s mouse from the projector’s remote or keypad?
1Locate the mouse cable and unplug it from your computer.
2Plug the  end of the CableWizard mouse cable into the mouse connector on your computer.
3Plug the  end of the CableWizard mouse cable into the
  connector on the CableWizard.

 mouse cable computer cable
audio cable
FIGURE 10
Connecting the CableWizard audio and mouse cables to an IBM-compatible laptop computer
Now you’re ready to power up the projector and your laptop. Skip to “Powering up the Projector and Adjusting the Image” on page 21.
12
Connecting a Macintosh Desktop Computer
1Locate the cable that connects the monitor to your computer. Unplug it from the computer.
2Plug the  end of the CableWizard computer cable into the monitor connector on your computer.
3Plug the  end ofthe CableWizard computercableinto the
 connector on the CableWizard.
computer cable
FIGURE 11
Connecting the CableWizard computer cable to a Macintosh desktop computer
Do you want to display the image on your computer’s monitor as well as on the projection screen?
1Plug the monitor’s cable into the  connector on the CableWizard.
Do you want to play your computer’s audio on the projector?
1Unplug the audio cable, if present, from your computer.
2Plug either end of the CableWizard audio cable into the audio connector on your Macintosh.
3Plug the other end of the audio cable into the 
 connector on the CableWizard.
13
S e t t i n g |
u p |
t h e |
P r o j e c t o r |
|
|
|
|
Do you want to control the computer’s mouse from the projector’s remote or keypad?
1Unplug the mouse from your Macintosh or locate an unused ADB connector.
2Plug the 
 end of the CableWizard mouse cable into the
mouse connector or the 
 (ADB) connector on your Macintosh.
3Plug the  end of the CableWizard mouse cable into the
  connector on the CableWizard.
monitor cable
mouse |
computer cable |
|
cable |
||
|
audio cable
FIGURE 12
Connecting the CableWizard monitor, audio and mouse cables to a Macintosh desktop computer
Now you’re ready to power up the projector and the Macintosh. Skip to “Powering up the Projector and Adjusting the Image” on page 21.
14
Loading...