


Congelatore
Iinstallazione e uso
Freezer
Installation and use
Congélateur
Installation et emploi
Vriekast
Plaatsing en gebruik
Congelador
Instalación y uso
Congelador
Instalação e uso
Кбфбшэкфзт
ЕгкбфЬуфбуз кбй чсЮуз
Kaappipakastin
Asennus ja Käyttö

I |
Congelatori orizzontali |
1 |
|
Istruzioni per l'installazione e l'uso |
|
GB |
Chest Freezers |
8 |
|
Instructions for installation and use |
|
F |
Congélateurs orizontal |
15 |
|
Instruction pour l'installation et l'emploi |
|
NL |
Horizontale diepvriezers |
22 |
|
Gebruiksaanwijzingen vor de plaatsing en gebruik |
|
E |
Congeladores horizontales |
29 |
|
Instrucciones para la instalación y uso |
|
P |
Congeladores horizontais |
36 |
|
Instruções para a instalação e o uso |
|
GR |
Кбфбшэкфет псйжьнфйпй |
43 |
|
ПдзгЯет гйб фзн егкбфЬуфбуз кбй фз чсЮуз |
|
SF |
Arkkupakastimet |
50 |
|
Koneen asennus ja käyttö |
|
Per garantire l’efficienza e la sicurezza di questo elettrodomestico:
-rivolgetevi esclusivamente a centri di assistenza tecnica autorizzati
-richiedete sempre l’utilizzo di parti di ricambio originali
To maintain the EFFICIENCY and SAFETY of this appliance, we recommend:
-call only the Service Centers authorized by the manufacturer
-always use original Spare Parts
Pour garantir l’efficacité et la sécurité de ce produit:
-adressez-vous exclusivement aux Centres d’assistance technique agréés
-demander toujours l’utilisation de pièces détachées originales
Om de doelmatigheid en veiligheid van dit toestel te garanderen raden wij u aan:
-voor reparaties alleen de Service Centers te bellen die door de fabrikant gemachtigd zijn
-altijd gebruik te maken van originele onderdelen
Para garantizar la eficacia y seguridad de este electrodoméstico:
-Diríjase exclusivamente al Servicio Técnico Oficial del Fabricante.
-Solicite siempre la utilización de recambios originales.
Para garantir a eficiência e a segurança deste electrodoméstico:
-dirija-se exclusivamente a centros de assistência técnica autorizados
-solicite sempre a utilização de peças originais
Гйб фз дйбуцЬлйуз фзт брпфелеумбфйкьфзфбт кбй фзт буцЬле йбт бхфЮт фзт пйкйбкЮт злекфсйкЮт ухукехЮт:
−Нб брехиэнеуфе брпклейуфйкЬ уе еопхуйпдпфзмЭнб кЭнфсб ф ечнйкЮт хрпуфЮсйозт
−Нб жзфЬфе рЬнфб фз чсЮуз бхиенфйкюн бнфбллбкфйкюн
Jotta tämän kodinkoneen toiminta ja turvallinen käyttö olisi jatkuvasti taattu:
-Vikojen sattuessa on käännyttävä yksinomaan tuottajan valtuuttaman huollon puoleen
-Korjauksissa on vaadittava aina tehtaan omien varaosien käyttöä

La sicurezza, una buona abitudine
ATTENZIONE
Leggete attentamente le avvertenze contenute nel presente libretto in quanto forniscono importanti indicazioni riguardanti la sicurezza di installazione, d’uso e di manutenzione.
Questa apparecchiatura è conforme alle seguenti Direttive Comunitarie:
- 73/23/CEE del 19/02/73 (Basse Tensioni) e successive modificazioni;
-89/336/CEE del 03/05/89 (Compatibilità Elettromagnetica) e successive modificazioni.
-In costruttore si riserva il diritto di modificare le caratteristiche dei modelli senza preavviso.
-Alcuni modelli possono non disporre della totalità degli accessori indicati
1.Questo apparecchio non va installato all’aperto, nemmeno se lo spazio è riparato da una tettoia; è molto pericoloso lasciarlo esposto alla pioggia e ai temporali.
2.Deve essere usato soltanto da adulti ed esclusivamente per conservare i cibi, seguendo le istruzioni d’uso scritte in questo manuale.
3.Non toccate né manovrate mai l’apparecchio a piedi nudi o con le mani o piedi bagnati.
4.Sconsigliamo di ricorrere a prolunghe e multiple. Se il congelatore è installato tra i mobili, controllate che il cavo non subisca piegature o compressioni pericolose.
5.Non tirate mai il cavo né il congelatore per staccare la spina dalla presa a muro: è molto pericoloso.
6.Non toccate le parti interne raffreddanti soprattutto con le mani bagnate poiché potreste scottarvi o ferirvi. Né mettere in bocca cubetti di ghiaccio appena estratti dall'apparecchio poiché rischiate di ustionarvi.
7.Prima di procedere a qualsiasi operazione di pulizia staccare l'apparecchio dalla rete di alimentazione (disinserendo la spina o l'interruttore generale dell'appartamento).
8.Prima di farvi ritirare il vecchio congelatore, mettete fuori uso l’eventuale serratura per evitare che i bambini, giocando, possano rimanere chiusi dentro l’apparecchio.
9.In caso di guasto, prima di chiamare il servizio-assistenza, controllate al capitolo “C’è qualche problema?” per verificare se è possibile eliminare l’eventuale inconveniente. Non tentate di riparare il guasto, cercando di accedere alle parti interne.
10.In caso di sostituzione del cavo di alimentazione rivolgersi ai nostri Centri di Aassistenza. In alcuni casi le connessioni sono eseguite con terminali speciali, in altri è richiesto l’uso di un utensile speciale per accedere ai collegamenti.
Installazione
Per garantire un buon funzionamento e un consumo contenuto di elettricità è importante che l’installazione sia eseguita correttamente.
L’aerazione
Il compressore ed il condensatore emettono calore e richiedono perciò una buona aerazione. Sono poco adatti ambienti con una non perfetta ventilazione. L’apparecchio va quindi installato in un ambiente servito da un’apertura (finestra o portafinestra) che assicuri il necessario ricambio dell’aria. E che non sia troppo umido.
Fare attenzione, durante l'installazione, a non coprire od ostruire le griglie che permettono la buona ventilazione del- l'apparecchio.
Per una buona aerazione dell'apparecchio occorre lasciare una distanza di almeno 10 cm tra le fiancate ed eventuali mobili/pareti laterali.
Lontano dal calore
Evitare di posizionare l'apparecchio in un luogo direttamente esposto alla luce solare, accanto alla cucina elettrica o similari.
Collegamento elettrico e messa a terra
Prima di procedere al collegamento elettrico, controllate che il voltaggio indicato sulla targhetta caratteristiche, che si trova nella parte posteriore del congelatore, corrisponda a quella del vostro impianto di casa, e che la presa sia dotata di una regolare messa a terra, come prescrive la legge sulla sicurezza degli impianti 46/90. Se manca la messa a terra, la Casa Costruttrice declina ogni responsabilità. Non usate prese multiple o adattatori.
La potenza è insufficiente?
La presa elettrica deve essere in grado di sopportare il carico massimo di potenza dell’apparecchio, indicata sulla targhetta caratteristiche posta dietro al congelatore.
1 |
I |
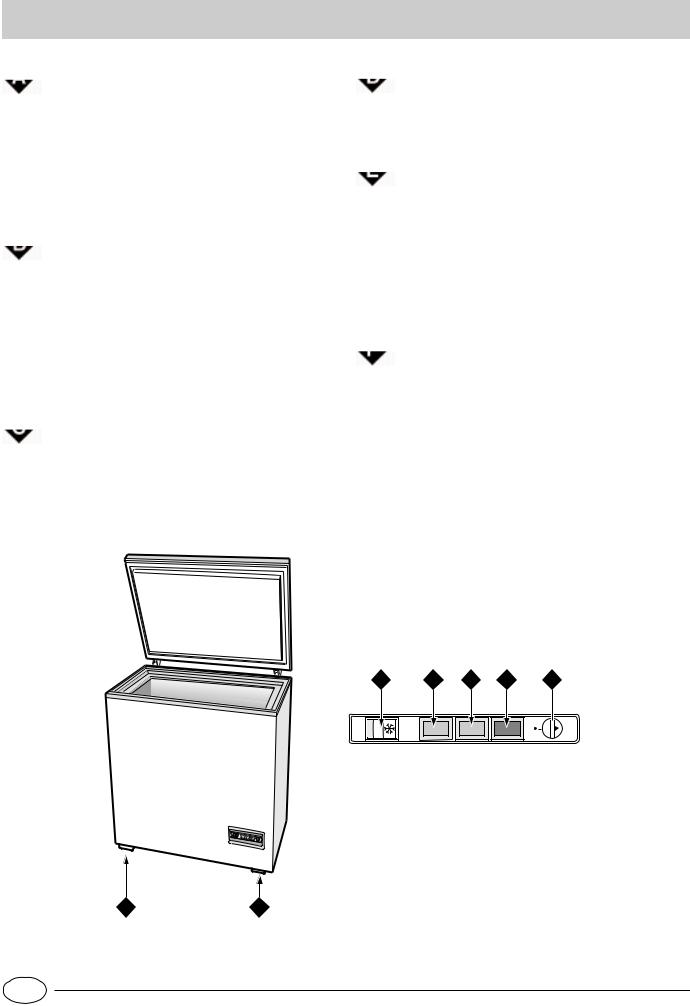
Visto da vicino
 Manopola per la regolazione della temperatura
Questa manopola consente di regolare la temperatura interna del congelatore su diverse posizioni;
-1 Freddo al minimo
-4 Freddo al massimo
Ruotando la manopola dalla posizione 1 alla posizione 4 è possibile ottenere temperature sempre più fredde.
 Spia di allarme
Quando questa spia rossa si accende per un tempo prolungato, significa che il funzionamento del congelatore non è regolare e che la temperatura si sta alzando troppo.
(Chiamare il Centro di Assistenza Tecnica.) Tale spia può accendersi per un breve periodo
quando si apre la porta per un tempo prolungato (in fase di caricamento o prelievo di derrate).
 Spia di collegamento alla rete elettrica
 Spia di congelazione rapida
Questa spia gialla si illumina quando l'interruttore E è in posizione  .
.
 Interruttore di congelamento rapido
Posizionato in  permette il funzionamento continuo del compressore per raggiungere le basse temperature necessarie al congelamento rapido delle derrrate fresche. Lo stesso interruttore posizionato nella posizione iniziale (opposto al
  ) consente al congelatore di funzionare secondo la regolazione del termostato
 Piedini di appoggio
La spia verde si accende e resta accesa durante il regolare funzionamento dell'apparecchio
E D C B A
1 

 2
2
4 

 3
3
1 |
2 |
4 |
3 |
F F
I |
2 |

Come avviare il congelatore
Una volta collegato l'apparecchio alla rete di alimentazione si accendono le lampade verde C e rossa B; portare poi L'in-
terruttore di congelamento rapido E sulla posizione  (lampada gialla "D" accesa).
Quando la lampada rossa B si sarà spenta, posizionare L'interruttore E nella posizione iniziale (lampada gialla "D" spenta). A questo punto il congelatore può essere utilizzato.
ATTENZIONE
Per un funzionamento ottimale ed economico ricordatevi di porre la manopola per la regolazione della temperatura su una posizione media.
Come utilizzarlo al meglio
Per congelare bene
-Un alimento scongelato, anche solo parzialmente, non deve mai essere ricongelato: lo dovete cuocere per consumarlo (entro 24 ore) oppure per ricongelarlo.
-Per la preparazione dei cibi da congelare consultare un manuale specializzato.
-Per ottenere una conservazione e una successiva scongelazione ottimale è consigliabile dividere i cibi in piccole porzioni così si congeleranno rapidamente e in modo omogeneo. Sulle confezioni riportate le indicazioni sul contenuto e sulla data di congelamento.
-Non congelare mai un quantitativo superiore alla capacità massima di congelamento indicata sulla targhetta delle caratteristiche posta dietro al congelatore.
-Portare l'interruttore E nulla posizione  (lampada gialla
D accesa).
- Per effettuare l'operazione di congelamento assicurarsi che la lampada rossa sia spenta dopo di che posizionare l'inter-
ruttore di congelamento rapido "E" nella posizione  (Super). Introdurre, quindi, i cibi da congelare avendo cura che siano posti, il più possibile, a contatto diretto con le pareti laterali della parte più profondaa della cella e che non siano messi a contatto con quelli già congelati. Non bisogna infatti dimenticare che la buona conservazione degli alimenti congelati dipende dalla velocità di congelazione. Per questo motivo consigliamo di portare l'interruttore nella posizione di
  24 ore prima dell'introduzione dei cibi da congelare.
-Durante la congelazione evitate di aprire la porta del congelatore.
-L’introduzione di notevoli quantitativi di cibi da congelare può riscaldare momentaneamente la temperatura all’interno del congelatore (accensione della lampada rossa). Tale situazione, essendo transitoria, non pregiudica la buona conservazione degli alimenti già stivati.
-Dopo 24 ore, terminato il congelamento, riportare l'interruttore di congelamento E nella posizione iniziale (lampada gialla spenta).
Attenzione: .questa operazione non va dimenticata se si vogliono evitare inutili sprechi di energia.
-Non aprite la porta del congelatore in caso di mancanza di corrente o di un guasto, ritarderete così l’aumento della temperatura al suo interno. In questo modo i surgelati e i conge-
lati si conserveranno senza alterazioni per circa 20 ore.
- Non mettete nel congelatore bottiglie piene: potrebbero rompersi poiché, gelandosi, tutti i liquidi aumentano di volume.
Conservazione
Per ottenere una buona conservazione di alimenti surgelati o di cibi congelati non posizionare mai l’indice della manopola del termostato al di sotto di 1, qualunque sia la temperatura ambiente. Per temperature ambiente fino a 25°-27°C l’indice della manopola va posizionato tra 1 e 2 mentre per temperature ambiente fino a 32°C tra 2 e 3.
Osservare sempre scrupolosamente le istruzioni riportate sulle confezioni dei cibi surgelati e in assenza di esse non conservare per più di 3 mesi dalla data di acquisto.
All’acquisto di prodotti surgelati occorre sincerarsi che gli stessi siano conservati a temperatura adeguata e che l’involucro sia intatto. Per mantenere inalterata la qualità del cibo surgelato è opportuno trasportarlo in appositi contenitori e riporlo al più presto all’interno dell’apparecchio.
Qualora una confezione presentasse tracce di umidità e anormali rigonfiamenti è probabile che sia stata precedentemente conservata a temperatura inadeguata e che il contenuto si sia nel frattempo deteriorato.
3 |
I |

Guida all'utilizzo del congelatore
Carni e pesci
Tipo |
Confezionamento |
Frollatura |
Conservazione |
Scongelamento |
|
|
|
(giorni) |
(mesi) |
|
|
|
|
|
|
|
|
Arrosto e bollito di |
Avvolto in foglio di alluminio |
2 / 3 |
9 / 10 |
Non necessario |
|
manzo |
|||||
|
|
|
|
||
|
|
|
|
|
|
Agnello |
Avvolto in foglio di alluminio |
1 / 2 |
6 |
Non necessario |
|
|
|
|
|
|
|
Arrosto di maiale |
Avvolto in foglio di alluminio |
1 |
6 |
Non necessario |
|
|
|
|
|
|
|
Arrosto e bollito di |
Avvolto in foglio di alluminio |
1 |
8 |
Non necessario |
|
vitello |
|||||
|
|
|
|
||
|
|
|
|
|
|
Bistecche e braciole di |
Ogni fetta avvolta in politene e quindi in |
|
6 |
Non necessario |
|
maiale |
foglio di alluminio in numero di 4-5 |
|
|||
|
|
|
|||
|
|
|
|
|
|
Fettine e cotolette di |
Ogni fetta avvolta in politene e quindi in |
|
6 |
Non necessario |
|
agnello o manzo |
foglio di alluminio in numero di 4-5 |
|
|||
|
|
|
|||
|
|
|
|
|
|
Cartne macinata |
In contenitori di alluminio ricoperti con |
Freschissima |
2 |
Lentamente in frigorifero |
|
politene |
|||||
|
|
|
|
||
|
|
|
|
|
|
Cuore e fagato |
In sacchetti di politene |
|
3 |
Non necessario |
|
|
|
|
|
|
|
Salsicce |
In fogli di politene o alluminio |
|
2 |
A seconda dell'uso |
|
|
|
|
|
|
|
Polli e tacchini |
Avvolti in fogli di alluminio |
1 / 3 |
9 |
Lentamente in frigorifero |
|
|
|
|
|
|
|
Anatre e oche |
In fogli di alluminio |
1 / 4 |
6 |
Lentamente in frigorifero |
|
|
|
|
|
|
|
Anatre selvatiche, |
In fogli di alluminio |
1 / 3 |
9 |
Lentamente in frigorifero |
|
fagiani e pernici |
|||||
|
|
|
|
||
|
|
|
|
|
|
Conigli e lepri |
In fogli di alluminio |
3 / 4 |
6 |
Lentamente in frigorifero |
|
|
|
|
|
|
|
Cervo e capriolo |
In fogli di alluminio o politene |
5 / 6 |
9 |
Lentamente in frigorifero |
|
|
|
|
|
|
|
Pesci grossi |
In fogli di alluminio o politene |
|
4 / 6 |
Lentamente in frigorifero |
|
|
|
|
|
|
|
Pesci piccoli |
In buste di politene |
|
2 / 3 |
Non necessario |
|
|
|
|
|
|
|
Crostacei |
In buste di politene |
|
3 / 6 |
Non necessario |
|
|
|
|
|
|
|
Molluschi |
In contenitori di alluminio o plastica |
|
3 |
Lentamente in frigorifero |
|
ricoperti con acqua e sale |
|
||||
|
|
|
|
||
|
|
|
|
|
|
Pesci cotti |
In fogli di alluminio o politene |
|
12 |
In acqua calda |
|
|
|
|
|
|
|
Pesci fritti |
In sacchetti di politene |
|
4 / 6 |
Direttamente in padella |
|
|
|
|
|
|
I |
4 |

Frutta e verdura
Tipo |
Preparazione |
Scottatura |
Confezionamento |
Conservazione |
Scongelamento |
|
|
|
(min) |
|
(mesi) |
|
|
|
|
|
|
|
|
|
Mele e pere |
Sbucciare e tagliare a |
2' |
In contenitori ricoperti di |
12 |
Lentamente in frigorifero |
|
pezzetti |
sciroppo |
|||||
|
|
|
|
|||
|
|
|
|
|
|
|
Albicocche, pesche, |
Snocciolare e pelare |
1' / 2' |
In contenitori ricoperti di |
12 |
Lentamente in frigorifero |
|
ciliege e prugne |
|
|
sciroppo |
|
|
|
|
|
|
|
|
|
|
Fragole, more e |
Pulire, lavare e lasciare |
|
In contenitori ricoperti di |
10 / 12 |
Lentamente in frigorifero |
|
mirtilli |
asciugare |
|
zucchero |
|||
|
|
|
||||
|
|
|
|
|
|
|
|
Tagliare, cuocere e |
|
In contenitori, |
|
|
|
Frutta cotta |
|
aggiungere 10% di |
12 |
Lentamente in frigorifero |
||
passare |
|
|||||
|
|
zucchero |
|
|
||
|
|
|
|
|
||
|
|
|
|
|
|
|
Succhi di frutta |
Lavare, tagliare e |
|
In contenitori, zucchero |
10 / 12 |
Lentamente in frigorifero |
|
schiacciare |
|
a piacere |
||||
|
|
|
|
|||
|
|
|
|
|
|
|
|
Spezzettare e scottare |
|
|
|
|
|
Cavolfiori |
in acqua e succo di |
2' |
In sacchetti di politene |
12 |
Non necessario |
|
|
limone |
|
|
|
|
|
|
|
|
|
|
|
|
Cavolo e cavolini |
Pulire e lavare |
1' / 2' |
In sacchetti di politene |
10 / 12 |
A temperatura ambiente |
|
(spezzettare) |
||||||
|
|
|
|
|
||
|
|
|
|
|
|
|
Piselli |
Sbucciare e lavare |
2' |
In sacchetti di politene |
12 |
Non necessario |
|
|
|
|
|
|
|
|
Fagiolini |
Lavare e tagliare a |
2 |
In sacchetti di politene |
10 / 12 |
Non necessario |
|
pezzetti |
||||||
|
|
|
|
|
||
|
|
|
|
|
|
|
Carote, peperoni e |
Tagliare a fette, |
3' / 4' |
In sacchetti di politene |
12 |
Non necessario |
|
rape |
pelare, lavare |
|||||
|
|
|
|
|||
|
|
|
|
|
|
|
Funghi e asparagi |
Lavare e tagliare |
3' / 4' |
In sacchetti o contenitori |
6 |
A temperatura ambiente |
|
|
|
|
|
|
|
|
Spinaci |
Lavare e tagliuzzare |
2' |
In sacchetti di politene |
12 |
A temperatura ambiente |
|
|
|
|
|
|
|
|
Verdure varie per |
Lavare e tagliare a |
3' |
In sacchetti in piccole |
6 / 7 |
A temperatura ambiente |
|
minestra |
pezzetti |
porzioni |
||||
|
|
|
||||
|
|
|
|
|
|
|
Cibi vari |
Preparazione |
Scottatura |
Confezionamento |
Conservazione |
Scongelamento |
|
|
|
|
|
(mesi) |
|
|
|
|
|
|
|
|
|
Pane |
|
|
In sacchetti di politene |
4 |
A temperatura ambiente o |
|
|
|
nel frigorifero |
||||
|
|
|
|
|
||
|
|
|
|
|
|
|
Torte |
|
|
In fogli di politene |
6 |
A temperatura ambiente e |
|
|
|
cuocere a 100/200°C |
||||
|
|
|
|
|
||
|
|
|
|
|
|
|
Panna |
|
|
In contenitori di plastica |
6 |
A temperatura ambiente o |
|
|
|
nel frigorifero |
||||
|
|
|
|
|
||
|
|
|
|
|
|
|
Burro |
|
|
Nel suo incarto originale |
6 |
In frigorifero |
|
|
|
avvolto in alluminio |
||||
|
|
|
|
|
||
|
|
|
|
|
|
|
Cibi cotti, |
|
|
Suddiviso in contenitori |
3 / 6 |
A temperatura ambiente e |
|
minestrone |
|
|
di plastica o vetro |
in acqua calda |
||
|
|
|
||||
|
|
|
|
|
|
|
Uova |
|
|
Congelare senza guscio |
10 |
A temperatura ambiente o |
|
|
|
in piccoli contenitori |
nel frigorifero |
|||
|
|
|
|
|||
|
|
|
|
|
|
5 |
I |

Consigli per risparmiare
- Installatelo bene
E cioè lontano da fonti di calore, dalla luce diretta del sole e in locale ben aerato.
- Il freddo giusto
Regolate la manopola per la regolazione della temperatura del congelatore su una posizione media. Il troppo freddo, oltre a consumare molto, non migliora né allunga la conservazione degli alimenti.
- A porta chiusa
Aprite il vostro congelatore il meno possibile perché ogni volta che lo fate va via gran parte dell’aria fredda. Per ristabilire la temperatura il motore deve lavorare a lungo consumando molta energia.
- Occhio alla guarnizione
Mantenetela elastica e pulita in modo che aderisca bene alle porte; solo così non lascerà uscire nemmeno un po’ di freddo.
- Niente brina
Controllate lo spessore della brina ed effettuate subito lo sbrinamento se lo strato è diventato troppo spesso (Vedi più avanti “Come tenerlo in forma”).
Come tenerlo in forma
Prima di procedere a qualsiasi operazione di pulizia staccare l'apparecchio dalla rete di alimentazione (disinserendo la spina o l'interruttore generale dell'appartamento).
Sbrinamento
E’ opportuno, di tanto in tanto, togliere la brina che ricopre le pareti interne dell’apparecchio.
Attenzione a non usare, per tale operazione, oggetti metallici appuntiti .che possono provocare forature al circuito refrigerante con conseguente irreparabile danneggiamento dell’apparecchio, ma servirsi del raschietto in plastica fornito in dotazione.
Per ottenere il completo sbrinamento dell’apparecchio (da effettuare una o due volte l’anno) scollegare l'apparecchio dalla rete di alimentazione e lasciare aperta la porta fino al completo scioglimento della brina.
Per accelerare le operazioni di sbrinamento si può introdurre all’interno dell’apparecchio una o più bacinelle di acqua tiepida.
Durante l’operazione di sbrinamento è opportuno avvolgere i cibi messi in conservazione con più fogli di carta e sistemarli in luoghi freschi. Poiché l’inevitabile aumento di temperatura ne abbrevia la durata è consigliabile consumarli a breve scadenza.
Pulizia e manutenzioni particolari
La pulizia interna dell’apparecchio va effettuata periodicamente, dopo aver sbrinato l'apparecchio, impiegando bicarbonato di sodio sciolto in acqua tiepida. Evitare in ogni caso l’uso di prodotti abrasivi, detergenti o saponi; dopo il lavaggio risciacquare con acqua pulita ed asciugare con cura.
Effettuate tali operazioni, rimettere in funzione l'apparecchio come descritto nel paragrafo "Come avviare il congelatore".
Inattività dell'apparecchio
Nel caso in cui l'apparecchio non venga utilizzato per lunghi periodi (ad esempio durante le vacanze estive) staccare la spina dalla presa di corrente e lasciare aperta la porta per evitare la formazione di muffe e cattivi odori, dopo aver provveduto a sbrinarlo e a pulirlo.
I |
6 |

C'è qualche problema?
Lampada spia verde spenta
Avete controllato se:
∙non manchi la corrente;
∙l'interruttore generale dell'appartamento non è disinserito;
Lampada allarme rossa sempre accesa
Avete controllato se:
∙la porta non chiude bene o la guarnizione è rovinata;
∙la porta viene aperta molto spesso;
∙la manopola di regolazione della temperatura non è in posizione corretta;
∙sulle pareti interne la brina non è eccessiva
Il motore funziona di continuo.
Avete controllato se:
∙la lampada gialla non sia accesa (condizione di funzionamento continuo);
∙il termostato è nella posizione corretta.
L’apparecchio emette troppo rumore.
Avete controllato se:
∙Il congelatore è posto ben in piano:
∙è stato installato tra mobili o oggetti che vibrano ed emettono rumori;
∙il gas refrigerante interno produce un leggero rumore anche quando il compressore è fermo (non è un difetto).
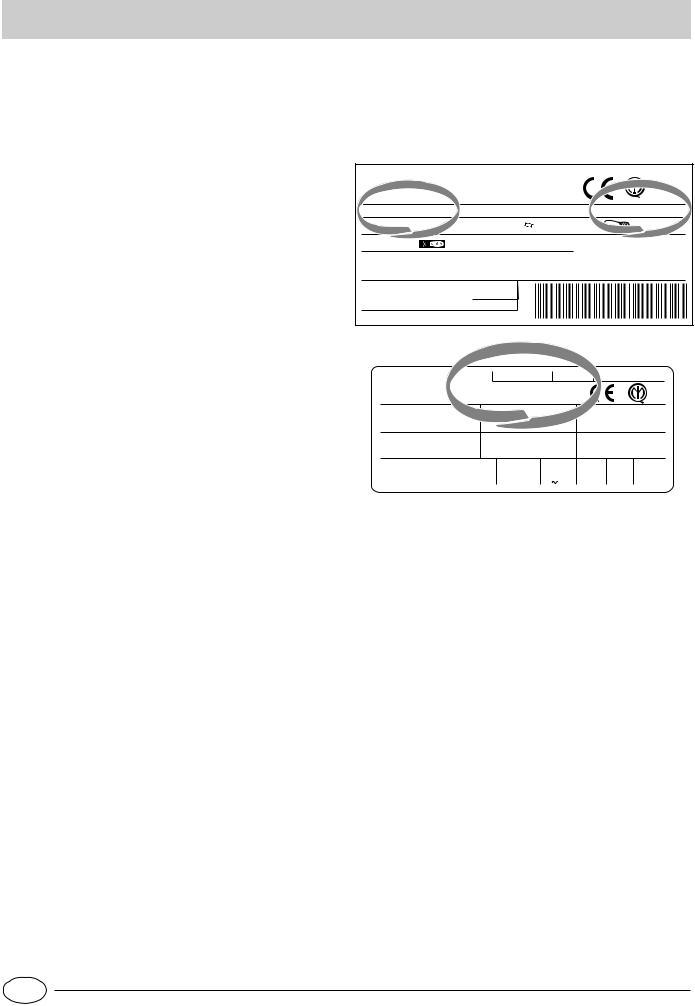
Se, nonostante tutti i controlli, l’apparecchio non funziona e l’inconveniente da voi rilevato continua ad esserci, chiamate il Centro di Assistenza più vicino, comunicando queste informazioni: il tipo di guasto, la sigla del modello (Mod.) e i relativi numeri (S/N) scritti sulla targhetta delle caratteristiche che si trova dietro l'apparecchio (vedi esempi nelle figure seguenti).
Mod. RG 2330 |
|
|
|
|
|
TI |
|
Cod. 93139180000 |
S/N 704211801 |
|||||||||||||||
|
|
|
|
|
|
|
|
|
|
|
|
|
|
|
|
|
|
|
|
|
|
|
|
|
220 - 240 V- |
|
50 Hz |
|
150 W |
|
|
|
|
|
W |
Fuse |
A |
|
|
Max 15 w |
|||||||||
|
|
|
|
|
|
|
|
|||||||||||||||||
|
|
|
|
|
|
|
|
|
||||||||||||||||
|
|
|
|
|
|
|
|
|
|
|
|
|
|
|
|
|
|
|
|
|
|
|
|
Class |
Total |
340 |
|
|
|
|
75 |
|
|
|
|
|
|
|
|
|
|
|
Freez. |
Capac |
|||||
|
|
|
|
|
|
|
|
|
|
|
|
|
|
|
||||||||||
Gross |
|
|
|
Gross |
|
|
Net |
|
|
|
Gross |
|
Poder de Cong |
Clase N |
||||||||||
Bruto |
|
|
|
Bruto |
|
Util |
|
|
|
Bruto |
|
kg/24 h 4,0 |
Classe |
|||||||||||
Brut |
|
|
|
Brut |
|
|
|
|
Utile |
|
|
|
Brut |
|
||||||||||
|
|
|
|
|
|
|
|
|
|
|||||||||||||||
Compr. |
|
R 134 a |
|
|
Test |
Pressure |
|
|
|
|
|
|
|
|
|
|
||||||||
Syst. |
|
|
|
|
|
|
|
|
|
HIGH-235 |
|
|
|
|
|
|
|
|
|
|
||||
Kompr. |
|
kg 0,090 |
|
|
P.S-I. LOW 140 |
|
|
|
|
|
|
|
|
|
|
|||||||||
Made in Italy 13918
|
|
|
|
RG 1145 |
WEU 47133980001 |
|||
MADE IN ITALY |
S/N |
704045585 |
|
|
|
|||
VOL. BRUT |
l. |
|
REFRIGERATEUR l. |
CONGELATEUR |
l. |
|||
GROSS VOL. |
135 |
|
REFRIGERATOR |
225 |
FREEZER |
|
||
VOL. BRUTO |
cu. fl. |
|
FRIGORIFICO |
cu. fl. |
CONGELADOR |
cu. fl. |
||
SYSTEME A COMPRESSION |
REFRIGERATEUR R134 A |
CONGELATEUR R134 A |
||||||
SYSTEM |
K |
|
REFRIGERATOR |
0,080 |
FREEZER |
kg |
||
SISTEMA |
|
FRIGORIFICO |
kg. |
CONGELADOR |
||||
POUVOIR DE CONGEL. kg/24h |
FUSE LINK |
220-240 |
HZ |
W |
CLASSE |
|||
FREEZING CAPACITY |
|
|
A |
V |
50 |
110 |
CLASS |
|
PODER DE CONGELACION |
|
CLASEN |
||||||
Non ricorrete mai a tecnici non autorizzati e rifiutate sempre l’installazione di pezzi di ricambio non originali.
7 |
I |

Safety - a good habit to get into.
ATTENTION
Read your manual carefully since it contains instructions which will ensure safe installation, use and maintenance of your appliance.
Your Refrigerator is built to International safety standards (EN60) ans has been awarded the European approval mark (IMQ) for compliance with UK electrical safety requirements. It also meets the EC standards on the prevention and elimination of readio interference (EC directive 87/308 - 02.06.89).
-The manufacturer reserves himself the right to modify the characteristics of the models without prior notice.
-Some models may not have all the accessoires indicated.
1.This appliance is designed to be used indoors and under no circumstances should it be installed outside even if protected by a roof. Leaving the appliance exposed to the rain and whether is exceedingly dangerous.
2.The appliance should be used only by adults and exclusively for storing foodstuffs in compliance with the instructions provided in this manual. Under no circumstances should children be allowed to operate, or tamper with, this product.
3.Do not attempt to operate or handle this appliance when barefoot, or with wet hands or feet.
4.It is highly recommended that you do not operate this appliance by connecting it to the power supply with extensions or multiple socket plugs. If the refrigerator has been
installed between two cabinets, make sure that the supply chord is not dangerously crimped or trapped beneath a heavy object.
5.Never pull the cable or the appliance to remove the plug from the socket; this is exceedingly dangerous.
6.Do not touch the internal cooling elements, especially if your hands are wet, since you could burn or hurt yourself. Do not place ice cubes straight from the freezer into your mouth as this may result in burns.
7.Before doing any cleaning, disconnect the appliance from the electricity (by pulling out the plug or turning off the general switch in your home).
8.Before disposing of your old appliance, remember to break or remove the lock as a safety measure to protect children who might lock themselves inside the appliance when playing. In addition, if the appliance is a new one with a lock, keeo the key out of the reach of small children.
9.If your appliance is not operating properly, read the chapter entitled, “Trouble Shooting”, which might help you resolve the problem, before calling an after-sales service centre. Do not attempt to repair the appliance by tampering with the internal components.
10.If the power supply cord must be replaced, please contact one of our Customer Service Centers. In some cases, the connections are made using special terminals and in others a special tool must be used to access the connections.
Installation
To ensure that the appliance operates properly and to reduce energy consumption, it is important that the appliance is installed correctly.
Ventilation
The compressor and condenser generate heat and, therefore, need to be ventilated properly. Rooms with less than perfect ventilation are not very suited for installation of the appliance. Therefore, it should be installed in a room with an opening (window or French window) that provide the appropriate amount of air re-circulation. It is also important that the room not be too humid.
During installation, make sure not to cover or obstruct the grates that allow for proper ventilation of the appliance. For proper ventilation of the appliance, you must leave a space of at least 10 cm between the sides of the appliance and any adjacent cabinets/walls.
Away from Heat
Avoid positioning the appliance in a place where it is directly exposed to sunlight or near an oven, cook top or the like.
Electrical Connection and Earthing
Before proceeding with the electrical connection, make sure that the voltage indicated on the rating plate, located on the back part of the freezer, corresponds to the mains voltage in your home and that the socket is fitted with a standard earthing wire in accordance with safety standards for 46/90 systems. If the socket is not fitted with an earthing wire, the manufacturer will not be held liability for any damages and or injuries arising out of the use of the appliance. Do not use multiple sockets or adapters.
Insufficient power?
The electrical socket must be able to handle the maximum power load of the appliance, which is indicated on the rating plate located on the back part of the freezer.
GB |
8 |
|
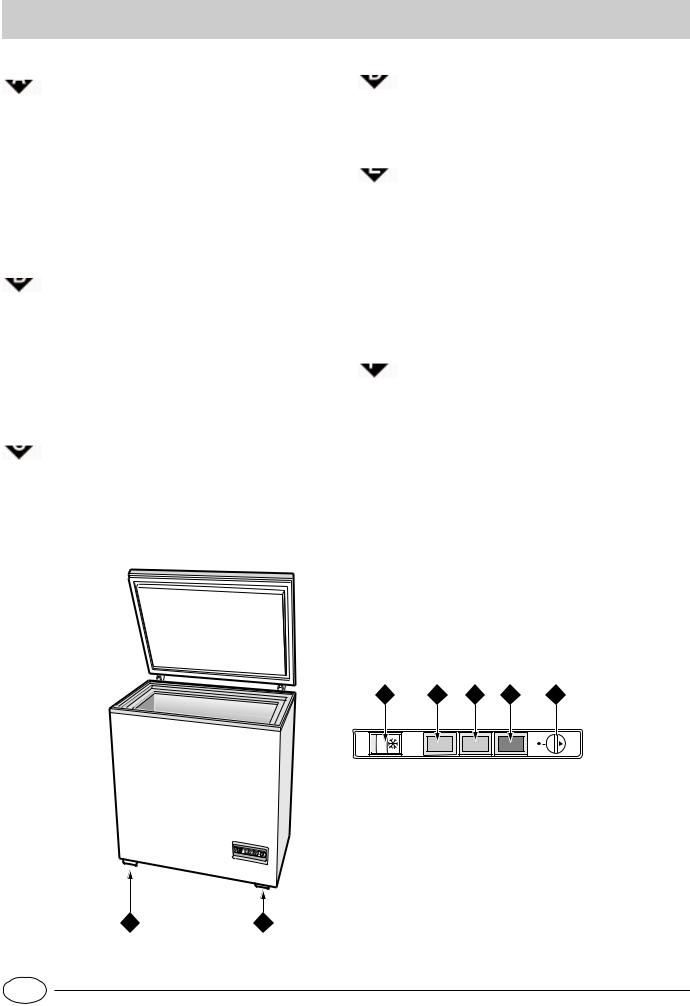
A Closer Look
 Temperature Adjustment Knob
This knob makes it possible to adjust the internal temperature of the freezer with the following settings:
-Stop: the freezer is off;
-1: Freezer is on low;
-4: Freezer is on high;
By turning the knob from setting "1" to setting "4" allows you to lower the temperature.
 Warning Light
When this red warning light comes on for a prolonged period of time, it means that the freezer is not functioning properly and the temperature is rising too much. (Call your Service Centre)
This warning light might come on for a brief period when the door is left open for an extended period of time (when the freezer is being loaded or unloaded).
 Power Supply Indicator Light
The green light will come on and stay on while the appliance is connected to the mains and is operating normally.
1 |
2 |
4 |
3 |
F F
 Fast Freeze Indicator Light
This yellow indicator light will come on when the freezing switch E is on the  setting.
 The freezing switch
When in position  (yellow light "D" lit), allows the compressor to function continuously in order to reach the low temperatures necessary for the rapid freezing of fresh food. When the appliance is running normally, this switch should be the first setting (opposite “
 ”)
”)
 Wheels
E D C B A
1 

 2
2
4 

 3
3
9 |
GB |
|

Setting Up Your Appliance
Once the appliance has been connected to the power source, the green C and red B lights will turn on. Turn the fast freeze
switch (E) to the Super  setting (the yellow D light will turn on).
When the red LED B turns off, set the freezer switch E to the first setting (yellow LED OFF): you may now use your appliance.
NOTICE
Use average temperature settings to ensure optimum performance and to save energy.
Getting the Most Out of Your Appliance
Tips on Freezing
-Remember that you should never refreeze products you have allowed to thaw, even if only partially. Once thawed, cook the food, then either eat (within 24 hours) or refreeze it
-Consult a specialized manual when packaging foods for freezing.
-For the best storage and thawing, remember to freeze small portions. This will ensure rapid and uniform freezing. Mark package with a description of the contents and the date it was frozen.
-Never freeze more food than that allowed by the maximum freezing capacity indicated on the data plate which is located on the back of the freezer.
-Turn the E switch to the  setting (the yellow D light will
come on).
- To freeze food, make sure that the red light is off. Then turn the fast freeze switch (E) to the  setting (Super). Then place the food to be frozen into the freezer, making sure that it is placed, to the furthest extent possible, in direct contact with the side walls of the deepest part of the freezer and not in contact with food that has already been frozen. It should be kept in mind, in fact, that proper storage depends on the speed at which the food is frozen. For this reason, we recommend that the switch be turned to the
  setting 24 hours before the food to be frozen is placed inside the freezer.
-Avoid opening the freezer door during the freezing process.
-Placing substantial amounts of fresh food in the appliance may temporarily raise the temperature within the freezer (the red light will turn on). Since this is a temporary situation, it will not compromise the storage of the food that has already been frozen.
-When foods are frozen, normally after about 24 hours, always remember to return the fast freezing switch “E” to its original position (yellow light “C” OFF) since this will save energy.
Attention: Do not forget to change the temperature setting if you want to avoid useless wastes of energy.
-In the case of power failure or breakdown, do not open the freezer door. This will help maintain the temperature
inside the freezer, ensuring that foods are conserved for at least 20 hours.
- Do not place full bottles in the freezer because liquids increase in volume when they freeze and this could cause the bottles to burst.
Storage
For best storage of fresh-frozen and frozen foods, do not set the thermostat knob below 1, regardless of the ambient temperature of the room where the freezer is installed. For ambient temperatures of up to 25°-27°C, the thermostat knob should be set between 1 and 2, while for temperatures up to 32°C the setting should be between 2 and 3.
Follow the instructions on the packages of frozen foods scrupulously. If none are provided, do not store the food for more than 3 months from the date of purchase.
When purchasing frozen foods, make sure that they have been stored at the proper temperature and that the package is properly sealed. When purchasing frozen foods, it is best to transport them in appropriate containers to keep them cold and then place them in the freezer immediately.
If the package is damp on the outside or is abnormally swollen, it is likely that the package was stored at an inadequate temperature and the food has deteriorated.
GB |
10 |
|

Guide to Using the Freezer
Meat and Fish
Food |
Wrapping |
Tenderising |
Storage |
Thawing Time |
|
(days) |
(months) |
||||
|
|
|
|||
|
|
|
|
|
|
Beef Roast |
Tinfoil |
2 / 3 |
9 / 10 |
Not required. |
|
|
|
|
|
|
|
Lamb |
Tinfoil |
1 / 2 |
6 |
Not required. |
|
|
|
|
|
|
|
Pork Roast |
Tinfoil |
1 |
6 |
Not required. |
|
|
|
|
|
|
|
Veal Roast |
Tinfoil |
1 |
8 |
Not required. |
|
|
|
|
|
|
|
Veal/Pork Chops |
Each piece wrapped in cling wrap and then |
|
6 |
Not required. |
|
in tinfoil (4 to 6 slices) |
|
||||
|
|
|
|
||
|
|
|
|
|
|
Veal/Lamb Cutlets |
Each piece wrapped in cling wrap and then |
|
6 |
Not required. |
|
in tinfoil (4 to 6 slices) |
|
||||
|
|
|
|
||
|
|
|
|
|
|
Minced Meat |
In aluminium containers covered with cling |
Freshly |
2 |
Slowly in refrigerator. |
|
wrap. |
minced |
||||
|
|
|
|||
|
|
|
|
|
|
Heart and Liver |
Plastic Baggies |
|
3 |
Not required. |
|
|
|
|
|
|
|
Sausages |
Cling Wrap or Tinfoil |
|
2 |
As necessary. |
|
|
|
|
|
|
|
Chicken and Turkey |
Tinfoil |
1 / 3 |
9 |
Very slowly in refrigerator. |
|
|
|
|
|
|
|
Duck and Goose |
Tinfoil |
1 / 4 |
6 |
Very slowly in refrigerator. |
|
|
|
|
|
|
|
Pheasant, Partrige and |
Tinfoil |
1 / 3 |
9 |
Very slowly in refrigerator. |
|
Wild Duck |
|||||
|
|
|
|
||
|
|
|
|
|
|
Hare and Rabbit |
Tinfoil |
3 / 4 |
6 |
Very slowly in refrigerator. |
|
|
|
|
|
|
|
Venison |
Tinfoil or Cling Wrap |
5 / 6 |
9 |
Very slowly in refrigerator. |
|
|
|
|
|
|
|
Large Fish |
Tinfoil or Cling Wrap |
|
4 / 6 |
Very slowly in refrigerator. |
|
|
|
|
|
|
|
Small Fish |
Plastic Baggies |
|
2 / 3 |
Not required. |
|
|
|
|
|
|
|
Crustaceans |
Plastic Baggies |
|
3 / 6 |
Not required. |
|
|
|
|
|
|
|
Shellfish |
Store in salted water in aluminium |
|
3 |
Very slowly in refrigerator. |
|
containers or plastic containers. |
|
||||
|
|
|
|
||
|
|
|
|
|
|
Boiled Fish |
Tinfoil or Cling Wrap |
|
12 |
In hot water. |
|
|
|
|
|
|
|
Fried Fish |
Plastic Baggies |
|
4 / 6 |
Directly in pan. |
|
|
|
|
|
|
11 |
GB |
|

Fruits and Vegetables
Food |
Preparation |
Blanching |
Wrapping |
Storage |
Thawing Time |
|
|
|
Time |
|
(months) |
|
|
Apples and Pears |
Peel and cut into slices. |
2' |
In Containers (cover |
12 |
In refrigerator very |
|
with syrup) |
slowly. |
|||||
|
|
|
|
|||
|
|
|
|
|
|
|
Apricots, Peaches, |
Peel and pit. |
1' / 2' |
In Containers (cover |
12 |
In refrigerator very |
|
Cherries and Plums |
with syrup) |
slowly. |
||||
|
|
|
||||
|
|
|
|
|
|
|
Strawberries |
|
|
In Containers (cover |
|
In refrigerator very |
|
Blackberries and |
Rinse and fry. |
|
10 / 12 |
|||
|
with sugar) |
slowly. |
||||
Raspberries |
|
|
|
|||
|
|
|
|
|
||
|
|
|
|
|
|
|
Cooked Fruit |
Cut, cook and strain. |
|
In Containers (add |
12 |
In refrigerator very |
|
|
10% sugar) |
slowly. |
||||
|
|
|
|
|||
|
|
|
|
|
|
|
Fruit Juice |
Wash, cut and crush. |
|
In Containers (sugar |
10 / 12 |
In refrigerator very |
|
|
to taste) |
slowly. |
||||
|
|
|
|
|||
|
|
|
|
|
|
|
|
Remove leaves, cut head into |
|
|
|
|
|
Cauliflower |
small pieces and blanch in |
2' |
Plastic Baggies |
12 |
Not required. |
|
water and a little lemon |
||||||
|
|
|
|
|
||
|
juice. |
|
|
|
|
|
|
|
|
|
|
|
|
Cabbage and Brussel |
Wash and cut into small |
1' / 2' |
Plastic Baggies |
10 / 12 |
At room temperature. |
|
Sprouts |
pieces. |
|||||
|
|
|
|
|||
|
|
|
|
|
|
|
Peas |
Shell and wash. |
2' |
Plastic Baggies |
12 |
Not required. |
|
|
|
|
|
|
|
|
French Beans |
Wash and slice if required. |
2 |
Plastic Baggies |
10 / 12 |
Not required. |
|
|
|
|
|
|
|
|
Carrots, Peppers and |
Peel, wash and slice if |
3' / 4' |
Plastic Baggies |
12 |
Not required. |
|
Turnips |
necessary. |
|||||
|
|
|
|
|||
|
|
|
|
|
|
|
Mushrooms and |
Wash, peel and cut up. |
3' / 4' |
Plastic Baggies or |
6 |
At room temperature. |
|
Asparagus |
Containers |
|||||
|
|
|
|
|||
|
|
|
|
|
|
|
Spinach |
Wash and mince. |
2' |
Plastic Baggies |
12 |
At room temperature. |
|
|
|
|
|
|
|
|
Vegetable for Soups |
Wash and cut up in small |
3' |
Plastic Baggies or |
6 / 7 |
Not required. |
|
pieces. |
Containers |
|||||
|
|
|
|
|||
|
|
|
|
|
|
|
Various Foods |
Preparation |
Blanching |
Wrapping |
Storage |
Thawing time |
|
|
|
Time |
|
(months) |
|
|
Bread |
|
|
Plastic Baggies |
4 |
At room temperature |
|
|
|
and in the oven. |
||||
|
|
|
|
|
||
|
|
|
|
|
|
|
|
|
|
|
|
About 10 minutes at |
|
Cakes |
|
|
Plastic Baggies |
6 |
room temperature, cook |
|
|
|
|
|
|
at 100/200°C. |
|
|
|
|
|
|
|
|
Cream |
|
|
Plastic Containers |
6 |
At room temperature or |
|
|
|
in refrigerator. |
||||
|
|
|
|
|
||
|
|
|
|
|
|
|
Butter |
|
|
In original wrapping |
6 |
In refrigerator. |
|
|
|
or tinfoil |
||||
|
|
|
|
|
||
|
|
|
|
|
|
|
Boiled Food or |
|
|
Plastic or Glass |
3 / 6 |
At room temperature or |
|
Vegetable Soup |
|
|
Containers |
in hot water. |
||
|
|
|
||||
|
|
|
|
|
|
|
Eggs |
|
|
Freeze without shells |
10 |
At room temperature or |
|
|
|
in small containers |
in refrigerator |
GB |
12 |
|

Energy Saving Tips
- Install the Appliance Correctly
This means that the appliance should be installed away from sources of heat or direct sunlight, in a well ventilated room.
- Correct Temperature Settings
Set the freezer temperature knob to one of the medium settings. Very low temperatures will not only consume a great deal of energy, but will neither improve nor lengthen the storage life of the food.
- Shut the Doors
Open your appliance only when strictly necessary - every time you open the door most of the cold air will be lost. In
order to restore the correct temperature, the motor will have to run and consume energy.
- Check the Door Seals
Keep the seals clean and pliable so that they fit closely against the door to ensure that no cold air is lost.
- Avoid Frost Buildup
Remember to check the sides of the freezer for frost. When the frost becomes too thick, defrost the freezer immediately (See, "Caring for Your Appliance").
Caring for Your Appliance
Before doing any cleaning, disconnect the appliance from the electricity (by pulling out the plug or turning off the general switch in your home).
Defrosting
It is a good idea to remove the frost buildup from the inside of the appliance from time to time.
Make sure not to use pointed metal objects to do so as this could result in piercing the refrigeration circuits, causing irreparable damage to the appliance. Use the plastic scraper provided with the freezer.
To defrost the freezer completely (which should be done once or twice a year), disconnect the appliance from the power supply and leave the door open until all the frost has melted.
To speed up defrosting, one or more pots of warm water can be placed inside the appliance.
While defrosting the freezer, it is a good idea to wrap the food taken from the freezer in several layers of paper and place it in a cool place. Since the temperature of the frozen food will inevitably rise, it is best to consume it quickly as its storage life will have been shortened.
Cleaning and Maintenance
The inside of the freezer should be cleaned on a periodic basis after it has been defrosted. Only use a water and bicarbonate solution to clean the appliance. Do not use abrasive cleaning products, detergents or soap. After the inside has been cleaned, rinse well with clean water and dry carefully.
Once the appliance has been cleaned, turn on the appliance, following the instructions in "Setting Up Your Appliance."
When not in use
Should the unit not be used for a long period of time (for example during the summer holidays), disconnect the plug from the mains and leave the door open to avoid the formation of mould and unpleasant odours after completing the defrosting and cleaning operations.
13 |
GB |
|
Troubleshooting
The Green Light is Off
Have you checked if:
∙there is power to the unit?
∙the main power switch to the house is on?
The Red Alarm Light is Always On
Have you checked if:
∙the door is closed properly and the seal is still OK?
∙the door is being opened too often?
∙the temperature knob is on the right setting?
∙there is too much frost buildup?
The Motor Runs Constantly
Have you checked if:
∙the yellow light is on (constant operation setting)?
∙the thermostat is on the right setting?
If after all the checks, the appliance still does not operate or the problem persists, call the nearest Service Centre and inform them of: the type of problem, the abbreviation of the model name (Mod.) and the relative numbers (S/N) written on the rating plate located on the back part of the freezer (see examples in the figures below).
Mod. RG 2330 |
|
|
|
|
|
TI |
|
Cod. 93139180000 |
S/N 704211801 |
|||||||||||||||
|
|
|
|
|
|
|
|
|
|
|
|
|
|
|
|
|
|
|
|
|
|
|
|
|
220 - 240 V- |
|
50 Hz |
|
150 W |
|
|
|
|
|
W |
Fuse |
A |
|
|
Max 15 w |
|||||||||
|
|
|
|
|
|
|
|
|||||||||||||||||
|
|
|
|
|
|
|
|
|
||||||||||||||||
|
|
|
|
|
|
|
|
|
|
|
|
|
|
|
|
|
|
|
|
|
|
|
|
Class |
Total |
340 |
|
|
|
|
75 |
|
|
|
|
|
|
|
|
|
|
|
Freez. |
Capac |
|||||
|
|
|
|
|
|
|
|
|
|
|
|
|
|
|
||||||||||
Gross |
|
|
|
Gross |
|
|
Net |
|
|
|
Gross |
|
Poder de Cong |
Clase N |
||||||||||
Bruto |
|
|
|
Bruto |
|
Util |
|
|
|
Bruto |
|
kg/24 h 4,0 |
Classe |
|||||||||||
Brut |
|
|
|
Brut |
|
|
|
|
Utile |
|
|
|
Brut |
|
||||||||||
|
|
|
|
|
|
|
|
|
|
|||||||||||||||
Compr. |
|
R 134 a |
|
|
Test |
Pressure |
|
|
|
|
|
|
|
|
|
|
||||||||
Syst. |
|
|
|
|
|
|
|
|
|
HIGH-235 |
|
|
|
|
|
|
|
|
|
|
||||
Kompr. |
|
kg 0,090 |
|
|
P.S-I. LOW 140 |
|
|
|
|
|
|
|
|
|
|
|||||||||
Made in Italy 13918
The Appliance Makes Too Much Noise
Have you checked if:
∙the freezer is level?
∙the appliance has been installed between cabinets that vibrate and make noise?
∙it is the noise made by the refrigerant, which occurs even when the compressor is off (this is not a defect).
|
|
|
|
RG 1145 |
WEU 47133980001 |
|||
MADE IN ITALY |
S/N |
704045585 |
|
|
|
|||
VOL. BRUT |
l. |
|
REFRIGERATEUR l. |
CONGELATEUR |
l. |
|||
GROSS VOL. |
135 |
|
REFRIGERATOR |
225 |
FREEZER |
|
||
VOL. BRUTO |
cu. fl. |
|
FRIGORIFICO |
cu. fl. |
CONGELADOR |
cu. fl. |
||
SYSTEME A COMPRESSION |
REFRIGERATEUR R134 A |
CONGELATEUR R134 A |
||||||
SYSTEM |
K |
|
REFRIGERATOR |
0,080 |
FREEZER |
kg |
||
SISTEMA |
|
FRIGORIFICO |
kg. |
CONGELADOR |
||||
POUVOIR DE CONGEL. kg/24h |
FUSE LINK |
220-240 |
HZ |
W |
CLASSE |
|||
FREEZING CAPACITY |
|
|
A |
V |
50 |
110 |
CLASS |
|
PODER DE CONGELACION |
|
CLASEN |
||||||
Never call on unauthorized technicians and always refuse spare parts which are not originals.
GB |
14 |
|

La sécurité, une bonne habitude
ATTENTION
Lire attentivement les avertissements contenus dans ce livret car ils fournissent des indications importantes pour la sécurité de l’installation, de l’utilisation et de l’entretien. Ce réfrigérateur a été construit conformément aux normes internationales de sécurité qui ont pour but de protéger le consommateur. Cet appareil a en effet obtenu le label IMQ que les techniciens de l’Institut Italien de Qualité n’accordent qu’aux appareils conformes aux normes du CEI: Comité Electrotechnique Italien.
-Le Fabricant se réserve le droit de changer les caractéristiques des modèles sans anis préalable.
-Certains modèles peuvent ne pas disposer de la totalité des accessoires signalés.
1.Cet appareil ne doit pas être installé à l’extérieur, même à l’abri d’un appentis, il est extrêmement dangereux de le laisser exposé à la pluie et aux orages.
2.Il ne doit être utilisé que par des adultes et uniquement pour conserver et congeler des aliments, conformément à ce mode d’emploi.
3.Ne touchez jamais ni ne manoeuvrez l’appareil pieds nus ou avec les mains ou les pieds mouillés.
4.Nous déconseillons d’utiliser des rallonges ou des prises multiples. Si le réfrigérateur est installé entre des meubles, veillez par soucis de sécurité à ce que le cordon d’alimentation ne soit ni plié ni comprimé.
5.Ne tirez jamais sur le cordon ou le réfrigérateur pour débrancher la fiche de la prise murale: c’est extrêmement dangereux.
6.Ne touchez pas aux parties internes refroidissantes, surtout si vous avez les mains mouillées, pour éviter toute brûlure ou blessure. Ne mangez pas les glaçons tout de suite après les avoir sortis du congélateur, vous risqueriez de vous brûler.
7.Ne procédez à aucune opération de nettoyage ou d’entretien sans avoir auparavant débranché la fiche de l’appareil.
8.Avant d’envoyer votre ancien réfrigérateur à la déchetterie, rendez sa serrure inutilisable. Vous éviterez ainsi que des enfants en jouant, ne restent enfermés à l’intérieur.
9.En cas de panne et avant de faire appel au service aprèsvente, consultez le chapitre «Quelque chose ne va pas?» pour vérifier si vous pouvez vous-même résoudre le problème. Ne tentez pas de réparer la panne en essayant d’accéder aux parties internes.
10.En cas de changement du câble d’alimentation, adres- sez-vous à nos Services après-vente. Dans certains cas, les connexions sont réalisées au moyen de bornes spéciales, dans d’autres, un outil spécial est indispensable pour accéder aux raccordements.
Installation
Pour garantir le bon fonctionnement de votre appareil tout en réduisant sa consommation d’électricité, il faut qu’il soit installé correctement.
L’aération
Le compresseur et le condenseur produisent de la chaleur et exigent par conséquent une bonne aération. Les pièces mal ventilées sont par conséquent déconseillées. L’appareil doit donc être installé dans une pièce munie d’une ouverture (fenêtre ou porte-fenêtre) qui permette de renouveler l’air et qui ne soit pas trop humide.
Attention, lors de son installation, à ne pas boucher les grilles d’aération de l’appareil.
Pour une bonne aération de l’appareil, il faut prévoir une distance de 10 cm au moins entre les côtés de l’appareil et des meubles ou des murs latéraux.
Loin de toute source de chaleur
Evitez d’installer votre appareil dans un endroit exposé à la lumière directe du soleil ou près d’une cuisinière électrique ou autre.
Raccordement électrique et mise à la terre
Avant de procéder à tout raccordement électrique, contrôlez si le voltage indiqué sur la plaquette des caractéristiques, placée dans la partie arrière du congélateur, correspond bien à celui de votre installation et contrôlez si la prise est dotée d’une mise à la terre conforme, comme prescrit par la loi 46/90 sur la sécurité des installations. S’il n’y a pas de mise à la terre, le Fabricant décline toute responsabilité. N’utilisez ni prises multiples ni adaptateurs.
La puissance est insuffisante?
La prise électrique doit être en mesure de supporter la charge maximum de puissance de l’appareil, indiquée sur la plaquette des caractéristiques placée à l'intérieur du congélateur.
15 |
F |
VU DE PRES
 Bouton de régulation de la température
Ce bouton permet de régler la température interne du congélateur sur des positions différentes;
-Stop Le congélateur est éteint
-1 Froid au minimum
-4 Froid au maximum
En tournant le bouton de la position 1 à la position 4 vous pouvez obtenir des températures de plus en plus froides.
 Voyant d'alarme
L’allumage prolongé du voyant rouge indique que le congélateur ne fonctionne pas bien et qu’à l’intérieur la température monte trop. (Appelez le Service Après-Vente.)
Il arrive que ce voyant s’allume pendant un bref laps de temps quand la porte reste ouverte trop longtemps (lors du stockage des denrées ou de leur prélèvement).
 Lampe-témoin de branchement à la ligne
électrique
Cette lampe-témoin verte s'allume et reste allumée en cas de fonctionnement normal de conservation de l'appareil.
 Lampe-témoin de congélation rapide
Cette lampe jaune s'allume quand l'intèrrupteur de congélation E est sur la position  .
.
 Intérrupteur de congélation rapide
Au moment où est placésur la position  (lampe jaune allume. permet au compresseur de marcher de daçon continue pour rejoindre les basses températures nécessaires à la congélation rapide des denrées fraîches.
Le même interrupteur positionné sur la postion initiale (opposée à  ) indique que l’appareil est sur la position de fonctionnement normal.
 Pieds de support
E D C B A
1 

 2
2
4 

 3
3
1 |
2 |
4 |
3 |
F F
F |
16 |
 Loading...