


 Loading...
HP VP15, W1707, W2007, W1907, W2216 User Manual
...User’s Guide
vp15 LCD Monitor
vp17 LCD Monitor
vp19 LCD Monitor
FP1707 LCD Monitor
WF1907 LCD Monitor
w1707 LCD Monitor
w1907 LCD Monitor
w2007 LCD Monitor
w2207 LCD Monitor
w2216 LCD Monitor
w2408 LCD Monitor
The only warranties for HP products and services are set forth in the express warranty statements accompanying such products and services. Nothing herein should be construed as constituting an additional warranty. HP shall not be liable for technical or editorial errors or omissions contained herein.
HP assumes no responsibility for the use or reliability of its software on equipment that is not furnished by HP.
This document contains proprietary information that is protected by copyright. No part of this document may be photocopied, reproduced, or translated to another language without the prior written consent of HP.
Hewlett-Packard Company
10955 Tantau Avenue
Cupertino, California 95014-0770
USA
Copyright © 2006–2008 Hewlett-Packard Development Company, L.P.
Microsoft and Windows are U.S. registered trademarks of Microsoft Corporation.
Adobe and Acrobat are trademarks of Adobe Systems Incorporated.
ENERGY STAR and the ENERGY STAR logo are U.S. registered marks of the United States Environmental Protection Agency.
Bluetooth is a trademark owned by its proprietor and used by Hewlett-Packard Company under license.
HP supports lawful use of technology and does not endorse or encourage the use of its products for purposes other than those permitted by copyright law.
The information in this document is subject to change without notice.

Notational Conventions
The following section describes notational conventions used in this document.
Notes, Cautions, and Warnings
Throughout this guide, blocks of text may be accompanied by an icon. These blocks are notes, cautions, and warnings, and they are used as follows:
ÅWARNING: Indicates that failure to follow directions could result in bodily harm or loss of life.
ÄCAUTION: Indicates that failure to follow directions could result in damage to equipment or loss of information.
NOTE: Indicates additional information.
User’s Guide |
iii |

iv |
User’s Guide |

Contents
Notational Conventions. . . . . . . . . . . . . . . . . . . . . . . . . . . . . . . . . . . . . . . . . . . . . . . . . . . . 1–iii Notes, Cautions, and Warnings . . . . . . . . . . . . . . . . . . . . . . . . . . . . . . . . . . . . . . . . . . . 1–iii
1 Product Features
HP LCD Monitors . . . . . . . . . . . . . . . . . . . . . . . . . . . . . . . . . . . . . . . . . . . . . . . . . . . . . . . . 1–1
Features . . . . . . . . . . . . . . . . . . . . . . . . . . . . . . . . . . . . . . . . . . . . . . . . . . . . . . . . . . . . 1–1
Base Designs . . . . . . . . . . . . . . . . . . . . . . . . . . . . . . . . . . . . . . . . . . . . . . . . . . . . . . . . 1–2
2 Safety and Maintenance Guidelines
Important Safety Information . . . . . . . . . . . . . . . . . . . . . . . . . . . . . . . . . . . . . . . . . . . . . . . . 2–1
Safety Precautions . . . . . . . . . . . . . . . . . . . . . . . . . . . . . . . . . . . . . . . . . . . . . . . . . . . . . 2–1
Maintenance Guidelines . . . . . . . . . . . . . . . . . . . . . . . . . . . . . . . . . . . . . . . . . . . . . . . . . . . 2–2
Cleaning the Monitor . . . . . . . . . . . . . . . . . . . . . . . . . . . . . . . . . . . . . . . . . . . . . . . . . . . . . 2–2
3 Setting Up the Monitor
Unpacking the Monitor . . . . . . . . . . . . . . . . . . . . . . . . . . . . . . . . . . . . . . . . . . . . . . . . . . . . 3–1 Installing the Monitor . . . . . . . . . . . . . . . . . . . . . . . . . . . . . . . . . . . . . . . . . . . . . . . . . . . . . 3–1 Installing on a Desktop. . . . . . . . . . . . . . . . . . . . . . . . . . . . . . . . . . . . . . . . . . . . . . . . . . 3–1 Unfolding the double-hinged monitor . . . . . . . . . . . . . . . . . . . . . . . . . . . . . . . . . . . . . 3–2 Assembling the cantilever base . . . . . . . . . . . . . . . . . . . . . . . . . . . . . . . . . . . . . . . . . 3–3 Assembling the column base . . . . . . . . . . . . . . . . . . . . . . . . . . . . . . . . . . . . . . . . . . . 3–3 Wall-Mounting the Monitor (Mounting Fixture not Supplied) . . . . . . . . . . . . . . . . . . . . . . . . 3–4 Preparing the double-hinged monitor for wall-mounting. . . . . . . . . . . . . . . . . . . . . . . . . 3–4 Preparing the cantilever-base monitor for wall-mounting . . . . . . . . . . . . . . . . . . . . . . . . 3–5 Preparing the column-base monitor for wall-mounting . . . . . . . . . . . . . . . . . . . . . . . . . . 3–6 Reinstalling the desktop pedestal and base for the monitor . . . . . . . . . . . . . . . . . . . . . . 3–6 Connecting the VGA (Analog) or DVI-D (Digital) Cable . . . . . . . . . . . . . . . . . . . . . . . . . . . 3–7 To connect the VGA cable . . . . . . . . . . . . . . . . . . . . . . . . . . . . . . . . . . . . . . . . . . . . 3–7 To connect the DVI-D cable . . . . . . . . . . . . . . . . . . . . . . . . . . . . . . . . . . . . . . . . . . . . 3–7
Connecting the HDMI Cable. . . . . . . . . . . . . . . . . . . . . . . . . . . . . . . . . . . . . . . . . . . . . . 3–7 Audio and Video Cables and Adapters . . . . . . . . . . . . . . . . . . . . . . . . . . . . . . . . . . . . . . 3–8 Connecting the Audio Cable . . . . . . . . . . . . . . . . . . . . . . . . . . . . . . . . . . . . . . . . . . . . . 3–9 Connecting the USB Hub Cable . . . . . . . . . . . . . . . . . . . . . . . . . . . . . . . . . . . . . . . . . . . 3–9 Connecting USB Devices to the Monitor . . . . . . . . . . . . . . . . . . . . . . . . . . . . . . . . . . . . . . 3–9 Connecting the Power Cable . . . . . . . . . . . . . . . . . . . . . . . . . . . . . . . . . . . . . . . . . . . . 3–10 Cable Management . . . . . . . . . . . . . . . . . . . . . . . . . . . . . . . . . . . . . . . . . . . . . . . . . . 3–11
Adjusting the Tilt. . . . . . . . . . . . . . . . . . . . . . . . . . . . . . . . . . . . . . . . . . . . . . . . . . . . . . . . 3–12 Adjusting the Swivel (Select Models Only) . . . . . . . . . . . . . . . . . . . . . . . . . . . . . . . . . . . 3–13 Adjusting the Height (Select Models Only) . . . . . . . . . . . . . . . . . . . . . . . . . . . . . . . . . . . 3–13 Pivoting the Monitor (Select Models Only) . . . . . . . . . . . . . . . . . . . . . . . . . . . . . . . . . . . 3–14 Ambient Light Sensor (Select Models Only) . . . . . . . . . . . . . . . . . . . . . . . . . . . . . . . . . . . . . 3–15 Keyboard Parking. . . . . . . . . . . . . . . . . . . . . . . . . . . . . . . . . . . . . . . . . . . . . . . . . . . . . . . 3–15
User’s Guide |
v |

4 Operating the Monitor
CD Software and Utilities . . . . . . . . . . . . . . . . . . . . . . . . . . . . . . . . . . . . . . . . . . . . . . . . . . 4–1
Installing Drivers . . . . . . . . . . . . . . . . . . . . . . . . . . . . . . . . . . . . . . . . . . . . . . . . . . . . . . 4–1
Downloading Updated Drivers from the Internet. . . . . . . . . . . . . . . . . . . . . . . . . . . . . . 4–1
Using the Auto-Adjustment Function . . . . . . . . . . . . . . . . . . . . . . . . . . . . . . . . . . . . . . . . . 4–1
My Display Software. . . . . . . . . . . . . . . . . . . . . . . . . . . . . . . . . . . . . . . . . . . . . . . . . . . . . . 4–2
Front-Panel Controls . . . . . . . . . . . . . . . . . . . . . . . . . . . . . . . . . . . . . . . . . . . . . . . . . . . . . . 4–3
Using the Onscreen Display (OSD) . . . . . . . . . . . . . . . . . . . . . . . . . . . . . . . . . . . . . . . . . . . . 4–3
OSD Menu Selections . . . . . . . . . . . . . . . . . . . . . . . . . . . . . . . . . . . . . . . . . . . . . . . . . . 4–4
Selecting Video Input Connectors . . . . . . . . . . . . . . . . . . . . . . . . . . . . . . . . . . . . . . . . . . . . . 4–7
Identifying Monitor Conditions . . . . . . . . . . . . . . . . . . . . . . . . . . . . . . . . . . . . . . . . . . . . . . . 4–7
Adjusting Screen Quality. . . . . . . . . . . . . . . . . . . . . . . . . . . . . . . . . . . . . . . . . . . . . . . . . . . 4–7
Optimizing Analog Video . . . . . . . . . . . . . . . . . . . . . . . . . . . . . . . . . . . . . . . . . . . . . . . 4–8
Power-Saver Feature . . . . . . . . . . . . . . . . . . . . . . . . . . . . . . . . . . . . . . . . . . . . . . . . . . . . . . 4–8
High-Bandwidth Digital Content Protection (HDCP) . . . . . . . . . . . . . . . . . . . . . . . . . . . . . . . . . 4–8
5 Preparing the Monitor for Shipping
Removing the Monitor Base . . . . . . . . . . . . . . . . . . . . . . . . . . . . . . . . . . . . . . . . . . . . . . . . . 5–1
Removing the cantilever base . . . . . . . . . . . . . . . . . . . . . . . . . . . . . . . . . . . . . . . . . . . . . 5–1
Removing the column base . . . . . . . . . . . . . . . . . . . . . . . . . . . . . . . . . . . . . . . . . . . . . . . 5–2
Folding the Double-Hinged Monitor . . . . . . . . . . . . . . . . . . . . . . . . . . . . . . . . . . . . . . . . . . . 5–3
A Troubleshooting
Solving Common Problems . . . . . . . . . . . . . . . . . . . . . . . . . . . . . . . . . . . . . . . . . . . . . . . . . A–1 Getting Support from hp.com. . . . . . . . . . . . . . . . . . . . . . . . . . . . . . . . . . . . . . . . . . . . . . . . A–2 Preparing to Call Technical Support . . . . . . . . . . . . . . . . . . . . . . . . . . . . . . . . . . . . . . . . . . . A–2 Locating the Rating Label . . . . . . . . . . . . . . . . . . . . . . . . . . . . . . . . . . . . . . . . . . . . . . . . A–2
B Technical Specifications
HP LCD Monitors . . . . . . . . . . . . . . . . . . . . . . . . . . . . . . . . . . . . . . . . . . . . . . . . . . . . . . . . B–1
Preset Video Modes . . . . . . . . . . . . . . . . . . . . . . . . . . . . . . . . . . . . . . . . . . . . . . . . . . . . . . B–7
LCD Monitor Quality and Pixel Policy . . . . . . . . . . . . . . . . . . . . . . . . . . . . . . . . . . . . . . . . . B–12
Power Cord Set Requirements . . . . . . . . . . . . . . . . . . . . . . . . . . . . . . . . . . . . . . . . . . . . . . B–12
C Agency Regulatory Notices
Federal Communications Commission Notice. . . . . . . . . . . . . . . . . . . . . . . . . . . . . . . . . . . . . C–1 Modifications . . . . . . . . . . . . . . . . . . . . . . . . . . . . . . . . . . . . . . . . . . . . . . . . . . . . . . . . C–1 Cables. . . . . . . . . . . . . . . . . . . . . . . . . . . . . . . . . . . . . . . . . . . . . . . . . . . . . . . . . . . . . C–1 Declaration of Conformity for Products Marked with FCC Logo, United States Only . . . . . . . . . . C–1 Materials Disposal . . . . . . . . . . . . . . . . . . . . . . . . . . . . . . . . . . . . . . . . . . . . . . . . . . . . . . . C–2 Canadian Notice . . . . . . . . . . . . . . . . . . . . . . . . . . . . . . . . . . . . . . . . . . . . . . . . . . . . . . . . C–2 Avis Canadien . . . . . . . . . . . . . . . . . . . . . . . . . . . . . . . . . . . . . . . . . . . . . . . . . . . . . . . . . . C–2 European Union Regulatory Notice. . . . . . . . . . . . . . . . . . . . . . . . . . . . . . . . . . . . . . . . . . . . C–2 Disposal of Waste Equipment by Users in Private Households in the European Union . . . . . . . . . C–2 Japanese Notice . . . . . . . . . . . . . . . . . . . . . . . . . . . . . . . . . . . . . . . . . . . . . . . . . . . . . . . . C–3 Japanese Power Cord Notice. . . . . . . . . . . . . . . . . . . . . . . . . . . . . . . . . . . . . . . . . . . . . . . . C–3 Japanese Material Content Declaration . . . . . . . . . . . . . . . . . . . . . . . . . . . . . . . . . . . . . . . . . C–3 Korean Notice . . . . . . . . . . . . . . . . . . . . . . . . . . . . . . . . . . . . . . . . . . . . . . . . . . . . . . . . . . C–3 EPA Energy Star® Compliance . . . . . . . . . . . . . . . . . . . . . . . . . . . . . . . . . . . . . . . . . . . . . . C–3 HP Recycling Program. . . . . . . . . . . . . . . . . . . . . . . . . . . . . . . . . . . . . . . . . . . . . . . . . . . . . C–3
vi |
User’s Guide |

1
Product Features
HP LCD Monitors
The HP LCD (liquid crystal display) monitors have an active matrix, thin-film transistor (TFT) screen. This guide discusses the following models:
■vp15 LCD Monitor
■vp17 LCD Monitor
■vp19 LCD Monitor
■FP1707 LCD Monitor
■WF1907 LCD Monitor
■w1707 LCD Monitor
■w1907 LCD Monitor
■w2007 LCD Monitor
■w2207 LCD Monitor
■w2216 LCD Monitor
■w2408 LCD Monitor
Features
■Large diagonal viewable-area display
■Optimum resolution:
vp15: 1024 × 768 @ 60 Hz
vp17, vp19, and FP1707: 1280 × 1024 @ 60 Hz
WF1907, w1707, and w1907: 1440 × 900 @ 60 Hz
w2007, w2216, and w2207: 1680 x 1050 @ 60 Hz
w2408: 1920 x 1200 @ 60 Hz
Plus full-screen support for lower resolutions
■Video inputs supported:
VGA analog signal
DVI digital signal (select models only)
High-definition multimedia interface (HDMI) (select models only)
■Fast response time, providing better experience for gaming and graphics
■Easy viewing from a sitting or standing position, or while moving from one side of the monitor to the other
■Tilt adjustment
■Height adjustment (select models only)
■Pivot adjustment, for landscape or portrait viewing (select models only)
■Removable pedestal and Video Electronics Standards Association (VESA) standard mounting holes for flexible mounting solutions, including wall-mounting
■Security lock slot for a Kensington lock security cable (security cable sold separately)
■Plug and Play capability, if supported by your computer system
User’s Guide |
1–1 |
Product Features
■On-screen display (OSD) adjustments for ease of setup and screen optimization (choose English, Simplified Chinese, French, German, Italian, Spanish, Dutch, or Japanese)
■Swiveling monitor, allowing a usable range of motion (select models only)
■Built-in stereo speakers, frontor rear-facing depending on model
■Universal Serial Bus (USB) 2.0 ports to use with USB devices (select models only have two or four ports)
■Ambient light sensor (select models only)
■Keyboard parking (select models only)
■Power Saver to reduce energy consumption
■Quick View settings display
■CD includes (select models only):
Drivers (select models only)
Auto-adjustment software
My Display software (select models only)
Documents
Adobe® Acrobat® Reader
■Varied monitor base designs
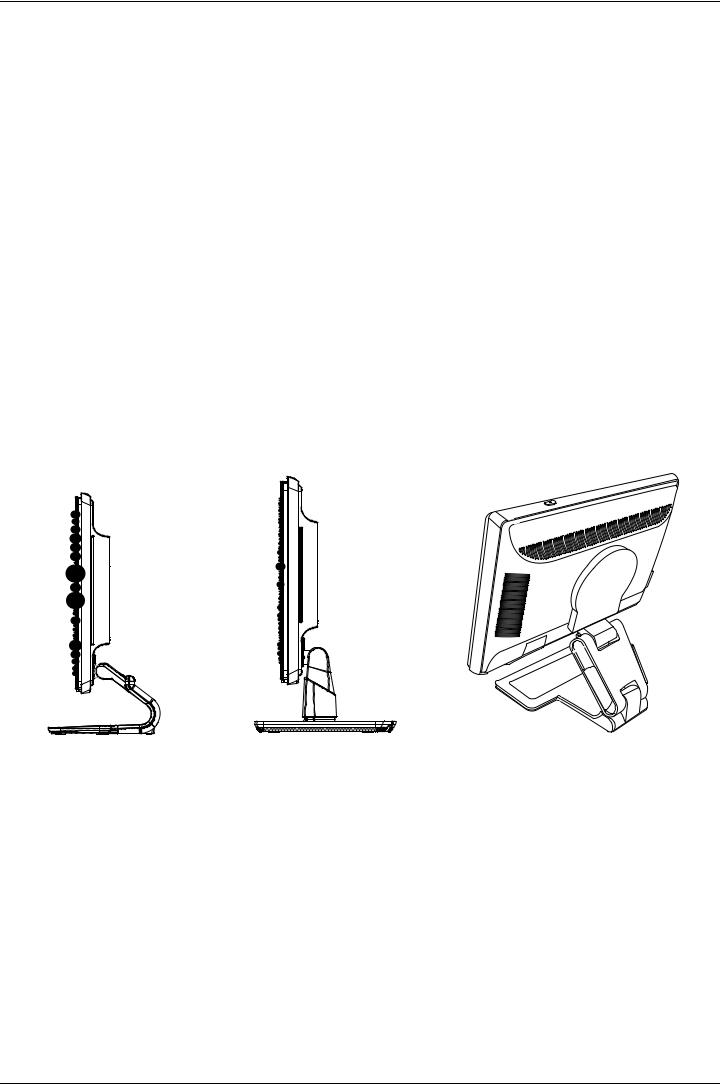
Base Designs
Cantilever base |
Column base |
Double-hinged base |
1–2 |
User’s Guide |

2
Safety and Maintenance Guidelines
Important Safety Information
The power cord is designed for use with your monitor. To use a different cord, use only a power source and connection compatible with this monitor.
ÅWARNING: Always connect your monitor, the computer, and other equipment to a grounded (earthed) power outlet. To reduce the risk of electric shock or damage to your equipment, do not disable the power cord grounding feature. The grounding plug is an important safety feature.
ÅWARNING: For your safety, be sure that the grounded power outlet you plug the power cord into is easily accessible to the operator and located as close to the equipment as possible. To disconnect power from the equipment, unplug the power cord from the power outlet by grasping the plug firmly. Never pull on the cord.
ÄCAUTION: To protect your monitor, as well as your computer, connect all power cords for your computer and its peripheral devices (such as a monitor, printer, or scanner) to a surge protection device such as a power strip with surge protection or uninterruptible power supply (UPS).
Not all power strips provide surge protection; the power strips must be specifically labeled as having this ability. Use a power strip whose manufacturer offers a damage replacement policy, so you can replace your equipment if surge protection fails.
Safety Precautions
■Use only a power source and connection compatible with this monitor, as indicated on the label/back plate of the monitor.
■Be sure the total ampere rating of the products connected to the outlet does not exceed the current rating of the electrical outlet, and the total ampere rating of the products connected to the power cord does not exceed the rating of the power cord. Look on the power label to determine the ampere rating (Amps or A) for each device.
■Install your monitor near a power outlet that you can easily reach. Disconnect the monitor by grasping the plug firmly and pulling it from the outlet. Never disconnect the monitor by pulling the cord.
■Do not allow anything to rest on the power cord. Do not walk on the cord.
User’s Guide |
2–1 |

Safety and Maintenance Guidelines
Maintenance Guidelines
To enhance the performance and extend the life of your monitor:
■Do not open your monitor cabinet or attempt to service this product yourself. If your monitor is not operating properly or has been dropped or damaged, contact your Hewlett-Packard authorized dealer, reseller, or service provider.
■Adjust only those controls that are described in the operating instructions.
■Turn your monitor off when not in use. You can substantially increase the life expectancy of the monitor by using a screen saver program and turning off the monitor when not in use.
■Keep your monitor in a well-ventilated area, away from excessive light, heat, or moisture.
■Slots and openings in the cabinet are provided for ventilation. These openings must not be blocked or covered. Never push objects of any kind into cabinet slots or other openings.
■Unplug the monitor from the power outlet before cleaning. Do not use liquid cleaners or aerosol cleaners.
■Do not drop the monitor or place it on an unstable surface.
■When removing the monitor base, you must lay the monitor face down on a soft area to prevent it from getting scratched, defaced, or broken.
Cleaning the Monitor
The monitor is a high-quality optical device that requires special care when cleaning. To clean the monitor, follow these steps:
1.Turn off the computer and the monitor.
2.Unplug your monitor from the power outlet before cleaning.
ÄCAUTION: Do not use benzene, thinner, ammonia, or any volatile substance to clean the monitor screen or cabinet. These chemicals may damage the monitor. Do not use liquid or aerosol cleaners. Never use water to clean an LCD screen.
3.Wipe the screen with a dry, soft, clean cloth.
If the screen requires additional cleaning, use an antistatic screen cleaner.
4.Dust the monitor housing. Use a damp cloth to clean the cabinet.
If the cabinet requires additional cleaning, use a clean cloth dampened with isopropyl alcohol.
5.Plug in the monitor.
6.Turn on the monitor and the computer.
2–2 |
User’s Guide |
3
Setting Up the Monitor
Unpacking the Monitor
1.Unpack the monitor. Make sure all contents are included. Store the packing box.
2.Turn off the computer and other attached devices.
3.Determine whether the monitor will be desktop mounted or wall-mounted. See “Installing the Monitor.”
4.Prepare a flat area to assemble the monitor. You may need a flat, soft, protected area for placing the monitor screen-down while preparing it for installation.
5.You need a Phillips screwdriver for preparing the monitor for wall-mounting. You may need a straight-slot screwdriver to secure some cables.
Installing the Monitor
You can install the monitor on a desktop or wall-mount it. Place the monitor in a convenient, well-ventilated location near your computer.
If the monitor will be installed on a:
■Desktop or table, see “Installing on a Desktop.”
■Wall, swing arm, or other mounting fixture, see “Wall-Mounting the Monitor (Mounting Fixture not Supplied).” Connect the monitor cables after you have installed the monitor.
Installing on a Desktop
Follow the instructions for your monitor type.
User’s Guide |
3–1 |
Setting Up the Monitor
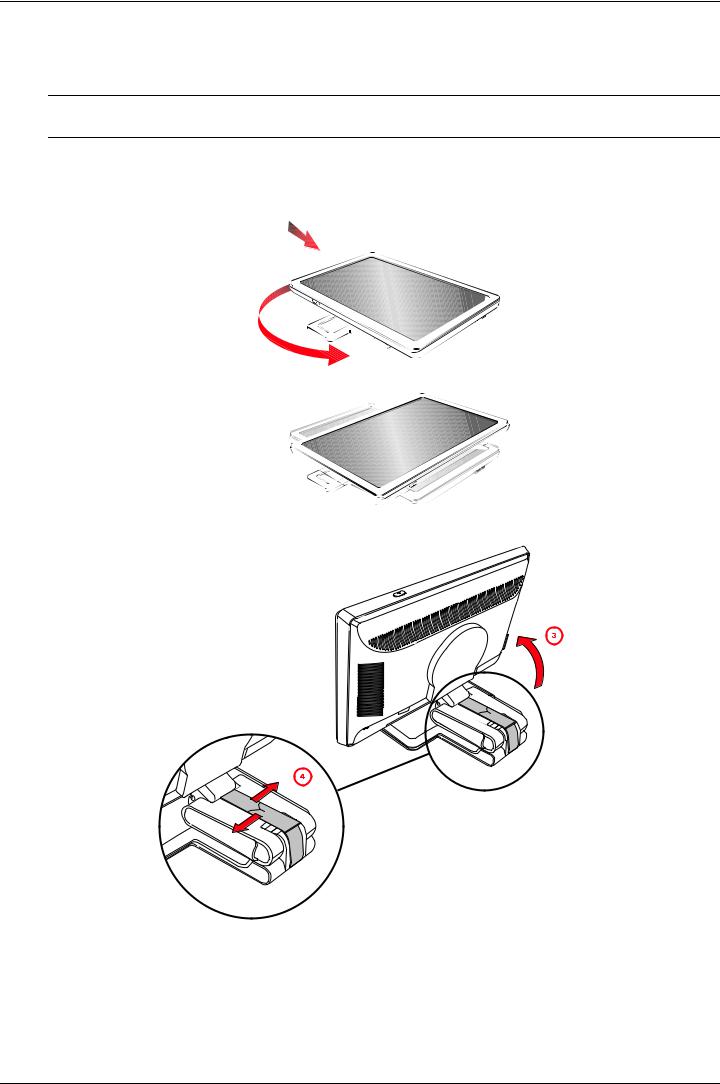
Unfolding the double-hinged monitor
ÅWARNING: Do not place the double-hinged monitor face down for folding. The base hinge can spring up and cause serious injury or damage.
1.With the monitor still in its flat, folded state, set it screen-side up on a flat surface.
2.Rotate the screen to the horizontal position (in the figure, the straight arrow is your position in front of the monitor).
3. Holding the base of the monitor, lift up the panel at its top without touching or putting pressure on the screen (3).
4.Remove the shipping strap (do not cut it) (4).
5.Put the shipping strap in a safe place, in case you need it to ship the monitor.
6.Lift and lower the base hinge for proper viewing.
3–2 |
User’s Guide |
Setting Up the Monitor
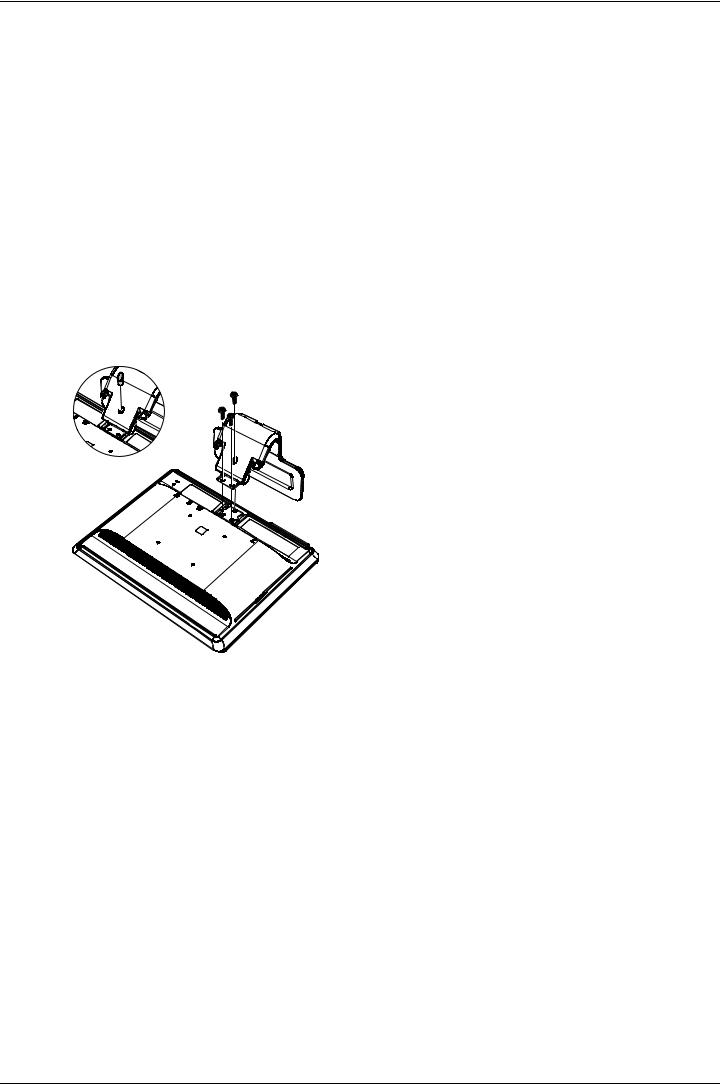
Assembling the cantilever base
ÄCAUTION:damage. The screen is fragile. Avoid touching or applying pressure to the LCD screen; doing so can cause
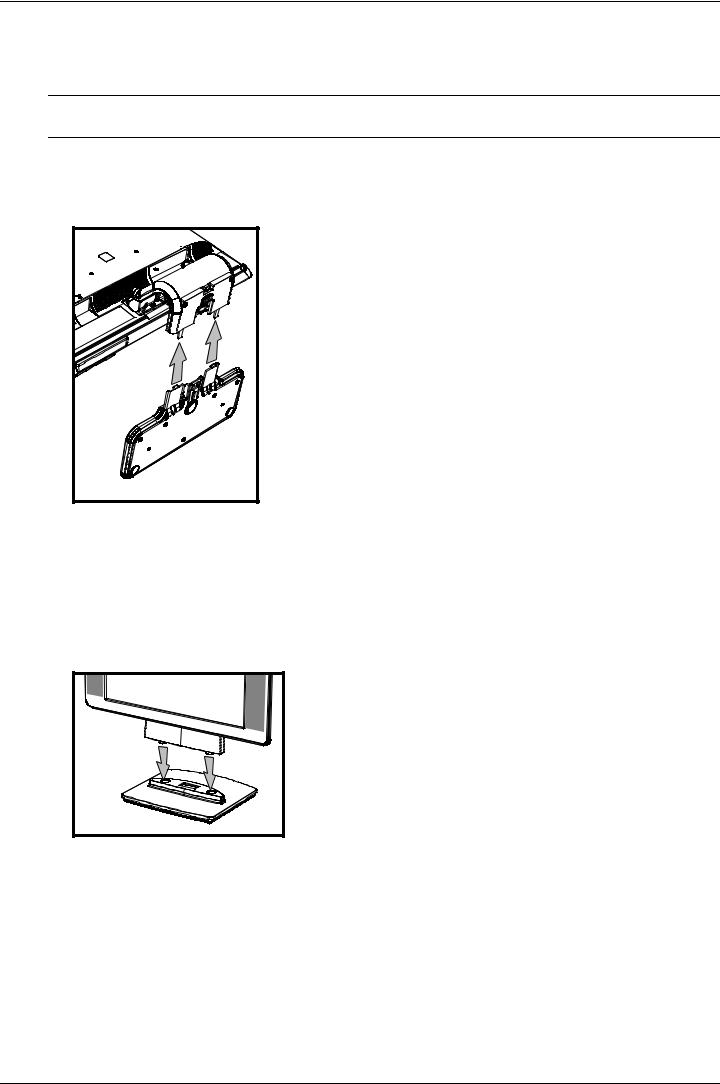
1.Set the monitor screen down on a flat, soft, protected surface.
2.Align the neck with the monitor base.
3.Slide the base until it snaps in place. Make sure the base is securely locked in place.
Attaching the cantilever base
4. Lift the monitor to an upright position and place on a flat, stable surface.
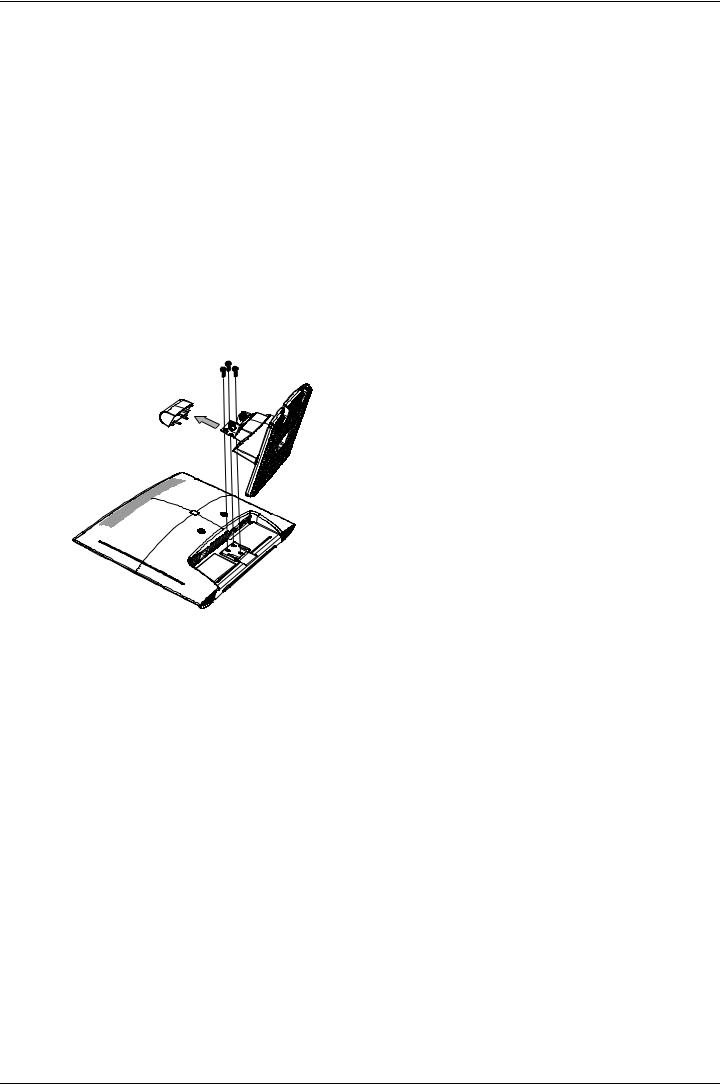
Assembling the column base
1.Set the monitor base on a flat, stable surface.
2.Lift the monitor, and align the pedestal with the base.
3.Lower the monitor until the base snaps in place. Make sure the base is securely locked.
Attaching the column base
User’s Guide |
3–3 |
Setting Up the Monitor
Wall-Mounting the Monitor (Mounting Fixture not Supplied)
Before you mount the monitor on a wall, a swing arm, or other mounting fixture, you must remove the monitor base and the pedestal. You will need a Phillips screwdriver. Read the following warning and caution statements before beginning the procedure.
ÅWARNING: To reduce the risk of personal injury or of damage to the equipment, check that the wall-mounting fixture is adequately installed and secured before attaching the monitor. Refer to the instructions supplied with the wall-mounting fixture and check that it is capable of supporting the monitor.
Preparing the double-hinged monitor for wall-mounting
ÅWARNING: Do not place the double-hinged monitor face down for folding. The base hinge can spring up and cause serious injury or damage.
1.Disconnect the power cable and any other cables from the monitor.
2.Carefully place the monitor face down on a flat, soft surface. This might entail elongating the hinge and tilting the monitor back to ensure the monitor is flat.
3.With your fingertips, snap off the VESA cover from the back of the monitor.
4.Remove all four screws from the VESA plate.
5.Save the removed items (cover, screws, and base) for future use.
6.Follow the instructions included with the mounting fixture to ensure that the monitor is safely attached.
The four-threaded mounting holes that are on the back of the panel are compliant with the VESA standard for mounting flat-panel monitors. The15-inch monitor uses the 75 mm spacing standard, while the other models use the 100 mm spacing standard.
Use the four holes to attach a swing arm or other mounting fixture.
3–4 |
User’s Guide |
Setting Up the Monitor
Preparing the cantilever-base monitor for wall-mounting
1.Disconnect the power cable and any other cables from the monitor.
2.Remove the monitor base. Refer to “Removing the Monitor Base.” Keep the monitor panel screen down on a flat, soft area.
3.After the base is removed, remove the rubber plug on the neck of the monitor. You will see a screw below the rubber plug and two additional screws on the panel.
4.Remove all three screws.
5.Remove the neck from the monitor.
6.Save the removed items (rubber plug, screws, neck, and base) for future use.
7.Follow the instructions included with the mounting fixture to ensure that the monitor is safely attached.
The four-threaded mounting holes that are on the back of the panel are compliant with the VESA standard for mounting flat-panel monitors. The vp15 monitor uses the 75 mm spacing standard, while the other models use the 100 mm spacing standard.
Use the four holes to attach a swing arm or other mounting fixture.
User’s Guide |
3–5 |
Setting Up the Monitor
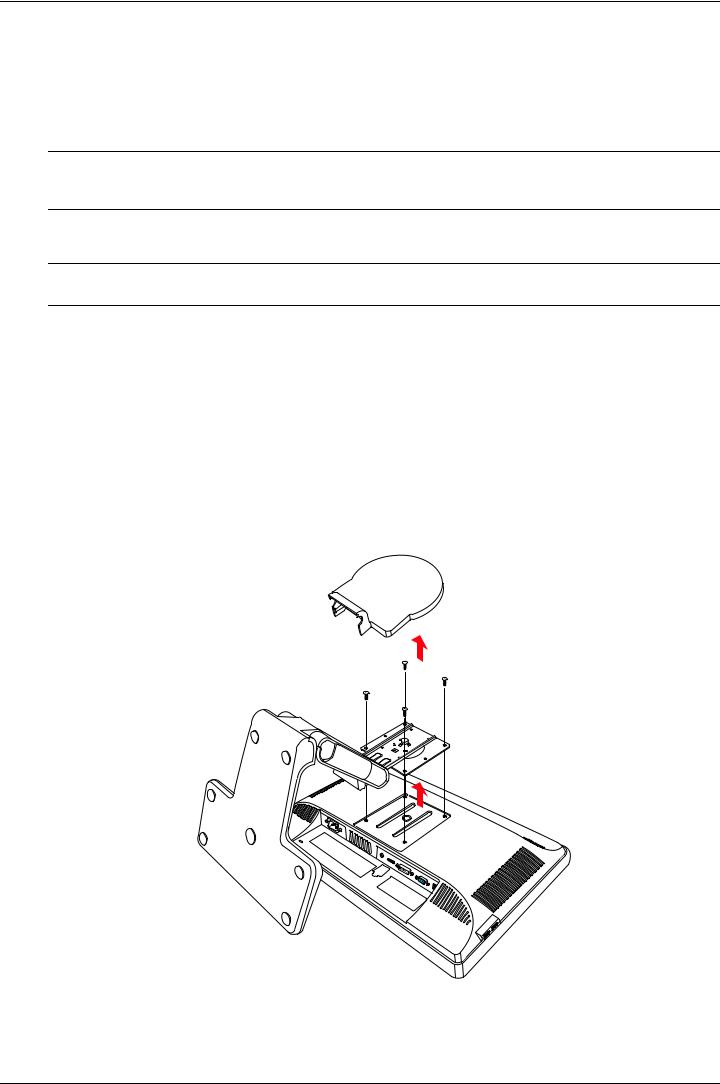
Preparing the column-base monitor for wall-mounting
1.Disconnect the power cable and any other cables from the monitor.
2.With the monitor screen face-down on a flat, soft surface, remove the monitor base. Refer to “Removing the Monitor Base.”
3.Remove the hinge cover and set it aside. Three screws and the hinge are exposed.
4.Holding the pedestal so that it cannot fall, remove the single screw that is close to the hinge, and then remove the other two screws. If necessary, move the pedestal, so that all three screws are accessible.
5.Slide the pedestal off the monitor panel.
6.Save the removed items (screws, hinge cover, pedestal, and base) for future use.
7.Follow the instructions that are included with the mounting fixture to ensure that the monitor is safely attached.
The four-threaded mounting holes that are on the back of the panel are compliant with the VESA standard for mounting flat-panel monitors. The vp15 monitor uses the 75 mm spacing standard, while the other models use the 100 mm spacing standard.
Use the four holes to attach a swing arm or other mounting fixture.
Reinstalling the desktop pedestal and base for the monitor
1.Remove the mounting fixture.
2.Reverse the preceding instructions.
3–6 |
User’s Guide |

Setting Up the Monitor
Connecting the VGA (Analog) or DVI-D (Digital) Cable
Use a VGA video cable or a DVI-D video cable (provided with select models). To use DVI, you must have a DVI-compliant graphic card. Connectors are located on the back of the monitor. Be sure the computer and monitor are turned off and unplugged.
Some graphic cards have both a DVI connector and a DVI-to-VGA converter included in the box (select models only). If the monitor has a VGA connector but no DVI connector, use the DVI-to-VGA converter to connect to the computer: Connect the DVI-to-VGA converter to the DVI connector on the computer graphic card, and then connect the VGA cable to the converter and the monitor.
Connecting the VGA or DVI-D cable—connector locations may vary
To connect the VGA cable
Connect one end of the VGA video cable to the back of the monitor and the other end to the VGA video connector on the computer.
To connect the DVI-D cable
Connect one end of the DVI-D video cable to the back of the monitor and the other end to the DVI video connector on the computer. You can use this cable only if your compute has a DVI-compliant graphic card installed. The monitor DVI-D connector and cable are included with select models only.
NOTE: If you use a DVI-to-HDMI adapter, you must connect the green audio cable to enable the speakers. The signal from the DVI connector is for video only.
Connecting the HDMI Cable
Connect one end of the HDMI cable (select models only) to the back of the monitor and the other end to any compatible digital audio/video source, such as a set-top box, a DVD player, or a digital television.
|
|
|
|
|
|
|
|
|
|
|
|
|
|
|
|
|
|
|
|
|
|
|
|
|
|
|
|
|
|
|
|
|
|
|
|
|
|
|
|
|
|
|
|
|
|
|
|
|
|
|
|
|
|
|
|
|
|
|
|
|
|
|
|
|
|
|
|
|
|
|
|
|
|
|
|
|
|
|
|
|
|
|
|
|
|
|
|
|
|
|
|
|
|
|
|
|
|
|
|
|
|
|
|
|
|
|
|
|
|
|
|
|
|
|
|
|
|
|
|
User’s Guide |
|
|
3–7 |
||||||
Loading...