


 Loading...
HP Scanjet Enterprise N9120/Flow
N9120
User Guide
Copyright and license
© 2013 Copyright Hewlett-Packard Development Company, L.P.
Reproduction, adaptation or translation without prior written permission is prohibited, except as allowed under the copyright laws.
The information contained herein is subject to change without notice.
The only warranties for HP products and services are set forth in the express warranty statements accompanying such products and services. Nothing herein should be construed as constituting an additional warranty. HP shall not be liable for technical or editorial errors or omissions contained herein.
Edition 2, 10/2013
Trademark credits
ENERGY STAR is a U.S. registered service mark of the United States Environmental Protection Agency.
Microsoft and Windows are registered trademarks of Microsoft Corporation.

Contents
1 |
Use the scanner |
|
|
Scanner overview................................................................................................................................................................. |
3 |
|
Scanner front panel buttons........................................................................................................................................... |
3 |
|
Scanner lamp setting...................................................................................................................................................... |
4 |
|
Load original documents...................................................................................................................................................... |
5 |
|
Use the automatic document feeder.............................................................................................................................. |
5 |
|
Document loading tips.............................................................................................................................................. |
5 |
|
How to load documents............................................................................................................................................ |
6 |
|
Load an original on the scanner glass............................................................................................................................ |
8 |
|
How to scan.......................................................................................................................................................................... |
9 |
|
Associate a quick start button with scanning software......................................................................................................... |
9 |
|
Scan from scanning software............................................................................................................................................... |
9 |
|
Scan from HP Smart Document Scan Software........................................................................................................... |
10 |
|
Scan from ISISor TWAIN-compliant scanning software............................................................................................. |
10 |
|
How to copy........................................................................................................................................................................ |
10 |
2 |
Useful scanner features |
|
|
Work with HP Smart Document Scan Software profiles..................................................................................................... |
11 |
|
Automatically rotate scanned pages.................................................................................................................................. |
12 |
|
Scan extra long documents................................................................................................................................................ |
12 |
|
Filter out color from a document (color dropout)................................................................................................................ |
12 |
|
Set the background color for scans from the automatic document feeder......................................................................... |
13 |
|
Use scanner hardware compression for faster scans........................................................................................................ |
13 |
|
Disable Misfeed (Multipick) Detection................................................................................................................................ |
13 |
|
Scan without reviewing....................................................................................................................................................... |
14 |
|
Set up and use the imprinter.............................................................................................................................................. |
14 |
|
Install or replace a print cartridge in the imprinter........................................................................................................ |
14 |
|
Position the imprinter.................................................................................................................................................... |
16 |
|
Test the imprinter.......................................................................................................................................................... |
16 |
|
Clean the imprinter....................................................................................................................................................... |
17 |
|
Use the imprinter.......................................................................................................................................................... |
17 |
3 |
Care and maintenance |
|
|
Order maintenance and scanning supplies........................................................................................................................ |
18 |
|
Clean the automatic document feeder............................................................................................................................... |
18 |
|
Clean the scanner glass..................................................................................................................................................... |
21 |
|
Clean the scanner fan filters............................................................................................................................................... |
21 |
|
Replace the feed roller and separation pad....................................................................................................................... |
22 |
|
HP Scanner Tools Utility scanner maintenance information.............................................................................................. |
22 |
4 |
Troubleshooting |
|
|
Scanner LEDs.................................................................................................................................................................... |
24 |
|
Installation troubleshooting................................................................................................................................................. |
25 |
|
Check that the scanner has power............................................................................................................................... |
25 |
|
Check the USB connection.......................................................................................................................................... |
25 |
|
Uninstall and then reinstall the HP Scanjet utilities...................................................................................................... |
26 |
|
Scanner operation problems.............................................................................................................................................. |
26 |
|
Scanner will not turn on................................................................................................................................................ |
26 |
|
Scanner lamp stays on................................................................................................................................................. |
26 |
|
Scanner does not scan right away............................................................................................................................... |
27 |
|
Scanner scans only one side of a double-sided page.................................................................................................. |
27 |
|
Scanned image is fuzzy............................................................................................................................................... |
27 |
|
Scanned pages are out of order at the scan destination.............................................................................................. |
27 |
|
Scanned pages are missing at the scan destination.................................................................................................... |
27 |
|
Optimizing scanning and task speeds.......................................................................................................................... |
28 |
1
|
The image is completely black or completely white..................................................................................................... |
28 |
|
Scanned images are not straight.................................................................................................................................. |
28 |
|
Scanned images contain streaks or scratches............................................................................................................. |
28 |
|
Vertical white stripes appear on the printed page........................................................................................................ |
29 |
|
Scan files are too large................................................................................................................................................. |
29 |
|
The imprinter is not printing or the print quality is poor................................................................................................ |
29 |
|
Scanner buttons are not working correctly......................................................................................................................... |
30 |
|
Buttons do not work...................................................................................................................................................... |
30 |
|
An unexpected program opens when a button is pressed........................................................................................... |
30 |
|
Wrong profile is used when the Scan button is pressed.............................................................................................. |
30 |
|
Automatic document feeder problems................................................................................................................................ |
31 |
|
Clear a jam from the automatic document feeder........................................................................................................ |
31 |
|
Automatic document feeder does not feed paper........................................................................................................ |
33 |
|
The bottom of the scanned image is cut off................................................................................................................. |
33 |
|
Additional troubleshooting information............................................................................................................................... |
34 |
5 |
Product care and support |
|
|
Maintenance, troubleshooting, and support....................................................................................................................... |
35 |
|
Getting assistance.............................................................................................................................................................. |
35 |
6 |
Regulatory information and product specifications.................................................................................................. |
36 |
7 |
Accessibility................................................................................................................................................................... |
39 |
2
1Use the scanner
•Scanner overview
•Load original documents
•How to scan
•Associate a quick start button with scanning software
•Scan from scanning software
•How to copy
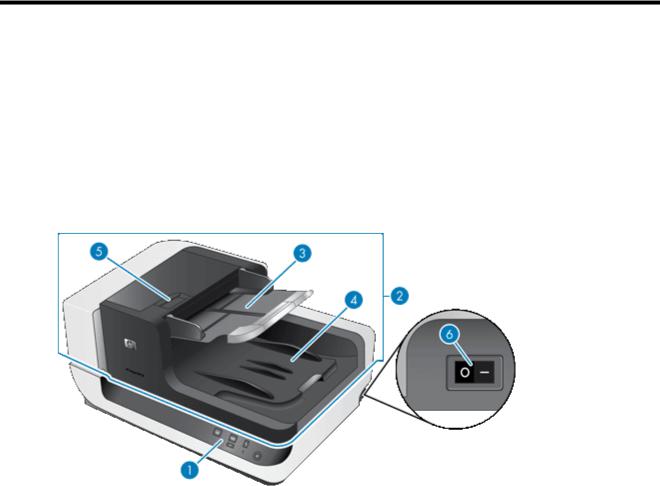
Scanner overview
1 |
Front panel |
|
|
2 |
Automatic document feeder (ADF) |
|
|
3 |
ADF input tray |
|
|
4 |
ADF output tray |
|
|
5 |
Latch for opening the ADF |
|
|
6 |
Power switch |
|
|
See also
•Scanner front panel buttons
•Scanner lamp setting
Scanner front panel buttons
Use the buttons on the scanner front panel to start a scan and to configure some scanner settings.
Use the scanner |
3 |

Chapter 1
Icon |
Button name |
Description |
||
|
|
|
|
|
1 |
|
Copy |
By default, print the number of copies currently configured in |
|
|
|
|
HP Document Copy. |
|
|
|
|
Alternatively, start the scanning software that is assigned to |
|
|
|
|
this button. |
|
|
|
|
|
|
2 |
|
Scan |
By default, start a scan that uses the HP Smart Document |
|
|
|
|
Scan Software profile that is assigned to this button. |
|
|
|
|
Alternatively, start the scanning software that is assigned to |
|
|
|
|
this button. |
|
|
|
|
|
|
3 |
|
Cancel |
Cancel a scan or copy in progress. |
|
|
|
|
|
|
4 |
|
Tools |
Open the HP Scanner Tools Utility where you can do the |
|
|
|
|
following tasks: |
|
|
|
|
• |
Associate the scanner quick start buttons with |
|
|
|
|
scanning software |
|
|
|
• |
Configure the buttons on the scanner front panel |
|
|
|
• |
Manage the imprinter |
|
|
|
• |
View information about scanner settings, status, and |
|
|
|
|
maintenance |
|
|
|
|
|
5 |
|
Attention LED |
The Attention LED provides status information about the |
|
|
|
|
scanner. |
|
|
|
|
|
|
6 |
|
Power Save |
Press the Power Save button to put the scanner in Power |
|
|
|
|
Save mode when you are not using the scanner. When you |
|
|
|
|
are ready to begin scanning again, press the Power Save |
|
|
|
|
button to wake up the scanner. |
|
|
|
|
|
|
See also
•Scanner LEDs
Scanner lamp setting
The scanner supports two modes of lamp operation:
•In Power Save mode, the scanner lamp times out and turns off automatically after about 15 minutes of inactivity. When you are ready to begin scanning again, press the Power Save button to wake up the scanner.
•In Instant Lamp On mode, the scanner lamp times out and turns off automatically after about 15 minutes of inactivity, but it remains warm and ready to scan.
To switch from Power Save mode to Instant Lamp On mode, select the Enable Instant Lamp On check box on the Buttons tab of the HP Scanner Tools Utility. To switch back to Power Save mode, clear the Enable Instant Lamp On check box.
4 Use the scanner
Load original documents
You can scan up to 200 singleand double-sided document pages from the automatic document feeder (ADF), and you can scan one side of a document directly from the scanner glass.
The section contains the following topics:
•Use the automatic document feeder
•Load an original on the scanner glass
Use the automatic document feeder
For helpful information on loading your documents properly, refer to the following topics.
•Document loading tips
•How to load documents
Document loading tips
•The automatic document feeder (ADF) supports the following paper types.
Width: |
70–300 mm (2.75–11.8 in) |
|
|
|
|
Length: |
148–864 mm (5.8–34 in) |
|
|
|
|
Weight: |
49–120 g/m2 (13–32 lb) |
|
|
|
|
 NOTE: In the scanning software, set the page size to match the width and length of the paper that you are scanning.
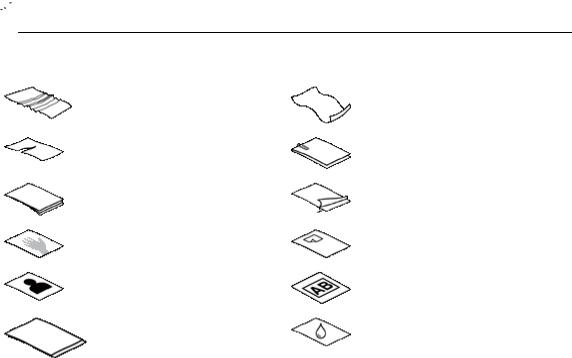
•Scanning the following types of documents might result in paper jams or damage to the documents. To scan these documents, make a photocopy, and then scan the copy instead.
|
Wrinkled or creased |
|
Curled documents |
|
documents |
|
|
|
|
|
|
|
Torn documents |
|
Documents with paper clips or |
|
|
|
staples |
|
|
|
|
|
Carbon paper |
|
Coated paper |
|
|
|
|
|
Extremely thin, translucent |
|
Paper with adhesive notes or |
|
paper |
|
flags attached |
|
|
|
|
|
Photos |
|
Overhead transparencies |
|
|
|
|
|
Papers that are stuck together |
|
Paper with wet substances |
|
|
|
such as glue or correction fluid |
|
|
|
|
•Before loading documents, make sure that the ADF access doors are securely latched.
•When loading a stack of documents, make sure that all of the documents are the same size.
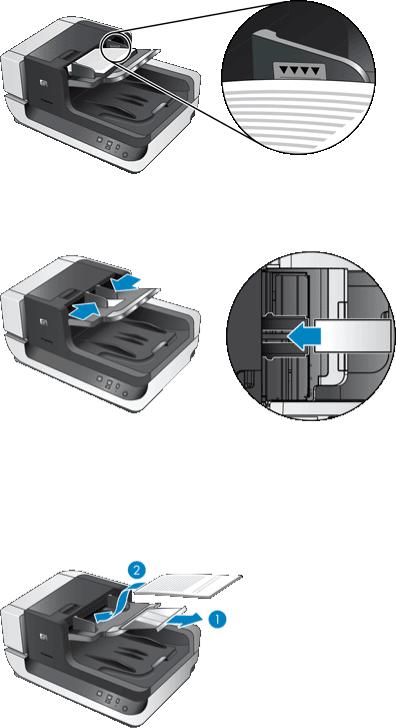
•The maximum capacity of the ADF is 200 sheets of 75 g/m2 (20 lb) paper. When using heavier paper, the maximum capacity is decreased. Use the fill line, shown below, as a guide for the maximum height of the document stack.
Load original documents |
5 |
Chapter 1
•For small or narrow documents, load the edge that is less than 148 mm (5.8 in) pointing into the feeder so that the longer edge can be pulled into the feeder and passed along by the feed rollers.
•When loading small or lightweight documents, such as A6 cards (index cards) or U.S. check carbons, load a stack of at least five documents to ensure that the ADF properly detects and feeds the stack. When scanning fewer than five small or lightweight documents, scan the documents by placing them on the scanner glass.
•When loading long documents that hang over the end of the input tray, pull out the input tray extender (1), and then load the documents (2).
How to load documents
1.Flip up the paper stop in the output tray that best matches the size of the documents that you are scanning. Select the stop position that is closest to (and beyond) the edge of your documents as they come out of the automatic document feeder (ADF).
6 Use the scanner

2.Fan the stack of document pages to ensure that the pages do not stick together. Fan the edge that will be pointing into the ADF in one direction, and then fan that same edge in the opposite direction.
3.Align the edges of the documents by tapping the bottom of the stack against the table top. Rotate the stack 90 degrees and repeat.
4.Place the stack in the middle of the input tray. Load the stack face up. For fastest scanning, load the stack with the left edge leading into the ADF.
 NOTE: In the scanning software, choose the layout setting that matches the orientation of the originals in the ADF.
5.Adjust the paper guides to the width of the documents. Take care not to overtighten the guides, which can restrict paper feeding, but make sure that the paper guides touch the edges of the documents.
Load original documents |
7 |
Chapter 1
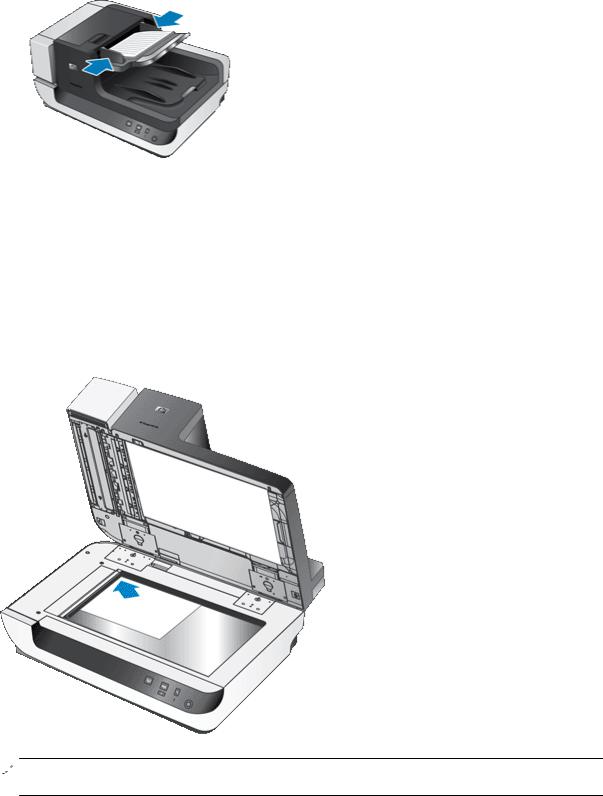
6.Gently push the stack forward to trip the tray sensor.
Load an original on the scanner glass
Place items that do not meet the specifications for the automatic document feeder (ADF) directly onto the scanner glass.
Minimum size: |
Any size |
|
|
Maximum size: |
300 x 432 mm (11.8 x 17 in) |
|
|
Place the original face down on the scanner glass, as indicated by the reference mark.
 NOTE: In the scanning software, choose the layout setting that matches the orientation of the original on the scanner glass.
8 Use the scanner
How to scan
The basic steps for scanning are:
1.Load the originals.
2.Do one of the following:
•Press the Scan ( ) button on the scanner front panel to start scanning with the assigned software (and profile, if appropriate).
•On the computer, open the scanning software, and then select the ISIS or TWAIN data source. Select the appropriate settings, and then initiate a scan.
TIP: 1 To reduce paper jams, use scan settings that specify the actual dimensions of the pages that you are scanning.
TIP: 2 If you select duplex scanning or copying and you load the originals into the automatic document feeder (ADF), the scanner processes both sides of a two-sided original at the same time.
See also
•Load original documents
•Associate a quick start button with scanning software
•Scan from scanning software
•Work with HP Smart Document Scan Software profiles
Associate a quick start button with scanning software
The scanner includes two quick start buttons, Scan ( ) and Copy (
 ). You can associate any button-aware scanning software with each of these buttons.
To associate a quick start button with scanning software, follow these steps:
1.Press the Tools ( ) button on the scanner front panel to open the HP Scanner Tools Utility. Click the
Buttons tab.
2.In the Program to Start drop-down list for a button, select the scanning software that you want this button to start.
3.Optionally, if you selected the HP Smart Document Scan Software, in the Profile drop-down list, select a profile.
If you do not select a profile, pressing the button starts the HP Smart Document Scan Software so that you can choose the scan settings each time that you start a new scan.
 NOTE: If you change the name of a profile that is assigned to a quick start button, update the button information in the HP Scanner Tools Utility.
See also
•Work with HP Smart Document Scan Software profiles
Scan from scanning software
You can scan an image or document directly into a software program if the program is ISIS or TWAIN compliant. Generally, the program is compliant if it has a menu option such as Acquire, Scan, Import New Object, or Insert. If you are unsure whether the program is compliant or what the option is, see the documentation for that program.
See also
•Scan from HP Smart Document Scan Software
•Scan from ISISor TWAIN-compliant scanning software
Scan from scanning software |
9 |

Chapter 1
Scan from HP Smart Document Scan Software
1.Click Start, point to Programs or All Programs, point to HP, point to HP Smart Document Scan, and then click HP Smart Document Scan Software.
2.Select a profile, and then click Scan.

 TIP: A description of the selected profile is displayed below the list.
3.Follow the onscreen instructions to complete the scan.
For more information, see the HP Smart Document Scan Software Help.
Scan from ISISor TWAIN-compliant scanning software
1.Start the scanning software, and then select the ISIS or TWAIN data source.
2.Select the settings that are appropriate for the documents that you are scanning.
3.Carry out the appropriate actions to complete the scan.
For more information, see the online help for the scanning software.
How to copy
The basic steps for copying are:
1.Load the originals.
2.Do one of the following:
•Press the Copy ( ) button on the scanner front panel to print the copies with the current copy settings.
•Click Start, point to Programs or All Programs, point to HP, point to Scanjet, point to N9120, and then click Document Copy.
Select print settings in the HP Document Copy dialog box.
 NOTE: If you want to change the copy settings, start the copy from the HP Document Copy software.
TIP: 1 You can configure HP Document Copy to always prompt for copy settings before starting to
print. For information, see the HP Scanner Tools Utility help.
TIP: 2 If you select duplex scanning or copying and you load the originals into the automatic document feeder (ADF), the scanner processes both sides of a two-sided original at the same time.
See also
•Load original documents
•Associate a quick start button with scanning software
•Scan from scanning software
10 Use the scanner

2 Useful scanner features
Experienced document management professionals might be interested in the following scan features that are available in the HP Smart Document Scan Software. Many of these features are also available from any ISISor TWAIN-compliant document scanning software that allows you to modify the scan settings.
•Work with HP Smart Document Scan Software profiles
•Automatically rotate scanned pages
•Scan extra long documents
•Filter out color from a document (color dropout)
•Set the background color for scans from the automatic document feeder
•Use scanner hardware compression for faster scans
•Disable Misfeed (Multipick) Detection
•Scan without reviewing
•Set up and use the imprinter
Work with HP Smart Document Scan Software profiles
An HP Smart Document Scan Software profile provides a fast, efficient way to select the settings for scanning and processing document pages. You can set up profiles for use with the quick start buttons on the scanner front panel.
Use the HP Smart Document Scan Software to set up and modify profiles. Use the HP Scanner Tools Utility to assign a profile to a quick start button on the scanner front panel.
You can configure each profile to perform specific scanning functions that you use often. For example, if you frequently need to scan originals at 200 dpi color to a searchable PDF file and e-mail that file to a co-worker, you can create a profile with the necessary settings to accomplish this task.
View profiles
The HP Smart Document Scan Software includes several default profiles.
To view the existing HP Smart Document Scan Software profiles, follow these steps:
1.Click Start, point to Programs or All Programs, point to HP, point to HP Smart Document Scan, and then click HP Smart Document Scan Software.
2.View the list of profiles.
Create profiles
To create an HP Smart Document Scan Software profile, follow these steps:
1.Click Start, point to Programs or All Programs, point to HP, point to HP Smart Document Scan, and then click HP Smart Document Scan Software.
2.Click New.
The Create New Profile dialog box is displayed.
3.In the Profile name box, type the name you want or accept the default name.
TIP: You might want to set up the new profile based on an existing one. To do so, select the Copy settings from profile check box, and then select an existing profile from the list.
4.Click Continue.
The Profile Settings dialog box is displayed.
5.Select the settings for the profile.
For more information, see the HP Smart Document Scan Software Help.
Useful scanner features |
11 |
Loading...