


HP PhotoSmart
S20 Photo Scanner
Basics
© Copyright 1999 Hewlett-Packard Company
All rights are reserved. No part of this document may be photocopied, reproduced, or translated to another language without the prior written consent of Hewlett-Packard Company.
The information contained in this document is subject to change without notice. HewlettPackard Company shall not be liable for errors contained herein or for consequential damages in connection with the furnishing, performance, or use of this material.
Portions of the software are copyright © LEAD Technologies, Inc. 1991-1998. ALL RIGHTS RESERVED.
HP, the HP logo, PhotoSmart, and the PhotoSmart logo are property of Hewlett-Packard Company.
Microsoft and Windows are registered trademarks of Microsoft Corporation.
Pentium and MMX are registered trademarks of Intel Corporation.
Adobe and Acrobat are registered trademarks of Adobe Systems Incorporated.

Table of Contents |
|
Chapter 1 - Introduction ....................................................................................................... |
3 |
Checking the System Requirements ............................................................................................................................................ |
3 |
Unpacking Your Photo Scanner .................................................................................................................................................... |
4 |
What’s Next? ............................................................................................................................................................................................ |
6 |
Chapter 2 - Quick Setup ...................................................................................................... |
7 |
Installing the Software ........................................................................................................................................................................ |
7 |
Connecting Your Photo Scanner .................................................................................................................................................. |
8 |
Calibrating Your Photo Scanner ................................................................................................................................................. |
10 |
Registering Your Photo Scanner ................................................................................................................................................. |
10 |
Installing Adobe Acrobat Reader ............................................................................................................................................... |
10 |
What’s Next? .......................................................................................................................................................................................... |
10 |
Chapter 3 - Scanning Photographs .............................................................................. |
11 |
Running the Scanning Software ................................................................................................................................................... |
12 |
Setting the Photo Scanner for the Photographic Format ................................................................................................. |
13 |
Setting the Photo Scanner for Mounted Film .............................................................................................................. |
14 |
Setting the Photo Scanner for a Film Strip ................................................................................................................... |
14 |
Setting the Photo Scanner for a Print .............................................................................................................................. |
14 |
Orienting Photographs for Insertion .......................................................................................................................................... |
15 |
Inserting and Scanning Photographs ........................................................................................................................................ |
16 |
Inserting and Scanning Mounted Film ........................................................................................................................... |
16 |
Inserting and Scanning Film Strips .................................................................................................................................. |
18 |
Inserting and Scanning Prints ........................................................................................................................................... |
20 |
Inserting and Scanning Small Prints and Paper Clippings .................................................................................. |
22 |
Manually Ejecting Photographs ................................................................................................................................................. |
24 |
Learning More About Your Photo Scanner ............................................................................................................................ |
25 |
Chapter 4 - Getting Help for Your Photo Scanner .............................................. |
27 |
Accessing the HP PhotoSmart Website .................................................................................................................................... |
27 |
Viewing Online Help ......................................................................................................................................................................... |
27 |
Getting Technical Support ............................................................................................................................................................. |
29 |
http://www.photosmart.com |
1 |
Appendix A - Cleaning Your Photo Scanner .......................................................... |
31 |
Appendix B - Uninstalling Your Photo Scanner ................................................... |
35 |
Uninstalling the Software ............................................................................................................................................................... |
35 |
Disconnecting the Photo Scanner .............................................................................................................................................. |
35 |
Glossary ................................................................................................................................... |
37 |
Index ........................................................................................................................................... |
41 |
2 |
HP PhotoSmart S20 Photo Scanner Basics |
Chapter 1 - Introduction
Welcome to the HP PhotoSmart S20 Photo Scanner Basics guide. The S20 photo scanner is a compact scanner designed specifically for scanning photographs.
It can scan these photographic formats:
•Mounted film — 35 mm mounted slides and mounted negatives
•Film strips — 35 mm negative strips and slide strips, up to 5 frames scanned at a time
•Prints — up to a maximum size of 5 inches x 7 inches (or 127 mm x 178 mm)
The S20 photo scanner also comes with the HP PhotoSmart scanning software for adjusting and storing scanned images with your PC.
This Basics guide helps you quickly set up the HP PhotoSmart scanning software and S20 photo scanner with your PC. This guide then explains how to scan mounted film, film strips, and prints with your photo scanner.
Note: For information on using the scanning software, please see the HP PhotoSmart Scanning Software Quick Reference and the online Help.
Checking the System Requirements
Both the HP PhotoSmart S20 photo scanner and the HP PhotoSmart scanning software work with PCs running either Microsoft® Windows® 95 or Windows 98. The specific system requirements for the photo scanner and scanning software are as follows:
Component |
Minimum Required |
Recommended |
|||
|
|
|
|
|
|
Processor |
|
Pentium® 90 or equivalent |
Pentium MMX® or equivalent |
||
RAM |
16 MB |
32 MB or more |
|||
Free hard disk space |
100 MB |
120 MB |
|||
Monitor/video |
640 x 480, 256 colors |
800 x 600 or more, 16-bit color |
|||
CD-ROM drive |
Double-speed (2X) |
Quad-speed (4X) or better |
|||
Sound card/speakers |
Not required |
16-bit or better |
|||
Pointing device |
Mouse or compatible |
Mouse or compatible |
|||
|
|
Windows pointing device |
Windows pointing device |
||
USB interface |
Available USB port |
Available USB port |
|||
http://www.photosmart.com |
3 |
Unpacking Your Photo Scanner
To unpack your S20 photo scanner, do the following:
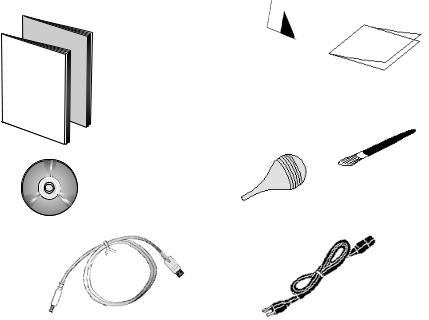
1.Remove all the contents from the HP PhotoSmart S20 photo scanner box. You should find the following items in the box along with the photo scanner.
This Basics guide for the S20 photo scanner and the Quick Reference for the HP PhotoSmart scanning software
HP PhotoSmart CD-ROM with the scanning software and multimedia tutorials
calibration card * |
photo sleeve * |
cleaning brush
air bulb
USB interface cable |
power cable |
|
* Note that both the calibration card and the photo sleeve are packaged in the special pocket inside the back cover of this Basics guide.
If you notice any damage while unpacking the contents, please notify the retailer where you purchased your photo scanner.
2.Remove the plastic wrapper from around the photo scanner.
4 |
HP PhotoSmart S20 Photo Scanner Basics |

3.Remove the tape from the photo scanner lid.
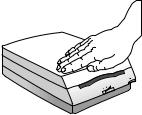
4.Hold the bottom of the photo scanner with one hand and pull up on the photo scanner lid with your other hand.
5.Open the photo scanner lid carefully and remove the foam insert.
http://www.photosmart.com |
5 |
6.Close the photo scanner lid by pressing down firmly until it snaps into place.
Note: Do not connect the S20 photo scanner to your PC. You must install the HP PhotoSmart scanning software on your PC (as explained in the next chapter) before you connect the photo scanner to your PC.
What’s Next?
You are now ready to set up the HP PhotoSmart scanning software and S20 photo scanner with your PC. To do this, go on to the next chapter, “Quick Setup.”
Note: If you ever need help while using the photo scanner, see Chapter 4 starting on page 27 in this guide. Chapter 4 explains how to access the HP PhotoSmart website, view the online Help, and get technical support from Hewlett-Packard Company for your photo scanner.
In addition, if you come across a particular term in this guide that you don’t understand, please refer to the Glossary of definitions starting on page 37.
6 |
HP PhotoSmart S20 Photo Scanner Basics |
Chapter 2 - Quick Setup
Note: You must install the HP PhotoSmart scanning software on your PC before you connect the S20 photo scanner to your PC.
This chapter helps you quickly set up the HP PhotoSmart scanning software and S20 photo scanner with your PC. By following these simple steps, you’ll be ready to scan photographs right away with your photo scanner.
Installing the Software
First, install the HP PhotoSmart scanning software on your PC, as follows:
1.Put the HP PhotoSmart CD into the CD-ROM drive of your PC. Within a minute or so, you will see the HP PhotoSmart setup screen displayed.
Note: If the HP PhotoSmart setup screen does not display: Click the Start button in the Windows taskbar and choose Run. Type the drive letter for your CD-ROM drive and the file name setup.exe (for example,
D:\setup.exe). Then click OK.
2.Click Install Software.
3.Follow the directions on the screen to have the setup program copy the scanning software onto your PC’s hard disk.
4.Once the software copying process is complete, the setup program prompts you to restart your computer. If you choose to restart your computer now, it will take a minute or two to do so.
5.The HP PhotoSmart Setup Wizard next prompts you to connect the photo scanner to a power outlet and to your PC. Go on to the next page for specific instructions on how to do this.
Setup Quick
http://www.photosmart.com |
7 |
Quick Setup
Connecting Your Photo Scanner
When the HP PhotoSmart Setup Wizard prompts you to do so, connect your photo scanner to a power outlet and to your PC, as follows:
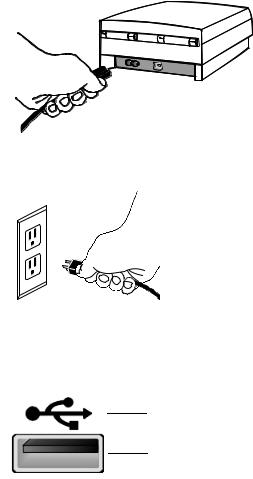
1.Connect the small end plug of the power cable to the power connector on the back of your photo scanner. (The power connector is to the left of the USB connector on the back of the photo scanner.)
2.Plug the other end of the power cable into a power outlet.
3.Locate the USB connector (or port) on the front or back exterior of your PC. The USB connector looks like this, and should have the distinctive USB symbol printed by it (usually above the connector), as shown here:
USB symbol
USB connector
8 |
HP PhotoSmart S20 Photo Scanner Basics |
4.Connect the rectangular end of the USB interface cable to the USB connector on the front or back exterior of your PC.
5.Connect the square end of the USB interface cable to the USB connector on the back of your photo scanner. (The USB connector is to the right of the power connector on the back of the photo scanner.)
Setup Quick
Note: The S20 photo scanner does not have a power switch. Thus, the photo scanner is always on while it is plugged into a power source. The photo scanner does, however, have a “sleep” mode for low power consumption when it is not in use.
6.Click the Connected button in the HP PhotoSmart Setup Wizard dialog box, and then go on to the next page.
http://www.photosmart.com |
9 |
Quick Setup
Calibrating Your Photo Scanner
The Scanner Calibration Utility now prompts you to calibrate your S20 photo scanner.
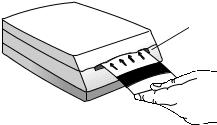
Get the calibration card from the special pocket inside the back cover of this Basics guide. Then, with the calibration card face up and with the arrows pointing toward the photo scanner, insert the calibration card into the photo insertion slot of the photo scanner.
photo insertion slot
When the calibration is complete, be sure to put the calibration card back into the pocket of this Basics guide so you will have it for future use.
Registering Your Photo Scanner
The setup program now prompts you to register your S20 photo scanner online, if you wish. If you choose to register it now, simply follow the directions on the screen to complete the registration. If you do not wish to register now, click Cancel, and you will be reminded to register in 2 weeks.
Installing Adobe Acrobat Reader
The setup program now prompts if you want the Adobe® Acrobat® Reader software installed on your PC. Acrobat Reader will allow you to read the HP PhotoSmart hardcopy documentation online, if you wish. If you choose to have Adobe Acrobat Reader installed, it will take a few seconds to do so.
What’s Next?
You have now successfully set up the HP PhotoSmart scanning software and S20 photo scanner with your PC. Go on to the next chapter, “Scanning Photographs,” to learn how to use your photo scanner.
10 |
HP PhotoSmart S20 Photo Scanner Basics |
Chapter 3 - Scanning Photographs
This chapter explains how to scan your photographs — mounted film, film strips, and prints — with the HP PhotoSmart S20 photo scanner.
Scanning photographs consists of these simple steps:
•Running the HP PhotoSmart scanning software on your PC
•Setting the photo scanner for the format of the photograph you want to scan
•Orienting the photograph for insertion into the photo scanner
•Inserting and scanning the photograph
Each of these steps is explained in this chapter. By following these simple steps, you will quickly gain professional-quality scanned images of your photographs from your S20 photo scanner.
Caution: Do not attempt to scan either small prints (less than 2 inches x 2 inches, or 50 mm x 50 mm) or paper clippings (such as magazine or newspaper clippings) without inserting them in the photo sleeve that came with your photo scanner. They may jam the photo scanner or may be destroyed by it. See “Inserting and Scanning Small Prints and Paper Clippings” starting on page 22 for more information.
Note: If you ever need to eject a photograph from the photo scanner during the scanning process, see “Manually Ejecting Photographs” starting on page 24.
http://www.photosmart.com |
11 |
Running the Scanning Software
You must first run the HP PhotoSmart scanning software on your PC so that your S20 photo scanner will recognize and then scan the photograph you insert into it. To run the scanning software, either:
•Double-click the HP PhotoSmart scanning software icon on your Windows desktop (if you had the setup program place such an icon, or shortcut, on your Windows desktop during software installation).
OR:
•Click the Start button in the Windows taskbar, and then choose Programs > HP PhotoSmart > S20 Photo Scanner > Scanning Software.
Note: You can also start the HP PhotoSmart scanning software from inside another software program that supports TWAIN. This allows you to be in the other program and use TWAIN to bring the images you scan with the S20 photo scanner into that other program. For more information, see the online Help.
12 |
HP PhotoSmart S20 Photo Scanner Basics |
 Loading...