


HP Notebook PC
Startup Guide
Enhanced for Accessibility

Notice
This manual and any examples contained herein are provided “as is” and are subject to change without notice. Hewlett-Packard Company makes no warranty of any kind with regard to this manual, including, but not limited to, the implied warranties of merchantability and fitness for a particular purpose. Hewlett-Packard Co. shall not be liable for any errors or for incidental or consequential damages in connection with the furnishing, performance, or use of this manual or the examples herein.
© Copyright 2002, 2004 Hewlett-Packard Company. All rights reserved. Reproduction, adaptation, or translation of this manual is prohibited without prior written permission of Hewlett-Packard Company, except as allowed under the copyright laws.
The programs that control this product are copyrighted and all rights are reserved. Reproduction, adaptation, or translation of those programs without prior written permission of Hewlett-Packard Co. is also prohibited.
Portions of the programs that control this product may also be copyrighted by Microsoft Corporation, Phoenix Technologies, Ltd., ATI Technologies Inc., Intel Corporation, and Adobe Systems Incorporated. See the individual programs for additional copyright notices.
This product incorporates copyright protection technology that is protected by method claims of certain U.S. patents and other intellectual property rights owned by Macrovision Corporation and other rights owners. Use of this copyright protection technology must be authorized by Macrovision Corporation and is intended for home and other limited viewing uses only unless otherwise authorized by Macrovision Corporation. Reverse engineering or disassembly is prohibited.
Microsoft®, MS-DOS®, and Windows® are U.S. registered trademarks of Microsoft Corporation. Pentium® and the Intel Inside logo are U.S. registered trademarks
and Celeron™ and SpeedStep™ are U.S. trademarks of Intel Corporation. Adobe® and Acrobat® are trademarks of Adobe Systems Incorporated.
HP Notebook PC Startup Guide
First Edition (December 2002)
Reference Number: ze4200/ze5200
Part Number: 311075-001
ii Startup Guide

Important Safety Information
CAUTION: To reduce the risk of fire, use only No. 26 AWG or larger telecommunications line cord to connect a modem to the telephone wall jack. In Australia, the computer must be connected to the Telecommunication Network through a line cord that meets the requirements of ACA Technical Standard TS008.
When using your notebook computer with a telephone connection, always follow basic safety precautions to reduce the risk of fire, electric shock, and injury to persons:
Do not use this product with a telephone connection near water (for example, near a bathtub, sink, swimming pool, or in a wet basement).
Avoid using a telephone connection (other than a cordless type) during an electrical storm. There may be a remote risk of electric shock from lightning.
Do not use a telephone connection to report a gas leak in the vicinity of the leak.
Use only the power cord and batteries indicated in this manual. Do not dispose of batteries in a fire. They may explode. Check with local codes for possible special disposal instructions.
Disconnect the modem cable before opening the computer case or touching an uninsulated modem cable, jack, or internal component.
Do not plug a modem cable or telephone cable into the network (LAN) receptacle.
WARNING: This is a Class B digital device, pursuant to Part 15 of the FCC Rules. For more Class B information, refer to the Reference Guide on the Documentation Library CD.
Startup Guide |
iii |

HP Software Product License Agreement
Your HP product contains software programs. CAREFULLY READ THIS LICENSE AGREEMENT BEFORE PROCEEDING TO OPERATE THIS EQUIPMENT. RIGHTS IN THE SOFTWARE ARE OFFERED ONLY ON THE CONDITION THAT THE CUSTOMER AGREES TO ALL TERMS AND
CONDITIONS OF THE LICENSE AGREEMENT. PROCEEDING TO OPERATE THE EQUIPMENT INDICATES YOUR ACCEPTANCE OF THESE TERMS AND CONDITIONS. IF YOU DO NOT AGREE WITH THE TERMS OF THE LICENSE AGREEMENT, YOU MUST NOW EITHER REMOVE THE SOFTWARE FROM YOUR HARD DISK DRIVE AND DESTROY THE MASTER DISKETTES, OR RETURN THE COMPLETE HP PRODUCT AND SOFTWARE FOR A FULL REFUND. PROCEEDING WITH CONFIGURATION SIGNIFIES YOUR ACCEPTANCE OF THE LICENSE TERMS.
UNLESS OTHERWISE STATED BELOW, THIS HP SOFTWARE LICENSE AGREEMENT SHALL GOVERN THE USE OF ALL SOFTWARE THAT IS PROVIDED TO YOU AS PART OF THE HP PRODUCT AND SHALL SUPERSEDE ANY OTHER SOFTWARE WARRANTY STATEMENT THAT MAY BE INCLUDED IN THIS HP PRODUCT OR MAY BE FOUND ONLINE.
Operating system and software applications by Microsoft are licensed to you under the Microsoft License Agreement contained in the Microsoft documentation or displayed on your screen when Microsoft Software Products are launched.
For a PC supplied with a Microsoft operating system: When you start the PC and accept the Microsoft End-user License Agreement (“EULA”), your license rights are valid only if a Certificate of Authenticity (“COA”) label corresponding to your Microsoft operating system is provided with your PC. The COA label can usually be found on the bottom of the computer. If the COA label does not correspond to your Microsoft operating system or is missing, contact your HP reseller for details.
Other non-HP Software and Operating Systems are covered by the appropriate vendor license. The following License Terms govern the use of the HP software:
USE. Customer may use the software on any one HP product. Customer may not network the software or otherwise use it on more than one HP product. Customer may not reverse assemble or decompile the software unless authorized by law.
COPIES AND ADAPTATIONS. Customer may make copies or adaptations of the software (a) for archival purposes or (b) when copying or adaptation is an essential step in the use of the software with an HP product so long as the copies and adaptations are used in no other manner.
iv Startup Guide

OWNERSHIP. Customer agrees that he/she does not have any title or ownership of the software, other than ownership of the physical media. Customer acknowledges and agrees that the software is copyrighted and protected under the copyright laws. Customer acknowledges and agrees that the software may have been developed by
a third party software supplier named in the copyright notices included with the software, who shall be authorized to hold the Customer responsible for any copyright infringement or violation of this Agreement.
PRODUCT RECOVERY CD-ROM OR DVD. If your HP product was shipped with a product recovery CD-ROM or DVD: (i) The product recovery CD-ROM or DVD and/or support utility software may only be used for restoring the hard disk
of the HP product with which the product recovery CD-ROM or DVD was originally provided. (ii) The use of any operating system software by Microsoft contained in any such product recovery CD-ROM or DVD shall be governed by the Microsoft License Agreement.
TRANSFER OF RIGHTS IN SOFTWARE. Customer may transfer rights in the software to a third party only as part of the transfer of all rights and only if Customer obtains the prior agreement of the third party to be bound by the terms of this License Agreement. Upon such a transfer, Customer agrees that his/her rights
in the software are terminated and that he/she will either destroy his/her copies and adaptations or deliver them to the third party.
SUBLICENSING AND DISTRIBUTION. Customer may not lease, sublicense the software, or distribute copies or adaptations of the software to the public in physical media or by telecommunication without the prior written consent of Hewlett-Packard.
TERMINATION. Hewlett-Packard may terminate this software license for failure to comply with any of these terms provided Hewlett-Packard has requested
Customer to cure the failure and Customer has failed to do so within thirty (30) days of such notice.
UPDATES AND UPGRADES. Customer agrees that the software does not include updates and upgrades which may be available from Hewlett-Packard under a separate support agreement.
EXPORT CLAUSE. Customer agrees not to export or re-export the software
or any copy or adaptation in violation of the U.S. Export Administration regulations or other applicable regulation.
Startup Guide |
v |

U.S. GOVERNMENT RESTRICTED RIGHTS. Use, duplication, or disclosure is subject to HP standard commercial license terms and for non-DOD Departments and Agencies of the U.S. Government, the restrictions set forth in FAR 52.227- 19(c)(1-2) (June 1987) Hewlett-Packard Company, 3000 Hanover Street, Palo Alto, CA 94304 U.S.A. Copyright (c) 2000 Hewlett-Packard Company. All Rights Reserved. Customer further agrees that Software is delivered and licensed as “Commercial computer software” as defined in DFARS 252-227-7014 (June 1995) or as a “commercial item” as defined in FAR 2.101(a), or as “Restricted computer software” as defined in FAR 52.227-19 (or any equivalent agency regulation or contract clause), whichever is applicable. The Customer agrees that it has only those rights provided for such Software by the applicable FAR or DFARS clause or the HP standard software agreement for the product involved.
SUPPORT POLICY FOR MICROSOFT OPERATING SYSTEMS SERVICE PACK. HP will provide end user support for HP PCs that use Microsoft Operating Systems, including its latest service packs. This support will be available 30 days after the service pack being released by Microsoft.
vi Startup Guide

Contents |
|
Getting Started with Your Notebook..................................................................... |
1 |
Identifying Parts of the Notebook........................................................................ |
2 |
Series ze4200 ................................................................................................. |
2 |
Series ze5200 ................................................................................................. |
5 |
Status Lights................................................................................................... |
8 |
Setting Up Your Notebook ................................................................................ |
10 |
Step 1: Insert the battery .............................................................................. |
10 |
Step 2: Connect AC power........................................................................... |
11 |
Step 3: Connect a phone line........................................................................ |
12 |
Step 4: Turn on the notebook ....................................................................... |
13 |
Step 5: Set up Windows ............................................................................... |
13 |
Using the Documentation Library CD ............................................................... |
14 |
Basic Operation ..................................................................................................... |
15 |
Operating Your Notebook.................................................................................. |
16 |
Default power settings.................................................................................. |
17 |
To reset the notebook ................................................................................... |
18 |
To change the boot device............................................................................ |
18 |
To use the TouchPad.................................................................................... |
19 |
To use the function hot keys ........................................................................ |
20 |
Using CDs or DVDs .......................................................................................... |
21 |
To play DVD movies ................................................................................... |
21 |
Batteries and Power Management ....................................................................... |
23 |
Using Battery Power.......................................................................................... |
24 |
To check battery status................................................................................. |
24 |
To respond to a low-battery warning ........................................................... |
25 |
To recharge the battery................................................................................. |
25 |
Troubleshooting and Maintenance....................................................................... |
27 |
Troubleshooting Your Notebook ....................................................................... |
28 |
Display Problems ......................................................................................... |
28 |
Hard disk drive problems ............................................................................. |
28 |
Keyboard and pointing device problems...................................................... |
29 |
Performance problems ................................................................................. |
29 |
Power and battery problems......................................................................... |
30 |
Startup problems .......................................................................................... |
31 |
Startup Guide |
vii |

Configuring Your Notebook .............................................................................. |
32 |
To run the BIOS Setup utility ...................................................................... |
32 |
Reinstalling and Updating Software .................................................................. |
33 |
Index ....................................................................................................................... |
35 |
viii Startup Guide

Getting Started with Your Notebook
Startup Guide |
1 |

Getting Started with Your Notebook
Identifying Parts of the Notebook
Identifying Parts of the Notebook
Series ze4200
NOTE: Components included with the notebook vary by geographical region and features selected. The following illustrations identify the standard external components included with most notebook models.
The following table describes the Series ze4200 standard external components identified in the previous illustration.
1Notebook open/close latch
2One-Touch buttons
3Keyboard status lights
4Power button: turns the notebook on and off
5TouchPad, scroll pad, Click buttons, and an on-off button
6Main status lights (left to right): power mode, hard disk activity, and battery
7Hard disk drive
8Infrared port (select models)
9Wireless on-off button and indicator light (select models)
10Battery
11CD-ROM, DVD, or other drive
12PS/2 port
2 Startup Guide
Getting Started with Your Notebook
Identifying Parts of the Notebook
The following table describes the Series ze4200 standard external components identified in the previous illustration.
13AC adapter jack
14Universal serial bus ports (USB)
15RJ-45 jack: connects a network cable
16S-video-out jack
17Parallel port (LPT1): use this port for a parallel printer or other parallel device
18Serial port (COM1): use this port for a serial mouse, modem, printer, or other serial device
19External monitor port
20Kensington lock slot (security connector)
21RJ-11 jack: connects the modem cab
22PC Card and CardBus slot and button (location varies by model)
23IEEE 1394 port (select models)
24Audio jacks (left to right): external microphone, audio out (headphones)
25Volume control
26Audio mute button and audio mute light
27Floppy disk drive (select models)
Startup Guide |
3 |
Getting Started with Your Notebook
Identifying Parts of the Notebook
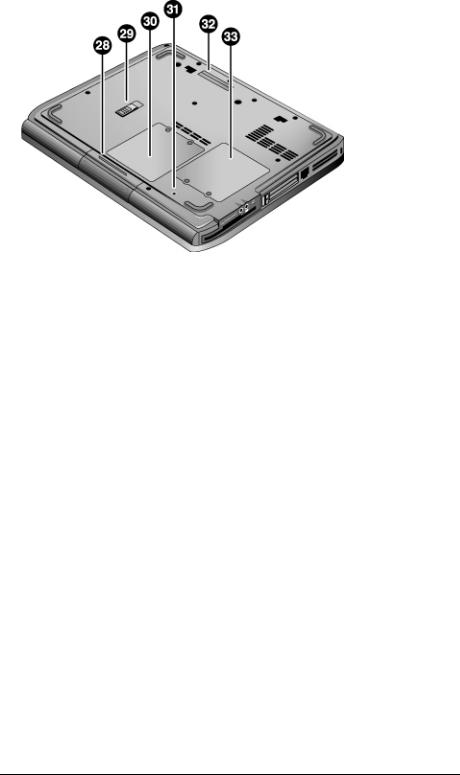
The following table describes the Series ze4200 standard external components identified in the previous illustration.
28 |
Hard disk drive |
31 |
Reset button |
29 |
Battery latch |
32 |
Docking port (select models) |
30 |
RAM (memory) cover |
33 |
Mini-PCI cover (no user parts inside) |
4 Startup Guide
Getting Started with Your Notebook
Identifying Parts of the Notebook
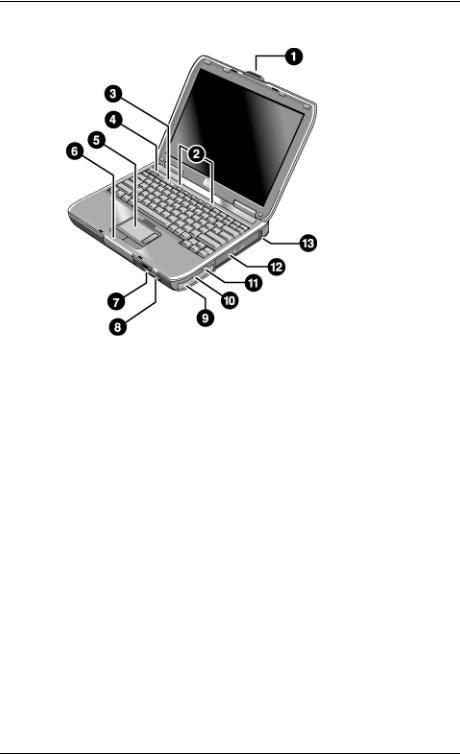
Series ze5200
The following table describes the Series ze5200 standard external components identified in the previous illustration.
1Notebook open/close latch
2One-Touch buttons
3Keyboard status lights
4Power button: turns the notebook on and off
5TouchPad, scroll pad, Click buttons, plus on-off button
6Main status lights (left to right): power mode, hard disk activity, and battery
7Infrared port (select models)
8Wireless on-off button and indicator light (select models)
9Battery
10Audio mute button, audio mute light, and volume control
11Audio jacks (left to right): audio out (headphones), external microphone
12CD-ROM, DVD, or other drive
13Universal serial bus port (USB)
Startup Guide |
5 |
 Loading...