


HP mx704, 7500, 7550, CRT Monitor, v72 User Manual
...Reference Guide
CRT Monitors 5500, v72, mx704, 7500, 7550, 9500
Document Part Number: 346224-002
January 2004
This guide provides information on setting up the monitor, installing drivers, using the onscreen display menu, troubleshooting, regulatory notices, and technical specifications.
Enhanced for accessibility.
© Copyright 2004 Hewlett-Packard Development Company, L.P.
The information contained herein is subject to change without notice.
Microsoft, MS-DOS, Windows, and Windows NT are trademarks of Microsoft Corporation in the U.S. and other countries.
Intel, Pentium, Intel Inside, and Celeron are trademarks of Intel Corporation in the U.S. and other countries.
Adobe, Acrobat, and Acrobat Reader are trademarks or registered trademarks of Adobe Systems Incorporated.
The only warranties for HP products and services are set forth in the express warranty statements accompanying such products and services. Nothing herein should be construed as constituting an additional warranty. HP shall not be liable for technical or editorial errors or omissions contained herein.
This document contains proprietary information that is protected by copyright. No part of this document may be photocopied, reproduced, or translated to another language without the prior written consent of Hewlett-Packard Company.
WARNING: Text set off in this manner indicates that failure to follow directions could result in bodily harm or loss of life.
CAUTION: Text set off in this manner indicates that failure to follow directions could result in damage to equipment or loss of information.
Reference Guide
CRT Monitors 5500, v72, mx704, 7500, 7550, 9500
Second Edition (January 2004)
Document Part Number: 346224-002

Contents
1 |
Introduction |
|
|
Kit Contents...................................................................... |
1–1 |
2 Safety and Maintenance Guidelines |
|
|
|
Safety Guidelines.............................................................. |
2–1 |
|
Power Requirements .................................................. |
2–1 |
|
Important Safety Information..................................... |
2–1 |
|
Maintenance Guidelines ................................................... |
2–2 |
|
Removing the Monitor Base ...................................... |
2–4 |
3 |
Installation |
|
|
Attaching the Monitor Base.............................................. |
3–1 |
|
Setting Up the Monitor..................................................... |
3–2 |
|
Connecting the Speakers (Available with Select Models) 3–4 |
|
|
Attaching the JBL Speakers to the Monitor............... |
3–5 |
|
Using the JBL Speaker Security Lock ....................... |
3–6 |
|
Connecting Portable Output Devices to the |
|
|
JBL Speakers ............................................................. |
3–7 |
|
Plugging Headphones into the Computer ......................... |
3–7 |
4 |
Operation |
|
|
Information Files .............................................................. |
4–1 |
|
Front Panel Controls......................................................... |
4–2 |
|
On-Screen Display............................................................ |
4–4 |
|
On-Screen Display Functions .................................... |
4–5 |
Reference Guide |
iii |

Contents
|
Monitor Messages .......................................................... |
4–10 |
|
No Signal Message .................................................. |
4–10 |
|
Out of Frequency Range Message ........................... |
4–11 |
|
Using the Energy Saver Mode........................................ |
4–12 |
A |
Troubleshooting |
|
|
Solving Common Problems............................................. |
A–1 |
|
Using the Worldwide Web .............................................. |
A–4 |
|
Preparing to Call Technical Support ............................... |
A–4 |
B |
Technical Specifications |
|
|
5500/15” Series Monitor ................................................. |
B–1 |
|
v72/17” Series Monitor ................................................... |
B–3 |
|
mx704/17” Series Monitor .............................................. |
B–5 |
|
7500/17” Series Monitor ................................................. |
B–7 |
|
7550/17” Flat CRT Monitor ............................................ |
B–9 |
|
9500/19” Series Monitor ............................................... |
B–11 |
C |
Agency Regulatory Notices |
|
|
Federal Communications Commission Notice ................ |
C–1 |
|
Modifications ............................................................ |
C–1 |
|
Cables........................................................................ |
C–2 |
|
Declaration of Conformity for Products Marked with FCC Logo, |
|
|
United States Only........................................................... |
C–2 |
|
Canadian Notice .............................................................. |
C–3 |
|
Avis Canadien........................................................... |
C–3 |
|
European Notice .............................................................. |
C–3 |
|
Japanese Notice ............................................................... |
C–4 |
|
Korean Notice.................................................................. |
C–4 |
|
EPA Energy Star Compliance ......................................... |
C–4 |
|
Power Cord Set Requirements......................................... |
C–4 |
iv |
Reference Guide |

1
Introduction
Your microprocessor-based, digitally controlled color monitor is a high-performance and easy-to-use product. It employs the latest on-screen menu technology.
Kit Contents
The monitor kit contains:
CRT monitor
Monitor Base (pre-attached on select models)
Monitor AC power cord (select models)
Speakers and power adapter (select models)
Documentaion kit
Reference Guide |
1-1 |
2
Safety and Maintenance
Guidelines
Safety Guidelines
Power Requirements
A power cord is included with your monitor. If another cord is used, use only a power source and connection appropriate for this monitor. For information on the correct power cord set to use with your monitor, refer to the “Power Cord Set Requirements” section in Appendix C.
Important Safety Information
WARNING: To reduce the risk of electric shock or damage to your equipment, do not disable the power cord grounding feature. This equipment is designed to be connected to a grounded (earthed) power outlet that is easily accessible to the operator. The grounding plug is an important safety feature.
WARNING: For your safety, be sure that the power outlet you plug the power cord into is easily accessible and located as close to the equipment as possible. When you need to disconnect the power to the equipment, unplug the power cord from the power outlet by grasping the plug firmly. Never pull on the cord.
Reference Guide |
2-1 |

Safety and Maintenance Guidelines
CAUTION: For the protection of your monitor, as well as your computer, connect all power cords for your computer and its peripheral devices (such as a monitor, printer, scanner) to some form of surge protection device such as a power strip or Uninterruptible Power Supply (UPS). Not all power strips provide surge protection; the power strips must be specifically labeled as having this ability. Use a power strip whose manufacturer offers a Damage Replacement Policy so you can replace your equipment if surge protection fails.
Maintenance Guidelines
To enhance the performance and extend the life of your monitor, follow these guidelines:
Do not open your monitor cabinet or attempt to service this product yourself. If your monitor is not operating properly,or has been dropped or damaged, first unplug from power oulet, then contact your Hewlett Packard authorized dealer, reseller, or service provider.
Adjust only those controls that are discussed in the operating instructions.
Place your monitor at least 3 inches (76 mm) away from walls or other enclosures.
Use only a power source and connection appropriate for this monitor as inidcated on the label/back plate of the monitor.
2-2 |
Reference Guide |

Safety and Maintenance Guidelines
Be sure the total ampere rating of the products connected to the outlet does not exceed the current rating of the electrical outlet, and the total ampere rating of the products connected to the cord does not exceed the rating of the cord. Look on the power label to determine the ampere rating (AMPS or A) for each device.
Install your monitor near an outlet that you can easily reach. Disconnect the montor by grasping the plug firmly and pulling it from the outlet. Never disconnect the monitor by pulling the cord.
Turn off your monitor off when not in use. You can substantially increase the life of your monitor by using a screen saver program and turing off the monitor when not in use.
Unplug your monitor from the wall outlet before cleaning. Do not use liquid cleaners or aerosol cleaners. Use a damp cloth for cleaning. If the screen requires additional cleaning, use an antistatic CRT screen cleaner.
CAUTION: Do not use benzene, thinner, ammonia, or any other volatile substances to clean your monitor or the screen. These chemicals may damage the cabinet finish as well as the screen.
Slots and opening in the cabinet are provided for ventilation. These openings must not be blocked or covered. Never push objects of any kind into cabinet slots or other openings.
Do not place plants on top of your monitor. Water or dirt from the plant may get into the vents.
Do not drop your monior or place it on an unstable surface.
Do not all anything to rest on the power cord. Do not walk on the cord.
Keep your monitor in a well ventilated area, away from excessive light, heat, or moisture. Keep your monitor away from high-capacity transformers, electical motors, and other devices with strong magnetic fields.
In a two-monior system, place your monitors as far apart from one another as possible to lessen interference between them.
Reference Guide |
2-3 |
Safety and Maintenance Guidelines
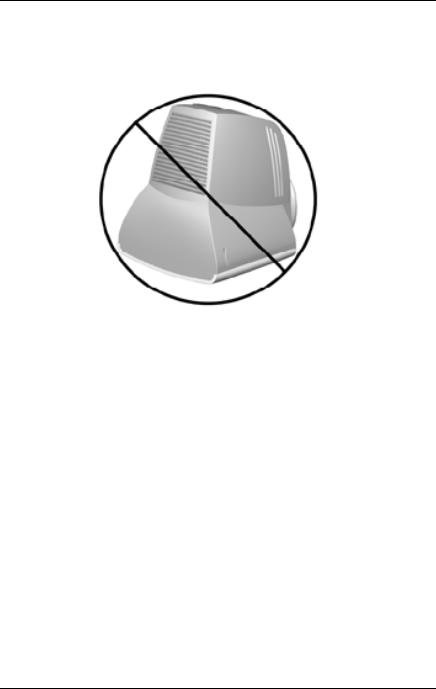
Do not place the monitor face down. Damage could result to the front panel controls or the monitor screen.
Removing the Monitor Base
In the event that you need to disassemble the base from the monitor, follow these instructions:
1.If you must remove the base attachment, release the catch and slide the base toward the back of your monitor.
2.Lift the base up and away from your monitor.
2-4 |
Reference Guide |
3
Installation
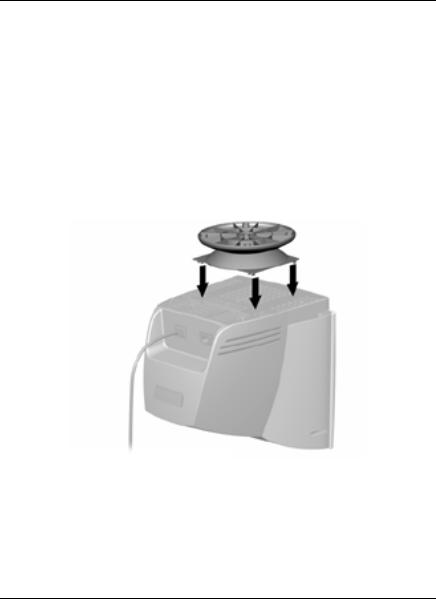
Attaching the Monitor Base
On some monitors, the base must be attached prior to setting up the monitor. To attach the base:
1.Align the hooks on the base with the sockets on the bottom of the monitor and attach the base.
Reference Guide |
3-1 |
Installation
2. Push the base toward the front of the monitor until it stops.
Setting Up the Monitor
Before setting up the monitor, place it in a convenient, wellventilated location near your computer.
1.Turn off the power to your computer and other peripheral devices.
2.Connect the video cable (blue connector) 1 from the back of the monitor to the blue 15-pin connector on the back of the computer. Tighten the cable screws to secure the cable to the connector.
CAUTION: To avoid damaging the video cable, ensure that the cable aligns with the 15-pin connector. Do not force the cable onto the connector.
3-2 |
Reference Guide |

Installation
3.Connect the power cord 2 to the back of the monitor, then connect the power cord to a power outlet.
4. Power on your computer and monitor.
If your monitor fails to function properly, refer to Appendix A, “Troubleshooting.”
5.If necessary, adjust the front panel monitor controls according to your personal preference. See “Front Panel Controls” for detailed information.
Your monitor installation is now complete.
Reference Guide |
3-3 |
 Loading...