


mp200
HD Media Player
HD
User Manual

Content |
|
Statement.................................................................................. |
1 |
Introduction............................................................................ |
2 |
Package Contents................................................................. |
3 |
Product Overview.................................................................. |
4 |
Front Panel ............................................................................................... |
4 |
Back Panel................................................................................................ |
4 |
Remote Control......................................................................................... |
6 |
Connect..................................................................................................... |
8 |
Setup......................................................................................................... |
10 |
Initial setup............................................................................................................. |
10 |
Setup Menu............................................................................................... |
12 |
Playback Multimedia................................................................................. |
20 |
Playback media files using an external DVD-ROM or USB storage device........... |
20 |
Rename or Delete media files................................................................................ |
34 |
Network player...................................................................... |
48 |
Setup the IP Address.............................................................................................. |
48 |
Check your PC’s computer name and workgroup.................................................. |
50 |
Setup your PC to share folders.............................................................................. |
52 |
Setup your home server or NAS to share folders................................................... |
53 |
Browse and play media from your PC or home server’s shared folder.................. |
53 |
My Shortcuts........................................................................................................... |
56 |
UPnP player............................................................................... |
60 |
Windows Media Player 11 Setup (on Windows XP/Vista)......................... |
60 |
Import media files to Windows Media Player 11..................................................... |
62 |
Browse through UPnP............................................................................................ |
62 |
NAS function............................................................................. |
65 |
Enabling the NAS function........................................................................ |
65 |
Accessing the NAS function................................................................................... |
65 |
BitTorrent (BT) download.................................................. |
67 |
Settings..................................................................................................... |
68 |
Add new torrent......................................................................................... |
68 |
Status page............................................................................................... |
69 |
English English
i
Troubleshooting................................................................... |
70 |
Reset the device........................................................................................ |
70 |
Power on/Standby time............................................................................. |
70 |
Battery....................................................................................................... |
70 |
Black screen.............................................................................................. |
70 |
Can’t use the Photo Thumbnail function................................................... |
70 |
Can’t see subtitle through UPnP playback................................................ |
71 |
Smooth playback through Ethernet/Wireless LAN.................................... |
71 |
TV Overscan issue.................................................................................... |
71 |
Error message displayed while playing DVD-Video.................................. |
71 |
Specification............................................................................ |
72 |
ii

Statement
Manufactured under license under U.S. Patent #’s: 5,451,942; 5,956,674; 5,974,380; 5,978,762; 6,487,535 & other U.S. and worldwide patents issued & pending. DTS and the Symbol are registered trademarks, & DTS 2.0+ Digital Out and the DTS logos are trademarks of DTS, Inc. Product includes software. © DTS, Inc. All Rights Reserved.
English English
1
Introduction
The HP mp200 HD Media Player allows you to enjoy your videos, photos and music on your TV and stereo system. It can playback high definition multimedia content up to 1080p using files stored on a USB flash drive, USB hard drive, or even across your
home network. Now you can finally get those files that have been stored on your PC for years and watch them on your HDTV screen.
Feature Highlights:
•Decode and output High Definition videos and photos (up to 1080p resolution).
•Support a wide variety of HD video formats.
•Connects to your TV using HDMI 1.3, Component or Composite connections.
•The built-in Ethernet port allows the media player to access content across the network using Universal Plug and Play protocols, as well as file sharing protocols such as SMB (Samba).
•High performance video playback with special playback control such as zoom out/in, picture panning, fast forward, fast reverse, slow-motion, and more.
•Fully supports multiple subtitle formats. Dynamically change the subtitle display by remote control.
•Photo playback in high definition. Supports 16X zoom in, and 3-direction rotation.
•Slide show mode includes 8 kinds of transition effects. Background music playback is supported.
•Supports a wide range of music encoding formats to playback high quality music files. The music playback function includes fast forward, fast reverse, repeat, shuffle and shuffle repeat.
•The USB 2.0 port allows for the connection of a USB Flash Drive, USB Hard Disk Drive, USB Card Reader, USB DVD-ROM Drive.
•Supports multiple types of file systems, including NTFS, FAT, and ext3.
•Easy to use interface and remote control.
2
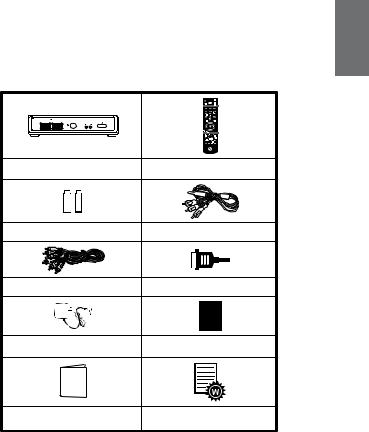
Package Contents
Please check the parts in the package, and contact the distributor if something is missing.
HP mp200 HD Media Player |
Remote Control |
Two AAA batteries |
Component Cable |
Composite AV Cable |
HDMI Cable |
Power Adapter |
Quick Installation Guide |
User’s Manual |
Warranty Card |
English English
3
Product Overview
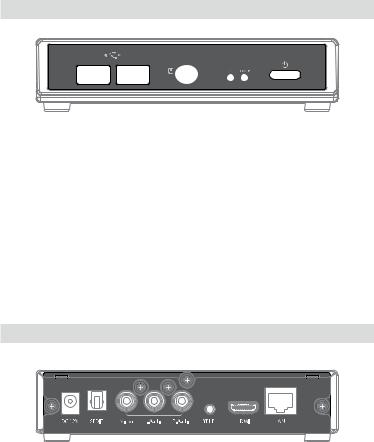
Front Panel
|
|
|
|
|
|
|
|
|
|
|
|
|
|
|
|
|
|
|
|
|
|
|
|
|
|
|
|
|
|
|
|
|
|
|
|
|
|
|
|
|
|
|
|
|
|
|
|
|
|
|
|
|
|
|
|
|
|
|
|
1 |
2 |
3 |
4 |
5 |
|||||||
LED/button/connector:
1.USB port: These two USB 2.0 type A sockets can be used to connect an external USB Flash Drive, USB Hard Drive, USB DVD-ROM, or USB Flash Card Reader.
2.IR sensor: This is the port that receives commands from the remote control. Please make sure not to block the port.
3.USB indicator: When plugging in a USB device, it may take up to 5 seconds for it to become ready.
4.Power indicator: Lights up when the power is plugged in, and the device is turned
on.
5.POWER STANDBY: Press this button to put the mp200 into standby or to wake it up from standby.
Back Panel
Video connection: Please select one of the following connections in order to connect the mp200 video to your TV set.
HDMI output: This high definition port can be used to connect the mp200 with your
4

HDMI receiver or HDMI TV set. This is the preferred connection method.
Component This high definition port is sometimes referred to as the YPbPr port. In the case where your TV does not support HDMI, or if you do not have a free HDMI port, you can use this to connect your media player to your TV or stereo receiver. Use the bundled cable in order to make this connection.
Composite Video (CVBS): This type of video connection only supports standard definition video playback. Only use this port if your TV does not have high definition playback capabilities.
Audio connection: Please select one of the following connections in order to connect the mp200 audio to your TV set or S/PDIF capable receiver.
HDMI output: HDMI can carry audio as well as video information. If you connect using HDMI, then you may not need to connect a separate audio connection.
AUDIO L/R: These ports provide the analog stereo audio channels to your TV set or stereo receiver.
S/PDIF: This is the TOSLINK (optical) digital audio output connection to connect your mp200 to your audio receiver.
Ethernet port: This is the Ethernet port for accessing content through your Local Network.
DC IN: This connects to the DC output of the Power Adapter. The power requirement is 12Vdc, 1.5 A.
English English
5

Remote Control
4 |
5 |
|
|
|
|
|
|
|
|
|
|
|
|
|||||||||
1 |
|
|
|
|
|
|
|
|
|
|
|
|
|
|
|
|
2 |
|||||
|
|
|
|
|
|
|
|
|
|
|
|
|
||||||||||
3 |
|
|
|
|
|
|
|
|
|
|
|
|
|
|
|
6 |
||||||
|
|
|
|
|
|
|
|
|
|
|
|
|
||||||||||
8 |
|
|
|
|
|
|
|
|
|
|
|
|
|
|
7 |
|||||||
|
|
|
|
|
|
|
|
|
|
|
||||||||||||
|
|
|
|
|
|
|
|
|
|
|
|
|
|
|
9 |
|||||||
|
|
|
|
|
|
|
|
|
|
|
|
|
||||||||||
|
|
|
|
|
|
|
|
|
11 |
|||||||||||||
10 |
|
|
|
|
|
|
|
|
|
|
|
|
|
|
12 |
|||||||
|
|
|
|
|
|
|
|
|
|
|
||||||||||||
|
|
|
|
|
|
|
|
|
|
|
|
|
|
|
|
|
|
|
|
|
||
|
|
|
|
|
|
|
|
|
|
|
|
|
|
|
|
|
|
|
|
|
|
|
|
|
|
|
|
|
|
|
|
13 |
|||||||||||||
15 |
|
|
|
|
|
|
|
|
|
|
|
|
|
|
|
|
|
|
|
|
|
|
17 |
|
|
|
|
|
|
|
|
|
|
|
|
|
14 |
||||||||
|
|
|
|
|
|
|
|
|
|
|
|
|||||||||||
|
|
|
|
|
|
|
|
18 |
||||||||||||||
16 |
|
|
|
|
|
|
|
|
|
|
19 |
|||||||||||
|
|
|
|
|
|
|
|
|
||||||||||||||
21 |
|
|
|
|
|
|
|
|
|
|
|
|
|
|
|
|
|
|
|
|
|
|
20 |
|
|
|
|
|
|
|
|
|
|
22 |
|||||||||||
24 |
|
|
|
|
|
|
|
|
25 |
|||||||||||||
22 |
|
|
|
|
|
|
|
|
|
|
26 |
|||||||||||
|
|
|
|
|
|
|
|
|
||||||||||||||
27 |
|
|
|
|
|
|
|
|
|
|
30 |
|||||||||||
|
|
|
|
|
|
|
|
|
||||||||||||||
28 |
|
|
|
|
|
|
|
|
29 |
|||||||||||||
6
1. |
POWER: Power on/suspend |
|
||
|
||||
2. |
INFO: Displays information about the file that is playing back |
English |
||
3. |
ALL: Hotkey to view all types of media files |
|||
|
||||
4. |
MUSIC: Hotkey to view only music files |
|
||
5. |
PHOTO: Hotkey to view only photo files |
|
||
6. |
VIDEO: Hotkey to view only video files |
English |
||
7. |
Number key: Number 0, 1 to 9 |
|||
|
||||
8. |
MUTE: Mute the audio |
|
||
9. |
DELETE: Delete selected files |
|
||
10. |
VOLUME +/-: Increase/decrease volume |
|
||
11. |
SETUP: Open System Setup page |
|
||
12. |
ZOOM +/-: Zoom In/out |
|
||
13. |
RETURN: Go up one folder/exit the current menu |
|
||
14. ▲, ▼, ◄, ►: Direction key UP, DOWN, LEFT, RIGHT |
|
|||
15. |
OK: Used to select specific files/folders, also used in general navigation |
|
||
16. |
PREV: During playback, skip backwards to the previous file/section. During file/folder |
|
||
navigation, scroll up 1 page. |
|
|||
17. |
NEXT: During playback, skip to the next file/section. During file/folder navigation, |
|
||
scroll down 1 page. |
|
|||
18. |
REV: Fast Reverse |
|
||
19. |
FWD: Fast Forward |
|
||
20. |
STOP: Stop |
|
||
21. |
PLAY: Start playback |
|
||
22. |
PAUSE/STEP: Pause and step frame by frame |
|
||
23. |
SLOW: Slow motion |
|
||
24. |
Q.REV (Quick Reverse): During video playback, this will skip backwards by 7 |
|
||
minutes, music playback skips backwards by 7 seconds |
|
|||
25. |
Q.FWD (Quick Forward): During video playback, this will skip forwards by 10 |
|
||
minutes, music playback skips forward by 10 seconds |
|
|||
26. |
OPTIONS: Allows for deleting and renaming folders and files. |
|
||
27. |
RESOLUTION: Change resolution of the video output. |
|
||
28. |
REPEAT 1/ALL: During playback allows you to toggle between Off/Title/Chapter/All |
|
||
29. |
REPEAT A-B: During playback allows you to mark two points (A and B), and then |
|
||
loop the playback between those two points. |
|
|||
30. |
L/R: Switch to right/left audio channel removal or normal audio |
|
||
7

RED / GREEN / YELLOW / BLUE: Special function
Function key |
Video playback DVD Menu |
File browser |
Network function |
|
|
|
|
Red |
Open DVD Menu |
None |
Refresh |
|
|
|
|
Green |
Toggle audio track |
Options |
Options |
|
|
|
|
Yellow |
Switch the subtitle |
Switch to Thumbnail |
None |
|
|
|
|
Blue |
Change the Angle |
Back to home |
Back to home |
|
|
|
|
Connect
There are three ways shown below to connect this player to your TV set. Please choose the one that best applies to your TV/Stereo configuration.
Basic connection (standard definition):
Power Cord: Connect the DC power adapter to the mp200 media player.
Audio cable output: Using the supplied analog stereo cable, connect the mp200 audio output to your TV set.
CVBS video output (NTSC or PAL): Using the supplied composite video cable, connect the mp200 video output to your TV set.
Advanced connection (high definition):
Power Cord: Connect the DC power adapter to the mp200 media player. Audio cable output: Connect the cables to TV set.
Component video cable for HD video output (720p, 1080i): Connect the 1/8” jack of the AV (component) cable to the back of the mp200, and then connect the other end of the component cable to the YPbPr input of your TV set.
HDMI connection (high definition):
Power Cord: Connect the DC power adapter to the mp200 media player.
HDMI output to TV (Up to 1080p): Using the supplied HDMI cable, connect one end to the back of the mp200 and the other end to your TV set. Note that the HDMI port sends digital video and audio signals through the same cable. In this configuration, the audio output must be set to LPCM 2CH. Please refer to the audio section of the user’s manual for more information.
*HDMI output to HDMI receiver: Using the supplied HDMI cable, connect one end to the back of the mp200 and the other end to your HDMI receiver, in this configuration, the multichannel audio can be enabled and decoded by the HDMI receiver. Please
8

configure the mp200 audio output to HDMI RAW. Please refer to the audio section of the user’s manual for more information.
SPDIF connection:
Either the Basic/Advanced connection or the HDMI connection can also be used with the
SPDIF connection. This connection provides 5.1 audio data to the SPDIF receiver, and then the receiver decodes it into 5.1 audio outputs.
TOSLINK cable: Connect the optical cable from this port to the SPDIF input of the audio receiver. When connecting via SPDIF, the analog stereo audio connection isn’t required.
Multichannel audio setting: To obtain multichannel audio via SPDIF, configure the mp200 audio output to SPDIF RAW.
Network connection:
Choose wired (Ethernet) for the network connection. If you have purchased the optional wireless USB adapter*, you can plug that into the USB port on the front of the mp200, and then select wireless for the network connection.
* ZW-N290
English English
9
Setup
Please insert the batteries into the remote control, and then start the initial setup.
Initial setup
Connect the mp200 to your TV and/or stereo receiver (as shown in the “Connect” section of this manual), then connect the power adapter to the mp200 and turn it on.
Note: If you want to connect the mp200 via HDMI, please connect the HDMI cable prior to powering up the mp200.
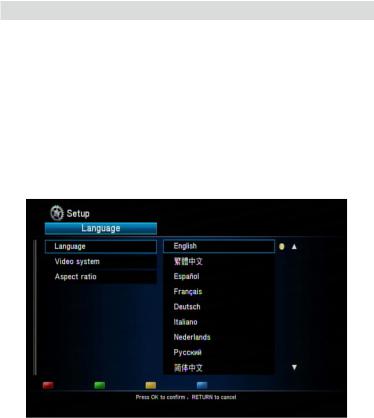
When the mp200 media player is first powered up, it will display a startup logo. After a few seconds, this logo will be replaced with a setup page. The first item in the setup page is the language selection. Using the ▲ ▼ buttons, please choose the language you want to use for the OSD, then press “OK” to confirm.
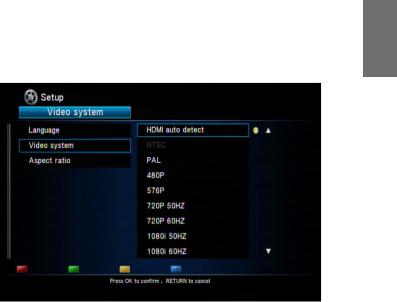
The second item is to choose the resolution of the video output according to your TV set and the connection between the mp200 and the TV set.
•For an HDMI TV set, the mp200 detects the available resolution of your TV set and lists them on screen. In the list of resolutions, the available options are shown using white characters, while the unsupported options are grayed out. We recommend you to select the option “HDMI Auto” which enables the maximum resolution on your TV set.
•For YPbPr (component) output, the supported resolution is up to 1080i so select “1080i 50Hz” for a PAL TV set or “1080i 60Hz” for an NTSC TV set. For a TV set that doesn’t support high definition inputs, select “NTSC” or “PAL” for the SD video.
10
• For CVBS output, choose “NTSC” for an NTSC TV set or “PAL” for a PAL TV set.
Note: The CVBS always outputs standard definition video no matter which resolution is chosen.
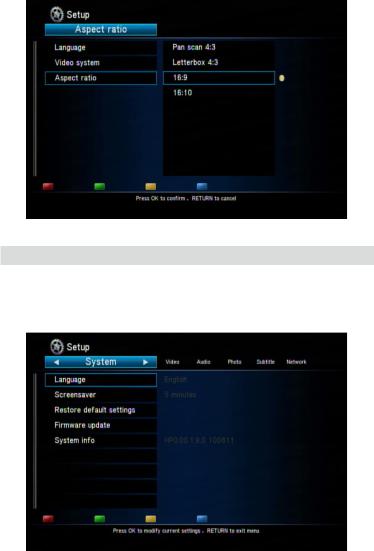
The final item is to setup the aspect ratio for your TV set. If your TV set is 4:3, then you can choose Pan Scan 4:3 or Letter Box 4:3. If you have a wide-screen TV, then you can choose 16:9. Use the ▲ ▼ buttons to select your aspect ratio, and press “OK” to confirm.
If you want to change any of these settings later on, you can access them via the
“Setup” option in the main menu.
English English
11
Setup Menu
From the main menu, you can press “SETUP” to open the setup menu. Use the ◄ ► buttons to select different pages among “System”, “Video”, “Audio”, “Photo” and “Network”. Use the ▲ ▼ buttons to select different categories within each page that can be configured. When on a specific category, press “OK” to open detailed configuration items that can be configured.
12
The menu structure and options are listed below.
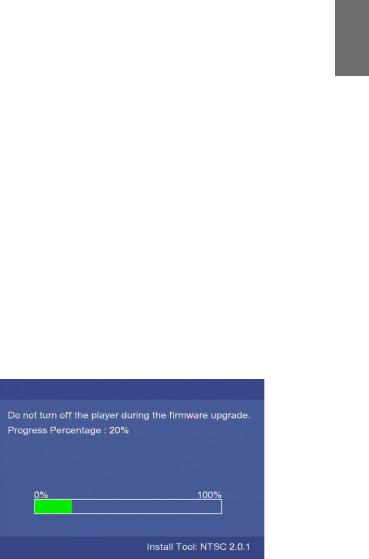
1. System
Select this option to access system settings for the mp200 media player.
Language: Select the OSD language. You can choose among English, Chinese Traditional, Español, Français, Deutsch, Italiano, Dutch, Pyccкий, Chinese Simplified and
Portuguese.
Screen Saver: Select to turn the screen saver off/on (the default setting is on). After a period of inactivity, the mp200 will display a moving icon on the screen to prevent screen burn. You can also choose the amount of time before the mp200 goes into screen saver mode.
Note: When using a plasma TV, it is recommended to leave the screen saver on.
Restore Default: Select this option to reset the mp200 settings to the factory defaults.
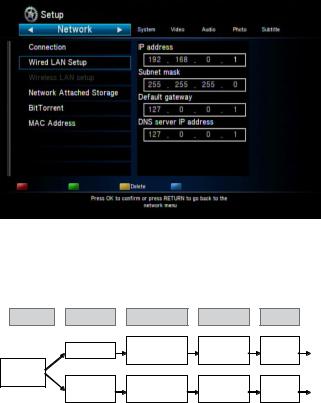
Firmware Update: Select this option to upgrade the mp200 firmware using a USB flash drive. The upgrade procedure is below:
1.Plug an empty USB flash drive into a PC.
2.Download the mp200 firmware file(s) into the root directory of the USB flash drive.
3.Remove the USB flash drive from the PC, and plug it into the mp200.
4.Select the “Firmware Update” option in the System menu, and then choose System upgrade and press “OK” to continue.
5.Do not unplug the power during the upgrade procedure. During the firmware upgrade, the mp200 will restart and then show a progress screen.
6.When the upgrade is completed, the mp200 will restart and return to the main screen.
English English
13
System Info: This will display the current firmware information including system version, audio firmware version, video firmware version, and the TV system.
2. Video
Select this option to access video settings for the mp200 media player.
Aspect Ratio: Select one from among these options: Pan Scan 4:3, Letter Box 4:3,
16:9.
Pan Scan 4:3: Select this option for a full-height picture with both sides cut.
Letter Box 4:3: Select this option for a “wide screen” display with black bands on the upper and lower parts of the TV screen.
16:9: Select this option for a wide screen 16:9 TV.
Note: When the movie is in wide screen 2.40:1, both sides of the video will be cropped.
Press “Zoom -” to zoom out the video to fit the screen.
Scaling option:
TV System: Select the video type and resolution for the TV picture.
Entering this page will allow you to view the current settings or to change the video type and resolution.
The possible resolutions for each TV system are listed below. Select the right resolution according to the capability of your TV set.
TV System & Resolution |
Standard Definition |
High Definition |
|
|
|
|
|
NTSC |
NTSC, 480p |
720p@60Hz, 1080i@60Hz, |
|
1080p@60Hz |
|||
|
|
||
PAL |
PAL, 576p |
720p@50Hz, 1080i@50Hz, |
|
1080p@50Hz |
|||
|
|
Only HDMI and Component (YPbPr) video connections can output high definition video.
Refer to the details below.
HDMI Connection: When the mp200 is connected via HDMI, the mp200 can automatically detect the available resolution of your TV. After entering the video setup page, the available resolutions will be shown in white characters while the unavailable resolutions will be grayed out.
HDMI Auto: When the media player is connected via HDMI, you can choose this option to have the mp200 automatically select the maximum resolution of the TV. If this option is grayed out, please unplug the HDMI cable, reconnect it and come back to this page and try again.
YPbPr: The maximum resolution of Component video (YPbPr) is 1080i. Select 50 Hz for a PAL TV system, or 60 Hz for an NTSC TV system.
14

CVBS: This port always outputs standard definition video, regardless of what resolution is selected.
Note: When connecting an LCD monitor via a DVI to HDMI converter, the mp200 will automatically detect the supported resolution of the LCD monitor. Only the supported resolutions (listed in white characters) can be selected.
1080P 24HZ: Select “On” to enable this option. When this option is on, the player will output 1080p 24Hz video when all of the following conditions have been met:
1.The mp200 is connected via HDMI.
2.The EDID (Extended Display Identification Data) sent by the TV indicates that the
TV supports 1080p 24Hz.
3.The frame rate of the video file is 23.976 fps or 24 fps.
Movie Preview: Turn this option off to disable the preview of the video file in the file browse window.
Resume Play: When this function is enabled, the video progress is saved when playback is stopped, and can be continued later on.
3. Audio
Select this option to access audio settings for the mp200 media player. The mp200 supports four types of digital audio output, which are divided into two categories
“HDMI” and “SPDIF”.
For HDMI, it is recommended to connect the HDMI output of the mp200 to an HDMI capable receiver or TV. For SPDIF, it is recommended to connect the mp200 to an SPDIF capable receiver.
HDMI LPCM (2CH): When connecting the mp200 to a TV via HDMI, select this option for stereo audio. The media player will then trans-code the multi-channel audio data into digital stereo audio (linear pulse code modulation), and send that to the TV via the
HDMI port.
HDMI LPCM (MULTI CH):
HDMI RAW: When connecting the mp200 to a device that can handle multi-channel audio
(such as an HDMI receiver), select this option. In this mode, the media player sends the digital audio (Dolby Digital AC3, DTS, etc) through the HDMI port. Please be aware that in this mode, the HDMI receiver is required to decode and output the digital audio.
SPDIF LPCM (2CH): When connecting to an SPDIF capable receiver, select this option to send digitized stereo audio (LPCM) out of the optical audio port.
SPDIF RAW: Select this option to send digital multichannel audio out of the optical audio
English English
15

port. The SPDIF RAW option allows for support of Dolby Digital AC3 and DTS audio, but also requires that your SPDIF receiver is capable of decoding these audio streams.
For HDMI TV + HDMI receiver: Select HDMI LPCM (2CH) or HDMI RAW.
For HDMI TV + SPDIF receiver: Select SPDIF LPCM (2CH) or SPDIF RAW.
For HDMI TV only: Select “HDMI LPCM (2CH)”.
* If your HDMI TV can only decode 2 channel audio, the use of HDMI RAW can cause audio playback issues.
Karaoke Vocal Removal: Some video content is created with vocal tracks and music tracks stored in separate audio channels. For example, the vocals might be in the right channel while the music is in the left channel. If you only want to hear the music portion, you can select to listen to only the left audio channel. Note: The selected channel with be played back on both of your stereo speakers. Select “Normal” to disable the karaoke vocal removal and restore normal audio playback.
4. Photo
Select this option to access photo/slideshow settings for the mp200 media player.
Slideshow Timing: This setting specifies how long each photo is displayed during a photo slideshow. You can choose from these options: Off, 2 Seconds, 5 Seconds, 10
Seconds, 30 Seconds, 1 Minute and 2 Minutes.
Transition Effect: This setting specifies the transition effect that is displayed between each photo in the photo slideshow. Choose from these options: Off, Cross fade, Left to right, Top to bottom, Waterfall, Snake, Dissolve, Peel left corner, and Shuffle all effects.
5. Subtitle
Select this option to access subtitle settings for the mp200 media player.
Subtitle Encoding: Select the encoding for the subtitle file, file name and folder name. You can choose from the following encoding types: Unicode (UTF8), Chinese Simplified (GBK), Chinese Traditional (BIG5), Western (CP1252), Turkish (CP1254), Central European (CP1250), Greek (CP1253), Cyrillic (CP1251), Hebrew (CP1255) and SE European (ISO 8859-16).
Note: Choosing the wrong encoding type may cause incorrect characters to appear on your OSD.
Subtitle Font Size: This setting allows you to adjust the subtitle’s font size. You can choose a number from -30 to 30. The default size is “0”. Note that this setting does not control the subtitle size of a DVD-Video/ISO/IFO file.
16
Subtitle Color: This setting allows you to change the default color of the subtitle text.
The default color is white, but you can choose one of the following alternate colors: red, yellow, green, blue and black.
Subtitle Delay: If you find that the video playback and the display of external subtitles are not synchronized, you can increase or decrease the delay for the subtitle text. Use the ◄ ► buttons on the remote control to choose a time from -2000 ms to 2000 ms.
Negative values will show the subtitle text earlier, while positive values will show the subtitle text later.
6. Network
Select this option to access network settings for the mp200 media player.
Connection: You can use this setting to chose between the onboard (wired) Ethernet to connect to your network. Only one interface can be enabled at a time. The use of a wired Ethernet connection is recommended.
Wired LAN setup: The available options are: Cancel, DHCP IP (auto), Fixed IP (manual), and PPPoE Setup. Select “Cancel” to discard your changes. Use “DHCP IP (auto)” to have your router assign an IP address to the mp200 media player (this assumes that your home network router is configured to use DHCP). Use “Fixed IP (manual)” to setup the mp200’s IP Address manually.
Note: When using the Fixed IP (manual) setting, you must fill in the fields for: IP Address,
Subnet Mask, Default Gateway and DNS server IP Address.
NAS: Turn this function “On” to enable the mp200’s network attached storage function. When this function is enabled, the USB storage devices inserted into the mp200 can be accessed by other network clients on your network. Please refer to the section titled
“NAS function” for more details.
MAC Address: The MAC Address of the mp200 is displayed.
English English
17
Wireless LAN setup: Before configuring the wireless network, insert the USB Wireless Adapter into one of the USB 2.0 ports on the front of the mp200.
To setup the wireless connection, the mp200 will walk you through the steps below.
During each step, you can press the “OK” button to continue, or press the “RETURN” button to go back to the previous step.
Profile |
Wireless |
Wireless Setup |
Security Setup |
IP Setup |
|
|
|
Infra AP |
Get SSID |
Enter the key |
DHCP |
OK |
|
|
(Scan WLAN) |
FIX IP |
||||
|
|
|
|
|||
Connection |
|
|
|
|
|
|
Profile |
Peer to Peer |
1. |
Setup SSID |
|
|
|
|
Enter the key |
FIX IP |
OK |
|||
|
Ad Hoc |
2. |
Security |
|||
Profile: Choose one profile to edit or apply. The saved profile can be applied later. To apply the profile, choose it and press blue button to apply. In the first setting, choose “Connection 1” and press the “OK” button to continue.
Connection: Select to use either the “Infrastructure (AP)” or “Peer to Peer (Ad Hoc)” modes. If you have a home router, you would typically choose “Infrastructure (AP)”. If your home network does not include a router, then choose “Peer to Peer (Ad Hoc)” mode.
The following wireless setup procedure is divided into two sections, depending on which mode your wireless network uses (Infrastructure/AP vs. Peer to Peer/Ad Hoc).
18
Infrastructure AP Mode: If your network is using a router, then you typically have an “Infrastructure AP” wireless setup.
Get SSID: select the SSID which is the network name for your wireless router/access point and then press “OK” to continue.
Signal Strength: in this page, you can find the signal strength for every SSID. Adjust the position and angle of the mp200 USB Wireless Adapter and/or your router/access point to get the highest possible signal strength.
Security setup: If your wireless network is protected with a security/encryption key, use the mp200’s remote control to navigate the on-screen keyboard to input the security/encryption key.
Note: The wireless security key on the mp200 must be set to the same value as the wireless security key configured on your router or access point.
IP Setup: Choose to use either “DHCP IP (auto)” or Fixed IP (manual). For most home networks, DHCP IP is the most common choice. If Fixed IP (manual) is required, use the mp200’s remote control to navigate the on-screen virtual keyboard and manually enter the IP address for the mp200.
Test Connection: In the final step, press “OK” to save your wireless settings, and test the connection. The mp200 will attempt to connect to the network, if it works then the wireless setup is complete.
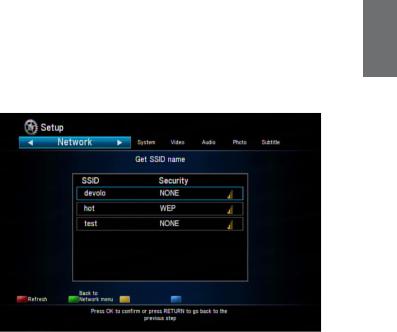
Peer to Peer Ad Hoc mode: If your network does not include a router, then you may have a peer to peer (Ad Hoc) wireless network. In this case, you must manually enter your wireless network settings using the mp200’s remote control and
English English
19

on-screen virtual keyboard.
SSID: Enter the wireless SSID, which is name of your wireless network.
Security: Select the type of security you are using on your wireless network (“None” for No encryption, “WEP” for WEP encryption, etc). Press the blue key to continue.
Enter the key: If choosing a security type that requires a security/encryption code, use the mp200’s remote control and on-screen virtual keyboard to input the security code. For a WEP key, the length of the password could be 10 or 26 hex digits.
Note: Only personal encryption modes are supported on the mp200. This includes: WEPOpen, WPA-PSK, and WPA2-PSK.
Note: The USB Wireless Adapter only supports 802.11n data rates (300 Mbps) when there is no wireless encryption or AES encryption. When using wireless security/encryption modes (like WEP-Open, WPA-PSK-TKIP or WPA2-PSK-TKIP modes), the data rate may only reach 802.11g (54 Mbps) speeds.
Note: For an Ad Hoc wireless network, the USB Wireless Adapter supports 11 b/g modes only ( 54 Mbps maximum).
Playback Multimedia
Playback media files using an external DVD-ROM or USB storage device
The mp200 supports the playback of videos, music and photos from USB devices such as a USB flash drive, a USB hard drive, or even a external USB DVD-ROM drive.
When you plug in a USB Mass Storage device (USB card reader, USB flash drive, etc) into the mp200, wait for about 5 seconds, and then you will see a message on screen indicating that the USB device was detected. At this point you can browse the USB device for the files that you want to playback.
To browse the USB storage device, you first select the type of files that you are looking for. Using the ◄ ► buttons on the remote control, select between: All, Music, Photo, and Video (alternatively, you can also use the buttons across the top of the remote control as a shortcut). Once you have selected the file type, you can use the ▲ ▼ buttons to select the device you want to browse, (in this example you can select “USB”), then press the “OK” button. Now use the ▲ ▼ buttons to select the USB device you want to browse (note that you can have more than 1 USB device connected to the mp200).
You can now use the ▲ ▼ buttons to move the highlight around the folders and files
20

stored on the USB device. If you have a large number of files you can press the |◄◄, ►►| buttons to jump backwards or forwards a page at a time.
To move into a folder, highlight it and press the “OK” button. To move out of a folder press the “RETURN” button. To start playback of a file, highlight it and press “OK”. To stop playback of a file, press the “STOP” button.
If the USB storage device is unplugged from the mp200, the USB LED on the front of the player will turn off, and the following message will shown on screen: “USB device removed”.
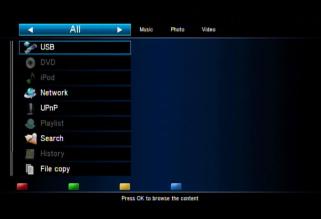
The first page
When powering on the media player the main menu window containing 11 options will be displayed.
•Select “DVD” to browse or playback content from an external DVD-ROM (that has a disc inserted).
•Select “USB” to browse or playback content from a USB storage device.
•Select “iPod” to browse or playback content from an iPod.
•Select “Network” to browse or playback files from a PC or home server. The “Network” option uses a file sharing protocol (Samba) to access your PC or home server. Depending upon how your PC or home servers are configured, you may have to provide login information to access certain shares.
•Select “UPnP” to browse or playback content from a PC or home server that is running an UPnP or DLNA media server.
•Select “Playlist” to playback media files that you had previously inserted into the playlist.
•Select “Search” to search for files by keyword.
•Select “History” to view a list of files that were played previously.
•Select “Internet multimedia” to browse or playback content from Internet Channels.
•Select “File Copy” to copy files between different USB storage devices.
•Select “Setup” to configure the mp200 settings (system, video, audio, photo, subtitle, network).
Note that there is also a selection across the top of the screen. Using the ◄ ► buttons on the remote control, select between: All, Music, Photo, and Video (alternatively, you can also use the buttons across the top of the remote control as a shortcut). These tabs act as filters, and will allow you to only see the selected file types. For example, if you select “Music”, and navigate into a folder with photos and music files, you will only see the music files. If you select “All”, then you will see all file types.
English English
21
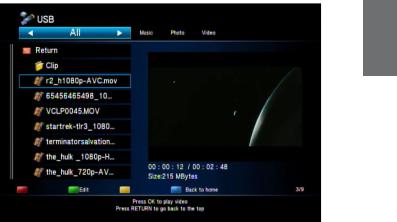
Video
Press the “VIDEO” button to filter out everything but video files. Use the ▲ ▼ buttons to select the device (DVD, USB, Network, UPnP, Playlist, etc) you want to browse and press “OK”.
Now use the ▲ ▼ buttons to move the highlight around the folders and files stored on the selected device. If you have a large number of files you can press the |◄◄, ►►| buttons to jump backwards or forwards a page at a time. To move into a folder, highlight it and press the “OK” button. To move out of a folder press the “RETURN” button.
The right panel will show a preview of the highlighted file.
* To disable the video preview, choose the “Setup” icon on the main menu, select the Video category, and then set “Movie Preview” to “Off”.
22
English English
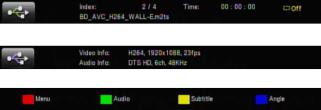
To start playback of a file, highlight it and press “OK”.
When the video begins to play, the four keys “Red, Green, Yellow, and Blue” will be displayed at the top of the TV screen.
Red, Green, Yellow, Blue: When playing DVD video files (such as a DVD ISO file or a VIDEO_TS.IFO file, you can press the red button to access the DVD “Menu”, the green key selects the DVD “Audio” track, the yellow button selects the DVD “Subtitle”, and the blue button changes the DVD “Angle”.
►, 
 ►: Press the Play button to play the file. Press the Pause button to temporarily pause the playback. Press the Play button again to resume playing.
REPEAT: When playing the content, press the “Repeat” button to switch the repeat modes among the following choices:, “Repeat Title” to repeat the current file, “Repeat ALL” to repeat all files in the directory, “Repeat Chapter” to repeat the current chapter in VOB/IFO/ ISO file, or “Repeat Off” to turn off the repeat mode.
|◄◄, ►►|: Jump to the previous or next file. While playing VOB/ISO/IFO video files, press this button to jump to the previous or next chapter. If there is no chapter in this file, the mp200 will remind you to press the button again to jump to the next file.
Note: When navigating a list of folders and/or files, these previous and next buttons allow you to jump backwards or forwards a page at a time.
 : Ban sign. When pressing a button that has no function for the file that you are playing back, the mp200 will show this icon on the screen.
◄◄, ►►: Press to play in fast reverse or fast forward. Pressing this button again will cause the mp200 to switch the rate among the following speeds: 1.5X, 2X, 4X, 8X, 16X,
23
and 32X.
SLOW: While playing a video, press this button to play in slow motion. Press again to toggle among the following speeds: 3/4X, 1/2X, 1/4X, 1/8X, 1/16X and 1X (normal speed).
ZOOM +, -: Press “+” to enlarge the video to 2X, 3X, 4X, and 8X. Press “-” to reduce the video to 8X, 4X, 3X, 2X, 1X and Zoom-out. When you are zoomed in, you can use the arrow buttons on the remote control to change the visible picture of the whole video.
Note: if the edge of the video is cut off on your TV screen, press the Zoom “-” button to make the video fit the screen.
VOLUME +, -: Press the volume buttons to adjust the audio volume.
RETURN: If navigating folders and files, press this button to go up one folder in the browse window. If navigating a menu, pressing this button will go back one menu level.
INFO: During playback, press this button to toggle among the following information screens codec information, video information, and DVD soft key information. In the video information screen, it shows the current title number/total number of titles, current play time, current repeat time and the file name. In the codec information screen, it shows the video and audio codec information. In the DVD soft key information screen, it shows how the remote control’s color soft-keys are mapped to the various playback functions.
Green button: If you are navigating files and folders, you can press the green button to rename or delete the file or folder. Please refer to the “Rename or delete media files” section for details.
Blue button: If you are navigating files and folders, you can press the blue button to go to the root directory.
Yellow button: While playing back an ISO/IFO file which supports a DVD-Video menu structure, you can press the yellow button to switch the language of the subtitle. When playing other types of video files, you can press the yellow button to change the subtitle code among: “OFF” for turning off subtitles, “BIG5” for traditional Chinese, “GBK” for simplified Chinese, and the rest of the Western European languages.
24

Subtitle display
External subtitle files: The mp200 supports various subtitle file formats such as: srt, sub, smi, idx+sub, ssa and ass. Please ensure that the subtitle filename is the same as the video filename and put them in the same folder. This mp200 will detect and apply the subtitle file automatically. If you have multiple formats of subtitle files, with the same filename, in the same folder, you can choose the one you want via the subtitle sub-menu which is explained below.
Adjust subtitle during playback: when playing a video with an external subtitle file, press the ◄ ► buttons to increase or decrease the font size of the subtitle text. The range of the font size is from -30 to 30. Press the ▲ ▼ buttons to adjust the vertical position of the subtitle text in the screen.
Subtitle sub-menu: during playback, press the yellow button to open the Subtitle submenu. In the sub-menu, you can configure the detailed settings of the subtitle. Press the ▲ ▼ buttons to navigate the options below and the ◄ ► buttons to change the value.
Subtitle number: if there are multiple subtitle files, choose one to display. The external and internal subtitles, like the MKV + SRT files can be chosen in the menu.
Text Encoding: choose the encoding type for the external subtitle files.
Delay: If you find that the video playback and the display of external subtitles are not synchronized, you can increase or decrease the delay for the subtitle text. Use the ◄ ► buttons on the remote control to choose a time from -2000 ms to 2000 ms. Negative values will show the subtitle text earlier, while positive values will show the subtitle text later.
Color: choose the color for the external subtitles.
Size: adjust the size of the external subtitles. The range is from -30 to +30.
Offset: Increase the height of the external subtitles. The default is 0 which shows the subtitle in the lowest position of the screen and where a bigger value means a higher screen position. The range is from 0 to 650.
* If the options including Text Encoding, Delay, Color, Size and Offset are grayed out and can’t be selected, the video type may not support external subtitle files. For
example, video files such as M2TS, ISO, VOB files, do not support external subtitle files.
English English
25
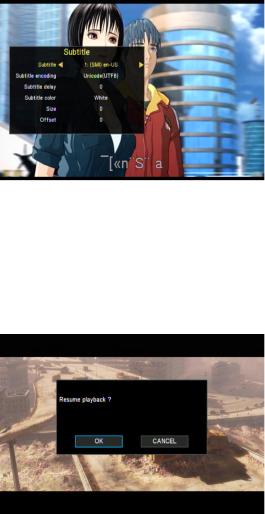
Resume Play
The mp200 media player supports a playback resume function. When video playback is stopped (either by the STOP key or the POWER key), the video progress will be saved in the player’s internal memory. When you play the same file the next time, a window will pop up, asking if you want to resume playback. Select “OK” to replay from the last location, or select “Cancel” to play from the beginning. The video progress is saved even if the mp200 loses electricity or is unplugged.
To disable this resume function, open the Setup menu; navigate to the Video category and set the “Resume play” option to “Off”.
26
 Loading...