


 Loading...
Multimedia
User Guide
© Copyright 2006 Hewlett-Packard
Development Company, L.P.
Microsoft and Windows are U.S. registered trademarks of Microsoft Corporation.
The information contained herein is subject to change without notice. The only warranties for HP products and services are set forth in the express warranty statements accompanying such products and services. Nothing herein should be construed as constituting an additional warranty. HP shall not be liable for technical or editorial errors or omissions contained herein.
First Edition: July 2006
Document Part Number: 416615-001
Table of contents
1 Multimedia hardware |
|
Using the audio features ...................................................................................................................... |
1 |
Using the audio-in (microphone) jack .................................................................................. |
3 |
Using the audio-out (headphone) jack ................................................................................. |
3 |
Using S/PDIF digital audio (select models only) .................................................................. |
4 |
Adjusting the volume ........................................................................................................... |
5 |
Using the QuickPlay buttons ................................................................................................................ |
6 |
Using the video features ....................................................................................................................... |
8 |
Using the external monitor port ............................................................................................ |
8 |
Using the S-Video-out jack .................................................................................................. |
8 |
Using the integrated camera (select models only) ............................................................................. |
10 |
Capturing and streaming video .......................................................................................... |
11 |
Capturing video ................................................................................................. |
11 |
Streaming video with an instant message program .......................................... |
11 |
Taking still photos .............................................................................................................. |
12 |
Adjusting camera properties .............................................................................................. |
12 |
Guidelines for using the camera ........................................................................................ |
13 |
Using the optical drive ........................................................................................................................ |
14 |
Identifying the installed optical drive .................................................................................. |
14 |
Inserting an optical disc ..................................................................................................... |
15 |
Removing an optical disc (with power) .............................................................................. |
16 |
Removing an optical disc (without power) ......................................................................... |
17 |
Using the media activity functions ...................................................................................................... |
18 |
Using the media activity hotkeys ....................................................................................... |
18 |
Using the media activity buttons (select models only) ....................................................... |
19 |
2 Multimedia software |
|
Locate and install software ................................................................................................................. |
22 |
Using multimedia software ................................................................................................................. |
23 |
Protecting playback ............................................................................................................................ |
24 |
Protecting the CD or DVD write process ............................................................................................ |
24 |
Changing DVD region settings ........................................................................................................... |
25 |
Observing the copyright warning ........................................................................................................ |
26 |
Index ................................................................................................................................................................... |
27 |
ENWW |
iii |
iv |
ENWW |
1 Multimedia hardware
Using the audio features
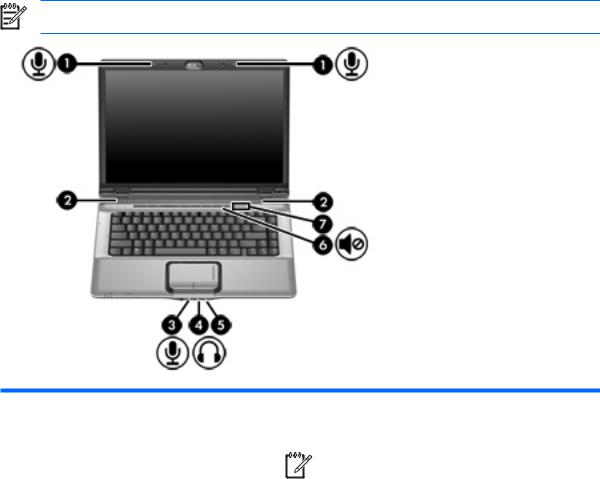
The following illustration and table describe the audio features of the computer.
NOTE Your computer may look slightly different from the illustration in this section.
Component |
Description |
||||||
|
|
|
|
|
|
|
|
(1) |
Internal microphones (2) (select models only) |
Record sound. |
|||||
|
|
|
|
|
|
|
|
|
|
|
|
|
|
NOTE A microphone icon next to each microphone |
|
|
|
|
|
|
|||
|
|
|
|
|
|
opening indicates that the computer has internal |
|
|
|
|
|
|
|||
|
|
|
|
|
|
microphones. |
|
|
|
|
|
|
|
|
|
|
|
|
|
|
|
|
|
(2) |
Speakers (2) |
Produce sound. |
|||||
|
|
|
|||||
(3) |
Audio-in (microphone) jack |
Connects an optional computer headset microphone, stereo array |
|||||
|
|
microphone, or monaural microphone. |
|||||
|
|
|
|||||
(4) |
Audio-out (headphone) jack |
Connects optional powered stereo speakers, headphones, ear |
|||||
|
|
buds, a headset, or television audio. |
|||||
|
|
|
|
|
|
|
|
ENWW |
Using the audio features 1 |

Component |
Description |
|
|
|
|
(5) |
Audio-out (headphone) S/PDIF jack |
Provides enhanced audio performance, including surround sound |
|
|
and other high-end audio output. |
|
|
|
(6) |
Volume mute button |
Mutes and restores speaker sound. |
|
|
|
(7) |
Volume scroll zone |
Adjusts speaker volume. Slide your finger to the left to decrease |
|
|
volume and to the right to increase volume. You can also tap the |
|
|
minus sign on the scroll zone to decrease volume, or you can tap |
|
|
the plus sign on the scroll zone to increase volume. |
|
|
|
2 Chapter 1 Multimedia hardware |
ENWW |
Using the audio-in (microphone) jack
The computer is equipped with a stereo (dual-channel) microphone jack that supports a stereo array and monaural microphone. Using sound recording software with external microphones allows for stereo recordings and stereo playbacks.
NOTE When connecting a microphone to the microphone jack, use a microphone with a 3.5- mm plug.
Using the audio-out (headphone) jack
WARNING! To reduce the risk of personal injury, adjust the volume before putting on headphones, earbuds, or a headset.
CAUTION To prevent possible damage to an external device, do not plug a single sound channel (monaural) connector into the headphone jack.
In addition to connecting headphones, the headphone jack is used to connect the audio input function of an audio/video device such as a television or VCR.
NOTE When connecting a device to the headphone jack, use only a 3.5-mm stereo plug.
NOTE When a device is connected to the headphone jack, the speakers are disabled.
ENWW |
Using the audio features 3 |

Using S/PDIF digital audio (select models only)
S/PDIF (Sony/Phillips Digital Interface), or digital audio, provides enhanced audio performance, including surround sound and other high-end audio output.
For digital audio connections, connect the S/PDIF digital audio cable to the digital audio connector on your audio/video equipment.
NOTE In order to use S/PDIF with the headphone jack, you will need an optional mini TOS link cable and/or adapter.
4 Chapter 1 Multimedia hardware |
ENWW |
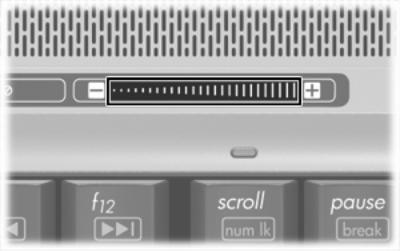
Adjusting the volume
You can adjust the volume using the following controls:
●Computer volume buttons:
●To mute or restore volume, press the mute button.
●To decrease volume, slide your finger across the volume scroll zone from right to left.
●To increase volume, slide your finger across the volume scroll zone from left to right.
●Microsoft® Windows® volume control:
a.Click the Volume icon in the notification area, at the far right of the taskbar.
b.Increase or decrease the volume by moving the slider up or down. Select the Mute check box to mute the volume.
– or –
a.Double-click the Volume icon in the notification area.
b.In the Master Volume column, you can increase the or decrease the column by moving the Volume slider up or down. You can also adjust the balance or mute the volume.
If the Volume icon is not displayed in the notification area, follow the steps below to place it there:
a.Select Start > Control Panel > Sounds, Speech, and Audio Devices > Sounds and Audio Devices.
b.Click the Volume tab.
c.Select the Place volume icon in the taskbar check box.
d.Click Apply.
●Program volume control:
Volume can also be adjusted within some programs.
ENWW |
Using the audio features 5 |

Using the QuickPlay buttons
NOTE Media button and DVD button (select models only) functions vary, depending on the software installed on your computer. Refer to the following table for more information.
The media button (1) and the DVD button (2) allow you to listen to music, play DVDs, and watch movies with the touch of a button.
Component |
Description |
|||||||||
|
|
|
|
|
|
|
|
|
|
|
(1) |
Media button |
If QuickPlay is installed and the computer is |
||||||||
|
|
● |
On, opens a music program or the Media menu allowing you |
|||||||
|
|
|
|
|
to select a multimedia program. |
|||||
|
|
● |
Off, opens a music program or the Media menu allowing you |
|||||||
|
|
|
|
|
to select a multimedia program. |
|||||
|
|
|
|
|
|
|
|
|
|
|
|
|
|
|
|
|
|
|
|
NOTE Press the power button to exit the |
|
|
|
|
|
|
|
|
|
|||
|
|
|
|
|
|
|
|
|
multimedia program. |
|
|
|
|
|
|
|
|
|
|||
|
|
|
|
|
|
|
|
|
||
|
|
● |
In standby, resumes from standby into Windows. |
|||||||
|
|
If QuickPlay is not installed and the computer is |
||||||||
|
|
● |
On, opens the default media player. |
|||||||
|
|
● |
Off, does not function. |
|||||||
|
|
● |
In standby, resumes from standby into Windows. |
|||||||
|
|
|
|
|
|
|
|
|
|
|
|
|
|
|
|
|
|
|
NOTE This button does not affect the procedure for |
||
|
|
|
|
|
|
|
|
|||
|
|
|
|
|
|
|
|
restoring from hibernation. |
||
|
|
|
|
|
|
|
|
|||
|
|
|
|
|
|
|
|
|
|
|
|
|
|
|
|
|
|
|
|
|
|
(2) |
DVD button (select models only) |
If QuickPlay is installed and the computer is |
||||||||
|
|
● |
On, opens the default DVD program to start a DVD in the |
|||||||
|
|
|
|
|
optical drive. |
|||||
|
|
● |
Off, opens QuickPlay to start a DVD in the optical drive. |
|||||||
|
|
|
|
|
|
|
|
|
|
|
6 Chapter 1 Multimedia hardware |
ENWW |
Component |
Description |
||
|
|
|
|
|
|
|
|
NOTE Press the power button to exit QuickPlay.
●In standby, resumes from standby into Windows. If QuickPlay is not installed and the computer is
●On, opens the default DVD program to start a DVD in the optical drive.
●Off, does not function.
●In standby, resumes from standby into Windows.
NOTE This button does not affect the procedure for restoring from hibernation.
ENWW |
Using the QuickPlay buttons 7 |
Loading...