HP HPE 112y User Manual
 Printed in
Upgrading and Servicing Guide
Removing and Replacing the
Front Panel
Removing and Replacing the Front Panel
10–20 minutes
Before You Begin
Observe the following requirements before removing and replacing the front panel.
Tools Needed
Flathead screwdriver
You can use a flathead screwdriver with the following screw (Torque screw).
CAUTION: Static electricity can damage the electronic components inside the computer. Discharge static electricity by touching the metal cage of the computer before touching any internal parts or electronic components.
WARNING:
Never open the cover with the power cord attached or power applied. You may damage your computer or be injured from the spinning fan blades.
Avoid touching sharp edges inside the computer.
Removing the Front Panel
1Remove the Pocket Media Drive, if it is present. Remove the Personal Media Drive, if it is present.
2Turn off the computer.
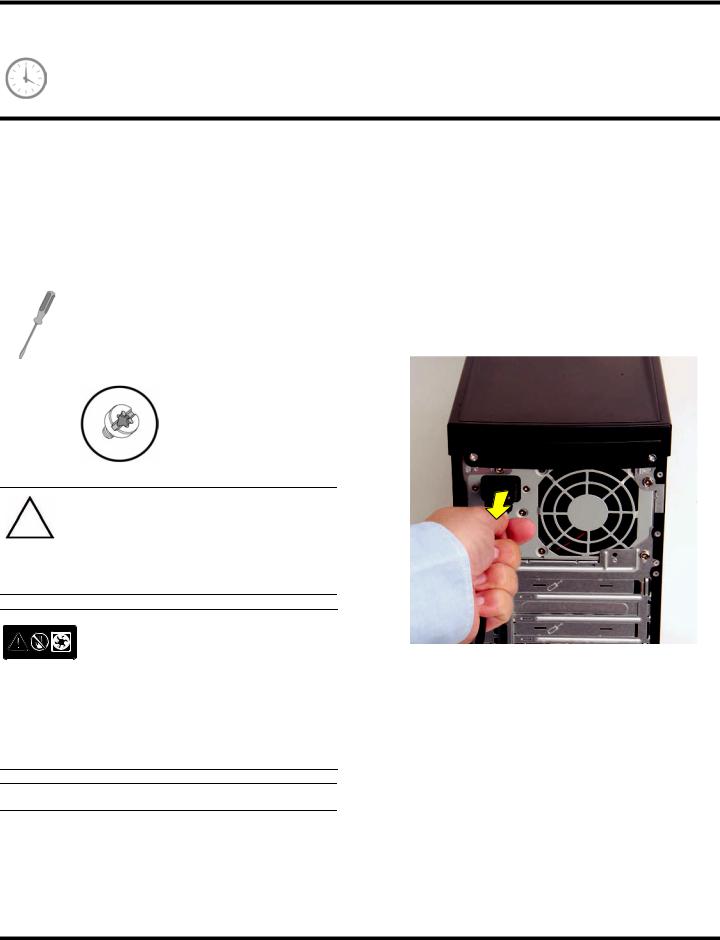
3Disconnect all peripherals and cables from the front and the back of the computer. Disconnect the power cord last.
NOTE: Computer features may vary by model.
2 |
570987-001 — Removing and Replacing the Front Panel |
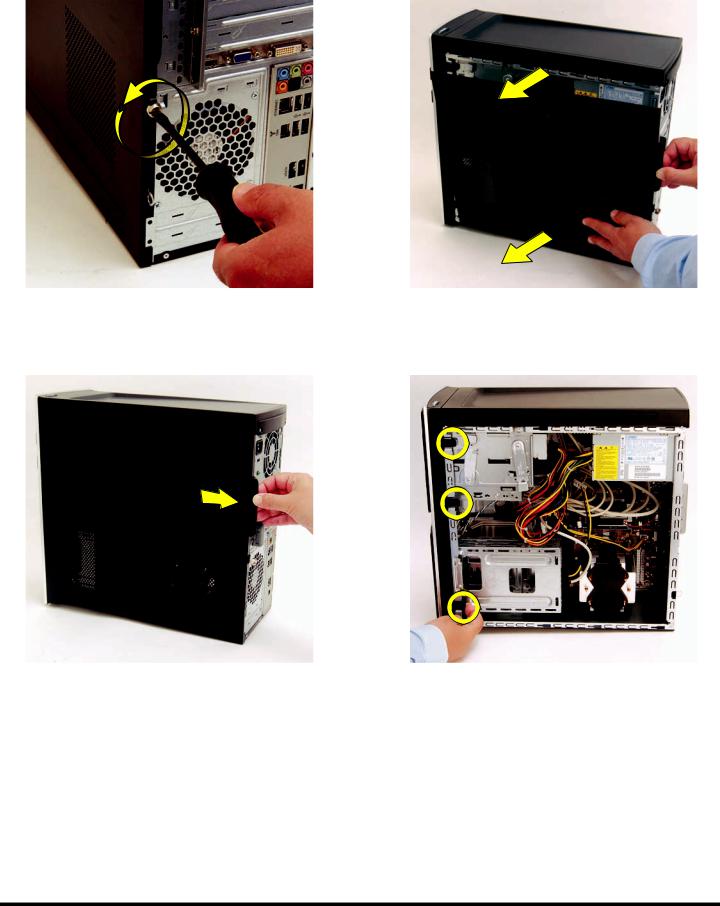
4Loosen the side panel thumbscrew on the back of the computer.
5Grasp the handle, and pull the side panel about 2.5 cm (1 inch) toward the back of the computer to release it.
6Tilt out the top of the side panel, and then lift the panel from the computer.
7Locate the three tabs that secure the front panel to the computer. Pull each of the tabs out slightly, away from the computer, to release the panel.
570987-001 — Removing and Replacing the Front Panel |
3 |
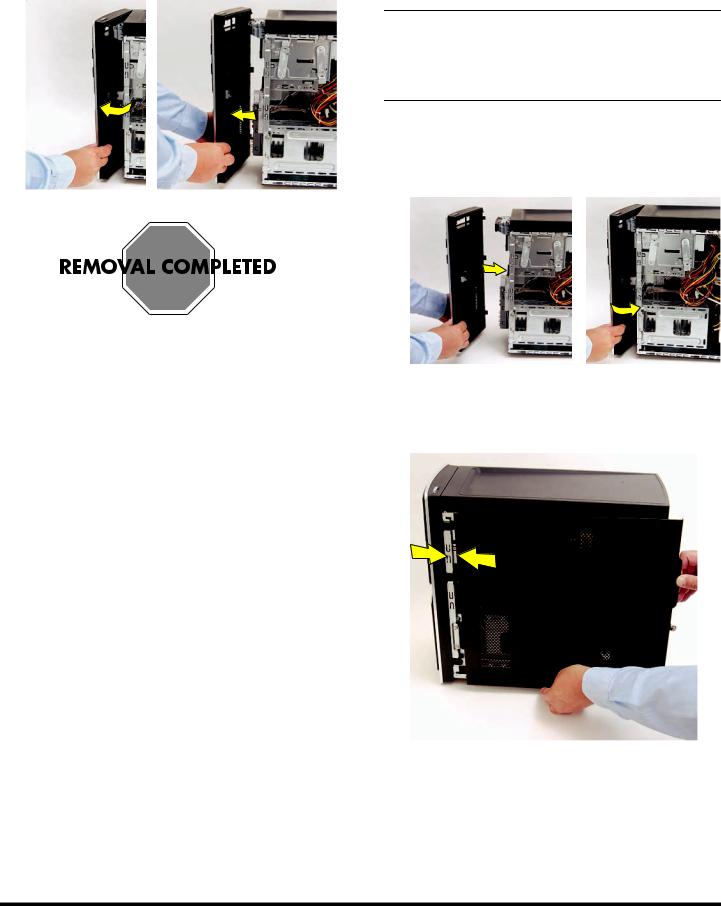
8Swing the front panel open toward the left, and then lift it off the computer.
Replacing the Front Panel
IMPORTANT: The new (replacement) part may not look the same as the original part, due to different manufacturers or models. Hewlett-Packard always provides quality parts that meet or exceed your original computer specifications.
1Hold the front panel over the computer, and then press the left side of the panel, inserting the tabs into the computer. Swing the right side of the panel toward the computer, and then press it into the computer.
2Hold the side panel over the side of the computer with the front edge of the panel about 2.5 cm (1 inch) from the front of the computer.
4 |
570987-001 — Removing and Replacing the Front Panel |
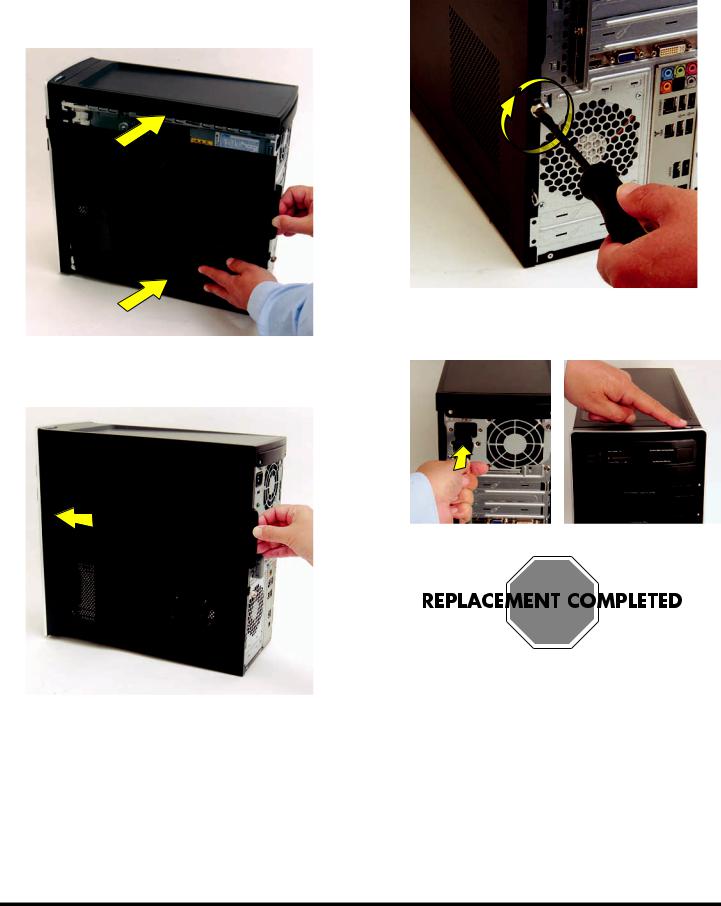
3Place the bottom of the panel on the computer, inserting the tabs on the inside of the panel into the rail slots on the computer. Swing the top of the panel toward the computer, inserting the top tabs into the rail slots.
5Tighten the side panel thumbscrew on the back of the computer.
6 Reconnect all peripherals and cables, and then turn on the computer.
4Slide the side panel toward the front of the computer into place.
570987-001 — Removing and Replacing the Front Panel |
5 |

6 |
570987-001 — Removing and Replacing the Front Panel |
Removing and Replacing an
Optical Disc Drive
Removing and Replacing an Optical Disc Drive
15–25 minutes
Before You Begin |
Removing an Optical Disc Drive |
Observe the following requirements before removing and replacing the optical disc drive.
Tools Needed
Flathead screwdriver
You can use a flathead screwdriver with the following screw (Torque screw).
CAUTION: Static electricity can damage the electronic components inside the computer. Discharge static electricity by touching the metal cage of the computer before touching any internal parts or electronic components.
WARNING:
Never open the cover with the power cord attached or power applied. You may damage your computer or be injured from the spinning fan blades.
Avoid touching sharp edges inside the computer.
NOTE: Computer features may vary by model.
1Before you begin servicing the computer, press the Eject button, and remove any CD or DVD from the optical disc drive tray.
2Remove the Pocket Media Drive, if it is present. Remove the Personal Media Drive, if it is present.
3Turn off the computer.
4Disconnect all peripherals and cables from the front and the back of the computer. Disconnect the power cord last.
2 |
537501-001 — Removing and Replacing an Optical Disc Drive |
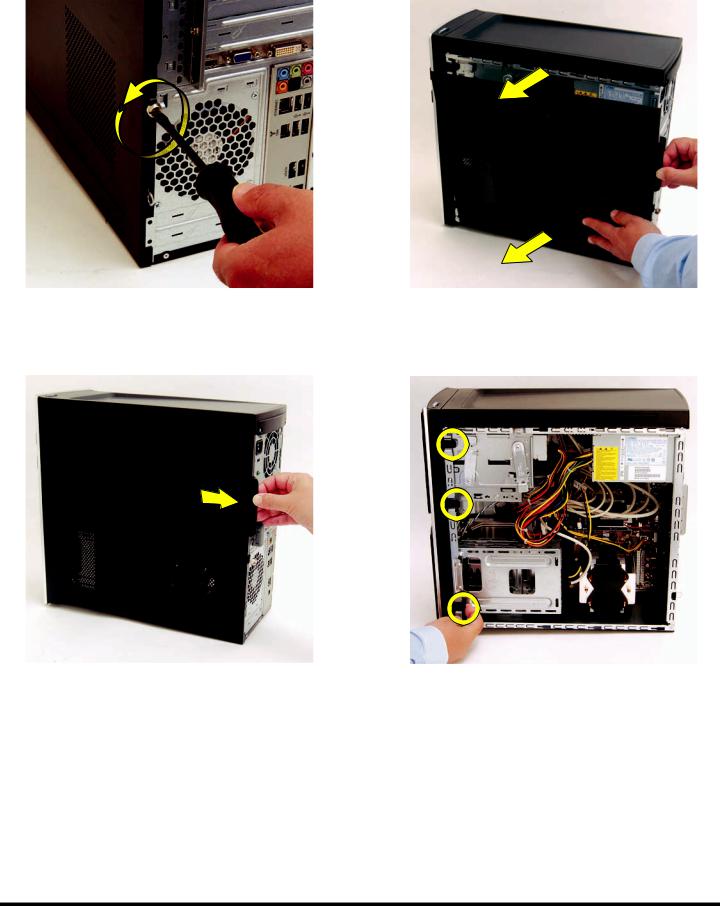
5Loosen the side panel thumbscrew on the back of the computer.
6Grasp the handle, and pull the side panel about 2.5 cm (1 inch) toward the back of the computer to release it.
7Tilt out the top of the side panel, and then lift the panel from the computer.
8Locate the three tabs that secure the front panel to the computer. Pull each of the tabs out slightly, away from the computer, to release the panel.
537501-001 — Removing and Replacing an Optical Disc Drive |
3 |
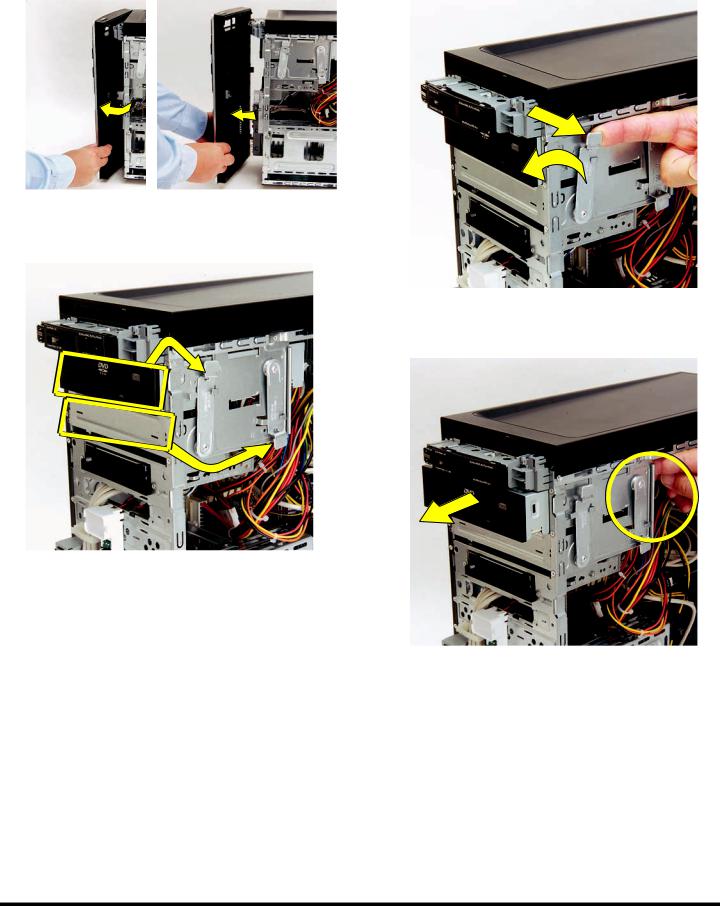
9Swing the front panel open toward the left, and then lift it off the computer.
11Pull out the optical drive latch (1), and then swing it to the left until it is in the center position (2).
10Locate the optical disc drive you want to replace (and also the drive latch for it).
1
2
12Push the drive partway out through the front of the computer.
4 |
537501-001 — Removing and Replacing an Optical Disc Drive |
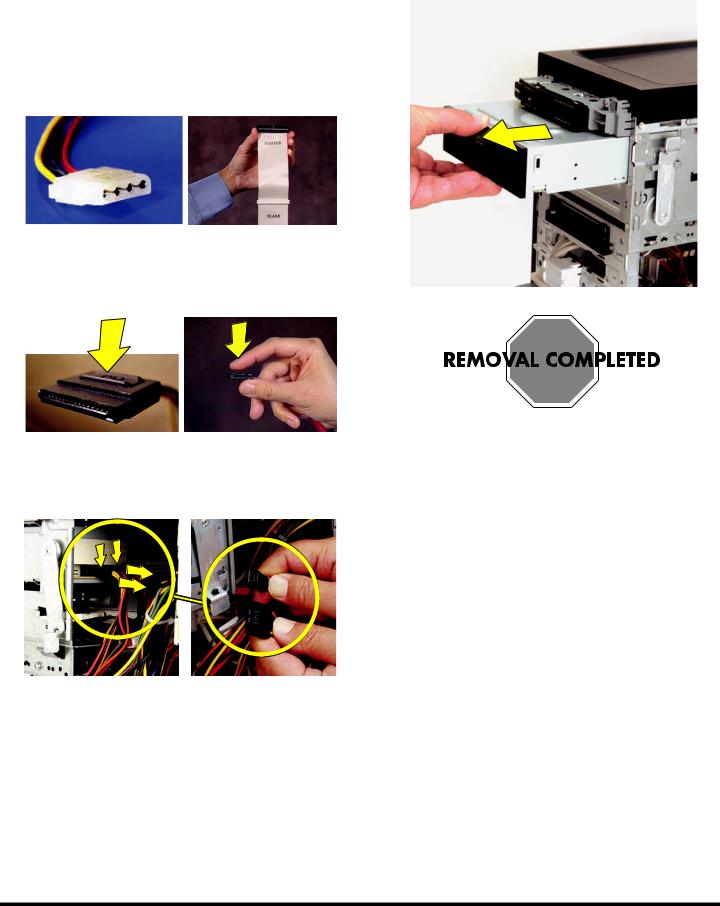
13Disconnect the cables from the drive:
The plugs on the cables are keyed and can be inserted only when aligned properly with the connector on the drive.
In addition, some plugs have a latch that must be pressed or squeezed to release the plug while pulling it from the connector.
Plugs without a latch:
For plugs without a latch, pull the plug straight out from the connector.
Plugs with a latch:
For plugs with a latch, press the latch (1 or 3) in the center of each plug, and then pull the plug (2 or 4) from the connector.
1 3
4
2
14Pull the drive completely out through the front of the computer.
537501-001 — Removing and Replacing an Optical Disc Drive |
5 |
Replacing an Optical Disc Drive
IMPORTANT: The new (replacement) part may not look the same as the original part, due to different manufacturers or models. Hewlett-Packard always provides quality parts that meet or exceed your original computer specifications.
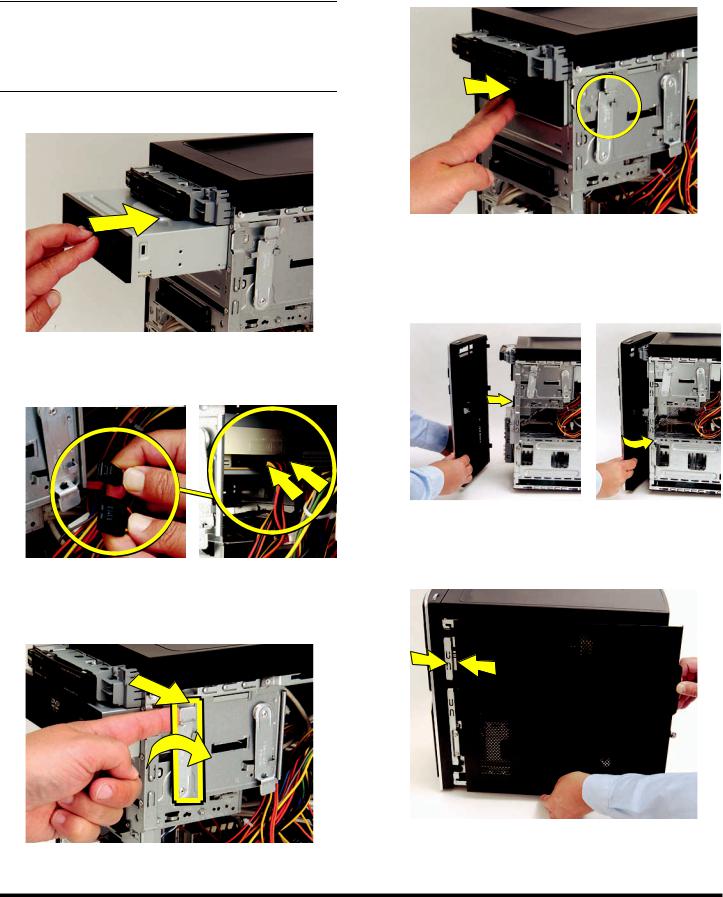
1 Insert the drive partway into the computer bay.
2Connect the data (1) and power (2) cables to the back of the drive.
4Push the drive completely into the computer, until the optical drive latch locks it into place in the hole labeled 2 on the computer.
5Hold the front panel over the computer, and then press the left side of the panel, inserting the tabs into the computer. Swing the right side of the panel toward the computer, and then press it into the computer.
2 1
3Pull out the optical drive latch (1), swing it to the right (2), and release it into the hole labeled 2 on the computer.
1
2
6Hold the side panel over the side of the computer with the front edge of the panel about 2.5 cm (1 inch) from the front of the computer.
6 |
537501-001 — Removing and Replacing an Optical Disc Drive |
 Loading...