


User's
Guide
HP DeskJet 1120C
Professional Series
This User's Guide with video help is also available in electronic copy in the Starter CD.
Acknowledgements
HP ColorSmart II, HP PhotoREt II and HP ZoomSmart Scaling Technology are trademarks of Hewlett-Packard Company.
Microsoft is a U.S. registered trademark of Microsoft Corporation.
Windows is a trademark of Microsoft Corporation.
Notice
The information contained in this document is subject to change without notice.
Hewlett-Packard makes no warranty of any kind with regard to this material, including, but not limited to, the implied warranties of merchantability and fitness for a particular purpose.
Hewlett-Packard shall not be liable for errors contained herein or for incidental or consequential damages in connection with the furnishing, performance, or use of this material.
No part of this document may be photocopied, reproduced, or translated to another language without the prior written consent of Hewlett-Packard Company.

Contents
Section 1 |
|
Getting Started |
2 |
|
|||
|
|
• Understanding the Printer's Parts and Functions |
|
|
|
• Setting Up |
4 |
|
|
• Accessing Information |
7 |
Section 2 |
|
Printing Basics |
8 |
|
|||
|
|
• Loading Paper |
|
|
|
• Replacing and Maintaining Print Cartridges |
10 |
|
|
• Getting to Know Your Printer Software |
11 |
|
|
• Changing Print Settings |
12 |
|
|
• Printing with Special Features |
13 |
|
|
• Using Your Printer on a Network |
15 |
|
|
• Printing from DOS Software Programs |
17 |
Section 3 |
|
Support |
18 |
|
|||
|
|
• Troubleshooting |
|
|
|
• Customer Support |
21 |
|
|
• HP Supplies |
23 |
Section 4 Specifications
• Printer Specifications |
25 |
• Regulatory Notice |
26 |
• Declaration of Conformity |
27 |
• Hewlett-Packard Warranty Statement |
28 |
1

Section 1 - Getting Started
Understanding the Printer's Parts and Functions
9
1
8
2 3
5
7 |
4 |
4 |
6
611 |
10 |
12 |
|
Printer Parts |
|
Functions |
1 |
Power Button and Indicator |
Turns the printer on and off. See the following section on |
|
|
"Printer Lights". |
2 |
Resume Button and Indicator |
Indicates that user intervention is required. |
|
|
See the following section on "Printer Lights". |
3 |
Cartridge Indicator |
Indicates print cartridges need user attention. |
4 |
Paper Length/Width Adjuster |
Holds paper in place. |
5 |
Alternative Top Media Feed |
Holds up to 10 sheets of paper. |
6 |
Main Bottom Media Tray |
Holds the stack of commonly used paper. |
|
|
Holds up to 150 sheets of paper. |
7 |
Output Tray |
Receives paper as it comes out of the printer. |
|
|
Holds up to 50 sheets of printed paper. |
8 |
Print Cartridge Latches |
Secure the print cartridges. |
9 |
Printer Cover |
Keeps dust particles from the printer parts. |
10 |
Rear Media Feed |
For feeding thick paper requiring straight paper path. |
11 |
Power Socket |
For connecting to a power source. |
12 |
Parallel Port |
For sending and receiving data to and from the computer. |
2

Printer Lights
The lights on the front panel of the printer indicate if the printer is on, in the process of receiving data, or in an error state.
If the lights are... |
Then... |
|
Power |
Off |
The printer is off. Press the Power button to turn on the printer. |
Resume |
Off |
|
Cartridge |
Off |
|
Power |
On |
The printer is ready to print. You can send a document to the printer. |
Resume |
Off |
|
Cartridge |
Off |
|
Power |
Blinking |
The printer is receiving data from the computer or is printing. |
Resume |
Off |
Wait for the document to print. |
Cartridge |
Off |
|
Power |
Blinking |
There is either a paper jam or the movement of the print cartridge |
Resume |
Blinking |
cradle is obstructed. |
Cartridge |
Off |
|
Power |
Blinking |
The printer is in error state. |
Resume |
Blinking |
Turn the printer off and then on. If the three lights remain blinking, |
Cartridge |
Blinking |
call your nearest Customer Support center, see page 21. |
Power |
On |
This indicates one or more of the following: |
Resume |
Off |
• the top cover is open; |
Cartridge |
Blinking |
• a print cartridge is missing or not functioning properly. |
Power |
On |
This indicates one or more of the following: |
Resume |
Blinking |
• the printer is out of paper; |
Cartridge |
Off |
• the printer is waiting for the ink on special media (transparencies) |
|
|
to dry, before printing the next page; |
• user intervention required to load or feed paper by following the instructions on the computer screen before pressing the Resume button to continue printing;
• user intervention required to feed paper to the rear media feed.
Started Getting - 1 Section
3
Section 1 - Getting Started
Setting Up
Step 1 - Unpack
1Check that the following items are included with the printer:
•Power Cord
•Black Print Cartridge
•Color Print Cartridge
•User’s Guide
•Output Tray
•Starter CD
•Print Kit
2Remove the packaging material and the four pieces of tape securing the printer (one at the back).
3Open the top cover and remove the fifth piece of tape and white packing material from the inside of the printer.
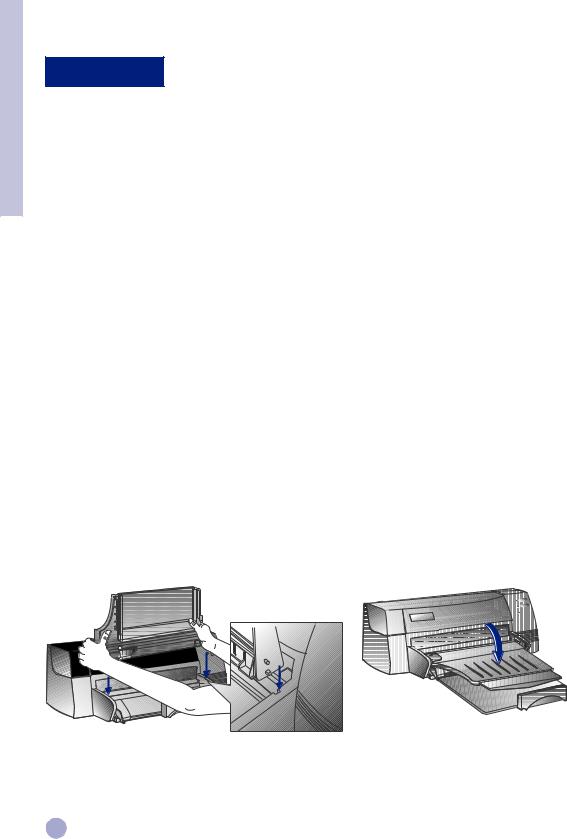
Step 2 - Install the Output Tray
1Remove the output tray from its plastic cover.
2Align the guides on the output tray with the grooves on the printer.
3Push the tray in to lock the left side then the right side.
4Lower the tray to its horizontal position.
|
4 |
2 |
3 |
|
4
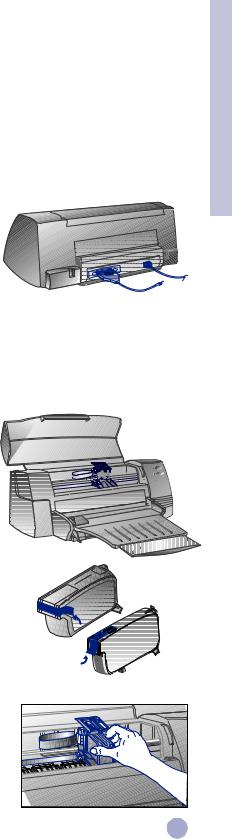
Step 3 - Connect the Cables
Note: The cable that connects the printer to the computer is not supplied with the printer. You will need to purchase a parallel cable. HP recommends a high-quality IEEE-1284 compliant parallel printer cable (HP part number C2950A or C2951A).
1 Turn the computer off.
2 Connect one end of the printer cable to the parallel port on the back of the printer and snap both clips onto the notches of the connector.
3 Connect the other end of the printer cable to the parallel port on the back of the computer and tighten the screws on the connector.
Note: |
Do not share the parallel port with a Zip drive or scanner. |
4 Plug the power cord into the printer and then into a grounded outlet.
Step 4 - Install the Print Cartridges
1Press the Power button to turn on the printer.
2Open the printer cover.
The print cartridge cradles will move to the center of the printer.
3Lift up the print cartridge latches.
4Remove the color print cartridge from its package.
5Gently remove the tape covering the ink nozzles. Be careful not to touch the ink nozzles or the gold-colored contacts.
6Insert and push the print cartridge firmly down into the left cradle and snap the cartridge latch onto the print cartridge.
7Repeat steps 4 to 6 to install the black cartridge into the right cradle.
Note: |
Both print cartridges must be correctly |
|
installed for the printer to work. |
8 Close the printer cover.
51645A |
5 |
Started Getting - 1 Section
Section 1 - Getting Started
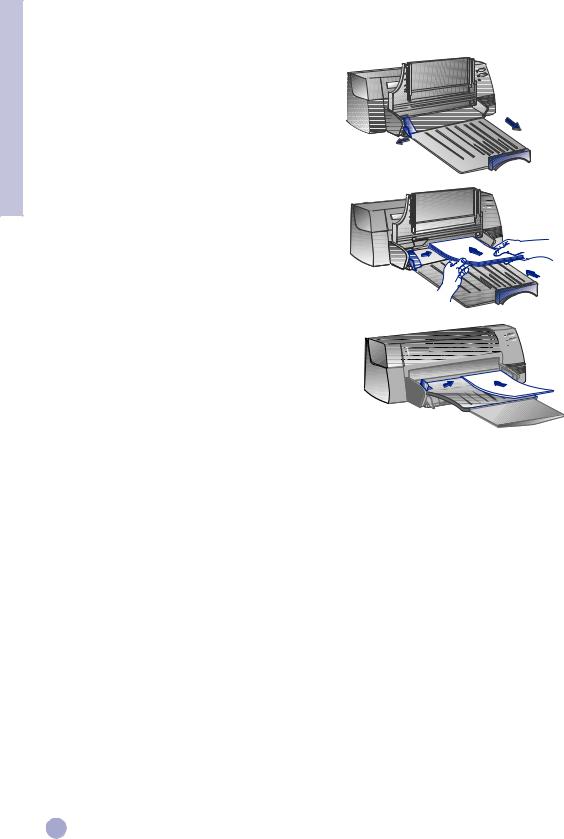
Step 5 - Insert Paper
Main Bottom Media Tray
1 Raise the output tray and extend the paper width and length adjusters to the maximum.
2 Insert up to 150 sheets of paper
aligning the right edge of the paper stack against the right side of the In-Tray, print side down. Slide the paper in until it stops.
3 Slide the paper width and length adjusters
in until they press lightly against the paper stack.
4 Lower the output tray to its horizontal position.
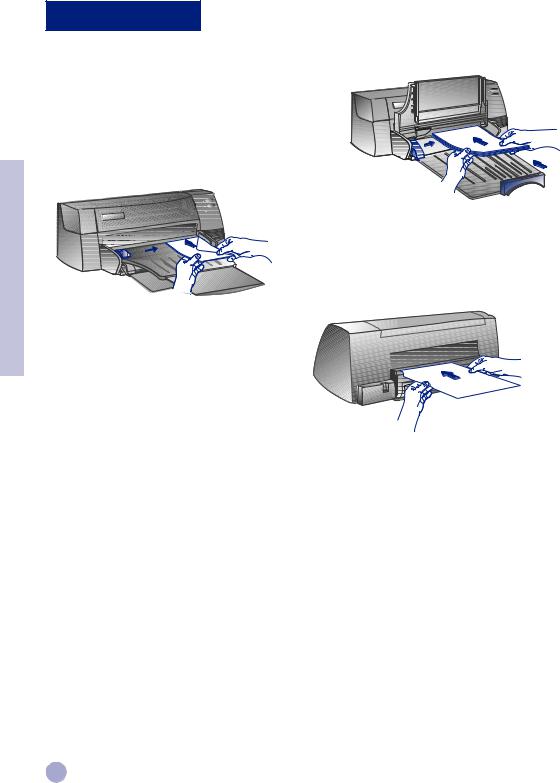
Alternative Top Media Feed
1 Extend the alternative media feed and slide the paper width adjuster to the outermost position.
2 Insert up to a maximum of 10 sheets of paper along
the right side of the alternative media feed, print side down, until it stops.
3 Slide the paper width adjuster in until it stops at the edges of the paper.
Step 6 - Install the Printer Software
Before you can use the printer, you must install the printer software. To install the printer software, you need at least 8 MB of RAM and Microsoft Windows 3.1x or 95 installed in your computer. To install the Windows NT 4.0 printer software, you need at least 24 MB of RAM and Microsoft Windows NT 4.0 installed in your computer. Please refer to page 25, “Hardware Compatibility” for hardware requirements.
Note: For Windows 95 users.
*If you see this message, New Hardware Found, before or during installation, select Do not
install a driver (Windows will not prompt you again) and click OK. Follow the instructions below to install the printer software.
*If you see the Update Device Driver Wizard dialog, click Next. Subsequently, click Finish. Follow the instructions below to install the printer software.
Installing from the Starter CD
Note: The Starter CD includes a utility to easily copy the HP DeskJet 1120C printer software to 3.5-inch, high-density diskettes. This allows you to use the diskettes to install the software on systems that do not have a CD-ROM drive. See the Printer Software menu in the Starter CD.
1Start Microsoft Windows and make sure no other Windows applications are running.
2Insert the Starter CD into your CD-ROM drive. The installation program will run automatically.
3Click the Printer Driver option on the CD menu to install your printer software.
If the installation program does not automatically run, follow the instructions below.
6

If the install does not run automatically
1Start Microsoft Windows and make sure no other Windows applications are running.
2Insert the CD into your computer's CD-ROM drive.
3Select File, Run in Windows 3.1 or select Start, Run in Windows 95/NT 4.0.
4At the Command Line box, type the letter of your computer's CD-ROM drive, followed by :\INSTALL (for example, D:\INSTALL).
5Follow the instructions that appear on the screen to complete installation.
Step 7 - Align Cartridges and Printer Test
You should align the print cartridges whenever a new cartridge is installed. This ensures that black and color inks align when printed together on the same text, line, or graphic.
1Run the HP DeskJet 1120C Toolbox software utility by double-clicking on the DJ1120C Toolbox icon on the desktop or in the program group.
2Click the Maintenance tab, and select Align Print Cartridges. Follow the instructions on the computer screen.
3Once you have aligned the cartridges, you may want to test the printer setup.
To do so, select Print a Self-Test from the Maintenance tab of the HP DeskJet 1120C Toolbox.
Accessing Information
User's Guide |
includes information about using the printer software, selecting and using paper, printing |
|
using special features, replacing print cartridges, solving printer problems, ordering |
|
HP Supplies and accessing Customer Support. |
Toolbox |
provides "how-to" and troubleshooting instructions, as well as access to printer maintenance |
|
functions and HP information. |
Starter CD |
includes a quick tour of your printer, a diskette download utility for the printer software, |
|
videos on how to use your printer, print samples, an electronic copy of this user's guide, and |
|
ordering information. |
Print Kit |
includes software that you can use for creating projects to print using the HP DeskJet 1120C |
|
printer. |
Web Site |
http://www.hp.com/go/dj1120 or http://www.hp.com provides a link to the HP Web site for |
|
latest printer software, product and support information. |
Note: If the help suggestions provided in the user's guide, toolbox, and Starter CD are not sufficient to help you solve your printing problems, you may obtain assistance from the HP Customer Support Center. See page 21 for a list of resources available to you for the support and maintenance of your printer.
Started Getting - 1 Section
7
Section 2 - Printing Basics
Loading Paper
Your printer supports paper sizes from 4"x6" to 13”x19” .
Paper may be loaded using one of the ways described below.
Main Bottom Media Tray
This is the default tray for loading commonly used paper.
Holds up to 150 sheets of paper or 15 envelopes.
Alternative Top Media Feed
Designed for occasional printing such as printing on transparencies, labels or envelopes.
Holds up to 10 sheets of paper or 3 envelopes.
Rear Media Feed
Provides a straight paper path for printing on thick paper (up to 0.3mm) such as cardboard. Holds 1 sheet of paper at any time.
Tips for Selecting Paper
•Always use paper that conforms with those listed under "Recommended Media Weight and Sizes", in the Printer Specifications section on page 25.
•Do not use media that is damaged, curled, or wrinkled. Do not use paper with cutouts or perforations or paper that is heavily textured or embossed.
•Do not use multiple-part forms.
•Load only one type of paper at a time into any of the trays.
•Always insert paper print side down, with the right edge of the paper aligned against the right edge of the tray.
•Do not load more that 150 sheets of paper or 15 envelopes into the main tray at one time. For the alternative tray, do not load more than 10 sheets of paper or 3 envelopes.
The rear media feed only takes 1 sheet of paper at a time.
8
 Loading...