


 Loading...
HP Compaq LA2006x, LA2206x, and
LA2306x LED Backlit LCD Monitors
User Guide
© 2010, 2011 Hewlett-Packard
Development Company, L.P.
Microsoft, Windows, and Windows Vista are either trademarks or registered trademarks of Microsoft Corporation in the United States and/or other countries.
The only warranties for HP products and services are set forth in the express warranty statements accompanying such products and services. Nothing herein should be construed as constituting an additional warranty. HP shall not be liable for technical or editorial errors or omissions contained herein.
This document contains proprietary information that is protected by copyright. No part of this document may be photocopied, reproduced, or translated to another language without the prior written consent of Hewlett-Packard Company.
Second Edition (June 2011)
Document Part Number: 630579-002

About This Guide
This guide provides information on setting up the monitor, installing drivers, using the on-screen display menu, troubleshooting and technical specifications.
WARNING! Text set off in this manner indicates that failure to follow directions could result in bodily harm or loss of life.
CAUTION: Text set off in this manner indicates that failure to follow directions could result in damage to equipment or loss of information.
 NOTE: Text set off in this manner provides important supplemental information.
ENWW |
iii |
iv About This Guide |
ENWW |

Table of contents
1 Product Features ............................................................................................................................................ |
1 |
HP LCD Monitors ................................................................................................................................. |
1 |
2 Safety and Maintenance Guidelines .............................................................................................................. |
3 |
Important Safety Information ................................................................................................................ |
3 |
Maintenance Guidelines ....................................................................................................................... |
3 |
Cleaning the Monitor ............................................................................................................ |
4 |
Shipping the Monitor ............................................................................................................ |
4 |
3 Setting Up the Monitor ................................................................................................................................... |
5 |
Unfolding the Monitor Pedestal Base ................................................................................................... |
5 |
Rear Components ................................................................................................................................ |
6 |
Connecting the Cables ......................................................................................................................... |
7 |
Adjusting the Monitor ............................................................................................................................ |
9 |
Turning on the Monitor ....................................................................................................................... |
11 |
Connecting USB Devices ................................................................................................................... |
12 |
Removing the Monitor Pedestal Base ................................................................................................ |
13 |
Mounting the Monitor ......................................................................................................... |
14 |
Locating the Rating Labels ................................................................................................................. |
15 |
Installing a Cable Lock ....................................................................................................................... |
15 |
4 Operating the Monitor .................................................................................................................................. |
16 |
Software and Utilities .......................................................................................................................... |
16 |
The Information File ........................................................................................................... |
16 |
The Image Color Matching File .......................................................................................... |
16 |
Installing the .INF and .ICM Files ....................................................................................................... |
17 |
Installing from the CD ........................................................................................................ |
17 |
Downloading from the Worldwide Web .............................................................................. |
17 |
Using the Auto-Adjustment Function .................................................................................................. |
18 |
Front Panel Controls .......................................................................................................................... |
19 |
Adjusting the Monitor Settings ............................................................................................................ |
20 |
Using the On-Screen Display Menu .................................................................................. |
20 |
OSD Menu Selections ....................................................................................... |
21 |
Optimizing Image Performance ......................................................................... |
25 |
Using the HP Display Assistant Utility ............................................................................... |
26 |
Identifying Monitor Conditions ............................................................................................................ |
26 |
ENWW |
v |
Sleep Timer Mode .............................................................................................................................. |
27 |
Appendix A Troubleshooting .......................................................................................................................... |
29 |
Solving Common Problems ................................................................................................................ |
29 |
Online Technical Support ................................................................................................................... |
30 |
Preparing to Call Technical Support ................................................................................................... |
30 |
Appendix B Technical Specifications ............................................................................................................ |
31 |
LA2006x Model .................................................................................................................................. |
31 |
LA2206x Model .................................................................................................................................. |
32 |
LA2306x Model .................................................................................................................................. |
33 |
Recognizing Preset Display Resolutions ............................................................................................ |
35 |
LA2006x Model .................................................................................................................. |
35 |
LA2206x Model .................................................................................................................. |
35 |
LA2306x Model .................................................................................................................. |
36 |
Entering User Modes .......................................................................................................................... |
37 |
Energy Saver Feature ........................................................................................................................ |
37 |
Appendix C Agency Regulatory Notices ....................................................................................................... |
38 |
Federal Communications Commission Notice ................................................................................... |
38 |
Modifications ...................................................................................................................... |
38 |
Cables ................................................................................................................................ |
38 |
Declaration of Conformity for Products Marked with the FCC Logo (United States Only) ................. |
38 |
Canadian Notice ................................................................................................................................. |
39 |
Avis Canadien .................................................................................................................................... |
39 |
European Union Regulatory Notice .................................................................................................... |
39 |
German Ergonomics Notice ............................................................................................................... |
40 |
Japanese Notice ................................................................................................................................. |
40 |
Korean Notice ..................................................................................................................................... |
40 |
Power Cord Set Requirements ........................................................................................................... |
40 |
Japanese Power Cord Requirements ................................................................................ |
40 |
Product Environmental Notices .......................................................................................................... |
41 |
ENERGY STAR® Qualification .......................................................................................... |
41 |
Materials Disposal ............................................................................................................. |
41 |
Disposal of Waste Equipment by Users in Private Household in the European Union ..... |
42 |
HP Recycling Program ...................................................................................................... |
42 |
Chemical Substances ........................................................................................................ |
42 |
Restriction of Hazardous Substances (RoHS) ................................................................... |
42 |
Turkey EEE Regulation ..................................................................................................... |
43 |
vi |
ENWW |
Appendix D LCD Monitor Quality and Pixel Policy ....................................................................................... |
44 |
ENWW |
vii |
viii |
ENWW |

1 Product Features
HP LCD Monitors
The LCD (liquid crystal display) monitors have an active matrix, thin-film transistor (TFT) panel. The monitor models and features include:
●LA2006x model, 50.8 cm (20-inch) diagonal viewable area display with 1600 x 900 resolution, plus full-screen support for lower resolutions; includes custom scaling for maximum image size while preserving original aspect ratio
●LA2206x model, 54.6 cm (21.5-inch) diagonal viewable area display with 1920 x 1080 resolution, plus full-screen support for lower resolutions; includes custom scaling for maximum image size while preserving original aspect ratio
●LA2306x model, 58.4 cm (23-inch) diagonal viewable area display with 1920 x 1080 resolution, plus full-screen support for lower resolutions; includes custom scaling for maximum image size while preserving original aspect ratio
●Non-glare panel with an LED backlight that provides better clarity and consumes less energy than traditional CCFL backlights
●Wide viewing angle to allow viewing from a sitting or standing position, or moving side-to-side
●Tilt capability
●Pivot capability to rotate display to portrait mode
●Swivel and height adjustment capabilities
●Removable stand for flexible monitor panel mounting solutions
●Video signal input to support VGA analog with VGA signal cable provided
●Video signal input to support DVI digital with DVI-D signal cable provided
●Video signal input to support DisplayPort digital (DisplayPort cable not provided)
●USB 2.0 hub with one upstream port (connects to the computer) and two downstream ports (connects to USB devices)
●USB cable provided to connect the monitor's USB hub to the USB connector on the computer
●Supports an optional HP speaker bar
●Plug and play capability if supported by the system
●Privacy filter slots to insert filters (purchased separately) to block side screen viewing
●Security slot provision on rear of monitor for optional cable lock
●Cable management feature for placement of cables and cords
●On-Screen Display (OSD) adjustments in several languages for easy setup and screen optimization
●HP Display Assistant for adjusting monitor settings
●Theft deterrence software
ENWW |
HP LCD Monitors 1 |
●HDCP copy protection on DVI and DisplayPort inputs
●Software and documentation CD that includes monitor drivers and product documentation
●Energy saver feature to meet requirements for reduced power consumption
●Energy Star® qualified
●Intelligent Management AssetControl
●Compliant with the following regulated specifications:
◦European Union CE Directives
◦Swedish TCO Requirements
2 Chapter 1 Product Features |
ENWW |
2 Safety and Maintenance Guidelines
Important Safety Information
A power cord is included with the monitor. If another cord is used, use only a power source and connection appropriate for this monitor. For information on the correct power cord set to use with the monitor, refer to the Power Cord Set Requirements on page 40.
 WARNING! To reduce the risk of electric shock or damage to the equipment:
•Do not disable the power cord grounding feature. The grounding plug is an important safety feature.
•Plug the power cord in a grounded (earthed) outlet that is easily accessible at all times.
•Disconnect power from the product by unplugging the power cord from the electrical outlet.
For your safety, do not place anything on power cords or cables. Arrange them so that no one may accidentally step on or trip over them. Do not pull on a cord or cable. When unplugging from the electrical outlet, grasp the cord by the plug.
To reduce the risk of serious injury, read the Safety and Comfort Guide. It describes proper workstation, setup, posture, and health and work habits for computer users, and provides important electrical and mechanical safety information. This guide is located on the Web at http://www.hp.com/ ergo and/or on the documentation CD, if one is included with the monitor.
CAUTION: For the protection of the monitor, as well as the computer, connect all power cords for the computer and its peripheral devices (such as a monitor, printer, scanner) to some form of surge protection device such as a power strip or Uninterruptible Power Supply (UPS). Not all power strips provide surge protection; the power strips must be specifically labeled as having this ability. Use a power strip whose manufacturer offers a Damage Replacement Policy so you can replace the equipment, if surge protection fails.
Use the appropriate and correctly sized furniture designed to properly support your HP LCD monitor.
WARNING! LCD monitors that are inappropriately situated on dressers, bookcases, shelves, desks, speakers, chests, or carts may fall over and cause personal injury.
Care should be taken to route all cords and cables connected to the LCD monitor so that they can not be pulled, grabbed, or tripped over.
Maintenance Guidelines
To enhance the performance and extend the life of the monitor:
●Do not open the monitor cabinet or attempt to service this product yourself. Adjust only those controls that are covered in the operating instructions. If the monitor is not operating properly or has been dropped or damaged, contact an authorized HP dealer, reseller, or service provider.
●Use only a power source and connection appropriate for this monitor, as indicated on the label/ back plate of the monitor.
●Be sure the total ampere rating of the products connected to the outlet does not exceed the current rating of the electrical outlet, and the total ampere rating of the products connected to the cord does not exceed the rating of the cord. Look on the power label to determine the ampere rating (AMPS or A) for each device.
ENWW |
Important Safety Information 3 |

●Install the monitor near an outlet that you can easily reach. Disconnect the monitor by grasping the plug firmly and pulling it from the outlet. Never disconnect the monitor by pulling the cord.
●Turn the monitor off when not in use. You can substantially increase the life expectancy of the monitor by using a screen saver program and turning off the monitor when not in use.
 NOTE: Monitors with a “burned-in image” are not covered under the HP warranty.
●Slots and openings in the cabinet are provided for ventilation. These openings must not be blocked or covered. Never push objects of any kind into cabinet slots or other openings.
●Do not drop the monitor or place it on an unstable surface.
●Do not allow anything to rest on the power cord. Do not walk on the cord.
●Keep the monitor in a well-ventilated area, away from excessive light, heat or moisture.
●When removing the monitor stand, you must lay the monitor face down on a soft area to prevent it from getting scratched, defaced, or broken.
Cleaning the Monitor
1.Turn off the monitor and unplug the power cord from the back of the unit.
2.Dust the monitor by wiping the screen and the cabinet with a soft, clean antistatic cloth.
3.For more difficult cleaning situations, use a 50/50 mix of water and Isopropyl alcohol.
CAUTION: Spray the cleaner onto a cloth and use the damp cloth to gently wipe the screen surface. Never spray the cleaner directly on the screen surface. It may run behind the bezel and damage the electronics.
CAUTION: Do not use cleaners that contain any petroleum based materials such as benzene, thinner, or any volatile substance to clean the monitor screen or cabinet. These chemicals may damage the monitor.
Shipping the Monitor
Keep the original packing box in a storage area. You may need it later if you move or ship the monitor.
4 |
Chapter 2 Safety and Maintenance Guidelines |
ENWW |
3 Setting Up the Monitor
To set up the monitor, ensure that the power is turned off to the monitor, computer system, and other attached devices, then follow the instructions below.
Unfolding the Monitor Pedestal Base
1.Lift the monitor from its box and place it face down on a flat surface.
2.Hold down the monitor base with one hand (1) then grasp the top of the stand with the other hand and unfold the display head 90 degrees (2).
CAUTION: Do not touch the surface of the LCD panel. Pressure on the panel may cause nonuniformity of color or disorientation of the liquid crystals. If this occurs the screen will not recover to its normal condition.
Figure 3-1 Unfolding the Monitor Pedestal Base


 NOTE: When the monitor is unfolded for the first time, the display head is locked from adjusting to a full-height position. To adjust the display head to full height, press down on the display head to unlock it then pull up on the display head to raise it to the full-height position. Refer to step 3 in Adjusting the Monitor on page 9.
ENWW |
Unfolding the Monitor Pedestal Base 5 |
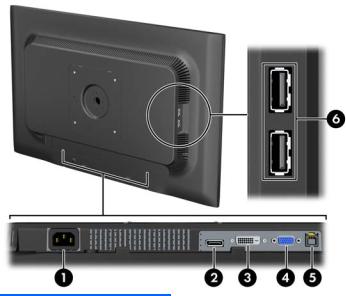
Rear Components
Figure 3-2 Rear Components
Component |
Function |
|
|
|
|
1 |
AC Power Connector |
Connects the AC power cord to the monitor. |
|
|
|
2 |
DisplayPort |
Connects the DisplayPort cable (not included) to the |
|
|
monitor. |
|
|
|
3 |
DVI-D |
Connects the DVI-D cable to the monitor. |
|
|
|
4 |
VGA |
Connects the VGA cable to the monitor. |
|
|
|
5 |
USB Upstream |
Connects the USB hub cable to the monitor's USB hub |
|
Connector |
connector and to a host USB port/hub. |
|
|
|
6 |
USB Downstream |
Connects optional USB devices to the monitor. |
|
Connectors (2) |
|
|
|
|
6 Chapter 3 Setting Up the Monitor |
ENWW |
Connecting the Cables
1.Place the monitor in a convenient, well-ventilated location near the computer.
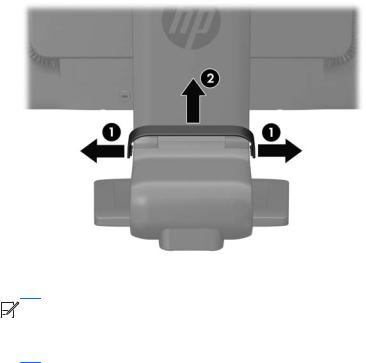
2.Remove the cable management clip from the pedestal by pulling outward on the two sides of the clip (1) then lifting the clip off the pedestal (2).
Figure 3-3 Removing the Cable Management Clip
3.Connect a VGA signal cable, DVI-D signal cable, or DisplayPort signal cable.


 NOTE: The monitor is capable of supporting either analog or digital input. The video mode is determined by the video cable used. The monitor will automatically determine which inputs have valid video signals. The inputs can be selected by pressing the +/source button on the front panel or through the On-Screen Display (OSD) feature by pressing the Menu button.
●For analog operation, use the VGA signal cable provided. Connect the VGA signal cable to the VGA connector on the rear of the monitor and the other end to the VGA connector on the computer.
●For DVI digital operation, use the DVI-D signal cable provided. Connect the DVI-D signal cable to the DVI connector on the rear of the monitor and the other end to the DVI connector on the computer.
●For DisplayPort digital operation, use a DisplayPort signal cable (not provided). Connect the DisplayPort signal cable to the DisplayPort connector on the rear of the monitor and the other end to the DisplayPort connector on the computer.
4.Connect one end of the provided USB cable to the USB hub connector on the rear panel of the computer, and the other end to the upstream USB connector on the monitor.
ENWW |
Connecting the Cables 7 |

5.Connect one end of the power cord to the AC power connector on the back of the monitor, and the other end to an electrical wall outlet.
Figure 3-4 Connecting the Cables
 WARNING! To reduce the risk of electric shock or damage to the equipment:
Do not disable the power cord grounding plug. The grounding plug is an important safety feature.
Plug the power cord into a grounded (earthed) electrical outlet that is easily accessible at all times.
Disconnect power from the equipment by unplugging the power cord from the electrical outlet.
For your safety, do not place anything on power cords or cables. Arrange them so that no one may accidentally step on or trip over them. Do not pull on a cord or cable. When unplugging from the electrical outlet, grasp the cord by the plug.
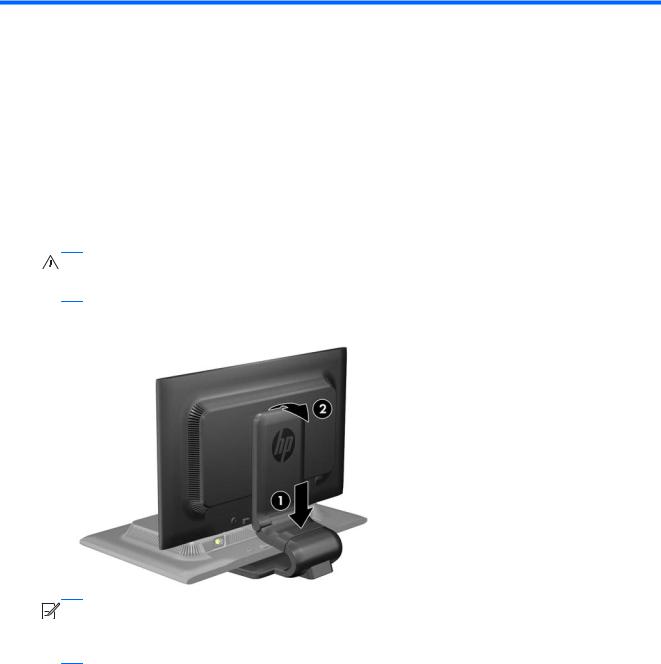
6.Secure the cables in place with the cable management clip. Press the clip straight down on the curved neck of the pedestal ensuring that the tabs on the sides of the clip snap into the slots on the pedestal.
Figure 3-5 Installing the Cable Management Clip
8 Chapter 3 Setting Up the Monitor |
ENWW |
Loading...