


HP 9200c Digital Sender
Getting Started Guide
Instaílační p íručka Szerz i jog és licenc
Podr czna instrukcja obsługi
Bașlangıç Kılavuzu

HP 9200C Digital Sender
English
Getting Started Guide
Copyright and License
© 2004 Copyright Hewlett-Packard
Development Company, LP
Reproduction, adaptation, or translation without prior written permission is prohibited, except as allowed under the copyright laws.
The information contained in this document is subject to change without notice.
The only warranties for HP products and services are set forth in the express warranty statements accompanying such products and services. Nothing herein should be construed as constituting an additional warranty. HP shall not be liable for technical or editorial errors or omissions contained herein.
Part number: Q5916-90904
Edition 1, 11/2004
Trademark Credits
Microsoft® and Windows® are U.S. registered trademarks of Microsoft Corporation.
Pentium® is a registered trademark of Intel Corporation or its subsidiaries in the United States and other countries/regions.

Table of contents
English
1 Introduction |
|
Where to look for information .................................................................................................... |
2 |
Installation checklist .................................................................................................................. |
2 |
Before you begin ....................................................................................................................... |
3 |
2 Setup |
|
Step 1. Unpack and check package contents ........................................................................... |
6 |
Step 2. Installation requirements and product parts ................................................................. |
7 |
Environmental requirements ............................................................................................... |
7 |
System requirements .......................................................................................................... |
7 |
Identifying the product parts ............................................................................................... |
9 |
Step 3. Change the control-panel overlays ............................................................................. |
10 |
Step 4. Unlock the scanner head ............................................................................................ |
12 |
Step 5. Connect the network cable ......................................................................................... |
13 |
Step 6. Connect the power cord ............................................................................................. |
14 |
Step 7. Configure the control-panel settings ........................................................................... |
15 |
Configuring the control-panel language ........................................................................... |
15 |
Configuring the date and time .......................................................................................... |
15 |
Step 8. Assign the IP address ................................................................................................. |
16 |
Finding the DHCP IP address .......................................................................................... |
16 |
Manually assigning an IP address .................................................................................... |
16 |
Step 9. Install and configure the software ............................................................................... |
17 |
Before you begin ............................................................................................................... |
17 |
To install the software ....................................................................................................... |
17 |
Step 10. Verify the product installation ................................................................................... |
21 |
3 Troubleshooting and customer support |
|
Troubleshooting ...................................................................................................................... |
24 |
Customer support .................................................................................................................... |
27 |
FCC regulations ...................................................................................................................... |
28 |
Index |
|
ENWW |
Table of contents iii |
iv |
ENWW |

1 Introduction
English
Congratulations on your purchase of the HP 9200C Digital Sender, a valuable addition to your content-management processes. The digital sender scans all kinds of documents and then sends them to e-mail addresses, fax destinations, or network folders. The digital sender can also be set up to send documents to workflow destinations, along with metadata files containing workflow information that is captured at the device control panel. By using these features, the digital sender can be the interface for a variety of content-management programs including Microsoft® Share Point, Documentum, Filenet, and Lotus Domino. By using additional software such as HP Autostore, the digital sender can also send a document through a more complex workflow that includes components such as bar code recognition or Optical Character Recognition (OCR).
The digital sender includes the following features:
●Digital sending—Send scanned files to e-mail addresses, fax destinations, network folders, and workflow folders. Digital-sending functions are carried out by the HP Digital Sending Software (HP DSS), which is included with the digital sender.
●Flatbed scanner—The letter/A4 size scanner can scan both black-and-white and color documents, and can scan the full page area within 1 mm (0.04 inch) of the paper edge.
●Interactive touchscreen control panel—Intuitive onscreen menus and wizards help to carry out digital-sending tasks.
●Automatic document feeder (ADF)—The legal-size ADF accepts up to 50 pages, and includes built-in duplexing for scanning both sides of a double-sided document.
●Memory—The device includes 128 megabytes (MB) of random access memory (RAM).
●Hard disk—The device comes with a 20-gigabyte (GB) internal hard drive for storing documents and settings.
●Connectivity—A 10/100Base-T port and an enhanced input/output (EIO) expansion slot are provided for connectivity.
●HP Jetdirect Inside—An HP Jetdirect embedded print server is integrated directly on the device for reliable network connectivity.
ENWW |
1 |

Where to look for information
Explore the following documentation sources to learn how to use the HP 9200C Digital Sender.
Getting started guide (this document)—Provides step-by-step instructions for installing and setting up the digital sender.
User guide and support guide—The HP 9200C Digital Sender User Guide (part number Q5916-90910) contains information about using the digital sender and troubleshooting problems. The HP 9200C Digital Sender Support Guide (part number Q5916-90930) contains more detailed configuration and administration instructions. Both of these guides are available on the documentation CD-ROM that came with the digital sender. They are also available on the Web at http://www.hp.com/support/9200c.
Online Help—The HP MFP DSS Configuration Utility includes online help that contains information about digital-sending options.
Installation checklist
This guide helps you set up and install your new product. For correct installation, complete each step, in order.
Step 1: Unpack the product.
Step 2: Verify installation requirements and product parts.
Step 3: Change the control-panel overlays (optional).
Step 4: Unlock the digital-sender scanner head.
Step 5: Connect the network cable.
Step 6: Connect the power cord.
Step 7: Configure the control-panel settings.
2 Chapter 1 Introduction |
ENWW |

Step 8: Assign the device IP address.
Step 9: Install and configure the software.
Step 10: Verify the product installation.
Before you begin
During the software installation procedure, you are prompted to configure the digital-send options. In order to complete this configuration, you need the following information:
●The software license key from the label on the software CD-ROM
●The host name or Internet Protocol (IP) address of the simple mail transfer protocol (SMTP) e-mail server that will be used to send e-mail from the digital sender
●The host name or IP address of the Lightweight Directory Access Protocol (LDAP) server that will be used to retrieve e-mail addresses (optional)
●The paths for any folders that are to be set up for the send-to-folder feature
●The host name or IP address of the digital sender
English
ENWW |
Before you begin 3 |
4 Chapter 1 Introduction |
ENWW |
2 Setup
English
Follow these steps to set up and configure the digital sender. If you need more detailed information about how to use or configure the device, see the HP 9200C Digital Sender User Guide or the HP 9200C Digital Sender Support Guide.
ENWW |
5 |
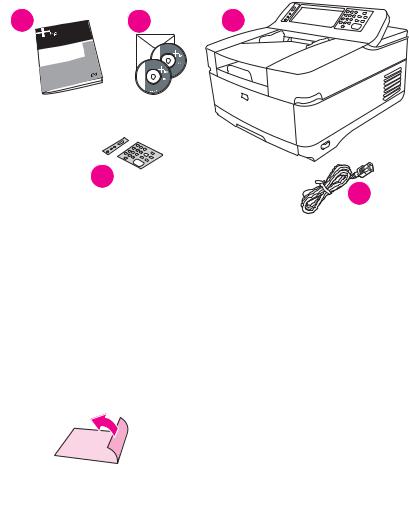
Step 1. Unpack and check package contents
The following items ship in the box with the digital sender.
1 |
2 |
3 |
4  5
5
1Getting started guide
2 |
HP DSS software and digital sender documentation CD-ROMs |
3Digital sender
4 |
Control panel overlays (optional) |
5Power cord
Follow these instructions to unpack the digital sender.
1.Lift the device out of its box and remove all shipping bags.
2.Remove all tape and packing material from the ADF.
3.Remove the protective film from the control-panel display.
6 |
Chapter 2 Setup |
ENWW |
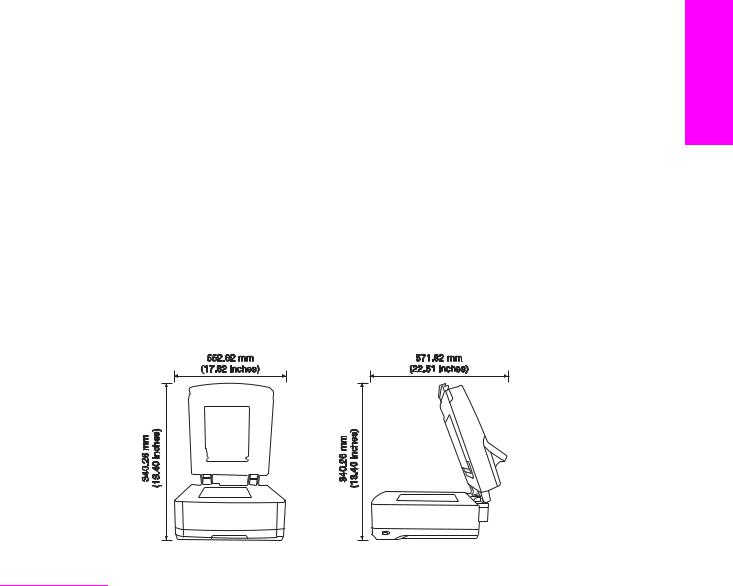
Step 2. Installation requirements and product parts
Ensure that the proper environmental and network conditions exist for the installation of the digital sender.
Environmental requirements
●Stable environment with no temperature or humidity changes
●Room temperature of 0 to 40°C (32 to 104°F)
●Relative humidity of 15 to 80% noncondensing
●Sturdy, level surface
●Well-ventilated room with no exposure to chemicals or direct sunlight Observe the following space requirements when installing the digital sender.
NOTE |
The digital sender requires 90 mm (3.5 inches) of free space behind the device in order to |
|
fully open the top. |
System requirements
The following system specifications are required for this product.
Hardware requirements
The digital sending software has the following hardware requirements for a server supporting less than 50 digital sending devices (MFPs or 9200C digital senders):
●A PC with a Pentium® 3 or higher processor
●512 MB of RAM
English
ENWW |
Step 2. Installation requirements and product parts |
7 |

NOTE
NOTE
The digital sending software has the following hardware requirements for a server supporting 50 to 250 digital sending devices:
●A PC with a 2 GHz Pentium® 4 or higher processor
●1 GB of RAM
You must have Administrative privileges on the server in order to install the software.
Network system requirements
The digital sending software has the following network requirements:
●Windows® 2000 Professional, Server, or Advanced Server; Windows XP Professional; or Windows Server 2003 Standard or Enterprise Server
●Fast Ethernet 100Base-TX or Ethernet 10Base-T
●Access to an SMTP e-mail gateway
It is highly recommended that the SMTP gateway be located on your own local area network. However, you can configure your product for e-mail functionality even if your mail services are provided by an outside Internet service provider (ISP) over a digital subscription line (DSL).
●Access to a network LDAP server to support optional user authentication
8 Chapter 2 Setup |
ENWW |

Identifying the product parts
The following illustrations show the location and names of the primary product parts.
English
1 Jam release button
2 Control panel
3 On/off switch
4Output bin
5ADF input bin
6ADF cable
7Control-panel cable
8 10/100Base-T network port
9EIO port
10 Power connector
11Scanner lock
12Serial number
ENWW |
Step 2. Installation requirements and product parts |
9 |
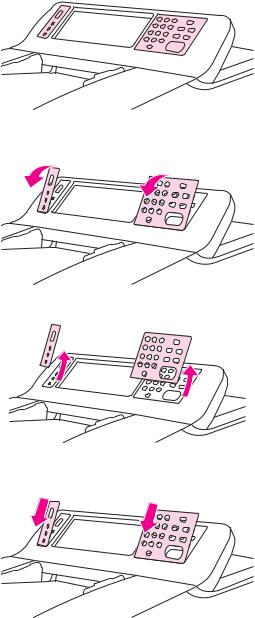
Step 3. Change the control-panel overlays
The device comes with overlays installed on the control panel, and overlays for different languages might be included in the box. If necessary, use the following procedure to change the control-panel overlays to support your preferred language.
1. Locate the two control-panel overlays.
2.Insert a small, flat-blade screwdriver or other thin tool in the slot at the top edge of one of the overlays to pull the top away from the control panel.
3. Lift the overlay up and back to remove it from the product.
4.Position the new overlay over the control panel. Align the ends of the overlay with the holes on the control panel and slide the overlay in.
10 Chapter 2 Setup |
ENWW |

5.Snap the overlay firmly onto the control panel. Ensure that the overlay is flat against the control panel.
6. Repeat steps 2 through 5 to change the second overlay.
English
ENWW |
Step 3. Change the control-panel overlays |
11 |
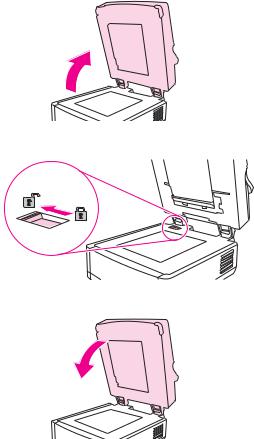
Step 4. Unlock the scanner head
The scanner head is locked to prevent damage during shipping. Follow these instructions to unlock it.
1. Open the top of the digital sender.
2. Unlock the scanner head.
3. Close the top of the digital sender.
12 Chapter 2 Setup |
ENWW |

Step 5. Connect the network cable
Use the RJ-45 connector on the back of the device to connect the product to a Fast Ethernet 100Base-TX or Ethernet 10Base-T network.
English
ENWW |
Step 5. Connect the network cable 13 |
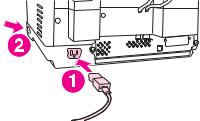
Step 6. Connect the power cord
|
1. Connect the power cord to the product power cord connector. Then connect the power |
|
cord to an adequate alternating current (ac) outlet. |
|
This product can operate using either 110/120 volts (V), 60 hertz (Hz) power or 220/240 V, |
NOTE |
|
|
50 Hz power. |
2.Turn the product on by using the power button. After the product warms up, a prompt appears asking you to configure your control-panel display language (see Step 7. Configure the control-panel settings).
14 Chapter 2 Setup |
ENWW |
Step 7. Configure the control-panel settings
When the device is turned on for the first time, the control-panel display presents prompts for setting the language, date, and time.
Configuring the control-panel language
By default, the control panel on the product shows messages in English. You can use the control panel menus to configure the product to show messages in another supported language. When the product is turned on for the first time, the LANGUAGE menu appears on the control-panel display. Select a language to continue.
NOTE |
If no language is selected within 60 seconds, English is set as the language, and any |
|
|
language change must be made using the process below. |
|
|
Follow these instructions to change the control-panel language. |
|
|
1. |
Press the MENU button on the control panel. |
|
2. |
Touch CONFIGURE DEVICE (the third menu item). |
|
3. |
Touch SYSTEM SETUP (the fourth menu item). |
|
4. |
Scroll down and touch LANGUAGE (the last menu item). |
|
5. |
Touch the preferred language. |
Configuring the date and time
After configuring the language, the control-panel display shows the current date and time. If the date and time are wrong, touch OK to set them. If they are right, touch Exit. Once it has been set, the real-time clock within the device will keep the correct time.
English
ENWW |
Step 7. Configure the control-panel settings |
15 |
Step 8. Assign the IP address
In order to function properly, the device must be assigned a valid IP address on your network. If your network uses dynamic host configuration protocol (DHCP), this IP address can be assigned automatically. DHCP is the default setting in the digital sender. If you are not using DHCP, you will need to manually assign an IP address.
Finding the DHCP IP address
Use one of the methods below to find the IP address that DHCP has automatically assigned.
●Look at the upper-left corner of the digital-sender control-panel display. Next to the word Ready the IP address should appear.
●If the IP address does not appear on the control-panel display, press the MENU button on the control panel. Touch the INFORMATION menu, and then touch CONFIGURATION. The digital-sender configuration information appears on the touchscreen. Touch the OK button to see the Jetdirect data. Scroll through the information until you find the IP address.
Manually assigning an IP address
If you need to assign an IP address to the device, follow these instructions.
1.Press the MENU button on the control panel.
2.Touch CONFIGURE DEVICE.
3.Scroll down and touch I/O.
4.Scroll down and touch EMBEDDED JETDIRECT MENU.
5.Touch TCP/IP.
6.Touch CONFIG METHOD.
7.Touch MANUAL.
8.Touch MANUAL SETTINGS.
9.Touch IP ADDRESS and use the control-panel keypad to type in the unique IP address for the device.
16 Chapter 2 Setup |
ENWW |

Step 9. Install and configure the software
|
Install the software on the server that will be supporting the HP Digital Sending Software |
|
(HP DSS) service. After installation, the HP DSS runs in the background as a service. It |
|
starts automatically whenever the server is restarted. |
|
The digital sender must be on and connected to the network in order to successfully |
NOTE |
|
|
complete the software installation process. |
Before you begin
During the software installation procedure, you are prompted to configure the digital-send options. In order to complete this configuration, you need the following information:
|
● The software license key from the label on the software CD-ROM |
|
● The host name or IP address of the SMTP e-mail server that will be used to send e-mail |
|
from the digital sender |
|
It is highly recommended that the SMTP gateway be located on your own local area |
NOTE |
|
|
network. However, you may also configure your product for e-mail functionality even if your |
|
mail services are provided by an outside Internet service provider (ISP) over a digital |
|
subscription line (DSL). |
|
● The host name or IP address of the LDAP server that will be used to retrieve e-mail |
|
addresses (optional) |
|
● The paths for any folders that are to be set up for the send-to-folder feature |
|
● The host name or IP address of the digital sender |
|
The installation steps that are provided here are for basic installation only. For more details, |
NOTE |
|
|
and more advanced configuration information, see the HP 9200C Digital Sender Support |
|
Guide. |
To install the software
|
1. |
Insert the HP DSS CD-ROM into the CD-ROM drive. When the setup program starts, |
|
|
select Install Now on the initial screen. |
|
The setup program should start automatically. If it does not, browse to the CD-ROM drive |
|
NOTE |
||
|
and run the SETUP.EXE file. |
|
|
2. |
In the Choose Setup Language dialog box, select a language for the installation. The |
|
|
setup wizard starts. |
|
3. |
On the installation Welcome screen, click Next. |
|
4. |
Accept the HP software license terms by clicking Yes. |
|
5. |
Accept the default install location, or click Browse to select a different one. |
English
ENWW |
Step 9. Install and configure the software |
17 |

NOTE
NOTE
6.After the software files have been installed, the HP MFP Digital Sending Software Configuration Wizard appears.
When the HP Digital Sending Software is installed for the first time, the software can run in trial mode for a set period of time. The Licenses section of this first Configuration Wizard screen displays a “Trial License” entry. The remaining trial period is displayed in this entry. When the trial period expires, the software becomes inactive until a valid license is installed.
To enter the license key click the Add button, type the license code key from the label on the software CD-ROM, and then click OK.
7.In the Administrator Information section of the screen, fill in the administrator contact information. Select the Notify administrator of critical errors check box if you would like to be notified by e-mail about errors that require administrative assistance.
8.Click Next to continue to the E-Mail Settings screen.
9.Configure the e-mail settings:
a.Click Find Servers to find the SMTP servers on the network.
b.In the dialog box that appears, select the SMTP server that you will be using to send e-mail from the digital sender, and then click OK.
If you would like to have redundant servers, you can select more than one by holding down the CTRL key while selecting the servers.
c.Select the SMTP server that you added and click Test to test its functionality. If the test is not successful, contact your network administrator to verify that the SMTP server is functional.
10.Click Next to continue to the Secondary E-mail Settings screen.
Secondary E-mail is designed for solutions that require an extra measure of data security. It differs from the regular e-mail feature in that it requires a third-party e-mail security software program in order to deliver the e-mail. The configuration of Secondary E-mail is not included in this procedure. If you are planning to enable Secondary E-mail, see the HP 9200C Digital Sender Support Guide for instructions.
11.Click Next to continue to the Authentication Settings screen.
12.Authentication is an important security feature. HP highly recommends that authentication be enabled on the digital sender in order to prevent unauthorized use. However, authentication is not required in order to send documents using the digital sender. If you do not want to enable authentication at this time, skip to Step 13.
To enable authentication, start by selecting an option from the Authentication Method drop-down list. This is the method that the device uses to verify the user’s login credentials. The following options are available.
●None
●Microsoft Windows
●LDAP server
●Novell NDS (if Novell client software is present)
●Novell Bindery (if Novell client software is present)
After you select an option, the remainder of the settings appear on the screen.
18 Chapter 2 Setup |
ENWW |

NOTE
NOTE
NOTE
a. |
Click the Find Servers button. The Select LDAP Server dialog box appears, |
English |
|
||
|
containing a list of LDAP servers on the network. (You might first be prompted for |
|
|
your network login information.) |
|
b. |
Select the LDAP server that you want to use. The information about the selected |
|
|
server appears. |
|
c. |
Click OK to accept the selected server. The server information is filled in on the |
|
|
||
|
Authentication Settings screen. |
|
d. |
Click the Test button to test the settings. In the Test User Authentication dialog |
|
|
box, type in the network logon credentials of a network user in order to test whether |
|
|
LDAP can successfully retrieve an e-mail address. If the test is not successful, |
|
|
contact your network administrator to troubleshoot the LDAP configuration. |
|
13. Click Next to continue to the Fax Settings screen.
Fax configuration is not included in this procedure. If you are planning to enable sending to fax, see the HP 9200C Digital Sender Support Guide for instructions.
14.Click Next to continue to the Folder Settings screen.
15.If you would like to make the send-to-folder feature available, select the Enable Send to Folder check box.
a.Click Add… to add a new folder. The Add Predefined Folder dialog box appears.
b.Type a name for the folder into the Alias Name text box. This name appears in the device control-panel interface.
c.Click Browse… to browse to a folder location, and then click OK to accept it.
The supported operating systems for folder destinations are Windows 98, Windows NT, Windows 2000, Windows Server 2003, Windows XP, and Novell NetWare.
d.In the Access Credentials drop-down list, select the credentials that you want to use for access to the folder. If Public is selected, the program uses the Credentials to Access Public Folders from the Folders Settings screen. If MFP User is selected, the program uses the credentials with which the user has logged into the device.
e.Click OK to save the settings. The new folder is added to the list.
f.Repeat steps a through e to add more folders.
g.In the Credentials to Access Public Folders area of the Folders tab, type the public access credentials for saving files into folders. This information is required before you can save the folder list.
16.Click Next to continue to the Workflow Settings screen.
Workflow configuration is not included in this procedure. If you are planning to enable sending to workflows, see the HP 9200C Digital Sender Support Guide for instructions.
17. Click Next to continue to the Addressing Settings screen.
ENWW |
Step 9. Install and configure the software |
19 |

NOTE
NOTE
NOTE
18.If your network supports it, select the Enable PABs (Personal Address Books) check box to allow users to use their Microsoft Outlook address books on the digital sender.
This is an optional feature which requires authentication to be enabled and set to Microsoft Windows. The Microsoft Messaging API (MAPI) is also required. See the HP 9200C Digital Sender Support Guide for more information.
19.Click Next to continue to the Preferences Settings page.
20.Click Next again. A dialog box appears asking if you want to configure MFPs to utilize the service. Click Yes.
21.On the MFP Configuration screen, click Add…. The Add MFPs dialog box appears.
22.Click the Find MFPs button to find all MFPs and digital senders on the network. Select the digital sender you are installing from the list that appears.
If you know the host name or IP address of the device, you can type it in the Hostname or IP Address text box under Manually enter an MFP's network name rather than using the Find MFPs button.
23.Click the Add--> button to add the device to the MFP List.
24.Click Close to close the Add MFPs dialog box. The digital sender now appears in the MFPs list on the MFP Configuration screen.
25.Select the digital sender and click the Configure MFP button. Use the settings in the Configure MFPs window to enable the digital sending options for the digital sender.
a.Select the Send to Email tab. Select the Enable Send to Email check box, and select via the Digital Sender service in the Send Emails drop-down list.
b.If you would like the users to be able to add their own e-mail message when sending e-mail, click the Advanced button and select the Editable by user check box.
c.Select the Send to Folder tab and select the Enable Send to Folder check box.
d.If you are enabling authentication, select the Authentication tab and select the Enable Authentication check box. If you are not enabling authentication, skip to step f.
e.Select the features for which you want authentication enabled. Then select the network domain from the Default Domain drop-down box.
f.Go to the Addressing tab and select the Allow MFP to directly access an LDAP Address Book check box if you want HP DSS to retrieve e-mail addresses directly from an LDAP server. Select the previously-configured LDAP server in the LDAP Server drop-down list.
g.Click OK to save the MFP configuration settings.
If you are configuring a group of digital senders, use the Copy Settings button on the MFP Configuration screen to copy the settings from the device you have configured, then use the Paste Settings button to apply those settings to the other digital senders.
26.Click the Finish button. The final install screen appears.
27.Click the Finish button on the InstallShield Wizard Complete screen to complete the installation.
20 Chapter 2 Setup |
ENWW |

Step 10. Verify the product installation
Use the following procedure to test the installation and configuration of the device.
1.On the device control-panel display, verify that the E-Mail and Folder options appear.
2.Place a document face-up in the ADF or face-down on the flatbed glass.
3.Touch E-MAIL on the control-panel display.
4.If prompted, type in your user name and password.
5.If you were not prompted to log in, touch From: and then type in your e-mail address.
6.Touch To: and then type your own e-mail address.
NOTE |
Touch |
to delete any incorrect keystrokes. |
7.Touch OK.
8.Press START. The device scans the document and sends it to you as an e-mail attachment.
9.Repeat this process using the FOLDER option, and verify that the file is sent to the correct folder.
If the document does not send the file correctly, verify your product installation and configuration. For additional information, see the HP 9200C Digital Sender User Guide or
HP 9200C Digital Sender Support Guide.
If the test is successful, you can now scan documents and send them to an e-mail address or to a folder. See the HP 9200C Digital Sender User Guide for detailed instructions about how to use all of the send-to options, and see the HP 9200C Digital Sender Support Guide for information about configuring all of the digital-sending features.
English
ENWW |
Step 10. Verify the product installation |
21 |
22 Chapter 2 Setup |
ENWW |

3 |
Troubleshooting and |
customer support |
English
Use the information in this section if you are having any problems with the initial setup of the device. For more advanced troubleshooting, see the HP 9200C Digital Sender User Guide or the HP 9200C Digital Sender Support Guide.
ENWW |
23 |

Troubleshooting
Use the following instructions to troubleshoot digital-sender installation problems.
Problem
The digital sender will not scan and a CHECK CABLES. CHECK SCANNER LOCK. error message is displayed.
The Find Servers button on the E-Mail Settings screen did not find any servers.
Action to take
The scanner head lock is still in the locked position. Switch it to the unlocked position. See Step 4. Unlock the scanner head.
●Verify that you have a functioning SMTP server on the network.
●Click the Add… button on the E-Mail Settings screen and type in the host name or IP address of the SMTP server. After typing in the address, click the Test button to verify that the software can contact the server.
●If testing the server is unsuccessful, contact your network administrator to help troubleshoot the communication with the server.
●If you have any other digital senders or MFPs that are using the HP DSS service, you can use the Copy Settings button on the MFP Configuration tab of the HP MFP DSS Configuration Utility to copy the settings from a device that is functioning correctly, and then use the Paste Settings button to apply those settings to the digital sender.
The Find Servers button on the Authentication Settings screen did not find any servers.
●Verify that you have a functioning LDAP server on the network.
●Type the host name or IP address of the LDAP server into the LDAP Server text box. After typing in the address, click the Find Settings button to retrieve the server settings. Then click the Test button to verify that the software can contact the server.
●If testing the server is unsuccessful, contact your network administrator to help troubleshoot the communication with the server.
●If you have any other digital senders or MFPs that are using the HP DSS service, you can use the Copy Settings button on the MFP Configuration tab of the HP MFP DSS Configuration Utility to copy the settings from a device that is functioning correctly, and then use the Paste Settings button to apply those settings to the digital sender.
24 |
Chapter 3 Troubleshooting and customer support |
ENWW |
 Loading...