


 Loading...
HP DeskJet Printer
User’s Guide
for |
895C Series |
|
880C Series |
||
Windows |
||
830C Series |
||
|
||
|
810C Series |
HP Customer Care
Congratulations on the purchase of your new HP DeskJet printer. Because HP wants owning your printer to be a trouble-free experience, we back your purchase with HP Customer Care—award-winning service and support that includes:
HP Customer Care Online
Click your way to a quick solution! http://www.hp.com/support/home_products is a great place to start for answers to questions about your HP DeskJet printer— 24 hours a day, seven days a week.
HP Customer Care User Forums
Go online, anytime, and you’ll also find helpful user forums—a great source of ideas and suggestions for using your HP DeskJet printer. You can access the user forums directly from http://www.hp.com/support/home_products.
HP Customer Care by Fax
When you want just the facts—and you want them fast by fax, call HP FIRST, our automated fax-back service. Dial (800) 333-1917 (U.S. only) from any touch-tone phone.
HP Customer Care by Phone
Call us direct at (208) 344-4131 and connect with a service technician who specializes in your product and who can typically answer your questions in one phone call. Most calls are answered in under three minutes.
Easy to reach. Easy to use. HP Customer Care lets you buy today with the confidence that we’ll stand behind you tomorrow.

HP DeskJet Printer User’s Guide
for Windows
895C Series
880C Series
830C Series
810C Series
English

Acknowledgments
Microsoft, MS, MS-DOS, and Windows are registered trademarks of Microsoft Corporation (U.S. patent numbers 4955066 and 4974159).
MMX and Pentium are U.S. registered trademarks of Intel Corporation.
TrueType is a U.S. trademark of Apple Computer, Inc.
Notice
The information contained in this document is subject to change without notice.
Hewlett-Packard Company makes no warranty of any kind with regard to this material, including, but not limited to, the implied warranties of merchantability and fitness for a particular purpose.
Hewlett-Packard shall not be liable for any errors or for incidental or consequential damages in connection with the furnishing, performance, or use of this material.
All rights reserved. Reproduction, adaptation, or translation of this manual is prohibited without prior written permission of Hewlett-Packard Company, except as allowed under the copyright laws.
No part of this document may be photocopied, reproduced, or translated to another language without the prior written consent of Hewlett-Packard Company.
Manual Part Number C6413-90009
Edition 1, 6/99
© Copyright Hewlett-Packard Company 1999
ii

|
Table of Contents |
|
Chapter 1 |
Setting Up Your Printer |
|
|
Setting Up Your Printer with a Parallel Printer Cable . . . . . . . . . . . . . . . . . . |
. 2 |
|
Step 1: Unpack Your Printer . . . . . . . . . . . . . . . . . . . . . . . . . . . . . . . . . . . . |
. 2 |
|
Step 2: Connect Parallel Cable . . . . . . . . . . . . . . . . . . . . . . . . . . . . . . . . . |
. .3 |
|
Step 3: Plug in the Power . . . . . . . . . . . . . . . . . . . . . . . . . . . . . . . . . . . . . . |
. 4 |
|
Step 4: Insert Print Cartridges . . . . . . . . . . . . . . . . . . . . . . . . . . . . . . . . . . |
. 5 |
|
Step 5: Load Paper in Your Printer . . . . . . . . . . . . . . . . . . . . . . . . . . . . . . |
. .7 |
|
Step 6: Install the Printer Software . . . . . . . . . . . . . . . . . . . . . . . . . . . . . |
. 9 |
|
Setting Up Your Printer with a USB Cable . . . . . . . . . . . . . . . . . . . . . . . . . . . . |
. 12 |
|
USB Step 1: Unpack Your Printer . . . . . . . . . . . . . . . . . . . . . . . . . . . . . . . |
. 12 |
|
USB Step 2: Plug in the Power . . . . . . . . . . . . . . . . . . . . . . . . . . . . . . . . . . |
. 13 |
|
USB Step 3: Insert Print Cartridges . . . . . . . . . . . . . . . . . . . . . . . . . . . . . |
.14 |
|
USB Step 4: Load Paper in Your Printer . . . . . . . . . . . . . . . . . . . . . . . . . |
.16 |
|
USB Step 5: Insert Printer Software CD in the Computer . . . . . . . . . |
.18 |
|
USB Step 6: Connect USB Cable . . . . . . . . . . . . . . . . . . . . . . . . . . . . . . . |
.18 |
|
USB Step 7: Install the USB Printer Software . . . . . . . . . . . . . . . . . . . . |
.18 |
|
USB Step 8: Install the Printer Software . . . . . . . . . . . . . . . . . . . . . . . . . |
20 |
|
Align the Inkjet Print Cartridges . . . . . . . . . . . . . . . . . . . . . . . . . . . . . . . . . . . . . |
22 |
|
Print a Page! . . . . . . . . . . . . . . . . . . . . . . . . . . . . . . . . . . . . . . . . . . . . . . . . . . . . . . . . |
22 |
|
Additional Setup Information . . . . . . . . . . . . . . . . . . . . . . . . . . . . . . . . . . . . . . . |
23 |
|
If You have Problems Installing . . . . . . . . . . . . . . . . . . . . . . . . . . . . . . . . |
23 |
|
More Information When Installing Your Printer Software . . . . . . . . |
23 |
Chapter 2 Using Your Printer Software
Finding the HP Print Settings Box . . . . . . . . . . . . . . . . . . . . . . . . . . . . . . . . . . . . 26 About the HP Print Settings Box . . . . . . . . . . . . . . . . . . . . . . . . . . . . . . . . . . . . . 27 Uninstalling the Printer Software . . . . . . . . . . . . . . . . . . . . . . . . . . . . . . . . . . . . 29
Chapter 3 Creative Printing
Paper Basics . . . . . . . . . . . . . . . . . . . . . . . . . . . . . . . . . . . . . . . . . . . . . . . . . . . . . . . . 30 Working with Color . . . . . . . . . . . . . . . . . . . . . . . . . . . . . . . . . . . . . . . . . . . . . . . . . 33 Customizing Your Print Jobs . . . . . . . . . . . . . . . . . . . . . . . . . . . . . . . . . . . . . . . . 35 Working With Photos . . . . . . . . . . . . . . . . . . . . . . . . . . . . . . . . . . . . . . . . . . . . . . . 40 Printing Envelopes . . . . . . . . . . . . . . . . . . . . . . . . . . . . . . . . . . . . . . . . . . . . . . . . . . 42 Printing Labels . . . . . . . . . . . . . . . . . . . . . . . . . . . . . . . . . . . . . . . . . . . . . . . . . . . . . 45 Printing Cards . . . . . . . . . . . . . . . . . . . . . . . . . . . . . . . . . . . . . . . . . . . . . . . . . . . . . . 46 Printing Non-standard Size Cards . . . . . . . . . . . . . . . . . . . . . . . . . . . . . . . . . . . 47 Printing on Transparencies . . . . . . . . . . . . . . . . . . . . . . . . . . . . . . . . . . . . . . . . . . 48
iii

Table of Contents
Printing Posters . . . . . . . . . . . . . . . . . . . . . . . . . . . . . . . . . . . . . . . . . . . . . . . . . . . . . 50
Printing Banners . . . . . . . . . . . . . . . . . . . . . . . . . . . . . . . . . . . . . . . . . . . . . . . . . . . . .51
Printing Iron-On Transfers . . . . . . . . . . . . . . . . . . . . . . . . . . . . . . . . . . . . . . . . . . . 54
Chapter 4 Using and Caring for Your Inkjet Print Cartridges
Using Inkjet Print Cartridges . . . . . . . . . . . . . . . . . . . . . . . . . . . . . . . . . . . . . . . . . 55 Replacing an Inkjet Print Cartridge . . . . . . . . . . . . . . . . . . . . . . . . . . . . . . . . . . 55 Storing Inkjet Print Cartridges . . . . . . . . . . . . . . . . . . . . . . . . . . . . . . . . . . . . . . . 57 Aligning the Inkjet Print Cartridges . . . . . . . . . . . . . . . . . . . . . . . . . . . . . . . . . . 58 Cleaning the Inkjet Print Cartridges . . . . . . . . . . . . . . . . . . . . . . . . . . . . . . . . . . 58 Damage Resulting from Refilling the Inkjet Print Cartridges . . . . . . . . . . . 62
Chapter 5 Getting Help When Things Go Wrong
Finding the HP DeskJet Toolbox . . . . . . . . . . . . . . . . . . . . . . . . . . . . . . . . . . . . . 63
About the HP DeskJet Toolbox . . . . . . . . . . . . . . . . . . . . . . . . . . . . . . . . . . . . . . 64
Basic Troubleshooting . . . . . . . . . . . . . . . . . . . . . . . . . . . . . . . . . . . . . . . . . . . . . . 65
Clearing a Paper Jam . . . . . . . . . . . . . . . . . . . . . . . . . . . . . . . . . . . . . . . . . . . . . . . 69
HP Customer Care . . . . . . . . . . . . . . . . . . . . . . . . . . . . . . . . . . . . . . . . . . . . . . . . . . 70
Extended Warranty Options . . . . . . . . . . . . . . . . . . . . . . . . . . . . . . . . . . . . . . . . . 72
Chapter 6 More About Your Printer and Supplies
Maintaining Your Printer . . . . . . . . . . . . . . . . . . . . . . . . . . . . . . . . . . . . . . . . . . . . 73
Increasing Printer Performance . . . . . . . . . . . . . . . . . . . . . . . . . . . . . . . . . . . . . . 73
Minimum Printing Margins . . . . . . . . . . . . . . . . . . . . . . . . . . . . . . . . . . . . . . . . . . 74
Supplies and Accessories . . . . . . . . . . . . . . . . . . . . . . . . . . . . . . . . . . . . . . . . . . . 75
Ordering Information . . . . . . . . . . . . . . . . . . . . . . . . . . . . . . . . . . . . . . . . . . . . . . . 77
Appendix A Specifications . . . . . . . . . . . . . . . . . . . . . . . . . . . . . . . . . . . . . . . 79 Appendix B Checking Your Computer Settings . . . . . . . . . . . . . . . . . . . . . 82 Appendix C Frequently Asked Questions About USB . . . . . . . . . . . . . . . 86 Appendix D Using Your HP DeskJet 895C Series Printer on a Network . 88 Appendix E Printing from DOS Applications . . . . . . . . . . . . . . . . . . . . . . . .91 Appendix F Legal Information . . . . . . . . . . . . . . . . . . . . . . . . . . . . . . . . . . . 101 Index . . . . . . . . . . . . . . . . . . . . . . . . . . . . . . . . . . . . . . . . . . . . . . . . . . . .103
iv
 Introduction
Congratulations on the Purchase of Your
HP DeskJet 895C, 880C, 830C or 810C Series Printer!
Here’s what comes in the box. If something is missing, talk to your HP dealer or call HP Customer Care. (See “HP Customer Care” on page 70 for the appropriate telephone number.)
Printer
Documents about your printer
Power adapter
Power cord
Black inkjet print cartridge
Tri-color inkjet Printer software6410020 print cartridge (CD and/or diskettes)
Note: You’ll need to buy a printer cable, such as the HP IEEE 1284-Compliant Parallel Interface Cable (bi-directional). See page 75 for ordering information. To use the Universal Serial Bus (USB) port on your printer, your computer must be using Windows 98. See “Frequently Asked Questions About USB (Universal Serial Bus)” on page 86.
If your computer does not have a CD-ROM drive and if diskettes were not included with your printer, see page 70 for information on getting printer software.
For information on printing across a network with the HP DeskJet 895C Series printer, see “Using Your HP DeskJet 895C Series Printer on a Network” on page 88.
v

Introduction
Special Features of Your HP Inkjet Printer
Your new HP DeskJet printer is equipped with special features that improve print quality, giving you a competitive edge:
•Discover laser-like quality text and brilliant photo-quality color that make documents more powerful and presentations more persuasive.
•Enjoy clear, natural-looking results on any paper using your HP printer with PhotoRet II printing technology.
•See perfect color every time with ColorSmart II color matching.
•Also, your HP printer is USB-capable (Universal Serial Bus).
In addition, the HP DeskJet 895C Series printer is designed for use either as a personal printer or for use by small workgroups over a network.
Finding More Information
This User’s Guide shows you how to operate your printer. For more information about your printer, look in these additional places:
•You can get the latest product information, troubleshoot problems, and download updated printer software from our Web site on the Internet at http://www.hp.com/support/home_products or http://www.hp.com
•The printer software includes an online troubleshooting system, called the HP DeskJet Toolbox. See “About the HP DeskJet Toolbox” on page 64 for more information.
•Also provided with your printer is a Release Notes file. This file is placed in the HP DeskJet 8xxC Series utilities group when you install the printer software. The Release Notes contain information about product compatibility.
•If you are printing from MS-DOS, see “Printing from DOS Applications” on page 91.
vi

1 Setting Up Your Printer
Your HP DeskJet printer is designed for connection to your computer using either of the following two cables:
• Parallel Printer Cable — This is the recommended method. You can use this method when your computer is running either Windows 95, Windows 98, Windows NT 4.0, or Windows 3.1x.
Parallel Printer Cable Setup . . . . . . . . . . . . . . . . . . . . . . . . . . . page 2
• Universal Serial Bus (USB) Cable — This method is only supported if you are running Windows 98 on your computer.
USB Printer Cable Setup . . . . . . . . . . . . . . . . . . . . . . . . . . . . . . . page 12
The printer cable is not supplied with the printer. You must purchase the printer cable separately. Go to page 75 for information on ordering either a parallel printer cable or a USB cable.
1
1Setting Up Your Printer with a Parallel Printer Cable
Setting Up Your Printer with a Parallel Printer Cable
Note: If you are using a USB cable for communications between your printer and your computer, go to page 12.
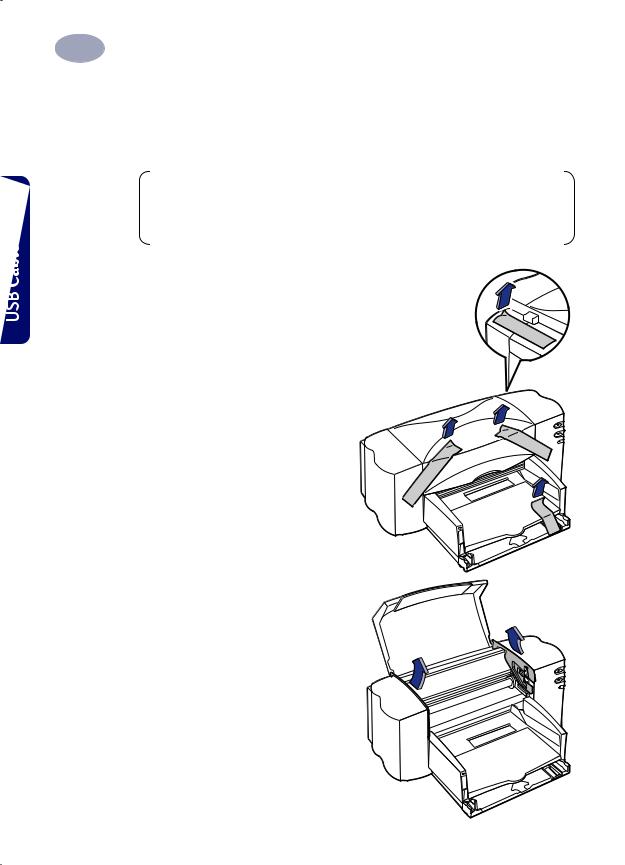
Step 1: Unpack Your Printer
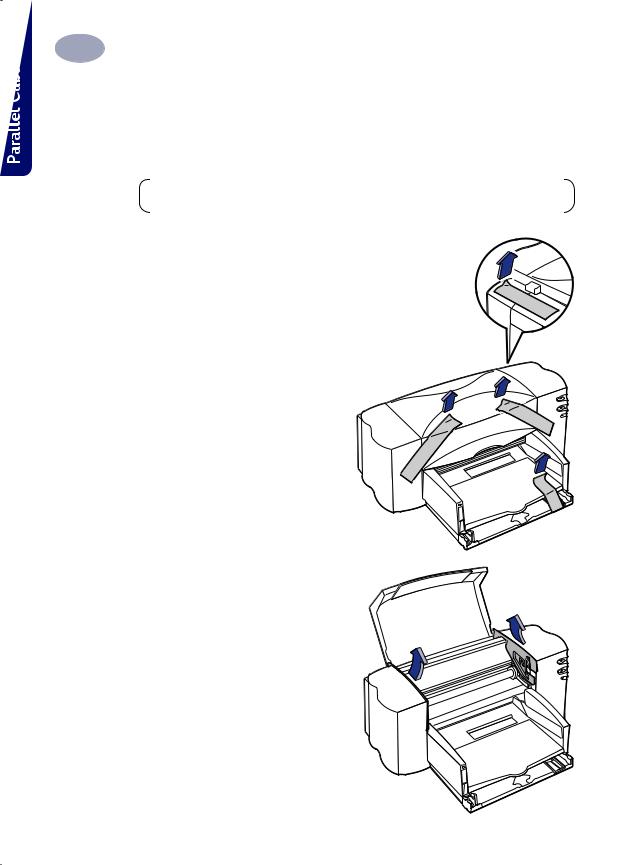
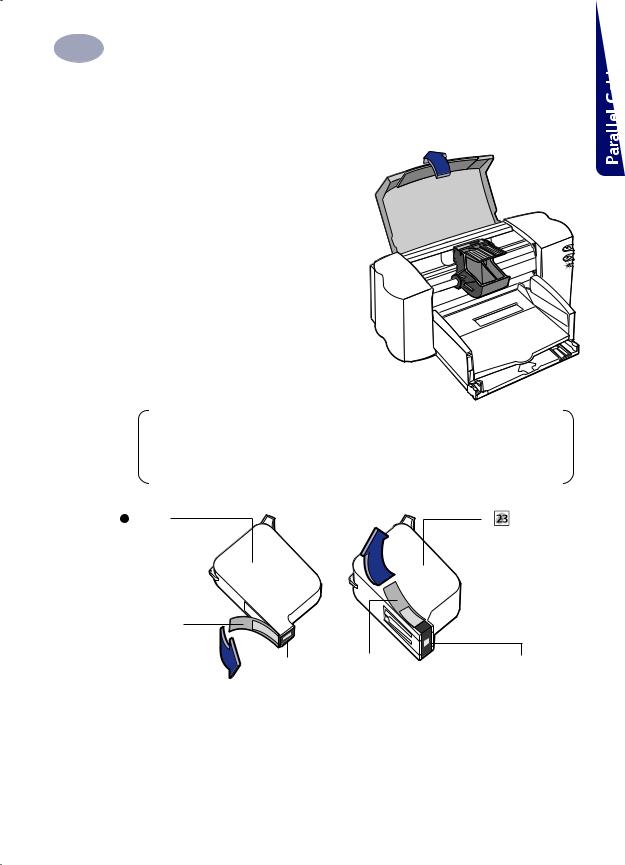
1 Remove the packing material and the packing tape from the outside of the printer.
6410021
2 Open the top cover. Remove both pieces of plastic packing material from the inside of the printer.
3 Close the top cover.
6410022
2
1Setting Up Your Printer with a Parallel Printer Cable
Step 2: Connect Parallel Cable
You’ll need to buy a printer cable that supports bi-directional communication (IEEE 1284-compliant), such as HP part number C2950A.
1 Make sure both the printer and the computer are turned off.
2 Lift open the cable access door on the back of the printer.
3 Plug the end of the cable that does not have screws attached into the printer. Snap both clips into the notches.
6410027
4 Plug the other end into the computer, and tighten the screws.
6410028
3
1Setting Up Your Printer with a Parallel Printer Cable
Step 3: Plug in the Power
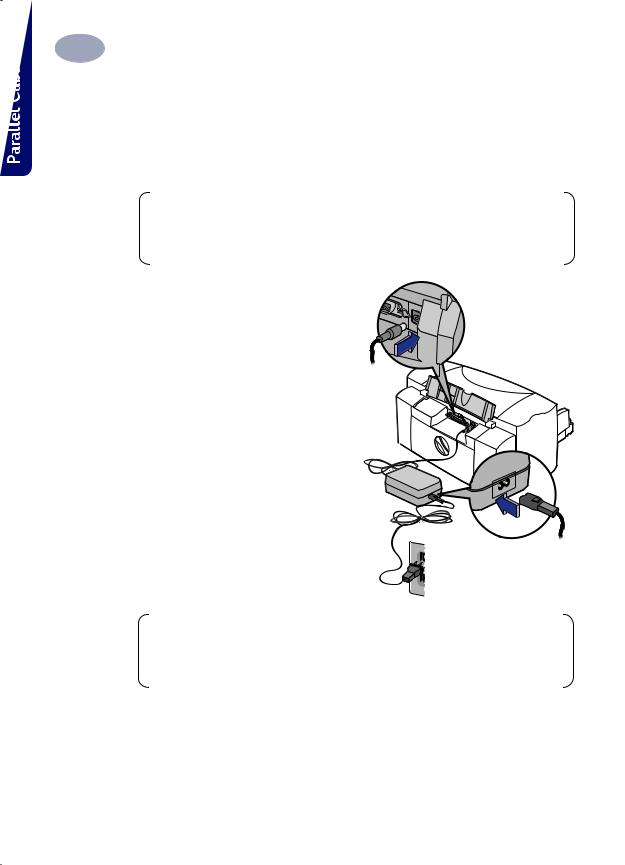
1 Leave the computer and the printer turned off.
2Lift open the cable access door on the back of the printer.
Note: If using an HP JetDirect External Print Server with your HP DeskJet 895C Series printer, go to “Setting Up Your Printer on a Network” on page 89.
3 Plug the power adapter’s cord firmly into the connector on the back of the printer.
4 Plug the appropriate end of the power cord into the power adapter.
5 Plug the other end of the power cord into an electrical outlet.
6410023
Note: Use only the Power  button on the front of the printer to turn the printer on and off. Using a power strip, surge protector or a wall outlet switch to turn the printer on and off may cause premature failure.
4
1Setting Up Your Printer with a Parallel Printer Cable
Step 4: Insert Print Cartridges
1 Press the Power  button to turn on the printer.
The Power light  comes on and the
Inkjet Print Cartridge  light blinks.
2 Open the top cover.
The cartridge cradles should move to the center of the printer.
3 Remove the inkjet print cartridges from their individual packages.
4 Carefully remove the protective vinyl tape from the tri-color and black inkjet print cartridges.
6410024
Note: Be sure not to touch the ink nozzles or the copper electrical contacts. Also, do NOT remove the copper strip; these are electrical contacts required for proper operation of the inkjet print cartridges.
Black |
Tri-color |
Inkjet Print |
Inkjet Print |
Cartridge |
Cartridge |
Vinyl Tape
Ink Nozzles |
Vinyl |
Ink Nozzles |
|
Tape |
6410025 |
|
|
5
1Setting Up Your Printer with a Parallel Printer Cable
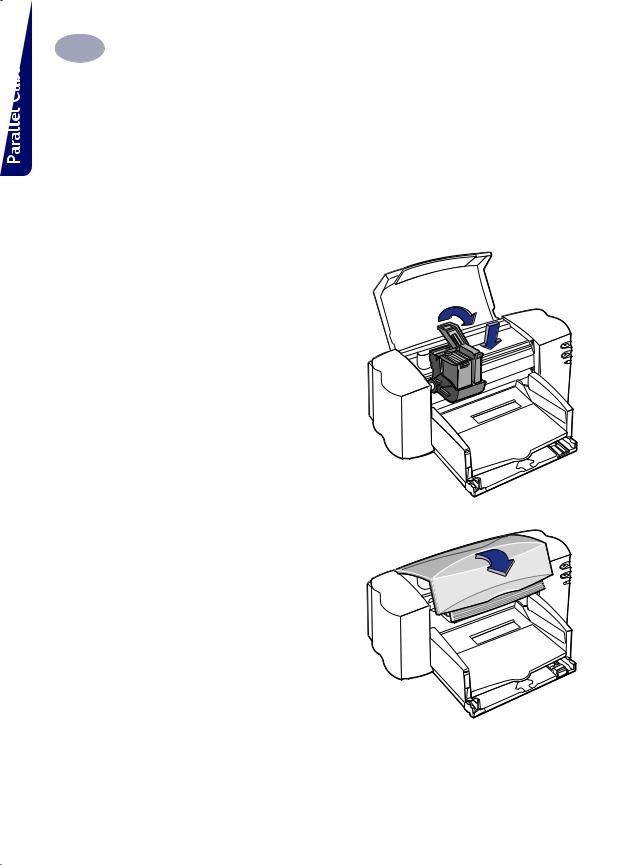
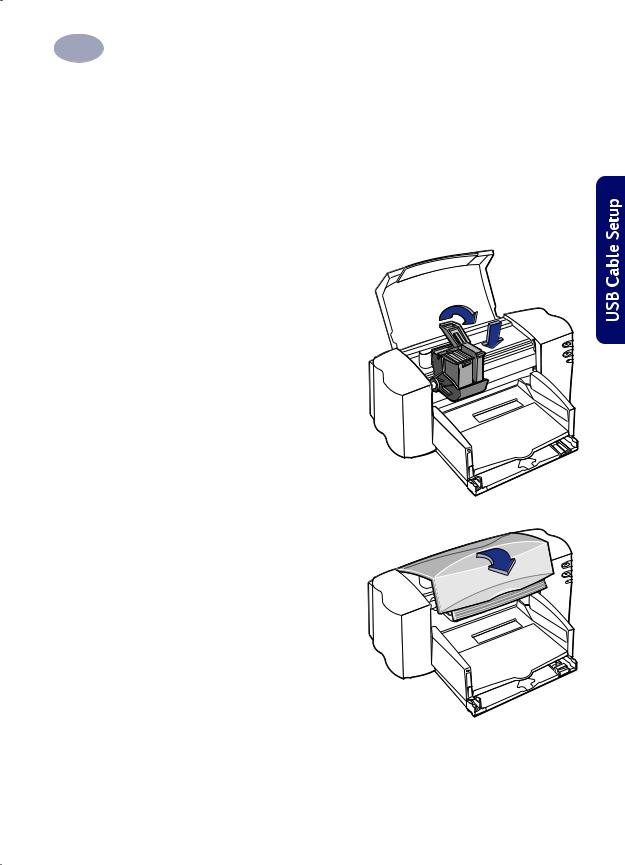
5For each inkjet print cartridge, lift the cradle latch inside the printer. With the copper electrical contacts toward the rear of the printer and the inkjet print cartridge held vertically, push the inkjet print cartridge firmly down into the cradle.
Insert the black inkjet print cartridge in the right cradle, and insert the tri-color inkjet print cartridge in the left cradle. You must insert both inkjet print cartridges for the printer to operate.
6 Close the latch.
You will hear a click and feel resistance when the latch is pushed down.
6410005
7 Close the top cover.
The Inkjet Print Cartridge  light continues to blink for awhile and then goes off. (You’ll hear the cartridge cradle return to its home position on the right side of the printer.)
6410026
6
1Setting Up Your Printer with a Parallel Printer Cable
Note: If the Inkjet Print Cartridge light continues to blink or if the cradle doesn’t move to the right side of the printer, take out both cartridges and reinsert them.
When either inkjet print cartridge starts to run out of ink, replace the empty inkjet print cartridge. If you do not have a new replacement for the empty inkjet print cartridge, leave the empty inkjet print cartridge in the cradle of the printer. The printer will not print with only one inkjet print cartridge installed.
We recommend you keep spare inkjet print cartridges on hand. When buying inkjet print cartridges, check the part numbers referenced below carefully to make sure you are buying the right inkjet print cartridges for your printer.
These inkjet print cartridges have been specifically designed to work with your printer to produce results that are always clear, always sharp.
895Cxi, 895Cse, 880C, 882C, 832C, 830C, 815C require:
 Black HP 51645 Series
  Tri-Color HP C1823 Series
810C, 812C require:
 Black HP No. [15] (equivalent to C6615A)
  Tri-Color HP No. [23] (equivalent to C1823 Series)
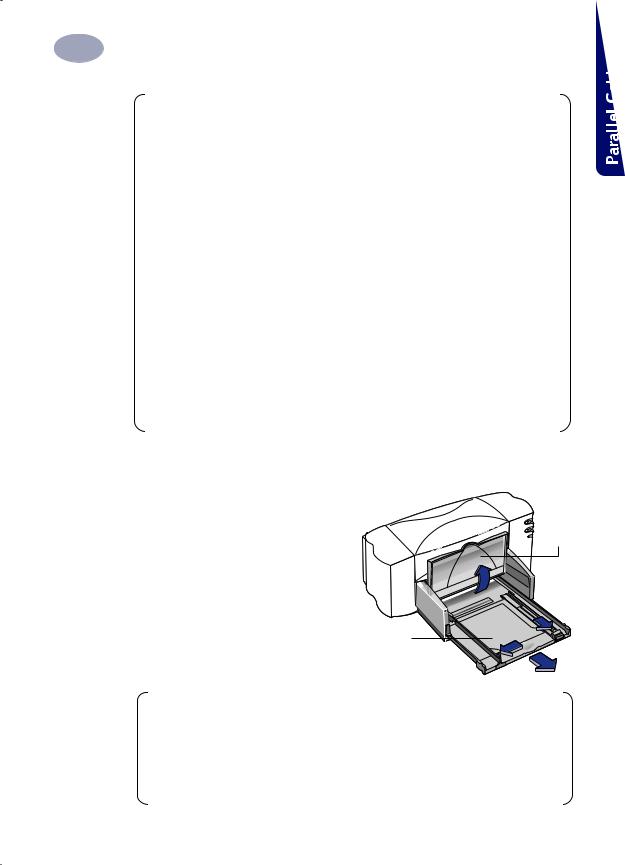
Step 5: Load Paper in Your Printer
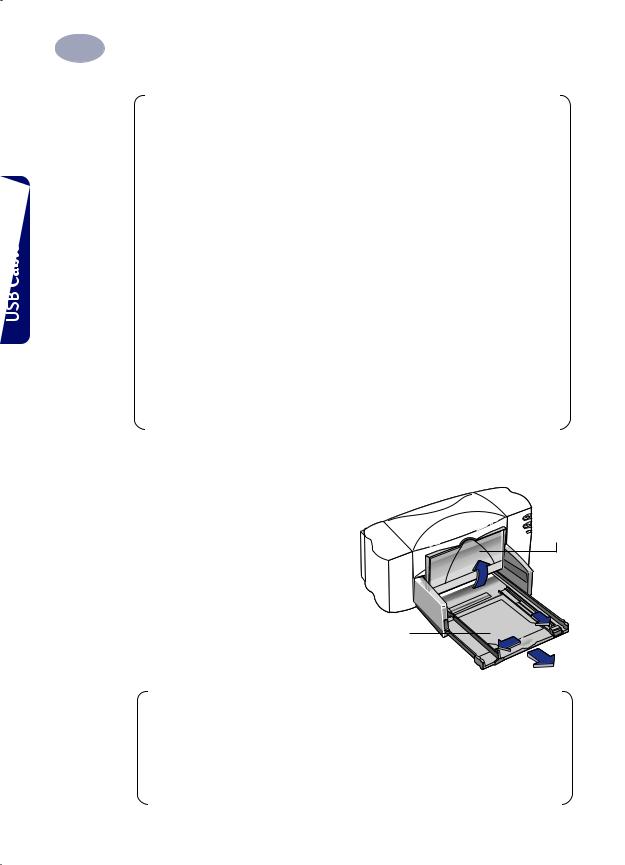
1Pull out the lower (IN) tray and slide the paper-width and
paper-length adjusters out as far as possible to make room for the paper.
Flip up the upper (OUT) tray for
a better view of the IN tray.
IN Tray
6410006
OUT
Tray
Note: Although you’ll get great print results using plain paper, HewlettPackard papers are developed especially for HP inks and your printer. In addition, a broad range of printing possibilities opens to you when you use the various HP papers. HP papers are available at most computer supply stores. Go to “Paper Basics” on page 30 for more details.
7
1Setting Up Your Printer with a Parallel Printer Cable
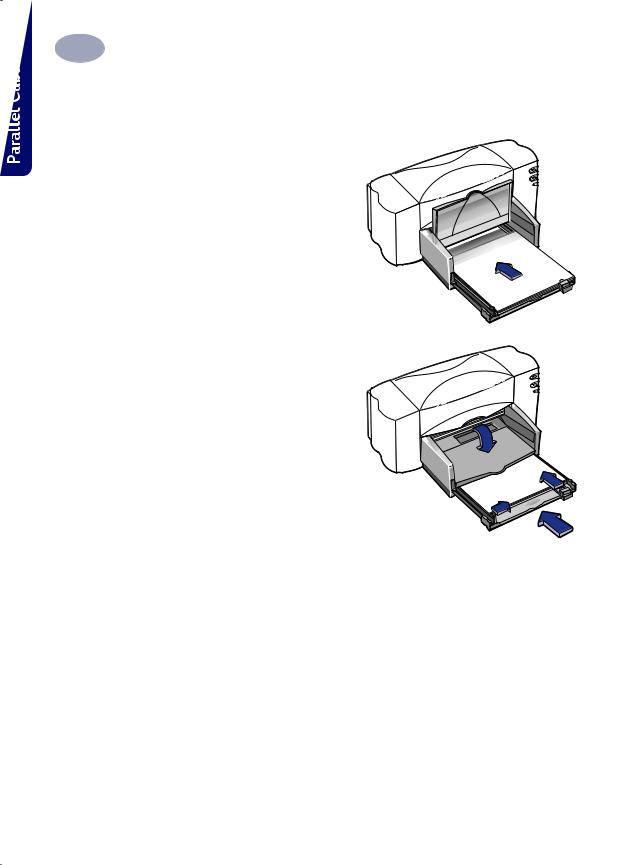
2Remove a stack of paper from its packaging. (Make sure all the paper in the stack is the same size and type.) Tap the stack on a flat surface to even it up.
3 Put the paper into the IN tray, print side down. You can insert up to
10 mm or 3/8 inch at a time.
4 Push the paper toward the back of the paper tray until it stops.
5 Slide both paper adjusters to fit
snug against the paper’s edges. |
6410007 |
|
|
make sure the paper lies flat in the |
|
tray and that the paper fits under |
|
the tab of the paper-length |
|
adjuster. |
|
6 Then slide the IN tray all the way back in.
If it is up, flip the OUT tray back down.
6410008
Print Side Down
Most paper prints better on one side than on the other. This is especially true for coated or specially treated paper. The print side is usually indicated on the paper package. Be sure you insert the paper into the IN tray of the printer with the print side down.
For More Information:
Go to “Printing Cards” on page 46 for information on how to load small-sized paper. Go to “Printing Banners” on page 51 for how to print on banner paper. Go to “How to Print on Different Paper Sizes” on page 35 for information on using papers of different sizes.
8

1Setting Up Your Printer with a Parallel Printer Cable
Step 6: Install the Printer Software
Before you can use your new HP DeskJet printer, you must install the printer software on every computer from which you will print. Your printer software is located on the CD included with your printer. For your convenience, the printer software is also available on diskettes.
From time to time, Hewlett-Packard provides updated printer software. Go to “Printer Software” on page 70 for information on obtaining updated printer software.
Go to the appendix, “Printing from DOS Applications” on page 91, for information on installing the DOS printing software and printing from DOS.
Before You Begin
1Make sure the computer is set up, operational, and meets the minimum system requirements as given in “Checking Your Computer Settings” on page 82.
2Perform all procedures given earlier in this book. This ensures that the printer is properly set up and ready to print.
3Make sure that the printer is connected to the computer with a parallel printer cable and that no peripheral devices (such as scanners, backup units, and switch boxes) are installed between the printer and the computer.
4 Make sure both the printer and the computer are turned on.
5Close any software programs that are open and running on the computer, except the HP DeskJet installer, Windows Explorer, or Program Manager. Go to page 23 for instructions on how to close software programs.
6Install the printer software on the computer. Perform the appropriate following installation procedure for your computer’s operating system and type of disk drives (either CD-ROM or floppy disk).
If you are installing the printer software from the CD, go to “Installing the Printer Software from the CD” on page 10. If you are installing the printer software from floppy disks, go to “Installing from Disks to a Directly Connected Computer (Parallel Cable)” on page 24.
9

1Setting Up Your Printer with a Parallel Printer Cable
Installing the Printer Software from the CD
Note: If the New Hardware Found box appears during the installation procedure, click the “X” in the upper-right corner of the box, or click Cancel.
1Insert the CD into your CD-ROM drive.
•For Windows 95, 98 and NT 4.0, do the following:
a.From the taskbar, select Start Run.
b.Type the letter of the computer’s CD-ROM player (usually D:\ or E:\), followed by setup.exe then click OK.
•For Windows 3.1x, do the following:
a.In the Program Manger, select File Run.
b.Type the letter of the computer’s CD-ROM player (usually D:\ or E:\), followed by setup.exe then click OK.
Note: If you don’t know which drive letter is for your CD-ROM player, open Windows Explorer or File Manager and look for the letter next to the CD-ROM icon.
2When the opening screen appears, click Install HP DeskJet 8xxC Series Printer Software. (Your printer model number will be on the install button.)
3When the HP License Agreement box appears, read the agreement and click
Accept.
4Do one of the following:
•If the printer is turned on and is connected to the computer with the parallel printer cable, the setup program automatically detects the printer and the port to which it is connected. Just follow the instructions on the screen. Then, proceed to step 5.
•If the printer is turned off or if the connection to the computer has not yet been made with the parallel printer cable, the setup program asks you to specify which port to use for the printer. Select an LPT-type port; the default setting of LPT1 is appropriate for most computers. Click Next and proceed to step 5.
10

1Setting Up Your Printer with a Parallel Printer Cable
5 Follow the instructions on the screen.
If something goes wrong, go to “If You have Problems Installing” on page 23.
6When prompted, restart Windows.
Note: You must restart Windows before the printer software can run.
7 Continue to follow the instructions on the screen.
8When the Communication Test box appears, click Test Printer Communication. Then do one of the following:
•If the print test is successful, go directly to step 9.
•If the test is unsuccessful, click Troubleshoot and try to correct this problem. If you cannot correct this problem, click OK. For more information about printer communications, go to “Communications Test and Two-way Communications (Parallel Cable)” on page 24.
Note: The HP DeskJet 8xxC Series printer is automatically set as the default Windows printer. If you find that it is not the default Windows printer, go to “Setting the HP DeskJet Printer as the Default” on page 24.
9 Proceed to “Align the Inkjet Print Cartridges” on page 22.
11
1Setting Up Your Printer with a USB Cable
Setting Up Your Printer with a USB Cable
Note: The USB cable set up requires Windows 98. If you are using a parallel cable for communications between your printer and your computer, go to page 2.
USB Step 1: Unpack Your
Printer
1Remove the packing material and the packing tape from the outside of the printer
6410021
2 Open the top cover. Remove both pieces of plastic packing material from the inside of the printer.
3 Close the top cover.
6410022
12
1Setting Up Your Printer with a USB Cable
USB Step 2: Plug in the Power
Note: Do NOT connect your USB cable between the printer and the computer. Make sure that the USB cable is NOT plugged into the computer at this point in the setup procedure.
1 Leave the computer and the printer turned off.
2 Lift open the cable access door on the back of the printer.
3 Plug the power adapter’s cord firmly into the connector on the back of the printer.
4 Plug the appropriate end of the power cord into the power adapter.
5 Plug the other end of the power cord into an electrical outlet.
6410023
Note: Use only the Power  button on the front of the printer to turn the printer on and off. Using a power strip, surge protector or a wall outlet switch to turn the printer on and off may cause premature failure.
13
1Setting Up Your Printer with a USB Cable
USB Step 3: Insert Print Cartridges
1 Press the Power  button to turn on the printer.
The Power light  comes on and the Inkjet Print Cartridge
  light blinks.
2 Open the top cover.
The cartridge cradle moves to the center of the printer.
3 Remove the inkjet print cartridges from their individual packages.
4 Carefully remove the protective vinyl |
|
tape from the tri-color and black |
|
inkjet print cartridges. |
6410024 |
Note: Be sure not to touch the ink nozzles or the copper electrical contacts. Also, do NOT remove the copper strip; these are electrical contacts required for proper operation of the inkjet print cartridges.
Black |
Tri-color |
Inkjet Print |
Inkjet Print |
Cartridge |
Cartridge |
Vinyl Tape
Ink Nozzles |
Vinyl |
Ink Nozzles |
|
Tape |
6410025 |
|
|
14
1Setting Up Your Printer with a USB Cable
5For each inkjet print cartridge, lift the cradle latch inside the printer. With the copper electrical contacts toward the rear of the printer and the inkjet print cartridge held vertically, push the inkjet print cartridge firmly down into the cradle.
Insert the black inkjet print cartridge in the right cradle, and insert the
tri-color inkjet print cartridge in the left cradle. You must insert both inkjet print cartridges for the printer to operate.
6 Close the latch.
You will hear a click and feel resistance when the latch is pushed down.
6410005
7 Close the top cover.
The Inkjet Print Cartridge  light continues to blink for awhile and then goes off. (You’ll hear the cartridge cradle returns to its home position on the right side of the printer.)
6410026
15
1Setting Up Your Printer with a USB Cable
Note: If the Inkjet Print Cartridge light continues to blink or if the cradle doesn’t move to the right side of the printer, take out both cartridges and reinsert them.
When either inkjet print cartridge starts to run out of ink, replace the empty inkjet print cartridge. If you do not have a new replacement for the empty inkjet print cartridge, leave the empty inkjet print cartridge in the cradle of the printer. The printer will not print with only one inkjet print cartridge installed.
We recommend you keep spare inkjet print cartridges on hand. When buying inkjet print cartridges, check the part numbers referenced below carefully to make sure you are buying the right inkjet print cartridges for your printer.
These inkjet print cartridges have been specifically designed to work with your printer to produce results that are always clear, always sharp.
895Cxi, 895Cse, 880C, 882C, 832C, 830C, 815C require:
 Black HP 51645 Series
  Tri-Color HP C1823 Series
810C, 812C require:
 Black HP No. [15] (equivalent to C6615A)
  Tri-Color HP No. [23] (equivalent to C1823 Series)
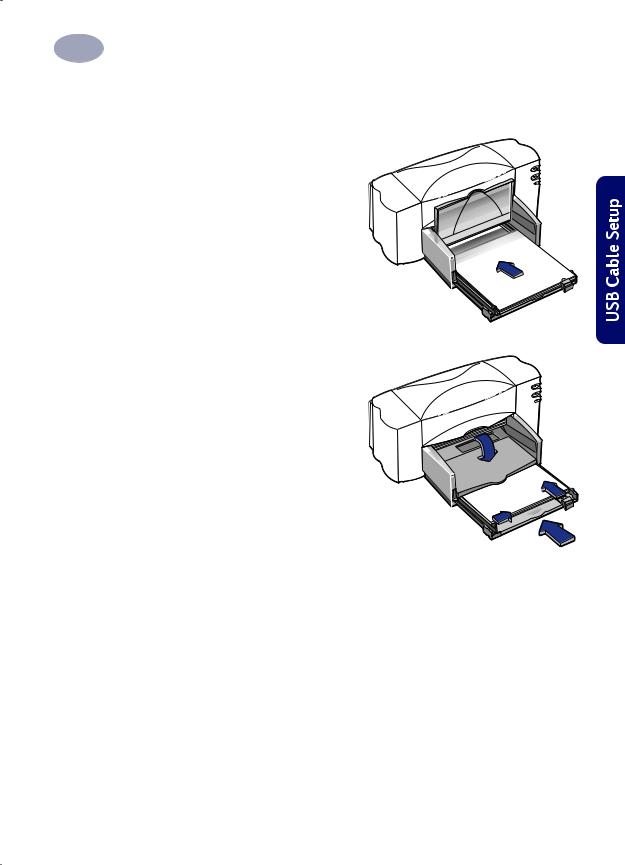
USB Step 4: Load Paper in Your Printer
1 Pull out the lower (IN) tray and slide the paper-width and paper-length adjusters out as far as possible to make room for the paper.
Flip up the upper (OUT) tray
for a better view of the IN tray.
IN Tray
6410006
OUT
Tray
Note: Although you’ll get great print results using plain paper, HewlettPackard papers are developed especially for HP inks and your printer. In addition, a broad range of printing possibilities opens to you when you use the various HP papers. HP papers are available at most computer supply stores. Go to “Paper Basics” on page 30 for more details.
16
1Setting Up Your Printer with a USB Cable
2Remove a stack of paper from its packaging. (Make sure all the paper in the stack is the same size and type.) Tap the stack on a flat surface to even it up.
3 Put the paper into the IN tray, print side down. You can insert up to
10 mm or 3/8 inch at a time.
4 Push the paper toward the back of the paper tray until it stops.
6410007
5Slide both paper adjusters to fit snug against the paper’s edges.
make sure the paper lies flat in the tray and that the paper fits under the tab of the paper-length adjuster.
6 Slide the IN tray all the way back in.
If it is up, flip the OUT tray back down.
6410008
Print Side Down
Most paper prints better on one side than on the other. This is especially true for coated or specially treated paper. The print side is usually indicated on the paper package. Be sure you insert the paper into the IN tray of the printer with the print side down.
For More Information:
Go to “Printing Cards” on page 46 for information on how to load small-sized paper. Go to “Printing Banners” on page 51 for information on how to print on banner paper. Go to “How to Print on Different Paper Sizes” on page 35 for information on using papers of different sizes.
17
1Setting Up Your Printer with a USB Cable
USB Step 5: Insert Printer Software CD in the Computer
Note: Make sure the host computer is operational, meets the minimum system requirements as given on page 82 and that its USB port is enabled and properly configured. (Go to “Frequently Asked Questions About USB (Universal Serial Bus)” on page 86 for more information.)
1 Turn on the computer and wait for Windows 98 to start.
2 Insert the HP Printer Software CD into your CD-ROM drive.
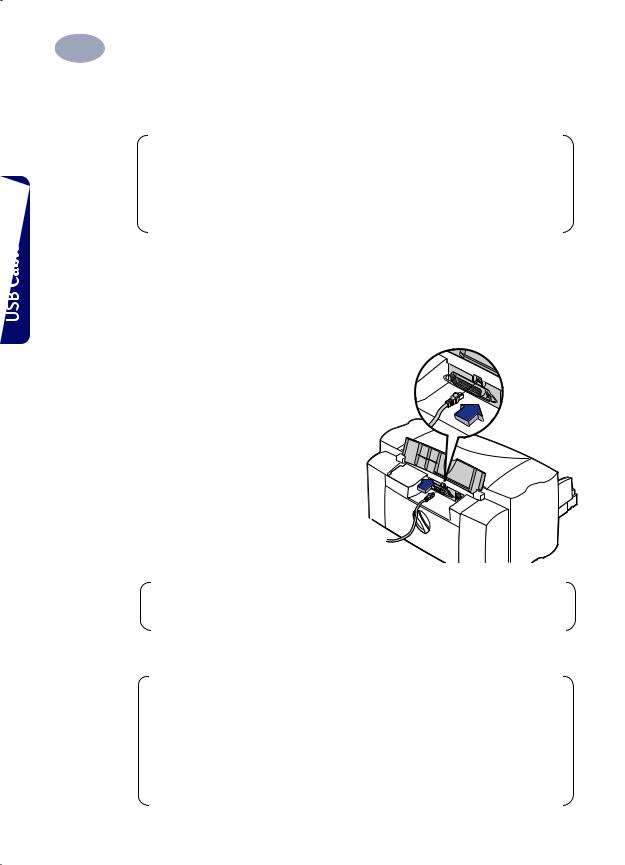
USB Step 6: Connect USB Cable
1 Lift open the cable access door on the back of the printer.
2 Plug one end of the USB cable into the USB port on the printer.
3 Plug the other end into any USB port on the computer.
USB Step 7: Install the USB
Printer Software
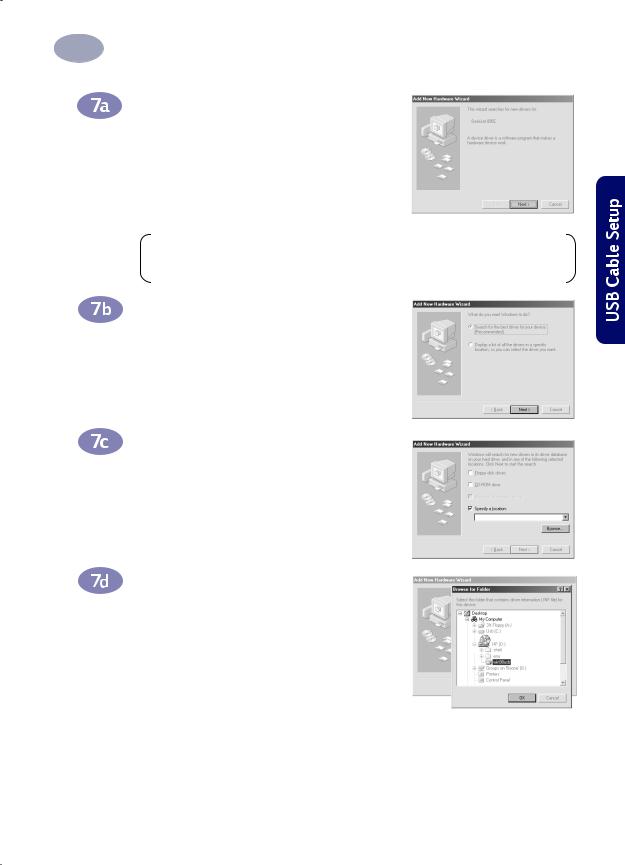
Note: You can also refer to the steps 7a through 7g, “Install USB Software” on the separate USB Cable Setup sheet included with your printer.
1After a few seconds, the Add New Hardware Wizard screen appears.
Note: If the Add New Hardware Wizard screen does not appear, your computer may not be USB-enabled. You can still enjoy the full capabilities of your HP DeskJet 8xxC Series printer by connecting the printer to the computer with a parallel cable. Go to “Step 2: Connect Parallel Cable” on page 3 of this User’s Guide for the appropriate procedures.
18
1Setting Up Your Printer with a USB Cable
2 Click Next in this screen.
Note: The printer version on your screen will match the version of the printer that you are installing.
3 Click Next in this screen too.
4 Select Specify a location: and click the Browse button in the following screen. Do NOT click Next.
5 As shown here, double-click on the CD or disk drive icon, which ever is appropriate for the type of media you are installing from. Click on the win98usb folder then click OK to close the Browse screen and return to the Wizard.
19
1Setting Up Your Printer with a USB Cable
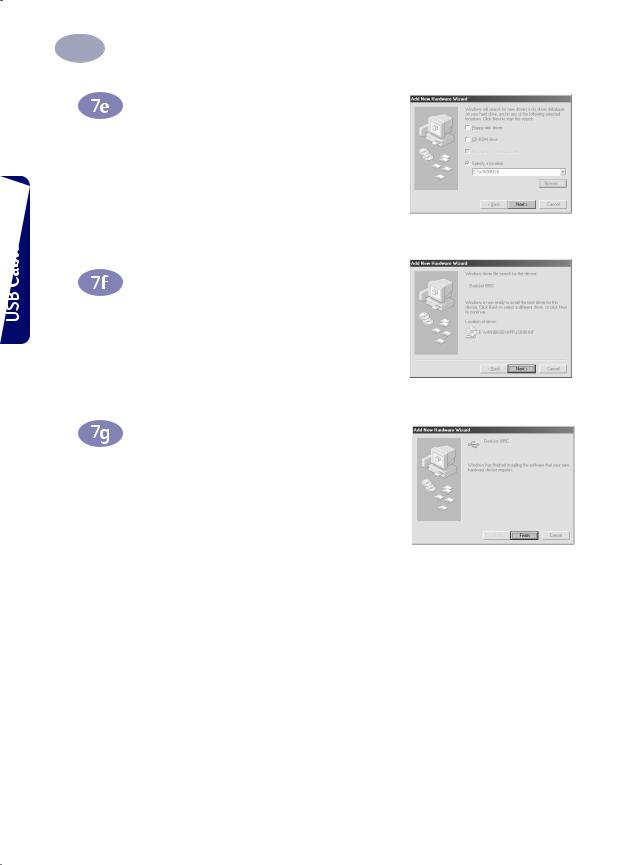
6Click Next in this screen.
The Add New Hardware Wizard searches for the win98usb driver.
7 When the driver file is located, click Next.
The driver file is installed on your computer.
8 When you are notified that installation of the USB software is completed, click
Finish.
USB Step 8: Install the Printer Software
1Soon the opening screen for installing the HP DeskJet printer software appears. Click Next.
2When the HP License Agreement box appears, read the agreement, then click
Accept.
3If you are notified that the HP DeskJet printer port could not be located, select the USB port. Then click Next.
4 Follow the instructions on the screen.
If something goes wrong, go to “If You have Problems Installing” on page 23.
5 When prompted, restart Windows.
20

1Setting Up Your Printer with a USB Cable
Note: You must restart Windows before the printer software can run.
6Continue to follow the instructions on the screen.
Note: The HP DeskJet 8xxC Series printer is automatically set as the default Windows printer. If you find that it is not the default Windows printer, go to “Setting the HP DeskJet Printer as the Default” on page 24.
7 Proceed to “Align the Inkjet Print Cartridges” on page 22.
21
1Setting Up Your Printer with a USB Cable
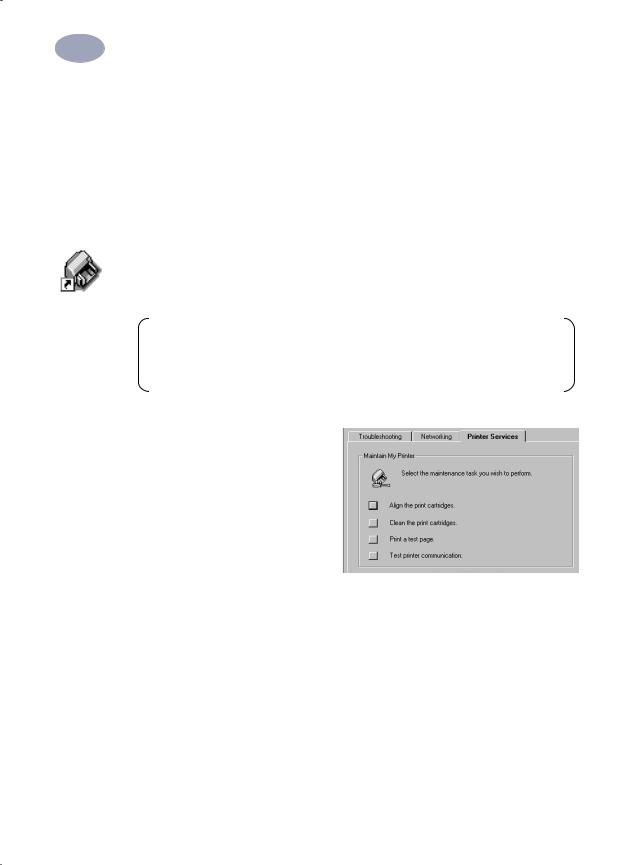
Align the Inkjet Print Cartridges
You’re ready for the final step in setting up your printer: aligning the inkjet print cartridges to make sure you get the best print quality. Be sure to align the inkjet print cartridges whenever you install a new inkjet print cartridge.
8 Be sure the printer’s IN tray contains plain paper.
9Make sure that the paper adjusters are pushed in snug against the paper in the IN tray.
10Double-click the HP DeskJet Toolbox icon on your computer’s desktop.
Note: For Windows 3.1x, you can find the HP DeskJet Toolbox icon on your desktop when you start your computer. Or, you can double-click it in the HP DeskJet 8xxC Series utilities group in the Program Manager..
11Click the Printer Services tab. Then click Align the print cartridges. Follow the directions on the computer screen.
Print a Page!
You’re done with setup. You can print a test page right now while you still have the HP DeskJet Toolbox open:
• On the Printer Services tab of the HP DeskJet Toolbox, click Print a test page.
Check out the results! You’re ready to print your own work. For instructions, tips, and some fun suggestions, read on!
22
Loading...