


 Loading...
HP Photosmart 470 series
GoGo Photo Printer
User’s Guide

Copyrights and trademarks
© Copyright 2005 Hewlett-Packard Development Company, L.P.
The information contained herein is subject to change without notice. Reproduction, adaptation or translation without prior written permission is prohibited, except as allowed under the copyright laws.
Notice
The only warranties for HP products and services are set forth in the express warranty statements accompanying such products and services. Nothing herein should be construed as constituting an additional warranty. HP shall not be liable for technical or editorial errors or omissions contained herein.
The Hewlett-Packard Development Company shall not be liable for incidental or consequential damages in connection with, or arising out of the furnishing, performance, or use of this document and the program material which it describes.
Trademarks
HP, the HP logo, and Photosmart are property of Hewlett-Packard Development Company, L.P.
The Secure Digital logo is a trademark of the SD Association. Microsoft and Windows are registered trademarks of Microsoft Corporation. CompactFlash, CF, and the CF logo are trademarks of the CompactFlash Association (CFA).
Memory Stick, Memory Stick Duo, Memory Stick PRO, and Memory Stick PRO Duo are trademarks or registered trademarks of Sony Corporation.
MultiMediaCard is a trademark of Infineon Technologies AG of Germany, and is licensed to the MMCA (MultiMediaCard Association). xD-Picture Card is a trademark of Fuji Photo Film Co., Ltd., Toshiba Corporation, and Olympus Optical Co., Ltd.
Mac, the Mac logo, and Macintosh are registered trademarks of Apple Computer, Inc.
The Bluetooth word mark and logos are owned by the Bluetooth SIG, Inc. and any use of such marks by Hewlett-Packard Company is under license.
PictBridge and the PictBridge logo are trademarks of the Camera & Imaging Products Association (CIPA).
Other brands and their products are trademarks or registered trademarks of their respective holders.
The embedded software in the printer is based in part on the work of the Independent JPEG Group.
The copyrights to certain photos within this document are retained by the original owners.
Regulatory model identification number VCVRA-0507
For regulatory identification purposes, your product is assigned a Regulatory Model Number. The Regulatory Model Number for your product is VCVRA-0507. This regulatory number should not be confused with the marketing name (HP Photosmart 470 series printer) or product number (Q7011A).
Safety information
Always follow basic safety precautions when using this product to reduce risk of injury from fire or electric shock.
Warning To prevent fire or shock hazard, do not expose this product to rain or any type of moisture.
●Read and understand all instructions in the setup instructions that came in the box with the printer.
●Use only a grounded electrical outlet when connecting the unit to a power source. If you do not know whether the outlet is grounded, check with a qualified electrician.
●Observe all warnings and instructions marked on the product.
●Unplug this product from wall outlets before cleaning.
●Do not install or use this product near water or when you are wet.
●Install the product securely on a stable surface.
●Install the product in a protected location where no one can step on or trip over the power cord, and where the power cord will not be damaged.
●If the product does not operate normally, see the troubleshooting information in the onscreen HP Photosmart Printer Help.
●There are no operator serviceable parts inside. Refer servicing to qualified service personnel.
●Use in a well-ventilated area.
Caution Risk of explosion if battery is replaced by an incorrect type. The following batteries are compatible only with HP printers: Q5599A. Dispose of used batteries in accordance with the instructions of the battery.
Environmental statements
Hewlett-Packard Company is committed to providing quality products in an environmentally sound manner.
Protecting the environment
This printer has been designed with several attributes to minimize impact on our environment. For more information, go to HP's Commitment to the Environment website at www.hp.com/hpinfo/globalcitizenship/ environment/.
Ozone production
This product generates no appreciable ozone gas (O3).
Paper use
This product is suited for the use of recycled paper according to DIN 19309.
Plastics
Plastic parts over 24 grams (0.88 ounces) are marked according to international standards that enhance the ability to identify plastics for recycling purposes at the end of the printer life.
Material safety data sheets
Material Safety Data Sheets (MSDS) can be obtained from the HP website at www.hp.com/go/msds. Customers without Internet access should contact HP Customer Care.
Recycling program
HP offers an increasing number of product return and recycling programs in many countries, and partners with some of the largest electronics

recycling centers throughout the world. HP conserves resources by reselling some of its most popular products.
This HP product contains lead in the solder, which may require special handling at the end of its life.
Disposal of waste equipment by users in private households in the European Union
This symbol on the product or on its packaging indicates that this product must not be disposed of with your other household waste. Instead, it is your responsibility to dispose of your waste equipment by handing it over to a designated collection point for the recycling of waste electrical and electronic equipment. The separate collection and recycling of your waste equipment at the time of disposal will help to conserve natural resources and ensure that it is recycled in a manner that protects human health and the environment. For more information about where you can drop off your waste equipment for recycling, please contact your local city office, your household waste disposal service or the shop where you purchased the product.
For more information regarding return and recycling of HP products generally, please visit: www.hp.com/ hpinfo/globalcitizenship/environment/ recycle/index.html.
Contents
1 |
Welcome................................................................................................................ |
3 |
|
Finding more information ....................................................................................... |
3 |
|
Printer parts ........................................................................................................... |
4 |
|
Available accessories .......................................................................................... |
10 |
|
Printer menu ........................................................................................................ |
10 |
|
Keyword menu ..................................................................................................... |
14 |
2 Getting ready to print......................................................................................... |
15 |
|
|
Loading paper ...................................................................................................... |
15 |
|
Choosing the right paper .............................................................................. |
15 |
|
Loading your paper ....................................................................................... |
16 |
|
Inserting print cartridges ...................................................................................... |
17 |
|
Inserting memory cards ....................................................................................... |
20 |
|
Supported file formats .................................................................................. |
20 |
|
Inserting a memory card ............................................................................... |
20 |
|
Removing a memory card ............................................................................ |
22 |
|
Saving photos from a memory card to the printer hard drive ........................ |
22 |
|
Checking the number of saved photos and the available space on the |
|
|
printer hard drive .......................................................................................... |
22 |
3 Printing without a computer.............................................................................. |
23 |
|
|
Getting your photos from camera to printer ......................................................... |
23 |
|
Deciding which photos to print ............................................................................. |
25 |
|
Selecting photos to print ...................................................................................... |
27 |
|
Improving the quality of your photos .................................................................... |
31 |
|
Getting creative ................................................................................................... |
32 |
|
Printing your photos ............................................................................................. |
34 |
|
Selecting a layout ......................................................................................... |
34 |
|
Setting print quality ....................................................................................... |
34 |
|
Selecting a print method ............................................................................... |
35 |
4 |
Getting connected.............................................................................................. |
39 |
|
Connecting to other devices ................................................................................ |
39 |
|
Connecting through HP Instant Share ................................................................. |
41 |
5 Maintaining and transporting the printer.......................................................... |
43 |
|
|
Backing up data on the printer hard drive ............................................................ |
43 |
|
Cleaning and maintaining the printer ................................................................... |
43 |
|
Cleaning the outside of the printer ................................................................ |
43 |
|
Automatically cleaning the print cartridge ..................................................... |
44 |
|
Printing a test page ....................................................................................... |
44 |
|
Aligning the print cartridge ............................................................................ |
45 |
|
Storing the printer and print cartridges ................................................................. |
46 |
|
Storing the printer ......................................................................................... |
46 |
|
Storing the print cartridge ............................................................................. |
46 |
|
Maintaining the quality of photo paper ................................................................. |
47 |
|
Storing photo paper ...................................................................................... |
47 |
|
Handling photo paper ................................................................................... |
47 |
|
Transporting the printer ....................................................................................... |
48 |
HP Photosmart 470 series User's Guide |
1 |
6 |
Troubleshooting................................................................................................. |
49 |
|
Printer hardware problems .................................................................................. |
49 |
|
Printing problems ................................................................................................. |
52 |
|
Bluetooth printing problems ................................................................................. |
55 |
|
Error messages ................................................................................................... |
57 |
7 |
Specifications .................................................................................................... |
59 |
|
System requirements ........................................................................................... |
59 |
|
Printer specifications ........................................................................................... |
60 |
8 |
HP Customer Care ............................................................................................. |
63 |
|
HP Customer Care by phone ............................................................................... |
63 |
|
Placing a call ................................................................................................ |
64 |
|
Return to HP repair service (North America only) ................................................ |
64 |
|
Additional warranty options .................................................................................. |
64 |
A |
Installing the software........................................................................................ |
65 |
B |
HP Warranty........................................................................................................ |
67 |
Index........................................................................................................................... |
69 |
|
2 |
HP Photosmart 470 series |
1 Welcome
Thank you for purchasing an HP printer! With your new printer you can easily print beautiful photos with or without a computer.
This guide explains how to print photos from the printer without connecting it to a computer. To learn how to print from your computer, install the printer software and explore the onscreen Printer Help. See Installing the software and Finding more information.
Among other things, you'll learn how to:
Print photos saved on the internal printer hard drive. (See Saving photos from a memory card to the printer hard drive.)
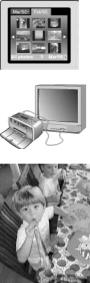
Connect the printer to a TV and use the remote control to view photos with friends and relatives. (See To view a slide show on the TV.)
Improve the quality of your photos by removing red-eye, brightening, and improving the contrast, and get creative by adding greetings and clipart, a colorful frame, or a color effect. (See Improving the quality of your photos.)
Finding more information
Your new printer comes with the following documentation:
●Setup Guide: The HP Photosmart 470 series Setup Guide explains how to set up the printer and print your first photo.
●User's Guide: The HP Photosmart 470 series User's Guide is the book you are reading. This book describes the basic features of the printer, explains how to use the printer without connecting a computer, and contains hardware troubleshooting information.
●HP Photosmart Printer Help: The onscreen HP Photosmart Printer Help describes how to use the printer with a computer and contains software troubleshooting information.
HP Photosmart 470 series User's Guide |
3 |
Chapter 1
After you have installed the HP Photosmart printer software on your computer, you can view the onscreen Help:
●Windows PC: From the Start menu, select Programs (in Windows XP, select All Programs) > HP > HP Photosmart 470 Series > Photosmart Help.
●Macintosh: Choose Help > Mac Help in the Finder, then choose Library >
HP Photosmart Printer Help for Macintosh.
Printer parts
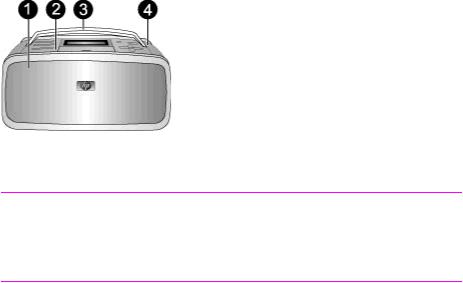
Front of printer
1Out tray (closed): Open this to print, insert a memory card, connect a compatible digital camera, or connect an HP iPod.
2 Control panel: Control the basic functions of the printer from here.
3 Handle: Extend to carry the printer.
4Internal printer hard drive: Transfer photos from a memory card or PictBridge-compatible digital camera to the 1.5 GB printer hard drive, or enhance photos and save copies on the printer hard drive. Save more than 1000 photos on the printer hard drive, depending on the size and resolution of the photos.
4 |
HP Photosmart 470 series |
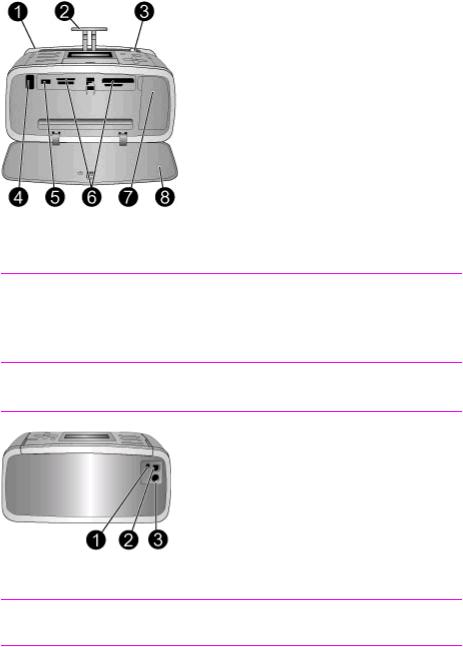
Inside front of printer
1 In tray: Load paper here.
2 In tray extender: Pull out to support paper.
3 Paper-width guide: Move to width of current paper to position the paper properly.
4Remote control infrared port: This port is used by the remote control to communicate with the printer. Be sure to open the Out tray before using the remote control, so the remote control can communicate with the printer using the infrared remote control port.
5Camera port: Connect a PictBridge digital camera, the optional HP Bluetooth wireless printer adapter, an HP iPod, or a USB flash/thumb drive.
6 Memory card slots: Insert memory cards into these slots. See Inserting memory cards.
7 Print cartridge door: Open to insert or remove a print cartridge.
8 Out tray (open): The printer deposits printed photos here.
Rear of printer
1 TV cable connection: Connect the video cable here.
2USB port: Use this port to connect the printer to a computer or to an HP direct-printing digital camera.
3 Power cord connection: Connect the power cord here.
HP Photosmart 470 series User's Guide |
5 |
Chapter 1
Indicator lights
1Memory Card light: Flashing if the printer is accessing the memory card, or solid if the printer has finished accessing the card and is ready to print.
2On light: Green if the printer is on, green and flashing if the printer is busy, or red and flashing if the printer requires attention.
3Print light: Green if the printer is ready to print, or green and flashing if the printer is printing or processing information.
Control panel
1 Menu: Access the printer menu.
2 Rotate: Rotate the currently selected photo.
3 Cancel: Deselect photos, exit a menu, or stop an action.
4 Print: Print selected photos from a memory card or the printer hard drive.
5 Delete: Delete the currently selected photo from a memory card or the printer hard drive.
6 Zoom: Increase or decrease the zoom level.
7 Keyword: Access the keyword menu.
8 On: Turn the printer on or off.
9 Printer screen: View photos and menus here.
10Select Photos arrows: Scroll through photos on a memory card or the printer hard drive, or navigate menus. Press OK to select a photo, menu, or menu option.
6 |
HP Photosmart 470 series |
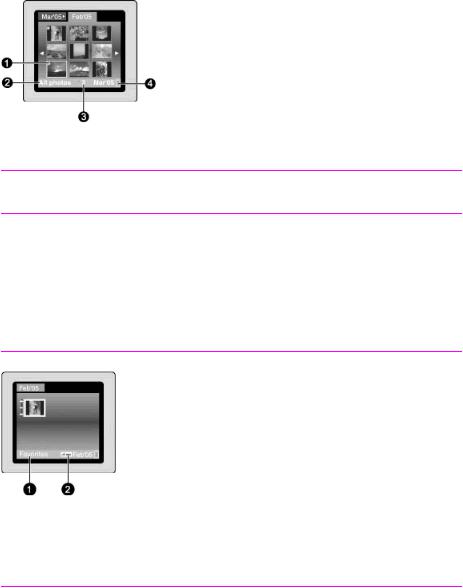
Printer screen
1 Selection check mark: Indicates a selected photo or album.
2Keyword/All photos/Mode: Indicates the keyword assigned to the currently selected photos, All photos if the selected photos are not assigned a keyword, or the mode, such as Panoramic mode.
3 Number of photos selected: Displays the number of photos currently selected.
4Battery icon: Displays the charge level of the HP Photosmart Internal Battery, if installed.
A solid green Battery icon indicates a fully-charged battery. As the battery is used, the Battery icon indicates the approximate amount of charge by the amount of solid fill.
A lightning bolt symbol shown on top of the Battery icon indicates that a power supply is connected and the battery is charging. An outlet symbol appears when the battery is fully charged, indicating that you can unplug the power cord and run the printer from the battery if desired.
For more information about the battery, refer to the instructions that came with the battery.
Folder view
1Keyword/All photos/Mode: Indicates the keyword assigned to the currently selected photos, All photos if the selected photos are not assigned a keyword, or the mode, such as Panoramic mode.
2 Keyword icon: Indicates the current photo or album has a keyword assigned.
HP Photosmart 470 series User's Guide |
7 |

Chapter 1
Video clip
1  Video clip: Displays this icon only when a video clip appears on the printer screen.
Internal battery compartment
1Cover of the battery compartment: Open this cover on the bottom of the printer to insert the optional HP Photosmart Internal Battery.
2HP Photosmart Internal Battery: A fully-charged battery has sufficient charge to print approximately 75 photos. You must purchase the battery separately.
3 Internal battery compartment: Insert the optional HP Photosmart Internal Battery here.
4 Battery compartment button: Slide to release the compartment cover.
8 |
HP Photosmart 470 series |
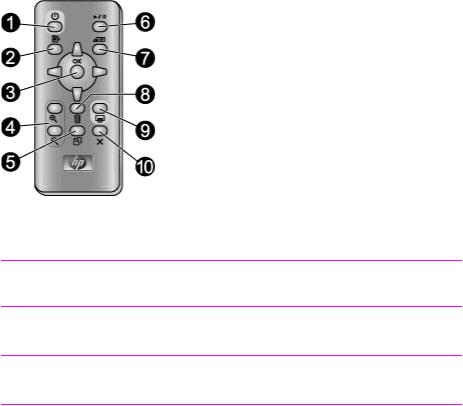
Remote control
1 On: Turn the printer on or off.
2 Menu: Access the printer menu.
3Select Photos arrows: Scroll through photos on a memory card or the printer hard drive, or navigate menus. Press OK to select a photo, menu, or menu option.
4 Zoom: Increase or decrease the zoom level.
5 Rotate: Rotate the currently selected photo.
6 Slide show: Play or pause a slide show.
7 Keyword: Access the keyword menu.
8 Delete: Delete the currently selected photo from a memory card or the printer hard drive.
9 Print: Print selected photos from a memory card or the printer hard drive.
10 Cancel: Deselect photos, exit a menu, or stop an action.
Use the remote control to access the printer functions when you view photos and slide shows on a TV. Be sure to open the Out tray before using the remote control, so the remote control can communicate with the printer using the infrared remote control port.
The remote uses a supplied CR2025 battery that you need to install. Purchase replacement batteries from your local electronics store.
HP Photosmart 470 series User's Guide |
9 |
Chapter 1
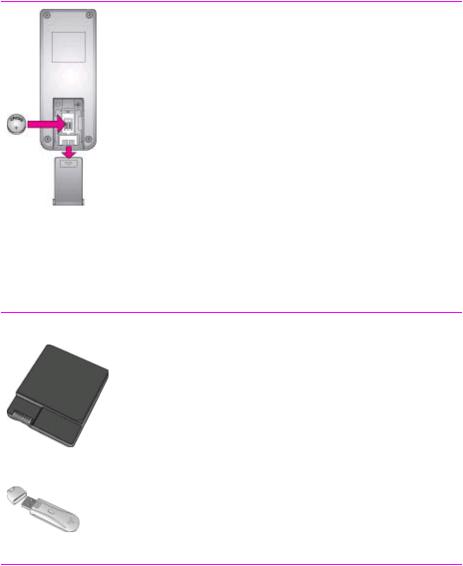
Installing the battery for the remote control
1. Remove the battery compartment cover from the back of the remote control.
2. Insert the supplied battery as shown with the + side up.
3. Slide the cover back into place.
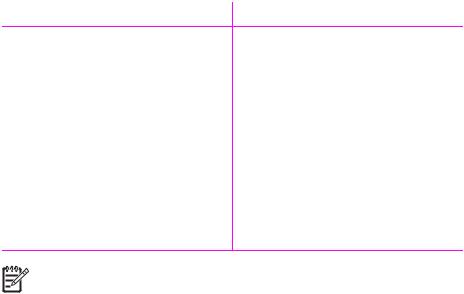
Available accessories
There are several accessories available for the printer that enhance its portability for printing anywhere, anytime. The appearance of the accessories may vary from what is shown.
Accessory name |
Description |
The HP Photosmart Internal Battery lets you take the printer with you wherever you go.
HP Photosmart Internal Battery
The HP Bluetooth wireless printer adapter goes into the camera port on the front of the printer and lets you use Bluetooth wireless technology for printing.
HP Bluetooth wireless printer adapter
Printer menu
Press Menu on the printer control panel or the remote control to access the printer menu.
10 |
HP Photosmart 470 series |
To navigate the printer menu:
●Press Select Photos or
or  to scroll through the menu options displayed on the printer screen. Menu items that are not accessible are grayed out.
●Press OK to open a menu or select an option.
●Press Cancel to exit the current menu.
Printer menu structure
●Slide show
–Play currently selected slide show: Select to play the current slide show.
–Play custom slide show: Select to play a custom slide show.
–Pause current slide show: Select to pause the current slide show.
–Resume current slide show: Select to resume playing the current slide show.
–Exit current slide show: Select to exit the current slide show.
–Save a custom slide show: Select to save the selected photos as a slide show.
–Edit custom slide show: Select to edit a saved slide show.
–Delete custom slide show: Select to delete a saved slide show.
●Improve image
–Remove red-eye: Select this feature to remove red-eye from your photos.
–Auto enhance: Select an enhancement option. Select Recommended, Option 2, or Option 3, to enhance the photo. Select Original (not enhanced) to not enhance the photo.
–Crop: Select to crop the image. Press Zoom – to adjust the size of the
cropped area. Press Select Photos  or
or  to move the cropped area. Press OK, then press OK again to save a copy of the cropped photo on the printer hard drive.
–Photo brightness: Press Select Photos  or
or  to move the slider and adjust the photo brightness.
●Get creative
–Frames: Select to add a frame to the current photo.
–Clipart: Select to add clipart to the current photo.
–Greetings: Select to add a greeting to the current photo.
–Panoramic photos: Select to turn panoramic printing On or Off (default). Select On to print all selected photos with a 3:1 aspect ratio; load 10 x 30 cm (4 x 12 inches) paper before printing. When a photo is selected, a green bounding box shows the area to be printed. Select Off to print with a normal 3:2 aspect ratio.
–Photo stickers: Select to turn sticker printing On or Off (default). Select On to print 16 photos per page; load special sticker media if desired. Select Off to print using one of the normal layout options.
–Passport photos: Select to turn passport photo mode On or Off (default). Select size: Passport mode tells the printer to print all selected photos in the selected passport photo size. A separate page is printed for each selected photo. Each printed page contains the number of photos of the selected size that will fit on the page.
–Add color effect: Choose from the following color effects: Black & white,
Sepia, Antique, or No effect (default).
HP Photosmart 470 series User's Guide |
11 |
Chapter 1
●Transfer
–Transfer to external: Select this option to transfer photos from an inserted memory card or the printer hard drive to a device connected to the camera port on the front of the printer.
–Transfer to internal: Select this option to transfer photos from an inserted memory card or from a device connected to the camera port on the front of the printer to the printer hard drive.
–Transfer to computer: Select this option to transfer photos from an inserted memory card or the printer hard drive to a computer attached to the USB port on the back of the printer.
●Storage
–Delete images: Select to delete the current photo (choose Yes or No).
–Reformat hard drive: Select this option to reformat the printer hard drive.
–Available space: Select to view the remaining space on the printer hard drive.
●Tools
–Change layout: Select a print layout. Select 1–up to print a single photo per page. Select 2–up to print 2 photos per page. Select 4–up to print 4 photos per page. Select Index sheet to print an index page with thumbnails of all the photos on the memory card.
–Cartridge status: Select to review the amount of ink remaining in the print cartridge.
–Instant Share: Select to share photos on an inserted memory card with family and friends (the printer must be connected to a computer and the printer software must be installed on the computer).
–Print quality: Normal uses less ink than Best (default) and applies only to the current print job. The setting then automatically resets to Best.
–Print test page: Select to print a test page containing information about the printer that can help in troubleshooting problems.
–Print sample page: Select to print a sample page useful for checking the print quality of the printer.
–Clean cartridge: Select to clean the print cartridge. After cleaning, you will be asked if you want to continue to second level cleaning (choose Yes or No), and if you choose Yes another cleaning cycle is completed. Next you will be asked if you want to continue to third level cleaning (choose Yes or
No).
–Align cartridge: Select to align the print cartridge.
●Bluetooth
–Device address: Some devices with Bluetooth wireless technology require you to enter the address of the device they are trying to locate. This menu option shows the device address.
–Device name: You can select a device name for the printer that appears on other devices with Bluetooth wireless technology when they locate the printer.
–Passkey: You can assign a Bluetooth numerical passkey to the printer that users of devices with Bluetooth wireless technology trying to locate the printer must enter before they can print, if the printer Bluetooth Security level is set to High. The default passkey is 0000.)
–Visibility: You can set the Bluetooth-equipped printer to be visible or invisible to other devices with Bluetooth wireless technology by changing this
12 |
HP Photosmart 470 series |
visibility option. Select Visible to all or Not visible. When Not visible is selected, only devices that know the device address can print to it.
–Security level: Select Low (default) or High. The Low setting does not require users of other devices with Bluetooth wireless technology to enter the printer passkey. The High setting does require users of other devices with Bluetooth wireless technology to enter the printer passkey.
–Reset Bluetooth options: Select to reset all the Bluetooth settings to the factory defaults.
●Help: Select to read help about using the printer, including printing tips, printing panoramic photos, inserting memory cards, installing the print cartridge, loading paper, connecting to a TV, using keywords, and transferring photos.
●Preferences
–Auto red-eye removal: Select On (default) or Off.
–SmartFocus: Select On (default) or Off.
–Adaptive lighting: Select On (default) or Off. This setting improves lighting and contrast.
–Slide show: Select to set the slide show options. Select Loop, Duration between images, Transitions, or Random.
–Television: Select to set the TV options. Select an Aspect ratio and NTSC/ PAL. Select to display on a TV or Printer.
–Date/time: Select to show a date/time stamp on your printed photos. Select
Date/time, Date only, or Off (default).
–Colorspace: Select to choose a colorspace. Select Adobe RGB, sRGB, or Auto-select (default). The Auto-select default tells the printer to use the Adobe RGB colorspace, if available. The printer defaults to sRGB if Adobe RGB is not available.
–Borderless: Select to turn borderless printing On (default) or Off. When borderless printing is turned off, all pages print with a narrow white border around the outside edges of the paper.
–After printing: Select to change whether selected photos are deselected after printing: Always (default), Never, or Ask each time.
–Video enhancement: Select to enhance video prints: On or Off (default).
–Restore defaults: Select to restore printer defaults: Yes or No (default). Selecting Yes restores the original factory preferences.
–Language: Select to change the language or country/region setting. Choose from Select language and Select country/region.
HP Photosmart 470 series User's Guide |
13 |

Chapter 1
Keyword menu
Press Keyword on the printer control panel or the remote control to access the keyword menu.
Note You can assign up to 10 keywords to each photo stored on the printer hard drive. The Keyword icon appears to indicate that the photo has an assigned keyword.
To navigate the keyword menu:
●Press Select Photos or
or  to scroll through the menu options displayed on the printer screen. Menu items that are not accessible are grayed out.
●Press OK to open a menu or select an option.
●Press Cancel to exit the current menu.
Keyword menu structure
●Assign a keyword
–Favorites
–People
–Places
–Events
–Other
●View photos by keyword
–All: Select to view all photos.
–Favorites: Select to view photos assigned the Favorites keyword.
–People: Select to view photos assigned the People keyword.
–Places: Select to view photos assigned the Places keyword.
–Events: Select to view photos assigned the Events keyword.
–Other: Select to view photos assigned Other as the keyword.
–Printed: Select to view all photos that have previously been printed.
–Most often viewed: Select to view the photos that you have previously viewed most often.
–All with assigned keywords: Select to view all photos assigned keywords.
●Remove assigned keyword
Select to remove assigned keywords from the selected photo or from all the photos in the selected album.
14 |
HP Photosmart 470 series |
2 Getting ready to print
Before you can begin printing, there are three easy procedures you need to become familiar with:
●Loading paper
●Inserting print cartridges
●Inserting memory cards
You must load paper and insert a print cartridge before inserting a memory card.
Loading paper
Learn how to choose the right paper for your print job and how to load it into the In tray for printing.
Choosing the right paper
For a list of available HP-designed inkjet paper, or to purchase supplies, go to:
●www.hpshopping.com (U.S.)
●www.hp.com/go/supplies (Europe)
●www.hp.com/jp/supply_inkjet (Japan)
●www.hp.com/paper (Asia/Pacific)
To get the best results from the printer, choose from these high-quality HP photo papers.
To print |
Use this paper |
High-quality, long-lasting prints and |
HP Premium Plus Photo Paper |
enlargements |
|
Medium-to-high-resolution images from |
HP Premium Photo Paper |
scanners and digital cameras |
|
Instant dry and fingerprint-resistant |
HP Advanced Photo Paper |
glossy photos |
|
Casual and business photos |
HP Photo Paper |
|
HP Everyday Photo Paper |
Panoramic photos |
HP Panoramic Photo Paper |
Photo stickers |
Avery C6611 and C6612 Photo Sticker |
|
Paper |
Note HP designs its photo papers to resist fading so your photos remain vibrant for years to come. For more detailed information on this subject, visit the HP website. Go to www.hp.com/support, select your country/region and your language, then type HP Photosmart 470 in the product/name search box. Press ENTER and then select the printer. In the Question or keywords
HP Photosmart 470 series User's Guide |
15 |
Chapter 2
search box enter lightfastness or permanence and then press ENTER. Click the topic you want to review.
To keep your paper in good condition for printing:
●Store the photo paper in its original packaging or in a resealable plastic bag.
●Keep the paper flat in a cool, dry place. If the corners curl, place the paper in a plastic bag and gently bend it in the opposite direction until it lies flat.
●Hold photo paper by the edges to avoid smears.
Loading your paper
Paper loading tips:
●You can print photos on photo paper, index cards, L-size cards, or Hagaki cards.
●Before loading paper, slide out the paper-width guide to make room for the paper.
●Load only one type and size of paper at a time. Do not mix paper types or sizes in the In tray.
Paper type
10 x 15 cm (4 x 6 inch) photo paper
13 x 18 cm
(5 x 7 inch) photo paper
10 x 30 cm (4 x 12 inches) panorama photo paper
10 x 15 cm (4 x 6 inches) photo sticker paper
Index cards L-size cards Hagaki cards
 How to load
1.Open the In tray and pull out the In tray extender.
2.Load up to 20 sheets of paper with the print side or glossy side facing towards you. When loading, slide the paper to the left side of the In tray and push the paper down firmly until it stops. If you are using tabbed paper, insert it so the tabbed end feeds in last.
Note If you are using panorama photo paper, only load up to 10 sheets. If you are using photo sticker paper, only load a single sheet at a time.
3.Move the paper-width guide to the left to fit close to the edge of the paper without bending the paper.
1 In tray
2 Paper-width guide
3 Out tray
16 |
HP Photosmart 470 series |
(continued) |
|
Paper type |
How to load |
4.Open the Out tray to prepare for printing.
Inserting print cartridges
HP provides different types of print cartridges so you can choose the best cartridge for your project. The cartridge numbers you can use with this printer vary by country/ region and appear on the back cover of this printed guide.
HP Vivera Inks deliver true-to-life photo quality and exceptional fade resistance resulting in vivid colors that last. HP Vivera Inks are specially-formulated and scientifically tested for quality, purity and fade resistance.
For optimum printing results, HP recommends using only genuine HP print cartridges. Genuine HP print cartridges are designed and tested with HP printers to help you easily produce great results, time after time.
Use the best print cartridge for the job |
|
To print… |
Insert this print cartridge in the |
|
cartridge cradle |
Full-color photos |
HP Tri-color |
Black-and-white photos |
HP Gray Photo |
Sepia or antique photos |
HP Tri-color |
Text and colored line drawings |
HP Tri-color |
Caution Check that you are using the correct print cartridge. HP cannot guarantee the quality or reliability of non-HP ink. Printer service or repairs required as a result of printer failure or damage attributable to the use of nonHP ink will not be covered under warranty.
For best print quality, HP recommends that you install all retail print cartridges before the date stamped on the box.
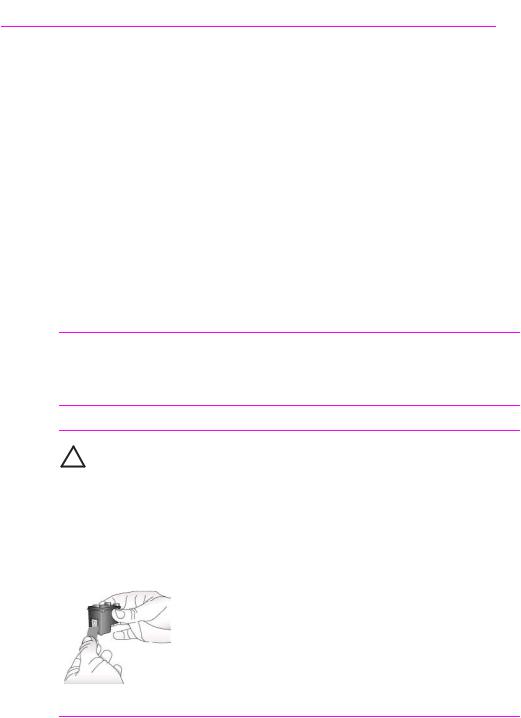
Insert or replace the print cartridge
Remove the pink tape
Prepare the printer and cartridge
1.Make sure the power is on and you have removed the cardboard from inside the printer.
2.Open the print cartridge door of the printer.
3.Remove the bright pink tape from the cartridge.
HP Photosmart 470 series User's Guide |
17 |
Chapter 2
Insert or replace the print cartridge (continued)
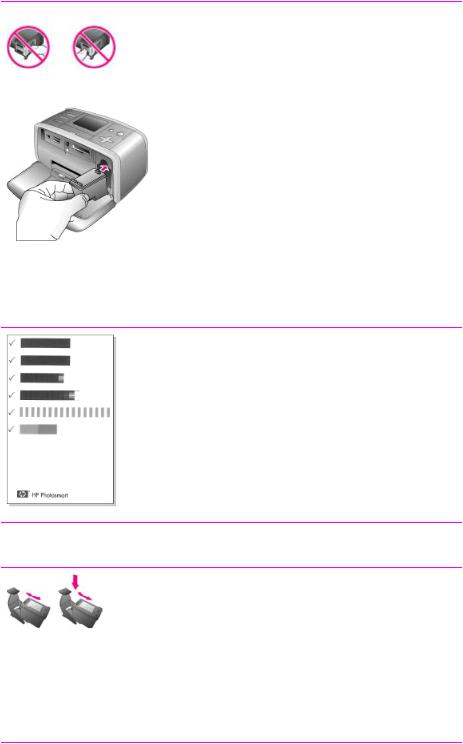
Do not touch here
Insert the cartridge
1. If you are replacing a cartridge, push down and pull outward on the cartridge in the cradle to remove it.
2. Hold the replacement cartridge with the label on top. Slide the cartridge at a slight upward angle into the cradle so the copper-colored contacts go in first. Push the cartridge until it snaps into place.
3. Close the print cartridge door.
Note To see the ink level of the print cartridge, press Menu, select Tools, press OK, then select Cartridge status.
Each time you install or replace a print cartridge, a message appears on the printer screen asking you to load plain paper so the printer can align the cartridge. This ensures high-quality prints.
Align the cartridge
1. Load paper in the In tray and press
OK.
2. Follow the onscreen instructions to align the cartridge.
See Aligning the print cartridge.
When you are not using a print cartridge
Whenever you remove a print cartridge from the printer, store it in a print cartridge protector. The cartridge protector keeps the ink from drying out. Storing the cartridge improperly can cause the cartridge to malfunction.
To insert a cartridge into the cartridge protector, slide the cartridge into the protector at a slight angle and snap it securely into place.
18 |
HP Photosmart 470 series |

When you are not using a print cartridge (continued)
In some countries/regions the cartridge protector is not included with the printer, but comes with the HP Gray Photo cartridge that can be purchased separately. In other countries/regions, the protector is included with the printer.
HP Photosmart 470 series User's Guide |
19 |
Loading...