


Instructions
WD865
WD860
Congratulations on choosing Ultima!!
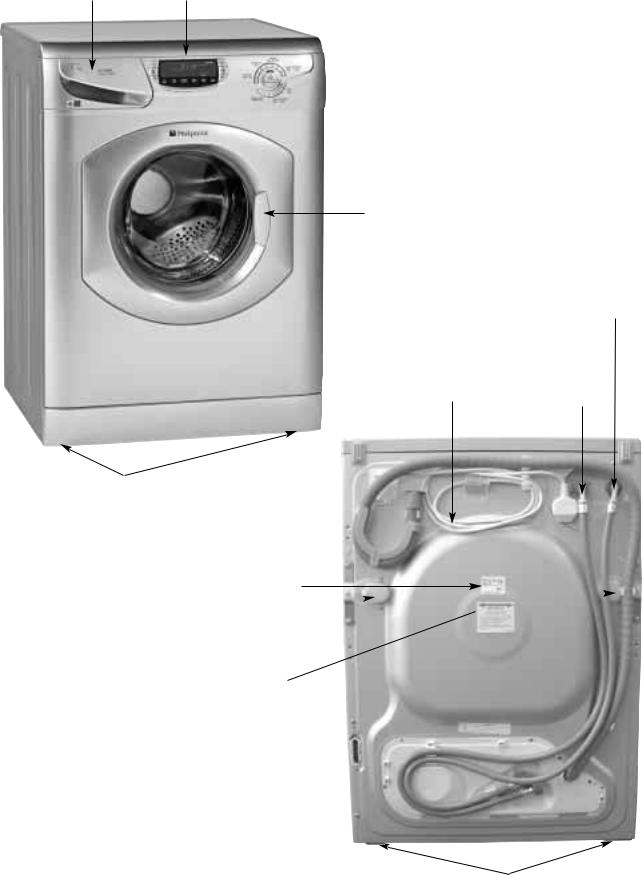
Dispenser drawer Control panel
Please record the Model number and the Serial number of your machine on the Back Cover of the book for future reference.
The Model number can be found on the control panel. The Serial number can be found on the inner door trim.
Interlocking door and release lever
|
Cold water inlet |
|
point and |
|
attached fill hose |
|
(blue connector) |
|
Hot water inlet |
Mains |
point and |
attached fill hose |
|
cable |
(red connector) |
Front adjustable feet
Hooked end support 
Rating plate
Transit bolts 
 (both must
be removed before use)
Plumbing
Indicator Line
label  Drainage
hose
Rear feet
2

The following instructions and information will help you to
get the most out of your new machine...
Safety first!
This instruction manual contains important details on using your machine safely. If you pass the machine onto someone else, make sure that you give them this manual.
Installing your machine
Follow these steps for trouble free installation:
location, transit bolt removal, electricity, water supplies and drainage. Moving the machine and adjusting the feet.
A typical wash and dry programme
Washcare tips and a simple step by step guide to using your machine.
The dispenser drawer
Guidance on getting the most out of your wash using powders, liquids, tablets and fabric conditioners.
Programmes, options and other features
Select a programme for any wash and/or dry, including automatic functions, pre-washes, economy loads, variable temperature and spin speeds.
Cleaning and maintenance
How to care for your machine by removing and cleaning the dispenser drawer and compartments, cleaning the door bowl and machine exterior plus the recommended Maintenance wash.
Troubleshooting
In the unlikely event that you have problems with your machine, the following guide may help you to get your machine working correctly straight away.
After sales service and guarantee
We give you a unique ‘satisfaction guaranteed’ promise - valid for ninety days after you have purchased your machine.
4 Page |
|
SAFETY |
|
|
|
|
|
|
10-5 Pages |
MACHINE |
YOUR INSTALLING |
|
|
|
|
|
|
12-11 Pages |
PROGRAMME DRY |
& WASHTYPICALA |
|
|
|
|
|
|
14-13 Pages |
DRAWER |
DISPENSER THE |
|
|
|
|
|
|
24-15 Pages |
OPTIONS AND |
PROGRAMMES |
|
|
|
|
|
|
25 Page |
MAINTENANCE |
& CLEANING |
|
|
|
|
|
|
27-26 Pages |
SHOOTING |
TROUBLE |
|
|
|
|
|
|
29-28 Pages |
GUARANTEE |
& SERVICE |
|
|
|
3

SAFETY
Safety first
This instruction manual contains important details on using your machine safely. Please keep it safe for your future reference.
If you pass the machine onto someone else, please make sure that you give them this manual so that the new owner can read these safety warnings.
|
|
●Dispose of packaging materials carefully and keep them well away from children.
●When disposing of your old machine, to minimise risk of injury to children, isolate from the electrical supply, remove the door, the plug and cut the mains cable off flush with the appliance. Dispose of them separately to make sure that the appliance can no longer be plugged into a mains socket.
●This washer dryer is designed for domestic use only.
●Before using your machine remove the transit bolts and spacers from the back of the machine.
Keep the parts you remove for future transportation.
●Any electrical work necessary to install this machine should be carried out by a qualified electrician.
●Do not plug your machine into a socket when your hands are wet.
●Do not connect the washer dryer to a single outlet instantaneous water heater.
●Do not try to modify this machine in any way.
●Do not connect the washer dryer directly to an artificial water softening unit.
Use the recommended amount of detergent for the water hardness in your area.
●Do not let children play with the machine or its controls.
●Do not stand on the machine or in the door opening.
●Do not lean on the door or use the door to lift or move the machine.
●Do not wash or dry garments that have previously been treated with solvents.
4
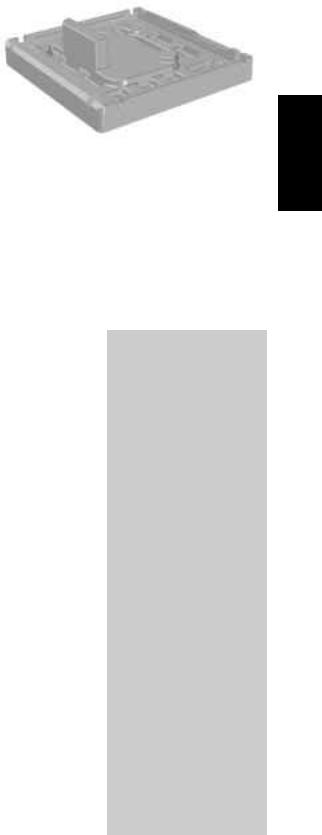
Remove the polystyrene base...
Important check when unpacking your machine:
This is part of the polystyrene base and should  have stayed intact when you remove the base.
If it has broken off and is still in the machine....
to remove it, carefully lay the machine on its side onto the polystyrene top cap and then remove the polystyrene block.
Note: You will need a second person to help you lower and raise the machine.
YOUR INSTALLING MACHINE
Installing your machine
Follow these steps for trouble free installation:
1. Choose a location...
Where you install the machine will affect its performance.
●For your safety and to comply with electrical regulations, seek professional advice if you want to install your machine in a bath or shower room.
●Make sure that the electrical socket and water taps are easily accessible. You should switch off the machine’s electrical and water supplies when you are not using it.
●Make sure that you allow enough space for the machine. Select a space at least 600mm wide, 600mm deep and 850mm high. Also leave enough space to open the door fully so you can load and unload it easily.
●Where possible the machine should be positioned on a solid level floor to minimise vibration.
●Take care when you move the machine not to rip any floor coverings. There are wheels on the bottom rear of the machine, so tilting it backwards a little is the easiest way to move it. The weight of the machine may cause indentations in some floor coverings.
WARNINGS:
●Do not plug the machine in and switch it on at the mains until the installation is completed.
●You will be charged for a service call if a problem with your machine is caused by incorrect installation or misuse.
5

INSTALLING YOUR MACHINE
Location of transit bolts.
WARNINGS:
●Before you use the machine, remove the two transit bolts complete with spacers.
If you do not do this, damage may occur to your machine. Keep the parts in case you need them for future
transportation.
●If and when you replace the bolts complete with spacers make sure
you do not overtighten them.
2. Remove the transit fixings...
There are two transit bolts fitted under plastic covers, one at either side of the rear of your machine. These bolts prevent damage to the machine while it is being transported.
Remove both transit bolts complete with spacers, by following the instructions below.
Use a screwdriver to release the covers and a standard 13mm spanner to remove both bolts.
Firstly, unhook the grey drainage hose and proceed as follows, taking care not to loosen the hot and cold water fill hoses.
1
Using a screwdriver, remove the screw to release the plastic cover.
2
Use a standard 13mm spanner to undo the bolt until three threads can be seen on the bolt.
(see below)
3
Hold the transit bolt and slide to the side and then pull out.
The bolt and spacer should be removed intact. (see below)
Example transit bolt complete with spacer.
4
For safety, you must replace the plastic cover over the hole left by the transit bolt.
(Repeat steps 1 to 4 to remove the second transit bolt).
6
3. Connect your machine to the electricity supply
Make sure that the electrical socket is accessible. Take the mains lead from the back of the machine and plug it into the socket. We do not recommend wiring your machine directly into the mains supply.
Changing the mains lead
If you have damaged the existing lead and need a new one, contact Hotpoint Service UK on 08709 066066 or www.theservicecentre.co.uk (or in the Republic of Ireland on 1850 302 200). A charge will be made. We strongly advise that fitting the new lead is carried out by a qualified electrician.
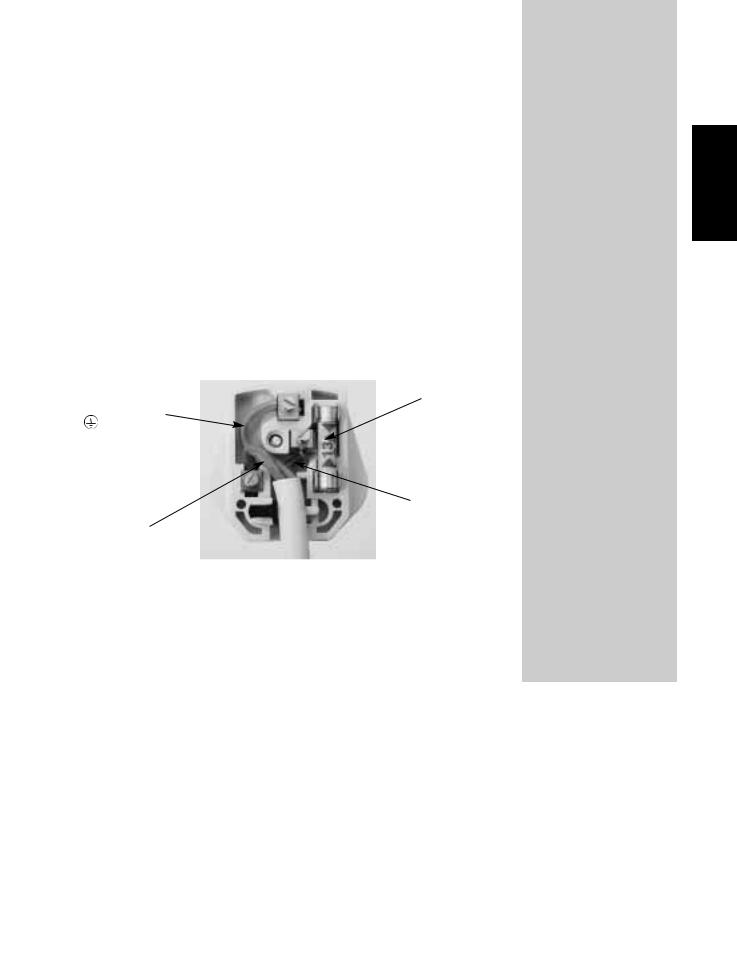
Changing the plug
If you need to change your plug, ie. if it does not fit your socket; isolate the machine from the mains supply. Cut off the supplied plug and safely dispose of the discarded plug. Note: If you change the plug, the colour of wires in the mains lead may not match the colour of the markings which show the different terminals in the plug. You must wire it as shown
below. Green and yellow |
|
13A ASTA |
(Earth) wire this to the |
|
approved fuse |
|
||
terminal marked |
|
to BS1362. |
‘E’, symbol, or |
|
|
coloured green |
|
Brown (Live) |
and yellow. |
|
|
|
wire this to |
|
|
|
|
|
|
the |
Blue (Neutral) |
|
terminal |
wire this to the |
|
marked ‘L’ or |
terminal |
|
coloured red. |
marked ‘N’ or |
|
|
coloured black. |
|
|
|
|
Fuses
Your machine comes fitted with a plug and a 13 amp (13A) fuse. If you need to replace the fuse, use only those rated at 13 amp (13A) and ASTA approved to BS1362. To change the fuse, lift the holder to vertical position and lift the fuse out. To replace the fuse, insert the fuse and push the fuse holder down into the locked position. Correct replacement is identified by colour coding or the marking on the base of plug.
WARNING:
Do not use the plug unless the fuse holder is in the locked position and the top cover firmly replaced.
We do not recommend the use of extension leads. If you need to do so, consult a qualified electrician.
CE marking shows that this machine meets the following EEC directives.
Low Voltage Equipment - 72/23/EEC & 93/68/EEC Electromagnetic Compatibility - 89/336/EEC, 92/31/EEC & 93/68/EEC.
WARNINGS:
●This machine must be earthed.
●Do not use the plug unless the fuse cover is fitted.
●To avoid a shock hazard, when changing a plug, always safely discard the cut off plug. Do not insert into any other socket.
●Seek professional advice if you need to use an extension lead.
YOUR INSTALLING MACHINE
7
4. Connect your machine to the water supply...
INSTALLING YOUR MACHINE
WARNINGS:
●The temperature of your hot water supply should ideally be 60°C and no higher than 70°C as this could cause damage to your laundry and the machine.
●Do not connect the machine to a single outlet instantaneous water heater.
●Your hot and cold water pressure must be in the range Max. 1Mpa (10 bar) and Min. 0.05Mpa (0.5 bar). Incorrect pressures could lead to flooding.
●The water supply taps should be accessible when the machine is installed.
●Before connecting the fill hoses, check that water is running from the water supply taps you will use for your machine.
●Connect the machine to the water supply using the fill hoses fitted to the machine. Do not use old hoses.
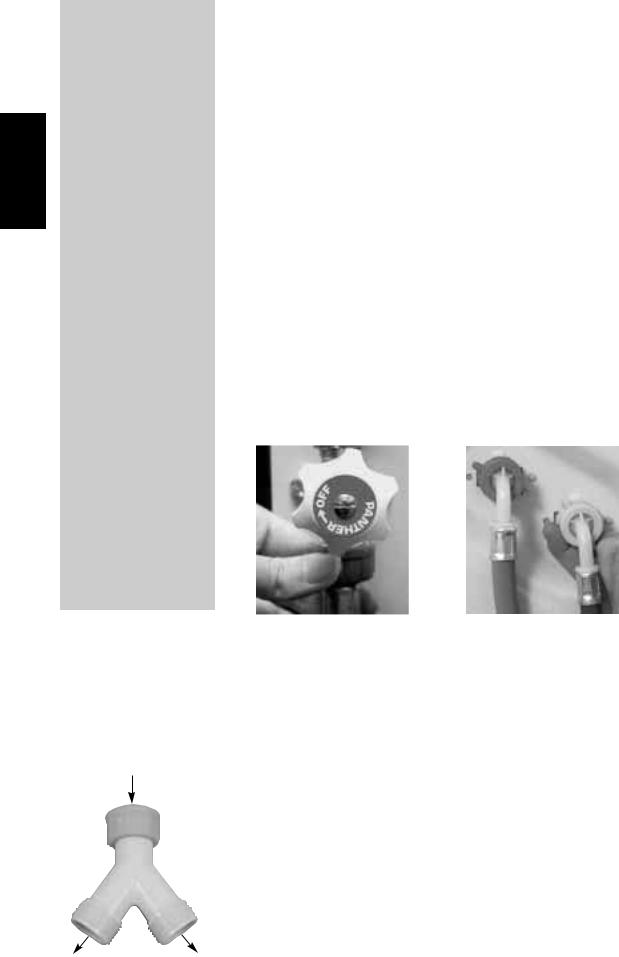
Hot and cold fill
1 Unclip both of the fill hoses from the back of the machine.
2Connect the free end of the grey fill hose with the red connector to the HOT water supply (see figure1). Connect the free end of the grey fill hose with the blue
connector to the COLD water supply.
3Turn on your water supply and check for leaks.
If there is a leak, turn off the water supply, remove the connector and check that the sealing washer is in place. Refit the connector and tighten it.
Turn on the water supply.
4When moving the machine into its final position, make sure that the hoses are not trapped or kinked.
figure 1 |
|
figure 2 |
|
|
|
If the fill hoses are too short:
Longer fill hoses are available from our Genuine Parts and Accessories Mail Order Hotline UK on 08709 077 077 or www.theservicecentre.co.uk (or in the Republic of Ireland on (01) 842 6836).
Remove the existing fill hoses from the inlet valves on the back of the machine and fit the new longer fill hoses as
cold water supply shown above with the angled ends of the hoses connected to the machine (see figure 2).
If you have no hot water supply or your hot water pressure is low:
A cold fill adaptor (figure 3) and fitting instructions are available from your local Hotpoint authorised Service Centre or by calling the Genuine Parts and Accessories Mail Order Hotline UK on 08709 077 077 or www.theservicecentre.co.uk
(or in the Republic of Ireland on (01) 842 6836).
8
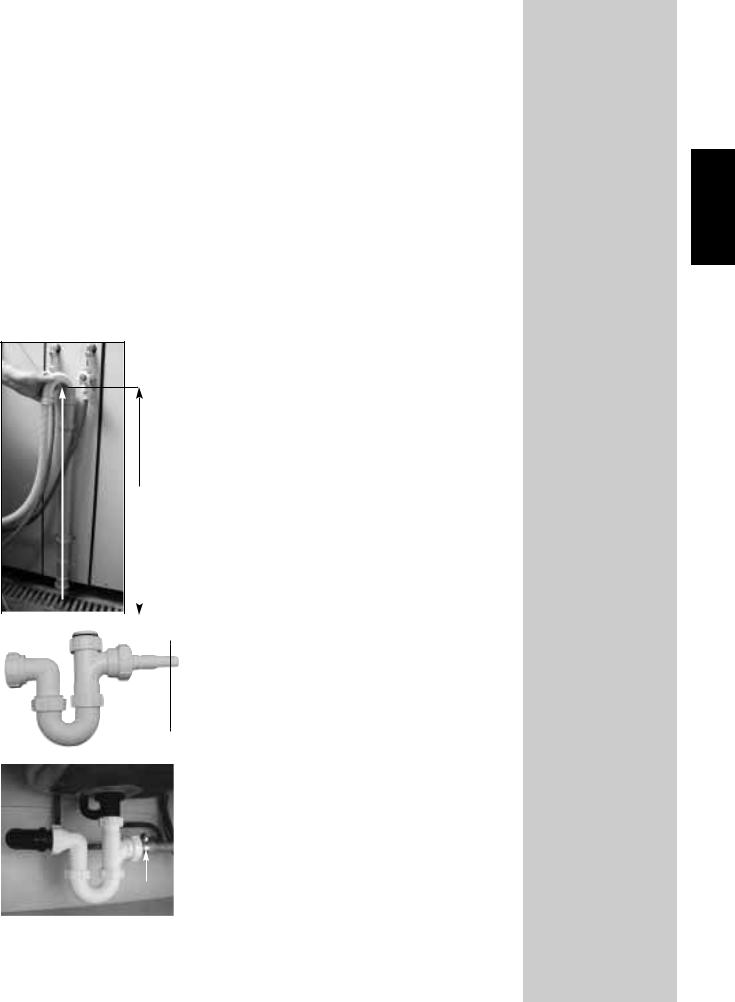
5.Connect the machine to a drainage system...
●Take care when you remove the drain hose from the clips on the back of the machine. All machines are tested with water before they leave the factory so a small amount of water may still be in the hose.
●Do not remove the hooked end support from the GREY drainage hose when using any of the drainage methods detailed below. You may need to reposition it as required along the drainage hose.
●For drainage into a standard work top sink, ensure the outlet pipe has a minimum diameter of 32mm. If your sink is inset, the front edge of the basin must be less than 75mm from the front edge of your worktop, so that the drain hose will hook securely into the sink. Unclip the drainage hose from the back of the machine and hook over into the sink. Make sure that the sink is free of any obstructions and that the sink plug can not fall into the sink, preventing the water from draining away freely. Pumped out water may be very hot.
figure 1
We recommend one of the following drainage methods:
Standpipe
1 Make sure that the standpipe has a minimum diameter of 38mm.
|
2 |
Remove the drainage hose from the |
||||
|
|
|
|
|
|
clips on the back of the machine. |
|
3 |
Make sure that the top of the |
||||
|
|
500 mm |
standpipe is positioned at least |
|||
|
|
|
|
|
|
|
|
|
|
|
|
|
|
|
|
|
|
|
|
500mm from the floor (see figure1). |
|
|
|
|
|
|
Use the plumbing indicator line label |
|
|
|
|
|
|
on the back of the machine as a |
|
|
|
|
|
|
guide. |
Hooked end support |
|
|
4 |
Place the drainage hose |
||
|
|
|
|
|
approximately 100mm into the |
|
|
|
|
|
|
|
|
figure 2 |
|
|
|
|
|
standpipe. |
|
|
|
|
|
Under sink waste system |
|
|
|
|
|
|
1 Cut out the membrane, bung or |
|
|
|
|
|
|
|
blanking plug (see figure 2). |
|
Cut off end |
2 Unclip the drainage hose from the |
||||
|
|
back of the machine. |
||||
|
|
|
|
|
|
|
|
|
|
|
|
3 Move the hooked end support along |
|
figure 3 |
|
|
|
|||
|
|
|
|
|
the drainage hose as required. |
|
|
|
|
|
|
|
|
|
|
|
|
|
4 Attach the drainage hose securely to |
|
|
|
|
|
|
|
the under sink drainage unit, using a |
|
|
|
|
|
|
hose clip (see figure 3). |
|
|
|
|
|
5 Raise the hooked end support up to |
|
|
Hose clip |
|
|
at least 800mm to avoid water being |
||
|
|
|
drawn back into the machine. |
|||
|
|
|
|
|
|
|
|
|
|
|
|
|
|
If the GREY drainage hose is too short
A longer drainage hose is available from our Genuine Parts & Accessories Mail Order Hotline
UK on 08709 077 077 or www.theservicecentre.co.uk (or in the Republic of Ireland on (01) 842 6836).
WARNINGS:
●Take care when using the sink drainage system. The discharge water may be very hot.
●Do not position the standpipe near an electrical socket.
●Flooding could occur if any part of the
installation is not carried out correctly.
●Remember you will be charged for a service call for problems caused by incorrect installation, non-removal of transit bolts or packaging, leaks from household pipework, loose or blocked fill and drain hoses.
YOUR INSTALLING
MACHINE
9
INSTALLING YOUR MACHINE
6. Move the machine into position...
WARNING:
●Do not drag or lift the machine by it’s door.
Your machine is heavy so care must be taken when moving it.
●Please take care not to damage any floor coverings when moving the machine.
●When moving the machine, take care not to kink or damage the hoses at the back of machine.
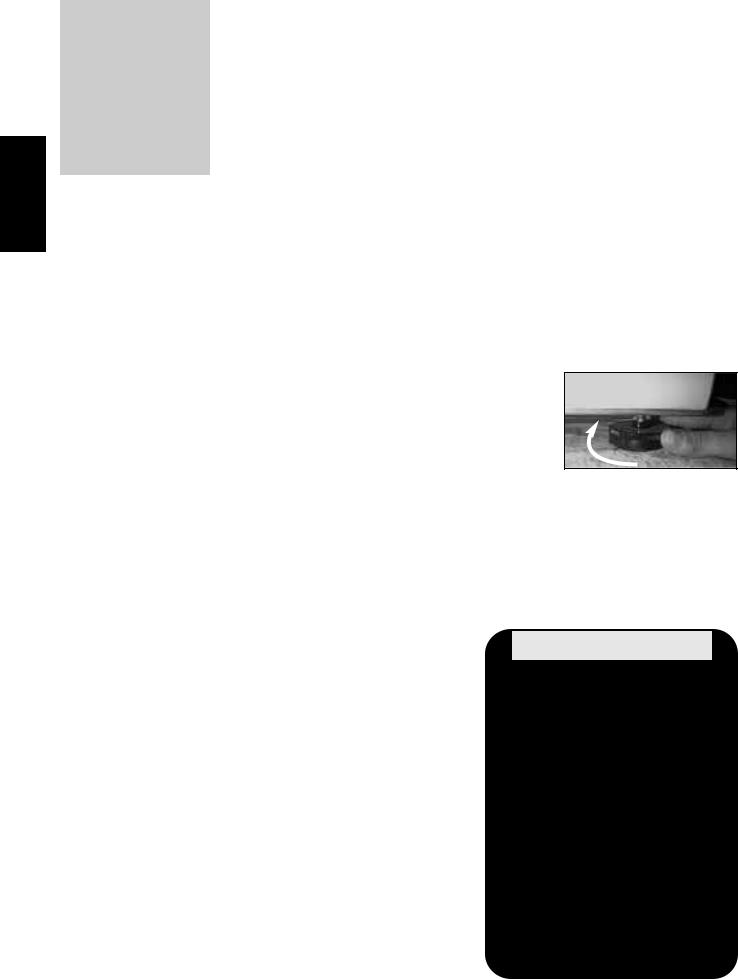
7. Adjust the feet...
Once the machine is in place
Your machine may become noisy or move about if it is not level. If necessary, to level the machine adjust the two front feet, as follows:
●When your machine is in its intended location, make sure that it is level
by turning one or both of the front feet clockwise until the machine stands firm and level.
The maximum slope of the table top must not exceed 2˚.
●The spring on each foot will stop them coming loose.
●Switch the machine on at the plug socket.
Now that you have successfully installed your new machine, we advise that you run it through a 95˚ White Cotton programme without any laundry and without any detergent in it.
This will check your installation, connections and drainage, and will thoroughly clean the interior before you carry out an actual wash programme on your laundry.
NOTE: This will take approximately 2 hours to complete.
Continue reading this book to get to know the various features of the machine.
TECHNICAL DETAILS
|
|
|
|
Models |
WD865, WD860 |
||
|
|
|
|
|
|
59.5cm wide |
|
Dimensions |
85cm high |
||
|
|
60cm deep |
|
|
|
|
|
Capacity |
from 1 to 6kg Wash |
||
|
|
from 1 to 5kg Dry |
|
|
|
|
|
Electric |
voltage 220/230 Volts 50Hz |
||
Connections |
maximum absorbed power 1700W |
||
|
|
|
|
Spin Speed |
up to 1600rpm |
||
|
|
|
|
Control |
Cotton wash |
||
programmes |
temperature 60˚C |
||
according to |
Wash run with a 6kg load |
||
IEC50229 |
Dry run with a 1kg load followed |
||
directive |
by a 5kg load |
||
|
|
|
|
10
 Loading...