


HDA150
Hotpoint HDA150, HDA300, HDA200, HDA100, HDA105 User Manual
...
HDA100
HDA105
HDA150
HDA180
HDA200
HDA300
HDA330
HDA900
HDA930
Dishwashers
Owner’s Manual
Part No. 165D4700P139 Pub. No. 39-5240
2
Congratulations!
You Are Now Part of the Hotpoint Family.
Welcome to the Hotpoint family. We’re
proud of our quality products and we are
committed to providing dependable service.
You’ll see it in this easy-to-use Owner’s
Manual and you’ll hear it in the friendly
voices of our customer service department.
Best of all, you’ll experience these values
each time you use your washer. That’s
important, because your new dishwasher will
be part of your family for many years. And we
hope you will be part of ours for a long time
to come.
We thank you for buying Hotpoint. We
appreciate your purchase, and hope you will
continue to rely on us whenever you need
quality appliances for your home.
Important!
Staple sales slip or cancelled
check here.
Proof of the original purchase date
is needed to obtain service under
the warranty.
Write the model and serial
numbers here.
#
#
You can find them on the tub wall just
inside the door.
Hotpoint&You,
AService Partnership.
Inside you will find many
helpful hints on how to use and
maintain your dishwasher
properly. Just a little preventive
care on your part can save you a
great deal of time and money
over the life of your dishwasher.
Read this Manual
Ask any Hotpointappliance owner and they
will tell you we stand behind our products
with unmatched quality service. However,
did you know that most questions result
from simple problems that you can easily
fix yourself in just a few minutes? This
Owner’s Manual can tell you how.
You’ll find many answers to
common problems here.
If you review our chart of
Troubleshooting Tips first,
you may not need to call for
service at all.
Review the Section on
Troubleshooting Tips
If you do need service, you can
relax knowing help is only a
phone call away. A list of toll-free
customer service numbers is
included in the back section.
Or you can always call the
GE Answer Center
® at
800.626.2000, 24 hours a day,
7 days a week.
If You Need Service
Customer ServiceTroubleshooting TipsOperating InstructionsSafety Information
Safety Information . . . . . . .4–7
Operating Instructions
Control Panel . . . . . . . . . . . . . . .8
Control Settings . . . . . . . . . . . . .9
Dial Cycles . . . . . . . . . . . . .10, 11
Using the Dishwasher . . . .12, 13
Loading the
Dishwasher Racks . . . . . . .14, 15
Changing Color Panels . . .16–19
Care and Cleaning . . . . . . . . . .20
Troubleshooting Tips
Before You
Call For Service . . . . . . . . .21–25
Customer Service
Warranty . . . . . . . . . . . . . . . . .27
Service Telphone
Numbers . . . . . . . . . .Back Cover
3
Safety InformationOperating InstructionsTroubleshooting TipsCustomer Service
IMPORTANT SAFETY INFORMATION.
READ ALL INSTRUCTIONS BEFORE USING.
4
WARNING!
For your safety, the information in this manual must be
followed to minimize the risk of fire, explosion, electric
shock, or to prevent property damage, personal injury,
or loss of life.
Under certain conditions hydrogen gas may be produced in
a water heater that has not been used for two weeks or
more. Hydrogen gas can be explosive under these
circumstances.
If the hot water has not been used for two weeks or more, prevent
the possibility of damage or injury by turning on all hot water
faucets and allow them to run for several minutes. Do this before
using any electrical appliance which is connected to the hot water
system. This simple procedure will allow any built-up hydrogen gas
to escape. Since the gas is flammable, do not smoke or use an open
flame or appliance during this process.
WATER HEATER SAFETY

5
Customer ServiceTroubleshooting TipsOperating InstructionsSafety Information
Use your dishwasher only for its intended purpose as
described in this Owner’s Manual.
This dishwasher must be properly installed and located in
accordance with the Installation Instructions before it is used.
If you did not receive an Installation Instructions sheet with
your dishwasher, you can receive one by calling us toll-free
at the GE Answer Center
®
, 800.626.2000.
■ Connect to a grounded
metal, permanent wiring
system; or run an equipment-
grounding conductor with
the circuit conductors and
connect to the equipment-
grounding terminal or lead
of the appliance.
■ Improper connection of the
equipment-grounding
conductor can result in a risk
of electric shock. Check with
a qualified electrician or
service representative if you
are in doubt whether the
appliance is properly
grounded.
■ Dispose of discarded
appliances and shipping or
packing material properly.
■ Do not attempt to repair or
replace any part of your
dishwasher unless it is
specifically recommended in
this manual. All other
servicing should be referred
to a qualified technician.
■ To minimize the possibility of
electric shock, disconnect
this appliance from the
power supply before
attempting any maintenance.
NOTE:
Turning the
dishwasher off does not
disconnect the appliance
from the power supply. We
recommend having a
qualified technician service
your appliance.
PROPER INSTALLATION
AND MAINTENANCE

Safety InformationOperating InstructionsTroubleshooting TipsCustomer Service
IMPORTANT SAFETY INFORMATION.
READ ALL INSTRUCTIONS BEFORE USING.
6
DO NOT…
■ Do not tamper with controls.
■ Do not abuse, sit on, or stand
on the door or dish rack of
the dishwasher.
■ Do not discard a dishwasher
without first removing the
door of the washing
compartment.
■ Do not store or use
combustible materials,
gasoline or other flammable
vapors and liquids in the
vicinity of this or any other
appliance.
■ Do not allow children to play
inside, on or with this
appliance or any discarded
appliance.
WARNING!
7
Customer ServiceTroubleshooting TipsOperating InstructionsSafety Information
WHEN USINGYOUR DISHWASHER
■ Use only powder or liquid
detergents or wetting agents
recommended for use in a
dishwasher.
■ Locate sharp items so that
they are not likely to damage
the door seal.
■ Load sharp knives with the
handles up to reduce the risk
of cut-type injuries.
■ Do not wash plastic items
unless marked
dishwasher
safe
or the equivalent. For
plastic items not so marked,
check the manufacturer’s
recommendations.
■ Do not touch the heating
element during or
immediately after use.
■ Do not operate your
dishwasher unless all
enclosure panels are properly
in place.
■ Close supervision is necessary
if this appliance is used by or
near children.
■ Load light plastic items so
they will not become
dislodged and drop to the
bottom of the dishwasher—
they might come into contact
with the heating element and
be damaged.
REMEMBER…
Your continued health and safety are important to us.
Please read and follow this Safety Information carefully.
We want you to remain a happy and healthy part of
our family.
SA VE THESE INSTRUCTIONS
Safety InformationOperating InstructionsTroubleshooting TipsCustomer Service
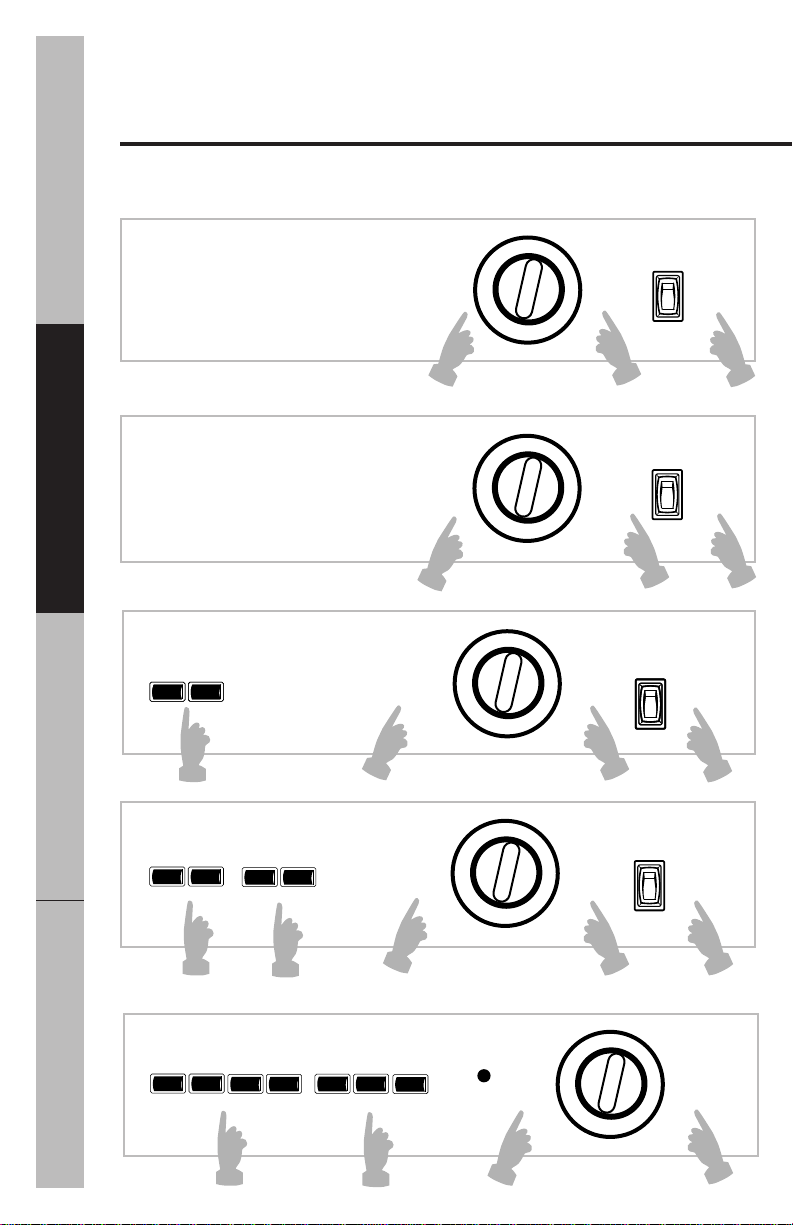
About the dishwasher control panel.
You can locate your model number on the tub wall just inside the door.
Throughout this manual, features and appearance may vary from your model.
8
OFF
HEATED
DRY OFF
HEATED
DRY ON
START
OFF
DRYING
OFF
ON
HEATED
DRY
HEAVY WASH
NORMAL WASH
WATER SAVER
RINSE & HOLD
(HEATED DRY OFF)
OFF
ON
WATER
SAVER
RINSE & HOLD
(HEATED DRY OFF)
OFF
ON
HEATED
DRY
NORMAL
WASH
POTS &
PANS
OFF
ON
WATER
SAVER
RINSE & HOLD
(HEATED DRY OFF)
OFF
ON
HEATED
DRY
(HEATED DRY ON)
NORMAL
WASH
POTS &
PANS
PLATE WARMER
OFF
OFF
ON
ON
WATER SAVER
RINSE & HOLD
PLATE
WARMER
(HEATED DRY OFF)
HEATED
DRY
NORMAL
WASH
POTS &
PANS
(HEATED DRY ON)
WASH TEMP BOOST
ON OFF
START DELAY
OFF
RINSE & HOLD
PLATE
WARMER
(HEATED DRY OFF)
NORMAL
WASH
POTS &
PANS
(HEATED DRY ON)
ENERGY
SAVER
HOURS
DELAY
START
(HOURS)
WATER
SAVER
LIGHT
WASH
HEATED
WASH
HEATED
DRY
6
4
2
1
2
3
Model HDA100
Models HDA150 and HDA180
Model HDA200
Model HDA300 and HDA330
Model HDA900 and HDA930
1
2
3
1
3
3
3
2
2
2
2
1
1
1
1
1
Energy Options
WASH TEMP Provides extra heat for best performance. It is used
BOOST ON/ best with heavily-soiled dishes.
HEATED WASH
WASH TEMP Turns TEMP BOOST off.
BOOST OFF
HEATED DRY/ Turns the drying heater on for fast drying. This cycle
HEATED DRY ON will extend the time to your wash cycle.
HEATED DRY Shuts off the drying heat option. Dishes air dry
OFF naturally and energy is saved.
ENERGY SAVER Turns all Options off.
Customer ServiceTroubleshooting TipsOperating InstructionsSafety Information
Control Settings
Cycles
POTS & PANS/ For heavily soiled dishes or cookware with dried-on
HEAVY WASH or baked-on soils. Everyday dishes may be included.
This cycle will not remove burned-on foods.
NORMAL WASH For loads of everyday dishes, glasses and cookware
with medium soils.
NOTE:
Many dishes have lighter
soil than normal. Choosing a cycle other than
NORMAL WASH
will save energy and water.
LIGHT WASH/ For dishes with light soils.
WATER SAVER
RINSE & HOLD For rinsing partial loads that will be washed later.
Do not use detergent.
PLATE WARMER For warming clean dishes and serving plates. This
cycle will take approximately 32 minutes.
■ Make sure the Dial is at the
OFF
position.
■ Latch the door.
1
2
Start
Slowly turn the Dial to the
START or ON
position. Don’t
turn it past the
STARTor ON
position, or you could
accidentally miss a rinse. There is a time delay between
start-up and water fill so you will not hear any wash
action right away.
3
9
 Loading...