


Instructions for Installation and Use
Model no. 6685X
|
CONTENTS |
|
|
PERFORMANCE TEST CHARTS ....................................................................... |
page |
3 |
|
INSTRUCTION FOR INSTALLATION.................................................................. |
page |
4 |
|
THE CONTROLS |
.............................................................................. |
page |
7 |
GET TO KNOW YOUR MICROWAVE ................................................................. |
page |
8 |
|
CHAP. 1 – GENERAL 1.1 |
Important safety warnings .................................... |
page |
9 |
1.2 |
Technical data....................................................... |
page |
10 |
1.3 |
Installation and Electrical Connection .................. |
page |
10 |
1.4 |
Accessories supplied ............................................ |
page |
11 |
1.5 |
Ovenware to use .................................................. |
page |
12 |
1.6 |
General rules / suggestions for using the oven.... |
page |
13 |
CHAP. 2 – USING THE CONTROLS AND SETTING THE MODES |
|
|
|
2.1 |
Setting the clock ................................................... |
page |
14 |
2.2 |
Programming the cooking..................................... |
page |
15 |
2.3 |
Automatic sequence for defrosting and cooking .. |
page |
17 |
2.4 |
Recalling the pre-memorised recipes |
|
|
|
(“Automatic Functions” keys) ................................ |
page |
18 |
2.5 |
Quick Reheat ........................................................ |
page |
18 |
2.6 |
Child lock-out feature............................................ |
page |
18 |
2.7 |
Turntable stop key ................................................ |
page |
18 |
2.8 |
Function “Memotime”............................................ |
page |
18 |
CHAP. 3 – USING THE PASTA FUNCTION |
|
|
|
3.1 |
Introduction ........................................................... |
page |
20 |
3.2 |
Using the cooker and setting the controls ............ |
page |
20 |
3.3 |
Important warnings ............................................... |
page |
23 |
CHAP. 4 – USING THE OVEN: SUGGESTIONS AND COOK CHARTS |
|
|
|
4.1 |
Defrosting ............................................................. |
page |
24 |
4.2 |
Reheating ............................................................. |
page |
25 |
4.3 |
Cooking starters, pasta and entrees .................... |
page |
26 |
4.4 |
Cooking meat ...................................................... |
page |
26 |
4.5 |
Cooking side dishes and vegetables.................... |
page |
27 |
4.6 |
Cooking fish .......................................................... |
page |
28 |
4.7 |
Cooking desserts and cakes ............................... |
page |
28 |
4.8 |
Reheating/cooking using the |
|
|
|
“Automatic Functions” keys .................................. |
page |
29 |
4.9 |
Simultaneous cooking on 2 levels ........................ |
page. |
30 |
CARE AND CLEANING |
.............................................................................. |
page |
32 |
TROUBLESHOOTING |
.............................................................................. |
page |
33 |
AFTER SALES SERVICE |
.............................................................................. |
page |
34 |
GUARANTEE |
.............................................................................. |
page |
35 |
KEY CONTACTS |
.............................................................................. |
BACK PAGE |
|
2

PERFORMANCE TESTS CHART
Data and instruction for Performance Tests according to IEC 705 and further Amendment Document 59H/69/CD.
The International Electrotechnical Commission SC 59H, has developed a Standard for comparative testing of heating performances of microwave ovens. The Draft of the new Edition of this Standard has been circulated with Document 59H/69/CD, which also describes the tests marked, in this table, with (*).
We recommend the following for this oven:
Test Nr. on |
Item |
Duration |
Function |
Power |
Oven |
Weight |
Standing |
Note |
|
standard |
Level |
temp. |
time |
||||||
|
|
|
|
|
|||||
|
|
|
|
|
|
|
|
|
|
|
Egg |
|
|
|
|
|
|
The upper surface shall be evaluated after the |
|
A |
16 min. |
only mw |
1000 W |
- |
750 gr |
5 min |
standing time. The inner custard evaluation shall be |
||
custard |
|||||||||
|
|
|
|
|
|
|
conducted after two hours. |
||
|
|
|
|
|
|
|
|
||
|
|
|
|
|
|
|
|
|
|
|
|
|
|
|
|
|
|
Use the borosilicate glass container stated in the |
|
|
Sponge |
|
|
|
|
|
|
Standard (max. dia. 210 mm) or a Pyrex® glass |
|
B |
6 min. |
only mw |
1000 W |
- |
475 gr |
5 min |
container dia. 210 mm, height 50 mm and wall thick |
||
cake |
|||||||||
|
|
|
|
|
|
|
6 mm. Put the container on the low wire rack placed |
||
|
|
|
|
|
|
|
|
||
|
|
|
|
|
|
|
|
on the turntable. |
|
|
|
|
|
|
|
|
|
|
|
|
|
|
|
|
|
|
|
Cover the container with cling film and pierce the |
|
C |
Meat loaf |
20 min. |
only mw |
750 W |
- |
900 gr |
5 min |
film. Use the rectangular borosilicate glass container |
|
stated in the Standard or the Arcopal® Cat. nr. Z1/B8 |
|||||||||
|
|
|
|
|
|
|
|
||
|
|
|
|
|
|
|
|
(01)10460-1. |
|
|
|
|
|
|
|
|
|
|
|
|
Defrosting |
|
|
|
|
|
|
Place the frozen load directly on the turntable (I ). |
|
Defrosting |
minced |
11 min. |
only mw |
|
- |
500 gr |
15 min |
Turn the load upsidedown after half of the defrosting |
|
|
meat |
|
|
|
|
|
|
time. |
|
|
|
|
|
|
|
|
|
|
|
|
|
|
|
|
|
|
|
Use the borosilicate glass container stated in the |
|
|
Potato |
|
combi |
|
|
|
|
Standard (max. dia. 210 mm) or a Pyrex® glass |
|
D (*) |
20 min. |
mw + fan |
750 W |
190°C |
1100 gr |
5 min |
container dia. 210 mm, height 50 mm and wall thick 6 |
||
gratin |
|||||||||
|
|
(simult.) |
|
|
|
|
mm. Put the container on the lower wire rack (F) |
||
|
|
|
|
|
|
|
|||
|
|
|
|
|
|
|
|
placed on the turntable.Do not preheat the oven. |
|
|
|
|
|
|
|
|
|
|
|
|
|
|
|
|
|
|
|
Use the borosilicate glass container stated in the |
|
|
|
|
|
|
|
|
|
Standard (max dia. 210 mm) or a Pyrex® glass |
|
|
Sponge |
|
combi |
|
|
|
|
container dia. 210 mm, height 50 mm and wall thick |
|
E (*) |
30 min. |
mw + fan |
150 W |
160°C |
710 gr |
5 min |
6 mm. The oven shall be preheated (in FAN ONLY |
||
cake |
|||||||||
|
|
(simult.) |
|
|
|
|
function) with the lower rack (F) placed on the |
||
|
|
|
|
|
|
|
|||
|
|
|
|
|
|
|
|
turntable. Once preheated, place the container on |
|
|
|
|
|
|
|
|
|
the lower rack (F). |
|
|
|
|
|
|
|
|
|
|
|
|
|
|
|
|
|
|
|
The following instruction shall be strictly observed |
|
|
|
|
combi |
|
|
|
|
for this type of load: put the chicken in a pyrex® |
|
F (*) |
Poultry |
40 min. |
mw + fan |
750 W |
190°C |
1200 gr |
5 min |
glass container dia 210 mm, height 50 mm and wall |
|
|
|
|
(simult.) |
|
|
|
|
thickness of 6 mm. Put the container on the lower |
|
|
|
|
|
|
|
|
|
wire rack (F) placed on the turntable. |
|
|
|
|
|
|
|
|
|
|
3
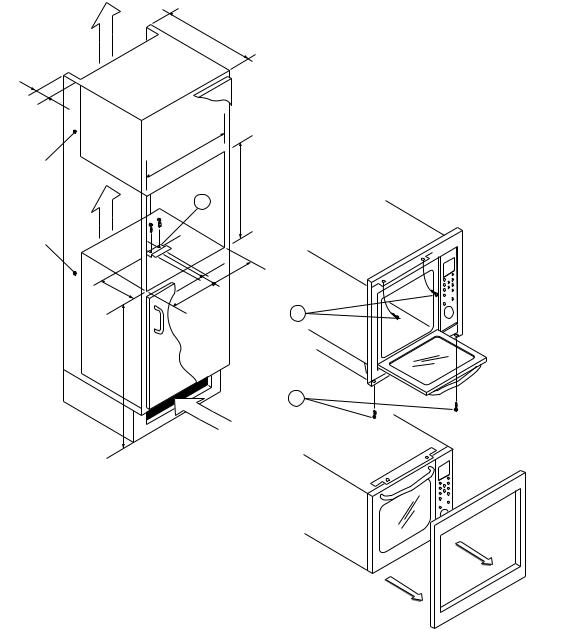
INSTRUCTION FOR INSTALLATION
1. Affix the metal strip (A) with the two 13 mm screws (all of which can be found in the accessory bag, inserted inside the oven cavity).
550 |
min. |
|
50 |
min. |
|
ventilation passageway
+8 |
|
560 |
0 |
|
|
A
450 0+2
295 |
min. |
|
|
|
min850 |
30  =
=
30  =
=
X
X
DIS. 1 |
DIS. 2 |
There must be a minimum space of 280 cm2 in order for ventilation air to enter.
2. Remove the 4 screws X which affix the oven frame to the body of the oven in order to remove the frame.
4

B
3. Open the fume exhaust exit B completely.
4.Insert the appliance into the niche, pushing it until the two strips (C) make contact with the cabinet.
C
C
DIS. 3
5.Keep an even distance between the oven and the cabinet in order to centre
it properly inside the niche. Attach the appliance to the cabinet with
two 16 mm screws (D) which can be found in the accessory bag.
=
D
= 
D
DIS. 4
5
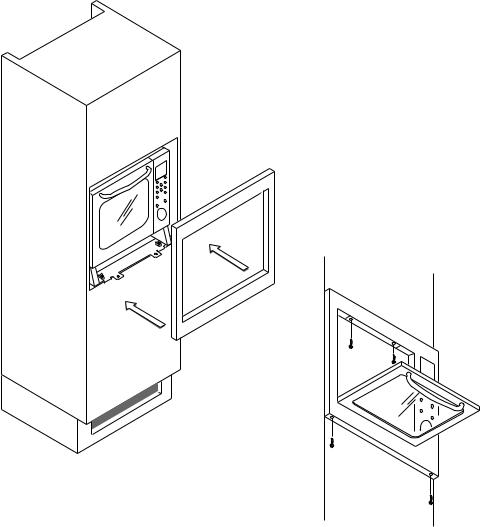
6. Reposition the frame onto the oven, attaching it with the previously removed screws, as shown in design 2.
DIS. 5
ELECTRICAL CONNECTION - IMPORTANT:
If the appliance is provided with supply cord AND plug, the appliance shall be positioned so that the plug is always accessible. If the appliance is provided with a supply cord WITHOUT the plug, the appliance must be connected to a fixed main wiring incorporating a disconnection switch with contact separation of at least 3 mm in all poles and provided with permanent connection to earth.
6
THE CONTROLS
1
2
3 |
6 |
|
5 |
15 |
|
4 |
||
|
||
7 |
8 |
|
9 |
11 |
|
10 |
||
12 |
13 |
|
14 |
|
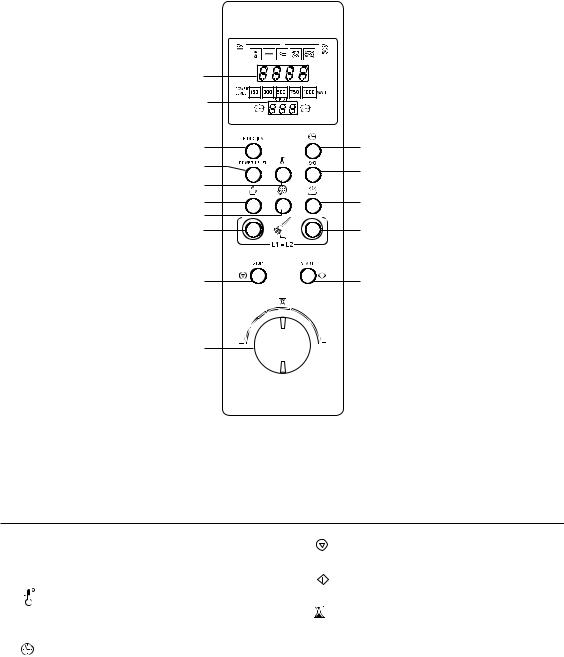
DESCRIPTION OF THE CONTROL PANEL
1. |
Time and mode display |
12. |
STOP key: interruption of cooking and |
2. |
Oven temperature display |
|
cancellation of settings |
3. |
FUNCTION key: mode selection |
13. |
START key: start of cooking and rapid |
4. |
key: oven temperature selection |
|
reheating |
5. |
POWER LEVEL key: microwave power level |
14. knob: setting of time and length of cooking |
|
|
selection |
15. Turntable stop key |
|
6. |
key: setting the clock |
|
|
7 - 8 - 9 “Automatic Functions” keys: pre-memorised rapid cooking
10 - 11 “Pasta“ buttons
7

GET TO KNOW YOUR MICROWAVE
A |
C |
|
|
F |
G |
|
B |
|
D |
H |
I |
|
|
|
E |
|
T |
DESCRIPTION
A |
Grill heating element |
G |
High wire rack |
B |
Control panel |
H |
Turntable |
C |
Microwave outlet cover |
I |
Turntable support |
D |
Turntable spindle |
T |
Rectangular grill |
E |
Inside of door |
|
|
F |
Low wire rack |
|
|
Spacer wire rack at medium height level that makes it possible to cook, defrost and reheat with microwave only function, two food dishes at the same time (simultaneous insertion of two plates or pans). Consult the instructions given on page 30.
PASTA COOKER
Hatch cover |
Cooker |
|
support |
||
|
||
Handle |
Mixer |
Handle
Pasta container
Shaft
8

CHAPTER 1 – GENERAL
1.1 FOR YOUR SAFETY
Read these instructions carefully and keep for future reference
1)WARNING: If the door or door seals are damaged, the oven must not be operated until it has been repaired by a competent person (trained by the manufacturer or by its Customer Service).
2)WARNING: It is hazardous for anyone other than a competent person to carry out any service or repair operation which involves the removal of a cover which gives protection against exposure to microwave energy.
3)WARNING: Liquids and other foods must not be heated in sealed containers since they are liable to explode. Eggs in their shell and whole hard-boiled eggs should not be heated in microwave ovens since they may explode even after microwave heating has ended.
4)WARNING: Children should not be allowed to play with the appliance or tamper with its controls. Do not allow children near the oven when it is in operation, as this may result in severe burns.
5)Do not attempt to operate the oven with the door open by tampering with the safety devices.
6)Do not operate the oven if objects for any kind get stuck between the front panel of the oven and the door. Always keep the inside of the door (E) clean, using a damp cloth and non-abrasive detergents. Do not allow dirt or remains of food to accumulate between the front panel of the oven on the door.
7)The following warnings must be observed when the door is open: Do not place heavy objects on the door or pull the handle downwards any further as the appliance may tip over. Never place hot containers or pans (e.g. just taken off the stove) on the door.
8)If the power cable becomes damaged, this must be substituted only by specialised personnel authorised or by the manufacturer.
9)If smoke is observed, switch off or unplug the appliance and KEEP THE DOOR CLOSED in order to stifle any flames.
10)Only use utensils that are suitable for use in microwave ovens. In order to avoid overheating and the consequent risk of fire, it is advisable to supervise the oven when cooking food in disposable containers made of plastic, cardboard or other inflammable materials, and when heating small quantities of food.
11)Never place the turntable in water after it has ben heated for a long time. The high thermal shock resulting would break the turntable.
12)You must not either preheat or operate the microwave oven in any way without food in the oven. Sparking can occur if you were to ignore this warning.
13)Before using this oven, make sure that the utensil and containers chosen are suitable for microwave oven use (see the section on "Glassware and Similar Items").
14)During use the appliance becomes hot. Do not touch the heating elements inside the oven.
15)When heating liquids (water, coffee, milk, etc.) it is possible that the contents may suddenly start to boil and spill violently as a result of delayed boiling, causing scalding. To avoid this happening, you should place a heat-resistant plastic spoon or a glass rod in the container before starting to heat liquids. Anyway, care should be taken when handling the container.
16)Do not heat spirit with a high alcohol content, nor large quantities of oil, as these could catch fire !
17)The contents of feeding bottles and baby food jars should be stirred or shaken and the temperature should be checked before consumption in order to avoid burns. It is also advisable to stir or shake the food in order to ensure that it has an even temperature.
When using commercially available bottle sterilisers, before turning the oven on, ALWAYS make sure the container is filled with the quantity of water indicated by the manufacturer.
When the oven is used for the first time it is possible that, for a period of approx. 10 minutes, it may produce a “new” smell and a small amount of smoke. This is only a result of protective substances applied to the heating element.
9
1.2 TECHNICAL DATA
ENERGY CONSUMPTION ventilated oven only function (CENELEC HD 376 norms) |
|
To reach 200°C |
0,35 kWh |
To maintain a temperature of 200°C for an hour |
1,15 kWh |
Total consumption |
1,5 kWh |
• OUTPUT POWER - MICROWAVE: 1000 W (IEC705) |
|
For additional data, consult the data plate placed on the front side of the appliance.
This appliance complies to E.E.C. directive no. 89/336 and 92/31 regarding Electromagnetic Compatibility, and to directive 89/109/E.E.C. regarding materials which come into contact with food.
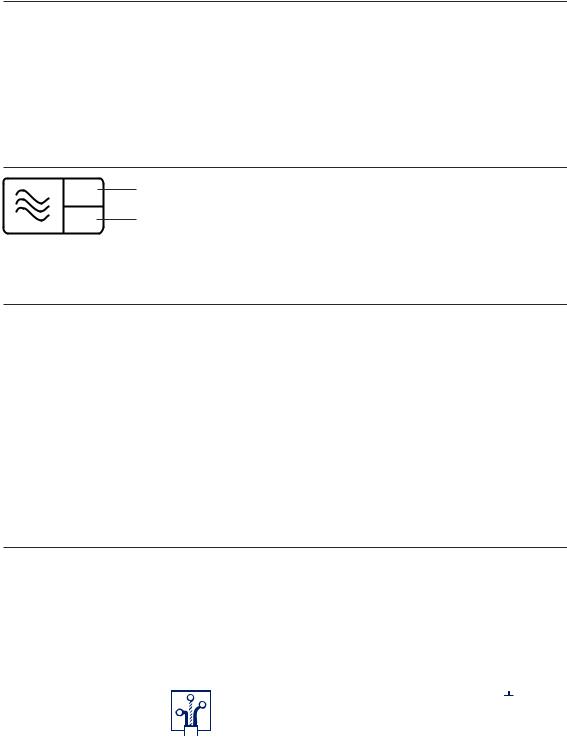
OUTPUT POWER
ONLY FOR SOME MODELS: The microwave output power is also indicated inside this simbol, placed on the door.
(ONLY FOR U.K.) The letter indicates the heating category to which your oven belongs: some pre-cooked food packages (frozen or chilled) give heating instructions corresponding to the various categories. Follow those instructions related to the category indicated for your oven.
1.3 INSTALLATION AND ELECTRICAL CONNECTION
1)Remove all the accessories and wash them.
2)Clean the inside with a soft, damp cloth.
3)Check that there is no damage as a result of transportation, and in particular that the door opens and closes properly.
4)Place the support (I) in the centre of the circular groove and fix the turntable (H) to it. The spindle (D) should be inserted in the corresponding groove in the centre of the turntable (see page 5).
5)The appliance is already fitted with a plug and may only be connected to a correctly installed earthed socket. Only a qualified electrician may install or relocate a socket outlet.
The plug must be easily accessible after installation unless an isolator switch is used to disconnect all poles having a contact gap of at least 3mm in each pole.
6)Before use, check that the power supply voltage is the same as the one shown on the rating label and that the power outlet is properly earthed: the manufacturer disclaims any liability in the event of non-compliance with this safety regulation.
ELECTRICAL CONNECTION (U.K. ONLY)
A)If your appliance comes fitted with a plug, it will incorporate a 13 Amp fuse. If it does not fit your socket, the plug should be cut off from the mains lead, and an appropriate plug fitted, as below.
WARNING: Very carefully dispose of the cut off plug after removing the fuse: do not insert in a 13 Amp socket elsewhere in the house as this could cause a shock hazard.
With alternative plugs not incorporating a fuse, the circuit must be protected by a 15 Amp fuse.
WARNING - THIS APPLIANCE MUST BE EARTHED
IMPORTANT
The wires in the mains lead are coloured in accordance with the following code:
Green and yellow: |
Earth |
E |
|
||
Blue: |
Neutral |
L |
Brown: |
Live |
N |
|
If the plug is a moulded-on type, the fuse cover must be re-fitted when changing the fuse using a 13 Amp Asta approved fuse to BS 1362. In the event of losing the fuse cover, the plug must NOT be used until a replacement fuse cover can be obtained from your nearest electrical dealer. The colour of the correct replacement fuse cover is that as marked on the base of the plug.
B)If your appliance is not fitted with a plug, please follow the instructions provided below:
As the colours of the wires in the mains lead may not correspond with the coloured markings identifying the terminals in your plug, proceed as follows:
The green and yellow wire must be connected to the terminal in the plug marked with the letter E or the earth symbol  or coloured green or green and yellow.
The blue wire must be connected to the terminal marked with the letter N or coloured black.
The brown wire must be connected to the terminal marked with the letter L or coloured red.
10
1.4 ACCESSORIES SUPPLIED
LOW WIRE RACK
Fan Oven Only mode:
for all types of traditional cooking, especially cakes.
HIGH WIRE RACK
Grill Only mode:
for all types of grilled food.
TURNTABLE and TURNTABLE SUPPORT
The turntable and its support are used for all the modes, except for the pasta mode.
RECTANGULAR RACK
Only for ventilated oven. For all types of traditional cooking in large sized rectangular casserole dishes. Naturally, the food must be stirred and turned during the cooking process. Position this rack directly on the bottom of the oven. The rotating plate (H) can be left in place.
This rack cannot be used for microwave cooking.
MEDIUM WIRE RACK
Microwave-only function
For all types of cooking on two
levels AT THE SAME TIME
(e.g., large amounts of food or different foods).
See the instructions on page 30
Combined microwave and fan oven mode and microwave + grill:
for rapid cooking of meat, potatoes, some leavened cakes and desserts and gratinéed dishes (for example, baked lasagne).
PASTA COOKER and COOKER SUPPORT
Support to be used with pasta cooker only.
Note: The round metal racks supplied are protected by a special chrome plating which allows them to be used safely in your microwave.
11
 Loading...