


Applications
The RPLS740B/RPLS741B programmable wall switch has been designed to control lights and motors:
Load types |
Maximum load |
Examples |
||
|
|
|
|
|
|
|
• |
fluorescent lights |
|
Lights and resistive |
1800 W |
• |
compact fluorescent lights (CFL) |
|
• |
electronic ballasts |
|||
loads (except tungsten) |
(15 A @ 120 V) |
|||
• |
sodium lamps |
|||
|
|
|||
|
|
• |
block heaters |
|
|
|
|
|
|
Tungsten lights |
1440 W |
• |
incandescent lights |
|
(12 A @ 120 V) |
• |
halogen lights |
||
|
||||
Motors |
3/4 hp |
• |
pool filter pumps |
|
• |
fans |
|||
|
|
|||
Installation
NOTE: This switch cannot be used if there is no neutral wire (white wires joint together) inside the electrical box.
Cut power at the circuit breaker to avoid electric shock.
Remove the existing switch.
Install the new switch (see the appropriate section below).
Apply power at the circuit breaker.
black white
120 |
white |
|
|
|
|
|
|
|
|
|
|
||
|
|
|
|
|
||
|
|
|
|
|
||
VAC |
black |
|
|
|
|
|
|
|
|
|
|
||
blue (LOAD)
white (NEUTRAL) black (LINE)
Quick Start-up
Set the time and date before using the timer for the first time.
The RPLS740B/RPLS741B will turn the lights on at sunset and turn them off at 11:00 pm by default. If these settings are appropriate for you, you only need to set the time and date (see shaded zone in the menu flowchart sheet). If the switch’s sunset time does not correspond to the actual sunset time, see sections 5.3.3 and 5.3.4.
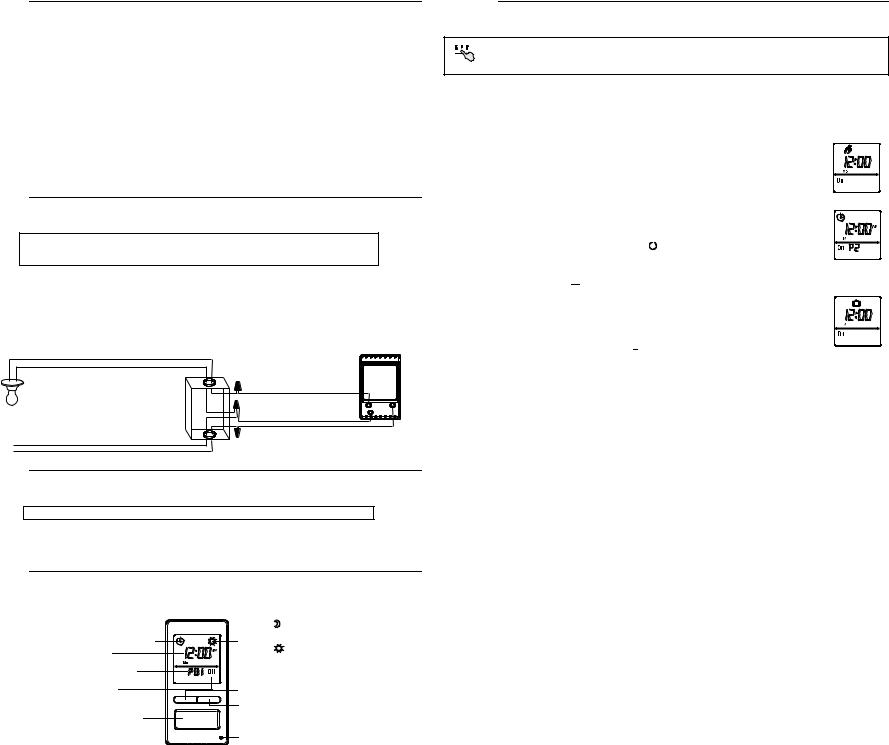
Operation
Indicates the mode of operation (see Section 5.1)
Indicates the time and day 


 Indicates the current program


 Indicates the load on/off state

Briefly press this button to turn the 


 lights on or off. See “Temporary
 Override” in Section 5.1.4.
Press for 3 seconds to enter the setup menus.
The  icon indicates the current program has been activated at sunset.
The 
 icon indicates the current program has been activated at sunrise.
Press this button to display today’s sunrise time. Press this button to display today’s sunset time.
The LED illuminates when the load state is on.
RPLS740B/RPLS741B
User guide
7-day Solar Programmable Wall Switch
Setup Menus


 Press the main button for 3 seconds to enter the setup menus. Refer to (3 sec.) the menu flowchart sheet on how to navigate the menus.
5.1Mode Menu
You can use the Mode menu to select one of the three modes of operation (see sections 5.1.1 to 5.1.3).
5.1.1 Manual Mode 
In Manual mode, the RPLS740B/RPLS741B operates like a regular switch. To turn the
lights on or off, briefly press the main button. The |
icon appears when the switch is in |
Manual mode.
5.1.2 Automatic Mode 
In Automatic mode, the RPLS740B/RPLS741B turns the lights on or off according to the
set programs (see Section 5.4). The  icon as well as the current program number are displayed.
5.1.3 Random Mode 
In Random mode, the RPLS740B/RPLS741B has no specific times to turn the lights on or off. This mode is designed to give the impression the house is occupied during your
absence. It is similar to the Automatic mode except there is no fixed program. The programs are automatically set to different times by the RPLS740B/RPLS741B every day.
The  icon appears when the switch is in Random mode.
The first “On” program occurs at sunset. Each “On” program lasts between 1 hour and 1 hour and 30 minutes; each “Off” program lasts between 15 and 30 minutes. The last “Off” program occurs between 10:30 pm and midnight.
5.1.4 Temporary Override
When the RPLS740B/RPLS741B is in Automatic or Random mode, you can press the main button at any time to override the default state for the current program. The lights will turn off if they are on and vice versa. The icon (On or Off) of the new state flashes to indicate that the state is temporary. The new state is maintained until you press the main button again or till the next “On” or “Off” program.
5.2Time Menu
The time display flashes on the screen when the time has not yet been set or after a 4-hour power outage. Use the Time menu to select the time format (12-hour or 24-hour) and to set the clock and date.
NOTE: The date is used to determine the sunset and sunrise times.
5.3Configuration Menu (Conf)
Use the Configuration menu to set the following parameters (see sections 5.3.1 to 5.3.4).
5.3.1 Backlight mode (SCRN)
The screen is lit at high intensity for 8 seconds when you press any button. The rest of the time, depending on the backlight mode selected, the screen behaves as follows:
Scrn Off: The screen is not lit.
Scrn On HI: The screen is lit at high intensity.
Scrn On LO: The screen is lit at low intensity (default mode).
5.3.2 Automatic Daylight Savings Time Changeover (DLS)
When automatic daylight savings time changeover is on (DLS On), the RPLS740B/RPLS741B changes to daylight savings time (summer time) at 2:00 am on the second Sunday of March and changes back to normal time (winter time) at 2:00 am on the first Sunday of November. This function is enabled (DLS On) by default.
5.3.3 Latitude and Longitude Coordinates (LAT and LONG)
The coordinates are used to turn the lights on at sunset and off at sunrise. The latitude is set to +45 and longitude to -75 by default. These settings provide approximate sunset and sunrise times for most North American cities. To obtain your city’s coordinates (or those of a nearby city), see the coordinates table. You can
RPLS740B/RPLS741B |
1/8 |

also obtain this information at www.geonames.org or with a Global Positioning System (GPS) device. The accuracy of the sunset and sunrise times depends on the accuracy of the coordinates you enter for your city.
NOTE: Enter a negative value for a south latitude or a west longitude.
5.3.4 Correction Factor (ADJ)
If your city’s time zone is based on political or economic boundaries instead of its coordinates, your lights might switch on or off too early or too late with respect to sunrise and sunset. In this case, apply a correction factor (+1 or -1 hour; refer to addendum). Otherwise, leave it at 0 (default value).
5.4Program Menu (Prog)
Use the Program menu to set the programs; i.e. the times you want the lights to turn On or Off when the switch is in Automatic mode. To set a program, proceed as follows:
Select a program number (see section 5.4.1) Set the day(s) of the program (see section 5.4.2)
Set the program start time (see section 5.4.3)
5.4.1 Selecting a program number
You can set up to 7 “On” programs |
|
|
|
(“P01 On” to “P07 On”) and 7 “Off” |
|
|
|
programs (“P01 Off” to “P07 Off”). For |
|
|
|
example, select an “On” program to set |
|
|
|
when to turn the lights on; select an |
|
|
|
“Off” program to set when to turn the |
“P01 On” |
“P01 Off” |
|
lights off. |
|||
|
|
5.4.2 Setting the day(s) of the program
After selecting a program, set the day(s) of the program. You can select a specific day, all 7 days or “none”. Choose “none” for any unused program.
5.4.3 Setting the program start time
After setting the day(s) of the program, set its start time. You can select either a specific time, the sunset time or the sunrise time:
•To select a specific time:
(1)Advance to the hour setting and select the hour.
(2)Advance to the minutes setting and select the minutes.
•To select sunset or sunrise time:
(1)Advance to the hour setting and select the sunset time or
sunrise time. (When you scroll, the sunset time  and
and
sunrise time 
 appear between 11 pm and 12 am.)
(2) To enter an offset (from -70 to +70 minutes in 10-minute increments) between the sunset or sunrise time and the program start time, advance to the minutes setting and change the minutes.
•EXAMPLE: If the sunset time is 6:13 pm and you change the minutes to display 6:43 pm, you have entered a delay of 30 minutes. If, later in the year, the sunset time is 4:01 pm, the program will start at 4:31 pm.
•NOTE: When you enter an offset,  appears along with
  or
or 
 when you display the sunset or sunrise time. To remove the offset, display the sunset or sunrise time and change the minutes until
  disappears.
5.4.4Examples
Example 1: The lights turn on at sunset and off at 11:00 pm every day (default setting).
Program |
Days |
Time |
Program |
Days |
Time |
P01 On |
All 7 |
sunset |
P01 Off |
All 7 |
11:00 |
|
days |
|
|
days |
pm |
P02 On to |
None |
— |
P02 Off to |
None |
— |
P07 On |
|
|
P07 Off |
|
|
Example 2: The lights turn on at sunset and off at sunrise every day.
Program |
Days |
Time |
Program |
Days |
Time |
P01 On |
All 7 |
sunset |
P01 Off |
All 7 |
sunrise |
|
days |
|
|
days |
|
P02 On to |
None |
— |
P02 Off to |
None |
— |
P07 On |
|
|
P07 Off |
|
|
Example 3: The lights turn on at 8:00 pm every day and turn off at 10:00 pm every day except on Saturday night when they turn off at 1:00 am.
Program |
Days |
Time |
Program |
Days |
Time |
P01 On |
All 7 days |
8:00 pm |
P01 Off |
Sunday (Su) |
10:00 pm |
P02 On |
None |
— |
P02 Off |
Monday (Mo) |
10:00 pm |
P03 On |
None |
— |
P03 Off |
Tuesday (Tu) |
10:00 pm |
P04 On |
None |
— |
P04 Off |
Wednesday (We) |
10:00 pm |
P05 On |
None |
— |
P05 Off |
Thursday (Th) |
10:00 pm |
P06 On |
None |
— |
P06 Off |
Friday (Fr) |
10:00 pm |
P07 On |
None |
— |
P07 Off |
Sunday (Su) |
1:00 am |
Be careful about overlapping!
For example, if you set “P01 Off” at 10:00 pm for all 7 days and set “P02 Off” to 11:00 pm for Saturday, on Saturday, the lights will turn off at 10:00 pm, not 11:00 pm since “P01 Off” is set to an earlier time than
“P02 Off”.
Reset to default Settings
To return the switch to its default settings, simultaneously press both main and left buttons and hold. The software version will appear for 5 seconds. RST will appear for the next 5 seconds. Release the buttons when all segments appear on the screen. The switch is now reset (see default settings in the menu flowchart).
Troubleshooting
The display is faded |
The ambient temperature is either below |
or irregular. |
or above switch’s operating temperature. |
|
|
The sunset or sunrise |
• The date or time is wrong |
time is inaccurate. |
(see section 5.2). |
•The longitude or latitude is wrong (see section 5.3.3).
•The correction factor is wrong (see section 5.3.4).
•You have entered an offset (see section 5.4.3).
Specifications
Supply: 120 VAC, 60 Hz
Maximum load: 1800 watts
Operating temperature range: -15 °C to 50 °C (5 °F to 122 °F)
Storage temperature range: -40 °C to 60 °C (-40 °F to 140 °F)
Power outage: The screen is blank. Only the time must be set if the outage lasts more than 4 hours; all other settings and programs are permanently saved.
Latitude range: from -65° to +65°
Solar table precision: +/- 11 min. (within ±60° latitude)
Certification: UL (c UL us)
Warranty
Honeywell warrants this product, excluding battery, to be free from defects in the workmanship or materials, under normal use and service, for a period of one (1) year from the date of purchase by the consumer. If at any time during the warranty period the product is determined to be defective or malfunctions, Honeywell shall repair or replace it (at Honeywell's option).
If the product is defective,
(i)return it, with a bill of sale or other dated proof of purchase, to the place from which you purchased it, or
(ii)call Honeywell Customer Care at 1-800-468-1502. Customer Care will make the determination whether the product should be returned to the following address: Honeywell Return Goods,
Dock 4 MN10-3860, 1885 Douglas Dr N, Golden Valley, MN 55422, or whether a replacement product can be sent to you.
This warranty does not cover removal or reinstallation costs. This warranty shall not apply if it is shown by Honeywell that the defect or malfunction was caused by damage which occurred while the product was in the possession of a consumer.
Honeywell's sole responsibility shall be to repair or replace the product within the terms stated above. HONEYWELL SHALL NOT BE LIABLE FOR ANY LOSS OR DAMAGE OF ANY KIND, INCLUDING ANY INCIDENTAL OR CONSEQUENTIAL DAMAGES RESULTING, DIRECTLY OR INDIRECTLY, FROM ANY BREACH OF ANY WARRANTY, EXPRESS OR IMPLIED, OR ANY OTHER FAILURE OF THIS PRODUCT. Some states do not allow the exclusion or limitation of incidental or consequential damages, so this limitation may not apply to you.
THIS WARRANTY IS THE ONLY EXPRESS WARRANTY HONEYWELL MAKES ON THIS PRODUCT. THE DURATION OF ANY IMPLIED WARRANTIES, INCLUDING THE WARRANTIES OF MERCHANTABILITY AND FITNESS FOR A PARTICULAR PURPOSE, IS HEREBY LIMITED TO THE ONE-YEAR DURATION OF THIS WARRANTY. Some states do not allow limitations on how long an implied warranty lasts, so the above limitation may not apply to you.
This warranty gives you specific legal rights, and you may have other rights which vary from state to state.
If you have any questions concerning this warranty, please write Honeywell Customer Relations, 1985 Douglas Dr, Golden Valley, MN 55422 or call 1-800-468-1502. In Canada, write Retail Products ON15-02H, Honeywell Limited/Honeywell Limitée, 35 Dynamic Drive, Scarborough, Ontario M1V4Z9.
Customer Assistance
If you have any questions about your light switch, go to http://yourhome.honeywell.com, or call Honeywell Customer Care toll-free at 1-800-468-1502.
RPLS740B/RPLS741B |
2/8 |
Applications
L’interrupteur mural programmable RPLS740B/RPLS741B a été conçu pour commander des appareils d’éclairage et des moteurs.
Types de charge |
Charge maximale |
Exemples |
||
Éclairages et charges |
|
• |
éclairage fluorescent |
|
1800 W |
• |
éclairage fluorescent compact |
||
résistives (sauf |
• |
ballasts électroniques |
||
(15 A à 120 V) |
||||
tungstène) |
• |
éclairage au sodium |
||
|
||||
|
|
• |
chauffe-moteur |
|
Éclairages tungstène |
1440 W |
• |
éclairage incandescent |
|
(12 A à 120 V) |
• |
éclairage halogène |
||
|
||||
Moteurs |
3/4 hp |
• |
pompes |
|
• |
ventilateurs |
|||
|
|
|||
Installation
NOTA : L’interrupteur ne peut être utilisé s’il n’y a pas de fil neutre (fils blancs reliés ensemble) dans la boite électrique.
Mettre le circuit hors tension à partir du disjoncteur afin d'éviter tout risque de choc électrique.
Enlever l’interrupteur existant.
Installer le nouvel interrupteur (voir la section appropriée ci-dessous).
Remettre le circuit sous tension à partir du disjoncteur.
|
noir |
|
blanc |
|
bleu (LOAD) |
|
blanc (NEUTRAL) |
|
noir (LINE) |
120 |
blanc |
Vca |
noir |
Démarrage rapide
Régler l’heure et la date avant d’utiliser l’interrupteur pour la première fois.
Le RPLS740B/RPLS741B allumera les lumières au coucher du soleil et les éteindra à 23h par défaut. Si ces réglages vous conviennent, vous n’avez qu’à régler l’heure et la date (voir la case grise dans la feuille de l’organigramme des menus). Si l’heure du coucher du soleil de l’interrupteur diffère de l’heure réelle du coucher du soleil, voir les sections 5.3.3 et 5.3.4.
Fonctionnement
Indique le mode de |
L’icône |
indique que le programme en |
|
cours a été activé au coucher du soleil. |
|||
fonctionnement (voir section 5.1) |
|||
L’icône |
indique que le programme |
||
Indique l’heure et le jour |
|||
en cours a été activé au lever du soleil. |
|||
Indique le programme en cours |
|||
Appuyer sur cette touche pour afficher |
|||
Indique l’état marche/arrêt |
|||
l’heure du lever du soleil d’aujourd’hui. |
|||
(On/Off) de la charge |
|||
Appuyer sur cette touche pour afficher |
|||
Appuyer brièvement sur cette |
|||
touche pour allumer ou éteindre |
l’heure du coucher du soleil d’aujourd’hui. |
||
les lumières. Voir “Dérogation |
Le témoin s’allume lorsque l’état |
||
temporaire” dans la section 5.1.4. |
|||
de la charge est à “Marche” (On). |
|||
Appuyer pendant 3 secondes |
|||
|
|
||
pour entrer dans les menus. |
|
|
|
RPLS740B/RPLS741B
Guide de l’utilisateur
Interrupteur mural programmable — solaire et 7 jours
Menus de réglage


 Appuyer sur la touche principale pendant 3 secondes pour entrer dans les menus. Consulter (3 sec.) la feuille de l’organigramme des menus pour savoir comment naviguer dans les menus.
5.1Menu Mode
Vous pouvez utiliser le menu Mode pour sélectionner l’un des trois modes de fonctionnement (voir les sections 5.1.1 à 5.1.3).
5.1.1 Mode Manuel 
En mode Manuel, le RPLS740B/RPLS741B fonctionne comme un interrupteur conventionnel.
Pour allumer ou éteindre les lumières, appuyer brièvement sur la touche principale. L’icône  apparaît lorsque l’interrupteur est en mode Manuel.
5.1.2 Mode Automatique 
En mode Automatique, le RPLS740B/RPLS741B allume et éteint les lumières selon les
programmes réglées (voir la section 5.4). L’icône  ainsi que le numéro du programme en cours sont affichés.
5.1.3 Mode Aléatoire 
En mode Aléatoire, le RPLS740B/RPLS741B n’a pas de moment précis pour allumer ou éteindre les lumières. Ce mode sert à donner l’impression que votre résidence est occupée pendant votre absence. Il est semblable au mode Automatique, sauf qu’il n’y a pas de programme fixe. Les programmes sont automatiquement réglés chaque jour par le RPLS740B/
RPLS741B à des heures différentes. L’icône  apparaît lorsque l’interrupteur est en mode Aléatoire.
Le premier programme « Marche » se produit au coucher du soleil. Chaque programme
« Marche » dure entre 1 heure et 1 heure et demie, et chaque programme « Arrêt » dure entre 15 et 30 minutes. Le dernier programme « Arrêt » se produit entre 22h30 et minuit.
5.1.4 Dérogation temporaire
Lorsque le RPLS740B/RPLS741B est en mode Automatique ou Aléatoire, vous pouvez, en tout temps, appuyer sur la touche principale pour déroger à l’état en cours; les lumières s’éteindront si elles sont allumées et vice versa. L’icône (On ou Off) du nouvel état clignote pour indiquer que l’état est temporaire. Le nouvel état est maintenu jusqu’à ce qu’on appuie de nouveau sur la touche principale ou jusqu’au prochain programme « Marche » (On) ou « Arrêt » (Off).
5.2Menu Heure (Time)
L’affichage de l’heure clignote à l’écran lorsque l’heure n’est pas encore réglée ou après une panne de courant de plus de 4 heures. Utiliser le menu Heure pour sélectionner le format d’heure (12 heures ou 24 heures) ainsi que pour régler l’horloge et la date.
NOTA : La date sert à déterminer l’heure du coucher du soleil et celle du lever du soleil.
5.3Menu Configuration (Conf)
Utiliser le menu Configuration pour régler les paramètres suivants (voir les sections 5.3.1 à 5.3.4).
5.3.1 Mode de rétroéclairage (SCRN)
L'écran est allumé à haute intensité pendant 8 secondes lorsque vous appuyez sur un bouton. Le reste du temps, selon le mode de rétroéclairage choisi, l'écran se comporte comme suit :
Scrn Off : L’écran n’est pas éclairé.
Scrn On HI : L’écran est éclairé à haute intensité.
Scrn On LO : L’écran est éclairé à basse intensité (mode par défaut).
5.3.2 Passage automatique à l’heure avancée (DLS)
Quand le passage automatique à l’heure avancée est activé (DLS On), le RPLS740B/RPLS741B passe à l’heure avancée (heure d'été) à 2h le deuxième dimanche de mars et passe à l’heure normale (heure d'hiver) à 2h le premier dimanche de novembre. La fonction est activée (DLS On) par défaut.
5.3.3 Latitude et longitude (LAT et LONG)
Les coordonnées servent à allumer les lumières au coucher du soleil et les éteindre au lever du soleil. Par défaut, la latitude est à +45 et la longitude est à -75. Ces réglages offrent des heures approximatives de cou-
RPLS740B/RPLS741B |
3/8 |
 Loading...