


HRDP DVR
Performance Series
Digital Recording and Transmission System
User Guide
______________________________________________________________________________________________
Document 800-02089 Rev B 06/08
Warnings and Safeguards
______________________________________________________________________________________________
2

Performance Series DVR User Guide
Revisions
Issue |
Date |
Revisions |
|
|
|
A |
05/08 |
Initial Release |
|
|
|
B |
06/08 |
Updated remote control image |
|
|
|
______________________________________________________________________________________________
Document 800-02089 Rev B 3 06/08
Warnings and Safeguards
______________________________________________________________________________________________
4

Performance Series DVR User Guide
Warnings and Safeguards
FCC STATEMENT
This equipment has been tested and found to comply with the limits for a Class A digital device, pursuant to Part 15 of the FCC Rules. These limits are designed to provide reasonable protection against harmful interference when the equipment is operated in a commercial environment. This equipment generates, uses, and can radiate radio frequency energy and, if not installed and used in accordance with the instruction manual, may cause harmful interference to radio communications. Operation of this equipment in a residential area is likely to cause harmful interference in which case the user will be required to correct the interference at his own expense.
EN 55022 Class A Notice
WARNING
This is a class A product. In a domestic environment this product may cause radio interference in which case the user may be required to take adequate measures.
______________________________________________________________________________________________
Document 800-02089 Rev B |
5 |
06/08

Warnings and Safeguards
Important Safeguards
1.Read Owner’s Manual – After unpacking this product, read the owner’s manual carefully, and follow all the operating and other instructions.
2.Power Sources – This product should be operated only from the type of power source indicated on the label. If not sure of the type of power supply to your home or business, consult product dealer or local power company
3.Ventilation – Slots and openings in the cabinet are provided for ventilation and to ensure reliable operation of the product and to protect it from overheating, and these openings must not be blocked or covered. The product should not be placed in a built-in installation such as a bookcase or rack unless proper ventilation is provided or Honeywell’s instructions have been adhered to.
4.Heat – The product should be situated away from heat sources such as radiators, heat registers, stoves, or other products that produce heat.
5.Water and Moisture – Do not use this product near water. Do not exceed the humidity specifications for the product as detailed in this manual
6.Cleaning – Unplug this product from the wall outlet before cleaning. Do not use liquid cleaners or aerosol cleaners. Use a damp cloth for cleaning.
7.Power Cord Protection – Power-supply cords should not be routed so that they are likely to be walked on or pinched by items placed against them, paying particular attention to cords at plugs, receptacles, and the point where they exit the product.
8.Overloading – Do not overload wall outlets; extension cords, or integral convenience receptacles as this can result in a risk of fire or electrical shock.
9.Lightning – For added protection for this product during storm, or when it is left unattended and unused for long periods of time, unplug it from the wall outlet. This will prevent damage to the product due to lightning and power line surges.
10.Object and Liquid Entry Points – Never insert foreign objects into the DVR, other than the media types approved by Honeywell, as they may touch dangerous voltage points or short-out parts that could result in a fire or electrical shock. Never spill liquid of any kind on the product.
11.Accessories – Do not place this product on an unstable cart, stand, tripod, bracket, or table. The product may fall, causing serious personal injury and serious damage to the product.
12.Disc Tray – Keep fingers well clear of the disc tray as it is closing. Neglecting to do so may cause serious personal injury.
13.Burden – Do not place a heavy object on or step on the product. The object may fall, causing serious personal injury and serious damage to the product.
14.Disc – Do not use a cracked, deformed, or repaired disc. These discs are easily broken and may cause serious personal injury and product malfunction.
15.Fuses - CAUTION: For continued protection against risk of fire, replace only with same type and rating of fuse.
______________________________________________________________________________________________
6
Performance Series DVR User Guide
16.Replaceable Batteries - CAUTION: Risk of Risk of Explosion if Battery is replaced by an Incorrect Type. Dispose of Used Batteries According to the Instructions
17.Grounded Outlet - This equipment shall be connected to a properly grounded outlet."
18.Outlet Location – This equipment must be installed within six feet of an easily accessible outlet.
19.Damage Requiring Service – Unplug the unit from the outlet and refer servicing to qualified service personnel under the following conditions:
When the power-supply cord or plug is damaged.
If liquid has been spilled, or objects have fallen into the unit. If the unit has been exposed to rain or water.
If the unit does not operate normally by following the operating instructions. Adjust only those controls that are covered by the operating instructions as an improper adjustment of other controls may result in damage and will often require extensive work by a qualified technician to restore the unit to its normal operation.
If the unit has been dropped or the enclosure has been damaged.
When the unit exhibits a distinct change in performance - this indicates a need for service.
20.Servicing – Do not attempt to service this product. Opening or removing covers may expose the user to dangerous voltage or other hazards. Refer all servicing to qualified personnel.
21.Replacement Parts – When replacement parts are required, be sure the service technician has used replacement parts specified by Honeywell. Unauthorized substitutions may result in fire, electric shock or other hazards.
22.Safety Check – Upon completion of any service or repairs to this unit, ask the service technician to perform safety checks to determine that the unit is in proper operating condition.
______________________________________________________________________________________________
Document 800-02089 Rev B |
7 |
06/08

Warnings and Safeguards
Notes on Handling
Please retain the original shipping carton and/or packing materials supplied with this product. To ensure the integrity of this product when shipping or moving, repackage the unit as it was originally received from Honeywell.
Do not use volatile liquids, such as aerosol spray, near this product. Do not leave rubber or plastic objects in contact with this product for long periods of time. They will leave marks on the finish.
The top and rear panels of the unit may become warm after long periods of use. This is not a malfunction.
Notes on Locating
Place the unit on a level surface. Do not use it on a shaky or unstable surface such as a wobbling table or inclined stand.
If this unit is placed next to a TV, radio, or VCR, the playback picture may become poor and the sound may be distorted. If this happens, place the DVR away from the TV, radio, or VCR.
Notes on Cleaning
Use a soft dry cloth for cleaning.
For stubborn dirt, soak the cloth in a weak detergent solution, wring well and wipe. Use a dry cloth to wipe it dry. Do not use any type of solvent, such as thinner and benzene, as they may damage the surface of the DVR.
If using a chemical saturated cloth to clean the unit, follow that product’s instructions.
Notes on Maintenance
This DVR is designed to last for long periods of time. To keep the DVR always operational we recommend regular inspection maintenance (cleaning parts or replacement). For details contact the nearest dealer.
______________________________________________________________________________________________
8

Performance Series DVR User Guide
Notes on Moisture Condensation
Moisture condensation could damage the DVR. Read the following information carefully. Moisture condensation might occur under the following circumstances:
When this product is brought directly from a cool location to a warm location. When this product is moved to a hot and humid location from a cool location. When this product is moved to a cool and humid location from a warm location. When this product is used in a room where the temperature fluctuates.
When this product is used near an air-conditioning unit vent When this product is used in a humid place.
Do not use the DVR when moisture condensation may occur.
If the DVR is used in such a situation, it may damage discs and internal parts. Remove any CD discs, connect the power cord of the DVR to the wall outlet, turn on the DVR, and leave it for two to three hours. After two to three hours, the DVR will warm up and evaporate any moisture. Keep the DVR connected to the wall outlet and moisture will seldom occur.
Safety Instructions – Rack Mount
A)Elevated Operating Ambient – If installed in a closed or multi-unit rack assembly, the operating ambient temperature of the rack environment may be greater than room ambient. Therefore, consideration should be given to installing the equipment in an environment compatible with the maximum ambient temperature (Tma) specified by the manufacturer.
B)Reduced Air Flow – Installation of the equipment in a rack should be such that the amount of air flow required for safe operation of the equipment is not compromised.
C)Mechanical Loading – Mounting of the equipment in the rack should be such that a hazardous condition is not achieved due to uneven mechanical loading.
D)Circuit Overloading - Consideration should be given to the connection of the equipment to the supply circuit and the effect that overloading of the circuits might have on overcurrent protection and supply wiring. Appropriate consideration of equipment nameplate ratings should be used when addressing this concern.
E)Reliable Earthing - Reliable earthing of rack-mounted equipment should be maintained. Particular attention should be given to supply connections other than direct connections to the branch circuit (e.g. use of power strips)."
______________________________________________________________________________________________
Document 800-02089 Rev B |
9 |
06/08
Warnings and Safeguards
WARNING
TO REDUCE THE RISK OF ELECTRICAL SHOCK, DO NOT EXPOSE THIS
APPLIANCE TO RAIN OR MOISTURE.
DANGEROUS HIGH VOLTAGES ARE PRESENT INSIDE THE ENCLOSURE.
DO NOT OPEN THE CABINET.
REFER SERVICING TO QUALIFIED PERSONNEL ONLY.
CAUTION
C A U T I O N
RISK OF ELECTRIC SHOCK
DO NOT OPEN
CAUTION: TO REDUCE THE RISK OF ELECTRIC SHOCK,
DO NOT REMOVE COVER (OR BACK).
NO USER-SERVICEABLE PARTS INSIDE.
REFER SERVICING TO QUALIFIED SERVICE PERSONNEL.
______________________________________________________________________________________________
10
Performance Series DVR User Guide
Contents |
|
|
1 |
Warnings and Safeguards .............................................................................................................. |
5 |
2 |
Contents ........................................................................................................................................ |
11 |
3 |
Introduction................................................................................................................................... |
15 |
|
Product Description .......................................................................................................... |
15 |
|
Features ............................................................................................................................ |
16 |
|
PTZ Compatibility List ....................................................................................................... |
17 |
|
Quick Start Guide.............................................................................................................. |
18 |
|
Logging In for the First Time............................................................................................. |
18 |
4 |
Installation..................................................................................................................................... |
19 |
|
Front Panel Controls ......................................................................................................... |
19 |
|
Rear Panel Connectors..................................................................................................... |
20 |
|
4 Channel................................................................................................................... |
20 |
|
8 Channel................................................................................................................... |
21 |
|
16 Channel................................................................................................................. |
21 |
|
Remote Control................................................................................................................. |
22 |
|
Connection Guide............................................................................................................. |
23 |
|
Connecting the Monitor............................................................................................. |
23 |
|
Video Inputs and Looping Outputs ........................................................................... |
23 |
|
Connecting to a Network........................................................................................... |
23 |
|
Connecting Audio...................................................................................................... |
23 |
|
Connecting a PTZ Camera........................................................................................ |
24 |
|
Connecting to a Sensor Input ................................................................................... |
24 |
|
Connecting to a Relay Output................................................................................... |
24 |
|
Installing the Rackmount Kit (optional) ............................................................................ |
25 |
|
Turning on the DVR........................................................................................................... |
25 |
5 |
Setup ............................................................................................................................................. |
27 |
|
Setup Menus..................................................................................................................... |
27 |
|
System .............................................................................................................................. |
28 |
|
System Configuration ................................................................................................ |
28 |
|
Setup Wizard ............................................................................................................. |
29 |
|
Disk Configuration ..................................................................................................... |
30 |
______________________________________________________________________________________________ |
||
Document 800-02089 Rev B |
11 |
|
06/08
Contents |
|
Format ................................................................................................................ |
30 |
Overwrite ............................................................................................................ |
31 |
Check ................................................................................................................. |
31 |
SMART Check .................................................................................................... |
32 |
User Configuration..................................................................................................... |
33 |
Server ................................................................................................................. |
33 |
Client................................................................................................................... |
34 |
Configuration ............................................................................................................. |
35 |
Shutdown................................................................................................................... |
35 |
Camera.............................................................................................................................. |
35 |
Camera Configuration ............................................................................................... |
35 |
Color Setup (Adjust)........................................................................................... |
36 |
PTZ Configuration...................................................................................................... |
36 |
Spot / Sequence Configuration................................................................................. |
37 |
Monitor Configuration................................................................................................ |
38 |
Record............................................................................................................................... |
39 |
Record Configuration ................................................................................................ |
39 |
Frame.................................................................................................................. |
39 |
Schedule............................................................................................................. |
40 |
Audio .................................................................................................................. |
40 |
Instant Recording ............................................................................................... |
41 |
Using Instant Recording ............................................................................. |
41 |
Motion/Event Configuration....................................................................................... |
42 |
Input.................................................................................................................... |
42 |
Setting Up Motion Detection Recording ............................................................ |
43 |
Sensor ................................................................................................................ |
44 |
Action.................................................................................................................. |
45 |
Alarm Monitor ..................................................................................................... |
45 |
Network ............................................................................................................................. |
46 |
Network Configuration............................................................................................... |
46 |
Serial Configuration ................................................................................................... |
47 |
Client Configuration................................................................................................... |
48 |
E-mail Configuration .................................................................................................. |
49 |
Information ........................................................................................................................ |
50 |
System Log View ....................................................................................................... |
50 |
Status View ................................................................................................................ |
50 |
Version View .............................................................................................................. |
51 |
6 Operation....................................................................................................................................... |
52 |
Search ............................................................................................................................... |
52 |
Searching Recorded Data ......................................................................................... |
52 |
Search Methods ........................................................................................................ |
53 |
Express Search .................................................................................................. |
53 |
Event Search ...................................................................................................... |
53 |
Daylight Savings Search .................................................................................... |
53 |
Go To First.......................................................................................................... |
54 |
Go To Last .......................................................................................................... |
54 |
______________________________________________________________________________________________
12
Performance Series DVR User Guide |
|
Go To Jump........................................................................................................ |
54 |
Search Details............................................................................................................ |
54 |
Search Popup Menu.................................................................................................. |
54 |
Monitoring ......................................................................................................................... |
55 |
Select Channel .......................................................................................................... |
55 |
Live Popup Menu....................................................................................................... |
56 |
Backup (Export) ................................................................................................................ |
57 |
Manual Export............................................................................................................ |
57 |
Play Back Backup Image.................................................................................................. |
58 |
S/W Upgrade..................................................................................................................... |
58 |
Save Settings .................................................................................................................... |
59 |
Save Settings............................................................................................................. |
59 |
Import Settings .......................................................................................................... |
59 |
PTZ Camera Control ......................................................................................................... |
60 |
Create PTZ Preset Position ....................................................................................... |
60 |
7 Remote Software........................................................................................................................... |
62 |
Set Up a Remote Connection........................................................................................... |
62 |
Configuring the DVR.................................................................................................. |
62 |
Configuring a Remote PC.......................................................................................... |
63 |
Default Remote Software Log In Information..................................................... |
63 |
Access Remote Connection ............................................................................................. |
64 |
Using the Remote Software.............................................................................................. |
64 |
Setting the Time and Date......................................................................................... |
64 |
Live View Screen ....................................................................................................... |
65 |
Camera View ...................................................................................................... |
66 |
Screen Division Buttons ..................................................................................... |
67 |
Setup Overview.......................................................................................................... |
68 |
Setup Screen Overview...................................................................................... |
68 |
Camera Setup .................................................................................................... |
68 |
Camera Setup ............................................................................................. |
68 |
PanTilt Setup............................................................................................... |
68 |
Sequence Setup ......................................................................................... |
69 |
SPOT Setup ................................................................................................ |
69 |
Record Setup ..................................................................................................... |
69 |
Time Setup .................................................................................................. |
69 |
Schedule Setup........................................................................................... |
70 |
Audio Setup ................................................................................................ |
70 |
Motion / Event Input.................................................................................... |
70 |
HDD Setup .................................................................................................. |
71 |
Sensor Setup...................................................................................................... |
71 |
Sensor ......................................................................................................... |
71 |
System Setup ..................................................................................................... |
72 |
User Management....................................................................................... |
72 |
Firmware Upgrade ...................................................................................... |
72 |
______________________________________________________________________________________________ |
|
Document 800-02089 Rev B |
13 |
06/08
Contents |
|
Search Overview........................................................................................................ |
73 |
Play Controls ...................................................................................................... |
74 |
Performing a Basic Search ................................................................................ |
74 |
Adjust the Brightness of an Image..................................................................... |
74 |
Zooming in on an Image.................................................................................... |
74 |
Zooming in on a Portion of an Image ................................................................ |
75 |
Printing an Image ............................................................................................... |
75 |
Save Clip ............................................................................................................ |
75 |
Saving a Video Clip..................................................................................... |
76 |
Status Search ............................................................................................................ |
77 |
Performing a Status Search ............................................................................... |
77 |
PTZ Overview............................................................................................................. |
78 |
Accessing PTZ Menus ....................................................................................... |
78 |
Controlling a PTZ Camera.................................................................................. |
78 |
Using the Graphical PTZ Controller................................................................... |
79 |
Using the On-screen Compass.......................................................................... |
80 |
Web Viewer Overview ....................................................................................................... |
81 |
Connecting to a DVR Using Web Viewer .................................................................. |
82 |
Closing the Web Viewer ............................................................................................ |
82 |
Digital Verifier Overview .................................................................................................... |
83 |
Using the Digital Verifier ............................................................................................ |
83 |
8 Appendix ....................................................................................................................................... |
84 |
DVR FAQ ........................................................................................................................... |
84 |
General ...................................................................................................................... |
84 |
Live Monitoring .......................................................................................................... |
84 |
Recording .................................................................................................................. |
84 |
Searching and Playing Video .................................................................................... |
85 |
Backup....................................................................................................................... |
85 |
Network...................................................................................................................... |
85 |
Miscellaneous............................................................................................................ |
85 |
Troubleshooting................................................................................................................ |
86 |
Specifications (HRDP) ...................................................................................................... |
87 |
______________________________________________________________________________________________
14
Performance Series DVR User Guide
Introduction
Product Description
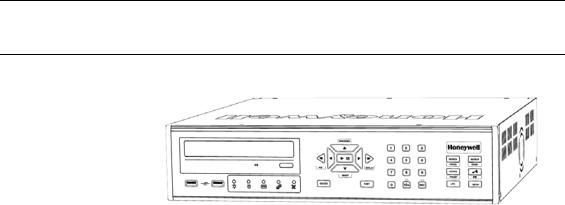
Honeywell’s HRDP Performance Series DVR is a powerful, yet affordable, video management solution designed for easy installation and operation. Preconfigured for continuous recording, with no additional setup required, the Performance Series DVR offers quick search, setup, and backup features.
The Honeywell Embedded DVR comes ready for fast and seamless integration within your existing IT infrastructure. The HRDP offers unparalleled stability, security, and ease of use in a 2U chassis. Accordingly, your security investment has never been easier to maintain. Multiple users may connect through digital networks such as LANs and WANs for simultaneous live viewing, and digital search. This powerful software enables users to view live video, perform searches, and operate PTZ cameras. It also provides system users and administrators with additional capabilities such as establishing recording schedules, and creating motion detection zones. With the latest advancements in the Performance Series DVR software, searching and indexing your video archive has never been easier.
______________________________________________________________________________________________
Document 800-02089 Rev B |
15 |
06/08

Introduction
Features
The Honeywell Performance Series DVRs include the following features:
•4 /8 / 16 Composite Video Input Connectors
•Compatible with Color (NTSC or PAL) and B&W Video Sources
•Multiple Search Methods (Date/Time, Calendar, Event)
•Records 120 NTSC Images Per Second / 100 PAL Images Per Second
•Live Real Time Video Display (480 NTSC Images Per Second / 400 PAL Images Per Second)
•4 /8 / 16 Looping Video Outputs
•Auto Termination (75 Ohm) on Looping Outputs
•Continuous Recording with Disk Overwrite Mode
•Continuous Recording on Archiving, Transmitting to Remote, and Playback
•Motion Based Recording Uniquely Configurable for Each Channel
•Customizable Motion Detection Grids Uniquely Configurable for Each Channel
•Multiple Recording Modes (Manual / Schedule / Event)
•Audio (Mono) Recording and Playback
•4 / 8 / 16 Built in Sensor Inputs (Normally Open or Normally Closed)
•1 / 4 (16 Channel DVR only) Built in Relay Outputs (Normally Open or Normally Closed)
•Remote Access via Ethernet and/or Modem
•PTZ Camera Control
•Internal DVD-RW supports CD-RW and DVD-RW media
______________________________________________________________________________________________
16

Performance Series DVR User Guide
PTZ Compatibility List
The Honeywell Performance Series DVRs support a wide selection of PTZ camera protocols:
Honeywell MAXPRO |
HMC-250 |
Honeywell VCL |
HSCP |
Honeywell (GC-655P) |
Inter-M (VRX-2101) |
Honeywell (HSD-250) |
Inter-M (VSD-640) |
Honeywell (HSD-251) |
LG (LPT-A100L) |
American Dynamics |
LG (LVC-A70x s) |
OpenEye 500 |
LG SpeedDome |
OpenEye 510 |
Merit Li-Lin |
OpenEye – Pelco D |
Merit Li-Lin V6 |
AcutVista |
NVCC-Z42N |
AlfaVision |
NICE CAM |
KalatelDome |
NIKO |
Cynix Speed Dome |
Pelco-D |
CoVi EVQ-1000 |
Pelco-P |
CRR-1600I |
PIH-7600 |
DMP23-H2 |
SAE |
Dongyang |
Samsung (SCC-C420X) |
DRX-500 |
Samsung (DVR-502A) |
DRX-502A |
Samsung (MRX-1000) |
DS120 |
Samsung (SCC-641) |
DSC-230/240 |
Samsung (SPD-1600) |
DY-255RXB |
Sensormatic |
DynaColor |
Sungjin |
ERNA Tech |
Tamron |
EyeView Dome |
Toshiba |
FastraxII |
ViconSpeedDome |
FilTech (DSC-230/PT-201) |
Visiontech |
Focvision |
WONWOO |
Ganz-PT |
WSD-7425D |
______________________________________________________________________________________________
Document 800-02089 Rev B 17 06/08

Introduction
Quick Start Guide
1.Turn on the DVR. See the Turning on the DVR section for more details.
2.Log in -- Use the number buttons to enter the password when prompted – The password is <none> – Press ENTER.
3.Complete System Configuration to set up the date, time and system ID. See the System Configuration section for more details.
4.Complete Sensor Configuration to enable any external devices connected to sensor inputs or relay outputs. See the Motion/Event Configuration section for more details.
5.Complete Disk Configuration to set overwrite options and enable SMART Check. See the Disk Configuration section for more details.
6.Complete User Configuration to change the Admin password and add additional users. See the System >User Configuration section for more details.
7.Complete Camera Configuration for all attached cameras. See the Camera Configuration section for more detail.
8.Complete PTZ Configuration for any attached Pan / Tilt / Zoom cameras. See the PTZ Configuration section for more details.
9.Create a recording schedule. See the Record section for more details.
10.Complete Motion/Event Configuration to trigger recording on an event: motion, sensor, video loss. See the Motion/Event Configuration section for more details.
11.The DVR is now configured to record, search and playback video. See the Operations section in this manual for more information on using the DVR.
Logging In for the First Time
The default administrative log in information:
ID: admin
Password: <none>
______________________________________________________________________________________________
18
Performance Series DVR User Guide
Installation
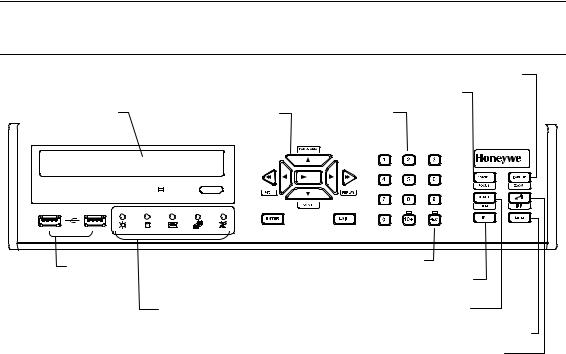
Front Panel Controls
Backup Menu
Search Mode
|
|
DVD Drive |
Arrow Buttons |
Numeric Keypad |
||||
|
|
|
|
|
|
|
|
|
|
|
|
|
|
|
|
|
|
|
|
|
|
|
|
|
|
|
|
|
|
|
|
|
|
|
|
|
|
|
|
|
|
|
|
|
|
|
|
|
|
|
|
|
|
|
|
|
|
|
|
|
|
|
|
|
|
|
|
|
|
|
|
USB Ports |
LED Lights |
Instant Record |
|
Live Display |
|||
|
• Power |
||
|
|
||
|
• HDD |
Rotate |
|
|
• Record |
||
|
|
||
|
• Network |
Setup Menu |
|
|
• Fan |
Lock (logout) |
______________________________________________________________________________________________
Document 800-02089 Rev B |
19 |
06/08
Installation
Rear Panel Connectors
The rear panel of the DVR contains virtually all of the connectors you will be using. The diagrams below outline the location and description of each connector:
4 Channel
Sensor Input |
Video Out Ports |
||||||||||
Relay Output |
Video In Ports |
||||||||||
|
|
|
|
|
|
|
|
|
|
|
|
|
|
|
|
|
|
|
|
|
|
|
|
|
|
|
|
|
|
|
|
|
|
|
|
|
|
|
|
|
|
|
|
|
|
|
|
OUT
IN
AC Power Input |
Spot Monitor Outputs |
|
|
Power Switch |
Audio Input / Output |
|
|
|
VGA Output |
Network Port |
RS-232 Input |
|
______________________________________________________________________________________________
20

|
Performance Series DVR User Guide |
8 Channel |
|
Sensor Input |
Video Out Ports |
Relay Output |
Video In Ports |
|
|
|
OUT |
|
IN |
AC Power Input |
Spot Monitor Outputs |
|
|
Power Switch |
Audio Input / Output |
|
|
|
VGA Output |
Network Port |
RS-232 Input |
|
|
16 Channel |
|
|
Video Out Ports |
Primary and Spot Monitor Outputs |
Video In Ports |
OUT
IN
|
|
|
|
|
|
S-Video Output |
Relay Output |
|
Power Switch |
|
|
|
|||
|
|
|
|
||||
|
|
|
|
||||
|
|
|
|
Audio Output |
|
||
|
|
|
|
|
|
Sensor Input |
|
AC Power Input |
|
Audio Input |
|||||
|
|
||||||
|
|
|
|
VGA Output |
|
||
|
|
Network Port |
|
RS-232 Input |
|
||
|
|
|
|
|
|||
______________________________________________________________________________________________
Document 800-02089 Rev B |
21 |
06/08
Installation
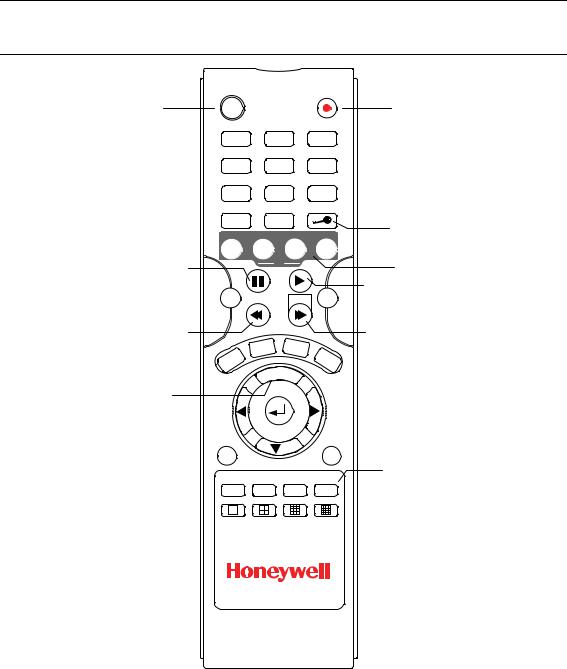
Remote Control
ID Select* |
ID |
1
4
7
+10
ZOOM
Pause
-30
Rewind
|
|
P |
|
U |
|
T |
|
|
E |
|
|
S |
|
|
S Arrow / Panorama
W Arrow
ENTER
REC
Record Toggle
2 3
5 6
8 9
0
Log Off (Lock)
FOCUS IRIS PRESET
|
|
PTZ |
|
PTZ Controls |
|
|
|
|
|
|
|
|
|
Play |
|
|
|
REPL AY +30 |
|
|
|
|
SEAR |
Fast Forward |
K |
|
|
||
BAC |
UP |
|
|
CH |
|
|
|
||
|
|
|
|
LI |
|
|
|
|
V |
|
|
|
|
E |
 P
P
 X Arrow
EXI T
S
Display Options
ROTATE ALARM OSD PTZ
*The ID Select button allows you to use one remote control for several DVRs.
______________________________________________________________________________________________
22

Performance Series DVR User Guide
Connection Guide
Connecting the Monitor
There are three available monitor outputs on the Performance Series DVR.
•Composite Monitor output for CCTV monitor – BNC (Marked MAIN)
•VGA output for VGA monitor – Mini-Sub D15
•S-Video output - Mini-Din 4 (16 Channel only)
Video Inputs and Looping Outputs
The Performance Series DVR comes with up to 16 BNC video inputs on the rear of its chassis. Each video input has a corresponding looping BNC output beneath it for passing the video signal to another monitoring/recording device.
Connecting to a Network
Use the RJ45 jack or RS232 port, if using a serial modem, on the rear of the
DVR when connecting to a network.
RJ45 |
RS232 |
Connecting Audio
To record audio on the DVR connect the audio source to the Audio In Port (White) on the back of the chassis.
To listen to live or recorded audio connect the Audio Out Port (Red) to an amplified speaker system.
Note The DVR audio output is a line level source which requires an amplified speaker system. The audio input can be from an amplified source or directly from a microphone.
______________________________________________________________________________________________
Document 800-02089 Rev B |
23 |
06/08
Installation
Connecting a PTZ Camera
The RS485 connector can be used to control Pan / Tilt / Zoom (PTZ) cameras. See the PTZ camera manufacturer’s manual for configuring the RS485 connection.
Note Use the RS485 connector for external control systems such as a control keyboard. Connect RX-/TX- and RX+/TX+ of the control system to the TX-/RX- and TX+/RX+ (respectively) of the DVR.
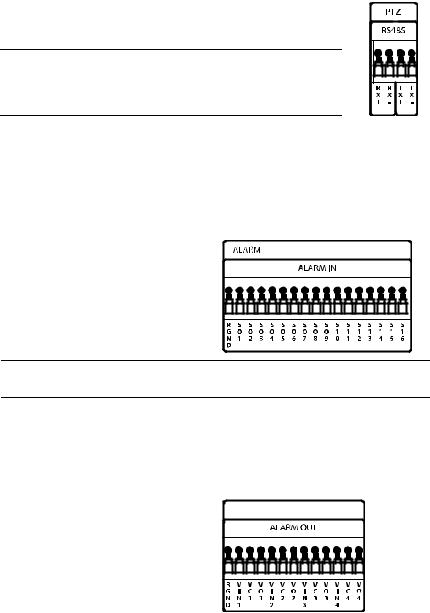
Connecting to a Sensor Input
To make connections on the Alarm Connector Strip, press and hold the button and insert the wire into the hole above the button. To disconnect the wire press and hold the button below the wire and pull out
Alarm In
Use external devices to send a signal to the DVR when an event occurs. Mechanical or electrical switches can be wired to the Alarm In and Ground (GND) connectors.
Note All connectors marked GND are common. Connect the ground side of the alarm input and/or alarm output to the GND connector.
Connecting to a Relay Output
To make connections on the Alarm Connector Strip, press and hold the button and insert the wire into the hole above the button. To disconnect the wire press and hold the button below the wire and pull out.
Alarm Out
The DVR can activate external devices such as buzzers or lights. Connect the external device to the Alarm Out and Ground (GND) connectors. See Sensor Configuration in the manual for more details.
______________________________________________________________________________________________
24

Performance Series DVR User Guide
Installing the Rackmount Kit (optional)
Caution There must be a minimum 1U space between the DVR and any other items in the rack.
1.Attach the rackmount brackets with the screws provided on each side of the DVR. Do not remove the plastic edge guards.
2.Mount the DVR in your rack.
Turning on the DVR
1.Connect the power cable.
2.Connect camera cables.
3.Connect a network cable and a monitor cable.
4.Switch the power switch on the back of the DVR to the ON position and wait until the main screen is displayed on the connected monitor; this process will take approximately two minutes.
Tip See the Connection Guide section for more details
______________________________________________________________________________________________
Document 800-02089 Rev B |
25 |
06/08
Installation
NOTES:
______________________________________________________________________________________________
26
Performance Series DVR User Guide
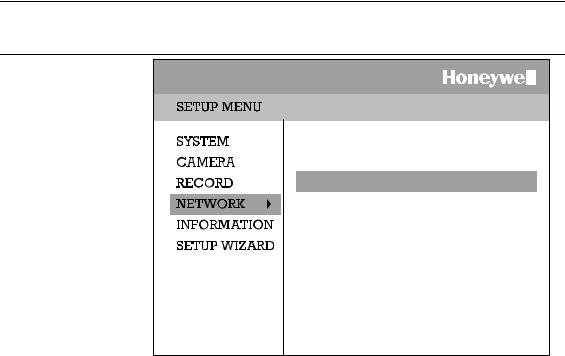
Setup
Setup Menus
NETWORK CONFIGURATION
SERIAL CONFIGURATION
CLIENT CONFIGURATION
E-MAIL CONFIGURATION
Use the setup menus to configure all of the DVR settings, schedule recording, networking and shutdown.
Press the Setup key on the front of the DVR or remote control to enter the setup menus and log in. See the Quick Start Guide section if entering setup for the first time. Use the S and T keys on the front of the DVR or remote control to navigate individual menus, and use the W and X keys to select a new setup menu.
______________________________________________________________________________________________
Document 800-02089 Rev B |
27 |
06/08
 Loading...