


OPERATOR’S MANUAL
MANUEL D’UTILISATION
MANUAL DEL OPERADOR
7.2 VOLT Shrubber
CISAILLES DE 7,2 V
CORTADORA DE ARBUSTOS DE 7,2 V
UT44171
Your shrubber has been engineered and manufactured to our high standard for dependability, ease of operation, and operator safety. When properly cared for, it will give you years of rugged, trouble-free performance.
 WARNING: To reduce the risk of injury, the user must read and understand the operator’s manual before using this product.
Thank you for your purchase.
SAVE THIS MANUAL FOR FUTURE REFERENCE
Ce cisailles a été conçu et fabriqué conformément à nos strictes normes de fiabilité, simplicité d’emploi et sécurité d’utilisation. Correctement entretenu, cet outil vous donnera des années de fonctionnement robuste et sans problème.
 AVERTISSEMENT : Pour réduire les risques de blessures, l’utilisateur doit lire et veiller à bien comprendre le manuel d’utilisation avant d’employer ce produit.
Su cortadora de arbustos ha sido diseñado y fabricado de conformidad con nuestras estrictas normas para brindar fiabilidad, facilidad de uso y seguridad para el operador. Con el debido cuidado, le brindará muchos años de sólido funcionamiento y sin problemas.
 ADVERTENCIA: Para reducir el riesgo de lesiones, el usuario debe leer y comprender el manual del operador antes de usar este producto.
Merci de votre achat. |
Le agradecemos su compra. |
CONSERVER CE MANUEL POUR |
|
GUARDE ESTE MANUAL PARA |
FUTURE RÉFÉRENCE |
|
FUTURAS CONSULTAS |
See this fold-out section for all the figures referenced in the operator’s manual.
Voir que cette section d’encart pour toutes les figures a adressé dans le manuel d’utilisation.
Vea esta sección de la página desplegable para todas las figuras mencionó en el manual del operador.
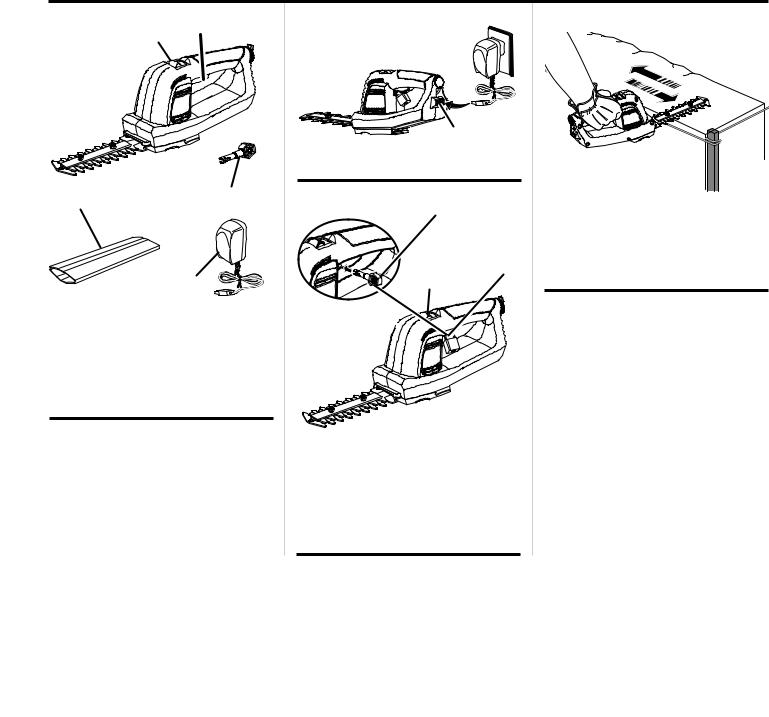
Fig. 1
B a
C D
E
A - Switch trigger (gâchette, gatillo del interruptor)
B - Lock-out button (bouton de verrouillage, botón de seguro)
C - Scabbard (fourreau, funda)
D - Lock-out pin (goupille de verrouillage, pasador de seguridad)
E - Charger (chargeur, cargador)
Fig. 2
a
A - Charger input jack (connecteur d’entrée du chargeur, enchufe de entrada del cargador)
Fig. 3
C
a
B
OR
(ou, o) 
A - Switch trigger with padlock (padlock not included) [gâchette avec cadenas (non compris), gatillo del interruptor con la condado (condado no viene incluido)]
B - Lock-out button (bouton de verrouillage, botón de seguro)
C - Lock-out pin (goupille de verrouillage, pasador de seguridad)
Fig. 4
PROPER OPERATING POSITION BONNE POSITION DE TRAVAIL
POSICIÓN CORRECTA PARA EL MANEJO
DE LA HERRAMIENTA
ii

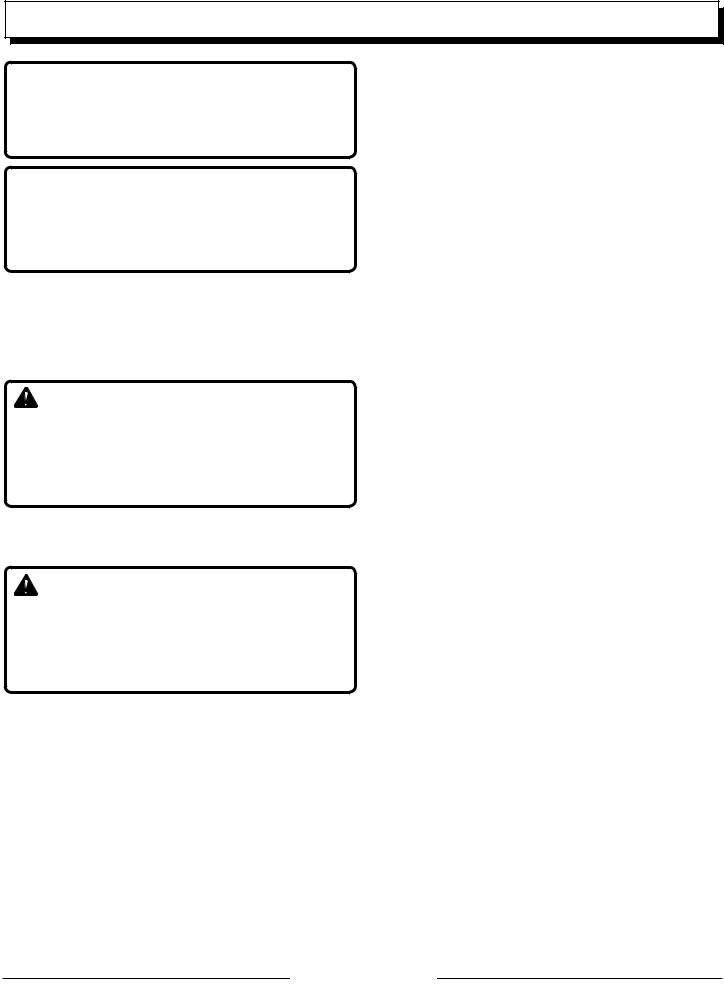
Fig. 5
OR
(ou, o)
a |
B |
d
C
e
A - Switch trigger with padlock (padlock not included) [gâchette avec cadenas (non compris), gatillo del interruptor con la condado (condado no viene incluido)]
B - Switch trigger with lock-out pin (gâchette avec goupille de verrouillage, gatillo del interruptor pasador de seguridad)
C - Bottom cover (couvercle inférieur, tapa inferior) D - Latch (loquet, broche)
E - Blade (lame, hoja)
Fig. 6
Fig. 7
A 

B 


E 


 C
C
D
A - Screws (vis, tornillos)
B - Motor housing cover (carter du moteur, cubierta de la caja del motor)
C - Battery pack (bloc de batteries, paquete de pilas)
D - Leads (fils, conductores)
E - Wire cutters with rubber coated or insulated handles (coupe-fils doté d’un revêtement en caoutchouc ou de poignées isolées, fresas de alambre con mangos revestidos de hule o aislados)
Fig. 8 |
a |
A - Scabbard (fourreau, funda)

TABLE OF CONTENTS
TABLE DES MATIÈRES / ÍNDICE DE CONTENIDO
Introduction....................................................................................................................................................................... |
2 |
Introduction / Introducción |
|
Important Safety Instructions......................................................................................................................................... |
3-4 |
Instructions importantes concernant la sécurité / Instrucciones de seguridad importantes |
|
Specific Safety Rules........................................................................................................................................................ |
5 |
Règles de sécurité concernant le chargeur / Reglas de seguridad para el empleo del cargador |
|
Safety Rules for Charger................................................................................................................................................... |
6 |
Symboles / Símbolos |
|
Symbols............................................................................................................................................................................ |
7 |
Symboles / Símbolos |
|
Features............................................................................................................................................................................ |
8 |
Caractéristiques / Características |
|
Assembly........................................................................................................................................................................ |
8-9 |
Assemblage / Armado |
|
Operation..................................................................................................................................................................... |
9-10 |
Utilisation / Funcionamiento |
|
Maintenance............................................................................................................................................................... |
11-12 |
Entretien / Mantenimiento |
|
Illustrated Parts List........................................................................................................................................................ |
13 |
Liste des pièces illustrées / lista de piezas ilustradas |
|
Warranty.......................................................................................................................................................................... |
14 |
Garantie / Garantía |
|
Parts Ordering and Service................................................................................................................................ |
Back Page |
Commande de pièces et réparation / Pedidos de piezas y servicio.......................................................... |
Page arrière / Pág. posterior |
introduction
Introduction / Introducción
This product has many features for making its use more pleasant and enjoyable. Safety, performance, and dependability have been given top priority in the design of this product making it easy to maintain and operate.
* * *
Ce produit offre de nombreuses fonctions destinées à rendre son utilisation plus plaisante et satisfaisante. Lors de la conception de ce produit, l’accent a été mis sur la sécurité, les performances et la fiabilité, afin d’en faire un outil facile à utiliser et à entretenir.
* * *
Este producto ofrece numerosas características para hacer más agradable y placentero su uso. En el diseño de este producto se ha conferido prioridad a la seguridad, el desempeño y la fiabilidad, por lo cual se facilita su manejo y mantenimiento.
Page 2

important safety instructions
WARNING:
Read and understand all instructions. When using electric gardening appliances, basic safety precautions should always be followed to reduce the risk of fire, electric shock and personal injury.
read all instructions
For safe operation, read and understand all instructions before using this product. Be familiar with all controls and proper use of the machine. Follow all safety instructions. Failure to follow all safety instructions listed below, can result in serious personal injury.
Do not allow children or untrained individuals to use this unit.
Thoroughly inspect the area where the equipment is to be used and remove all foreign objects.
Always wear eye protection with side shields marked to comply with ANSI Z87.1. Failure to do so could result in objects being thrown into your eyes, resulting in possible serious injury.
Wear heavy long pants, long sleeves, boots, and gloves when working outdoors. Do not wear loose fitting clothing that could be caught in moving parts, short pants, or go barefoot. Do not wear jewelry of any kind. Use of rubber gloves and substantial footwear is recommended when working outdoors.
Secure long hair above shoulder level to prevent entanglement in moving parts.
Keep all bystanders, children, and pets at least 50 ft. away.
Stay alert and watch what you are doing; use common sense. Do not operate this unit when you are tired, ill, or under the influence of alcohol, drugs, or medication.
Do not operate in poor lighting.
Do not operate power tools in explosive atmospheres, such as in the presence of flammable liquids, gases or dust. Power tools create sparks which may ignite the dust or fumes.
Avoid body contact with earthed or grounded surfaces such as pipes, radiators, ranges and refrigerators. There is an increased risk of electric shock if your body is earthed or grounded.
Use only with charger listed.
MODEL CHARGER
UT44171 36901251G
Keep firm footing and balance. Do not overreach. Overreaching can result in loss of balance or exposure to hot surfaces.
Keep all parts of your body away from any moving part. Do not touch or try to stop cutting blades when they are moving.
Inspect the unit before each use for loose fasteners, etc. Replace any damaged parts before use.
When not in use, product should be stored indoors in a dry, locked up place—out of the reach of children. Power tools are dangerous in the hands of untrained users.
Use only original manufacturer’s replacement parts. Failure to do so may cause poor performance, possible injury, and will void your warranty.
Do not, under any circumstance, use any attachment or accessory on this product which was not provided with the product or identified as appropriate for use with this product in the operator’s manual.
Avoid dangerous environments. Do not use the product in damp or wet locations. Do not use in rain. Do not handle or operate the unit with wet hands.
Use the right appliance. Do not use the shrubber for any job except that for which it is intended.
Do not use on steps, a ladder, or unstable support. Stable footing on a solid surface enables better control of the product in unexpected situations.
Do not force the shrubber. It will do the job better and with less likelihood of a risk of injury at the rate for which it was designed.
DANGER! Keep hands away from cutting area.
Keep hands away from blades. Do not reach underneath work or around or over the blade while blade is rotating. Do not attempt to remove cut material when blade is moving. Make sure shrubber is off, blades have stopped moving, and padlock (not included) or lock-out pin is installed when clearing jammed materials from blades. Do not grasp the exposed cutting blades or cutting edges when picking up or holding the shrubber.
CAUTION! Blade coasts after being turned off.
Warning! Use outdoor extension cords marked SW-A, SOW-A, STW-A, STOW-A, SJW-A, SJTW-A, or SJTOWA. These cords are rated for outdoor use and reduce the risk of electric shock.
Ground Fault Circuit Interrupter (GFCI) protection should be provided on the circuit(s) or outlet(s) to be used for the shrubber. Receptacles are available having built-in GFCI protection and may be used for this measure of safety.
Inspect extension cords periodically and replace if damaged. Keep handles dry, clean, and free from oil or grease.
Do not charge in rain or in wet locations.
Always stop the motor, ensure the blades have stopped, and lock switch when not in use by installing padlock (not included) or lock-out pin, before attempting to clean any obstruction caught or jammed in the blade, or before removing and installing the blade.
Page 3 — English

important safety instructions
Avoid accidental starting. Never carry shrubber with finger on switch. Stop the motor when cutting is delayed or when walking from one cutting location to another. If the tool is left unattended, install the padlock (not included) in the trigger to avoid unauthorized use.
Maintain shrubber with care. Keep cutting edge sharp and clean for best performance and to reduce the risk of injury. Follow instructions for lubricating and changing accessories.
Recharge only with the charger specified by the manufacturer. A charger that is suitable for one type of battery pack may create a risk of fire when used with another battery pack.
Under abusive conditions, liquid may leak from the battery, avoid contact. If contact accidentally occurs, flush with water. If liquid contacts eyes, additionally seek medical help. Liquid leaking from the battery may cause irritation or burns.
Whenservicingapowertool,useonlyidenticalreplacement parts. Follow instructions in the Maintenance section of this manual. Use of unauthorized parts or failure to follow maintenance instructions may create a risk of shock or injury.
Do not dispose of batteries in a fire. The cells may explode. Batteries should be recycled. Consult your local waste authority for information regarding available recycling and/ or disposal options.
Page 4 — English

specific SAFETY RULES
Use non-slip, heavy-duty protective gloves when operating the shrubber and when installing or removing blades.
Replace any blade or other parts that are cracked or damaged. Always make sure blade is installed correctly and securely fastened before each use. Failure to do so can cause serious personal injury to the operator, bystanders, or damage to the unit.
Never cut any material over 3/8 in. diameter.
Maintain a firm grip on handle while cutting with a blade. Keep the blade away from body.
Know how to stop the unit quickly in an emergency.
Check damaged parts. Before further use of the shrubber, a guard or other part that is damaged should be carefully checked to determine that it will operate properly and perform its intended function. Check for alignment of moving parts, binding of moving parts, breakage of parts, mounting, and any other condition that may affect its operation. A guard or other part that is damaged should be properly repaired or replaced by an authorized service center unless indicated elsewhere in this manual.
Install the padlock (not included) or lock-out pin into the switch before making any adjustments, changing accessories, or storing the shrubber. Such preventive safety measures reduce the risk of starting the product accidentally.
Service on the product must be performed by qualified repair personnel only. Service or maintenance performed by unqualified personnel could result in injury to the user or damage to the product.
Always stop motor and install padlock (not included) or lock-out pin into switch when not in use, before attempting to remove any obstruction caught or jammed in the blade, and before removing, installing, or making any blade adjustments.
Battery powered units do not have to be plugged into an outlet; therefore, they are always in operating condition. Be aware of possible hazards even when the unit is not operating.
NEVER attempt to change the cutting attachments without first padlocking (not included) the switch or installing the lock-out pin into the switch.
Never use shrubber if the switch will not turn the unit on or off. A unit that cannot be controlled by the switch is dangerous and must be repaired before use.
Shrubber is for cutting hedges and shrubbery only. Do not use for any other purpose.
Maintain shrubber with care. Keep cutting edge sharp and clean for best performance and to reduce the risk of injury. Follow instructions for lubricating and changing accessories. Keep handles dry, clean, and free from oil and grease.
Battery tools do not have to be plugged into an electrical outlet; therefore, they are always in operating condition. Be aware of possible hazards when not using your battery tool or when changing accessories. Following this rule will reduce the risk of electric shock, fire, or serious personal injury.
Do not place battery tools or their batteries near fire or heat. This will reduce the risk of explosion and possibly injury.
Do not crush, drop or damage battery pack. Do not use a battery pack or charger that has been dropped or received a sharp blow. A damaged battery is subject to explosion. Properly dispose of a dropped or damaged battery immediately.
Batteries vent hydrogen gas and can explode in the presence of a source of ignition, such as a pilot light. To reduce the risk of serious personal injury, never use any cordless product in the presence of open flame. An exploded battery can propel debris and chemicals. If exposed, flush with water immediately.
For best results, your battery tool should be charged in a location where the temperature is more than 50°F but less than 100°F. To reduce the risk of serious personal injury, do not store outside or in vehicles.
Save these instructions. Refer to them frequently and use them to instruct others who may use this tool. If you loan someone this tool, loan them these instructions also to prevent misuse of the product and possible injury.
Page 5 — English

SAFETY RULES FOR CHARGER
WARNING!
Read and understand all instructions.
Failure to follow all instructions listed below, may result in electric shock, fire and/or serious personal injury.
Before using battery charger, read all instructions and cautionary markings in this manual, on battery charger, battery, and product using battery to prevent misuse of the products and possible injury or damage.
CAUTION:
To reduce the risk of electric shock or damage to the charger and battery, charge only the UT44171 as specifically designated on your charger. Other types of batteries may burst, causing personal injury or damage.
Do not use charger outdoors or expose to wet or damp conditions. Water entering charger will increase the risk of electric shock.
Use of an attachment not recommended or sold by the battery charger manufacturer may result in a risk of fire, electric shock, or injury to persons. Following this rule will reduce the risk of electric shock, fire, or serious personal injury.
Do not abuse cord or charger. Never use the cord to carry the charger. Do not pull the charger cord rather than the plug when disconnecting from receptacle. Damage to the cord or charger could occur and create an electric shock hazard. Replace damaged cords immediately.
Make sure cord is located so that it will not be stepped on, tripped over, come in contact with sharp edges or moving parts or otherwise subjected to damage or stress. This will reduce the risk of accidental falls, which could cause injury, and damage to the cord, which could result in electric shock.
Keep cord and charger from heat to prevent damage to housing or internal parts.
Do not let gasoline, oils, petroleum-based products, etc. come in contact with plastic parts. They contain chemicals that can damage, weaken, or destroy plastic.
Anextensioncordshouldnotbeusedunlessabsolutely necessary. Use of improper extension cord could result
in a risk of fire and electric shock. If extension cord must be used, make sure:
a.That pins on plug of extension cord are the same number, size and shape as those of plug on charger.
b.That extension cord is properly wired and in good electrical condition; and
c.That wire size is large enough for AC ampere rating of charger as specified below:
Cord Length (Feet) |
25' |
50' |
100' |
Cord Size (AWG) |
16 |
16 |
16 |
NOTE: AWG = American Wire Gauge
Do not operate charger with a damaged cord or plug, which could cause shorting and electric shock. If damaged, have the charger replaced by an authorized serviceman.
Do not operate charger if it has received a sharp blow, been dropped, or otherwise damaged in any way.
Take it to an authorized serviceman for electrical check to determine if the charger is in good working order.
Do not disassemble charger. Take it to an authorized serviceman when service or repair is required. Incorrect reassembly may result in a risk of electric shock or fire.
Unplug charger from outlet before attempting any maintenance or cleaning to reduce the risk of electric shock.
Disconnect charger from the power supply when not in use. This will reduce the risk of electric shock or damage to the charger if metal items should fall onto the connector. It also will help prevent damage to the charger during a power surge.
Disconnect charger from tool when the battery is fully charged.
Risk of electric shock. Do not touch uninsulated portion of output connector or uninsulated battery terminal.
For best results, your battery tool should be charged in a location where the temperature is more than 50° but less than 100°. To reduce the risk of serious personal injury, do not store outside or use in vehicles.
Save these instructions. Refer to them frequently and use them to instruct others who may use this tool. If you loan someone this tool, loan them these instructions also to prevent misuse of the product and possible injury.
IMPORTANT SAFETY INSTRUCTIONS
1. SAVE THESE INSTRUCTIONS
This manual contains important safety and operating instructions for battery charger 3511T72T.
2. Before using battery charger, read all instructions and cautionary markings on battery charger, battery, and product using battery.
3. CAUTION! To reduce the risk of injury, charge only UT44171. Other types of batteries may burst, causing personal injury or damage.
Page 6 — English

SYMBOLS
The following signal words and meanings are intended to explain the levels of risk associated with this product.
SYMBOL |
SIGNAL |
MEANING |
|
|
|
|
DANGER: |
Indicates an imminently hazardous situation, which, if not avoided, will result in |
|
death or serious injury. |
|
|
|
|
|
|
|
|
WARNING: |
Indicates a potentially hazardous situation, which, if not avoided, could result in |
|
death or serious injury. |
|
|
|
|
|
|
|
|
CAUTION: |
Indicates a potentially hazardous situation, which, if not avoided, may result in minor |
|
or moderate injury. |
|
|
|
|
|
|
|
|
CAUTION: |
(Without Safety Alert Symbol) Indicates a situation that may result in property dam- |
|
age. |
|
|
|
Some of the following symbols may be used on this product. Please study them and learn their meaning. Proper interpretation of these symbols will allow you to operate the product better and safer.
SYMBOL |
NAME |
EXPLANATION |
|
Safety Alert Symbol |
Indicates a potential personal injury hazard. |
|
Read Operator’s Manual |
To reduce the risk of injury, user must read and understand op- |
|
erator’s manual before using this product. |
|
|
|
|
|
Eye Protection |
Always wear eye protection with side shields marked to comply |
|
with ANSI Z87.1. |
|
|
|
|
|
Wet Conditions Alert |
Do not expose to rain or use in damp locations. |
|
No Hands Symbol |
Failure to keep your hands away from the blade will result in |
|
serious personal injury. |
|
|
|
|
|
Risk of Electrocution |
DANGER! Risk of electrocution! |
|
Electric Shock |
Failure to use in dry conditions and to observe safe practices |
|
can result in electric shock. |
|
|
|
|
|
Keep Bystanders Away |
Keep all bystanders at least 50 ft. away. |
|
Gloves |
Wear non-slip, heavy-duty protective gloves when handling |
|
the blades. |
|
|
|
|
|
Hot Surface |
To reduce the risk of injury or damage, avoid contact with any |
|
hot surface. |
|
|
|
|
|
Operate With Two Hands |
Hold and operate the shrubber properly with both hands. |
|
|
This product uses nickel-cadmium (Ni-Cd) batteries. Local, state, |
|
Recycle Symbol |
or federal laws may prohibit disposal of batteries in ordinary |
|
trash. Consult your local waste authority for information regarding |
|
|
|
|
|
|
available recycling and/or disposal options. |
V |
Volts |
Voltage |
A |
Amperes |
Current |
Hz |
Hertz |
Frequency (cycles per second) |
W |
Watt |
Power |
hrs |
Hours |
Time |
|
Class II Construction |
Double-insulated construction |
|
|
Page 7 — English |

FEATURES
PRODUCT SPECIFICATIONS
Cutting Capacity........................................................ |
3/8 in. |
Charger Input..................................... |
120 V, AC only, 60 Hz |
Total Blade Length........................................................ |
6 in. |
Weight...................................................................... |
2.1 lbs. |
Motor..................................................................... |
7.2 V DC |
|
|
KNOW YOUR Shrubber
See Figure 1.
The safe use of this product requires an understanding of the information on the product and in this operator’s manual as well as a knowledge of the project you are attempting. Before use of this product, familiarize yourself with all operating features and safety rules.
CHARGER
The shrubber comes with a convenient portable charger.
LOCK-out BUTTON
The lock-out button reduces the possibility of accidental starting.
Lock-out piN
The lock-out pin is inserted into the switch trigger when installing, removing, or changing the blades, when removing cut or jammed material from the blades, when performing any maintenance, and for storage.
Note: The lock-out pin does not protect against unauthorized usage. Only a locked padlock with the key stored in another location can prevent unauthorized use of the shrubber.
PADLOCK (optional, not included with shrubber)
An optional padlock (with a long shackle up to 9/32 in. diameter) may be used. The padlock is inserted into the switch trigger when installing, removing, changing the blades, when removing cut or jammed material from the blades, when performing any maintenance, and for storage.
NOTE: Only a locked padlock with the key stored in another location can prevent unauthorized use of the shrubber.
scabbard
The scabbard keeps the operator from coming in contact with the sharp blade when the tool is not in use. It also helps keep the blade from being nicked or damaged when the tool is in storage.
switch trigger
The switch trigger activates the motor and blades when it is depressed and the lock-out button is pushed.
ASSEMBLY
UNPACKING
This product has been shipped completely assembled.
nCarefully remove the product and any accessories from the box. Make sure that all items listed in the packing list are included.
WARNING:
Do not use this product if it is not completely assembled or if any parts appear to be missing or damaged. Use of a product that is not properly and completely assembled could result in serious personal injury.
nInspect the product carefully to make sure no breakage or damage occurred during shipping.
nDo not discard the packing material until you have carefully inspected and satisfactorily operated the product.
nIf any parts are damaged or missing, please call 1-800-242-4672 for assistance.
PACKING LIST
Shrubber with Lock-out Pin
Charger
Scabbard
Operator’s Manual
Page 8 — English
ASSEMBLY
 WARNING:
If any parts are damaged or missing, do not operate this product until the parts are replaced. Use of this product with damaged or missing parts could result in serious personal injury.
 WARNING:
Do not attempt to modify this product or create accessories not recommended for use with this product. Any such alteration or modification is misuse and could result in a hazardous condition leading to possible serious personal injury.
 WARNING:
Do not connect to power supply until assembly is complete. Failure to comply could result in accidental starting and possible serious personal injury.
OPERATION
WARNING:
Do not allow familiarity with product to make you careless. Remember that a careless fraction of a second is sufficient to inflict serious injury.
 WARNING:
Always wear eye protection with side shields marked to comply with ANSI Z87.1. Failure to do so could result in objects being thrown into your eyes, resulting in possible serious injury.
WARNING:
Do not use any attachments or accessories not recommendedbythemanufacturerofthisproduct.Theuseof attachments or accessories not recommended can result in serious personal injury.
APPLICATIONS
You may use this product for the purpose listed below: n Trimming and shaping hedges and shrubbery
CHARGING THE Shrubber
See Figure 2.
This tool has been shipped in a low charge condition to prevent possible problems. Therefore, you should charge it overnight prior to use. After each use, charge for at least 8 hours.
To charge:
Stop the motor.
Install padlock (not included) or lock-out pin into switch trigger hole. Keep both hands away from switch.
Insert charger plug into input jack making sure they are properly connected.
Charger can be used with normal household voltage of 120 volts, AC only, 60 Hz.
Connect charger to power supply.
Do not place charger in an area of extreme heat or cold. It will work best at normal room temperature.
LOCK-OUT BUTTON
See Figure 3.
The lock-out button reduces the possibility of accidental starting. It is located on the handle above the switch trigger and must be depressed before you pull the switch trigger. The lock-out button resets each time the trigger is released.
SWITCH TRIGGER
See Figure 3.
To prevent unauthorized use of the shrubber, disconnect it from the power supply and lock the switch in the off position. To lock the switch, install a padlock (not included) or the lock-out pin through the hole in the switch trigger. A padlock with a long shackle up to 9/32 in. diameter may be used. When a padlock is installed and locked or the lock-out pin is installed, the switch is inoperable. Store the padlock key in another location.
Page 9 — English

OPERATION
STARTING AND STOPPING
See Figure 3.
To start:
Remove padlock (not included) or lock-out pin from switch trigger.
Depress the lock-out button.
Depress the switch trigger.
To stop:
Release the switch trigger.
Install padlock (not included) or lock-out pin.
CUTTING TIPS
See Figures 3 - 4.
Do not attempt to cut stems or twigs that are larger than 3/8 in. thick, or those obviously too large to feed into the cutting blade. Use a non-powered hand saw or pruning saw to trim large stems.
If blades do become jammed, stop the motor, allow the blades to stop, and install padlock (not included) or lock-out pin into switch trigger hole before attempting to remove the obstruction.
If desired, you can use a string to help cut your hedge level. Decide how high you want the hedge. Stretch a piece of string along the hedge at the desired height. Trim the hedge just above the guide line of string. Trim the side of a hedge so that it will be slightly narrower at the top. More of the hedge will be exposed when shaped this way, and it will be more uniform.
 DANGER:
Never cut near electric cords or lines. If blade jams on any electrical cord or line, DO NOT TOUCH THE BLADE! IT CAN BECOME ELECTRICALLY LIVE AND VERY DANGEROUS. Continue to hold the shrubber by the handle or lay it down and away from you in a safe manner. Disconnect the electrical service to the damaged line or cord before attempting to free the blade from the line or cord. Contact with the blade, other conductive parts of the shrubber, or live electric cords or lines will result in death by electrocution or serious injury.
 WARNING:
Clear the area to be cut before each use. Remove all objects such as cords, lights, wire, or loose string which can become entangled in the cutting blade and create a risk of serious personal injury.
Do not force the shrubber through heavy shrubbery. This can cause the blades to bind and slow down. If the blades slow down, reduce the pace.
Page 10
Wear gloves when trimming thorny or prickly growth. When trimming new growth, use a wide sweeping action, so that the stems are fed directly into the cutting blade. Older growth will have thicker stems and will be trimmed easiest by using a sawing movement.
OPERATING THE Shrubber
 WARNING:
Read the safety information for safe operation using the blade. Extreme care must be taken when using blades to ensure safe operation. Refer to Important Safety Instructions and Specific Safety Rules.
Use a firm grip on the handle. The unit is used for cutting in either direction in a slow, sweeping action from side to side.
Stand so that you are stable and balanced on both feet.Inspect and clear the area of any hidden objects.
Never use the shrubber near power lines, fencing, posts, buildings, or other immovable objects.
Never use a blade after hitting a hard object without first inspecting it for damage. Do not use if any damage is detected.
— English
MAINTENANCE
 WARNING:
When servicing, use only identical replacement parts. Use of any other parts may create a hazard or cause product damage.
 WARNING:
Always wear eye protection with side shields marked to comply with ANSI Z87.1. Failure to do so could result in objects being thrown into your eyes, resulting in possible serious injury.
GENERAL MAINTENANCE
Avoid using solvents when cleaning plastic parts. Most plastics are susceptible to damage from various types of commercial solvents and may be damaged by their use. Use clean cloths to remove dirt, dust, oil, grease, etc.
WARNING:
Do not at any time let brake fluids, gasoline, petroleumbased products, penetrating oils, etc., come in contact with plastic parts. Chemicals can damage, weaken, or destroy plastic which may result in serious personal injury.
Only the parts shown on the parts list are intended to be repaired or replaced by the customer. All other parts should be replaced at an Authorized Service Center.
WARNING:
Blades are sharp. When handling the blade assembly, wear non-slip, heavy-duty protective gloves. Do not place your hand or fingers between blades or in any position where they could get pinched or cut. NEVER touch blades or service unit while running.
removing/CHANGING blades
See Figure 5.
Stop the motor.
Install padlock (not included) or lock-out pin into switch trigger hole. Keep both hands away from switch.
Unlatch and remove the bottom cover.
Remove the attached blade.
Install the desired blade into the hole on the bottom of the shrubber.
Reattach the bottom cover by sliding it into the slots on the bottom of the shrubber until it clicks into place.
Remove padlock or lock-out pin from switch trigger hole.
LUBRICATING THE BLADE
See Figure 6.
For easier operation and longer blade life, lubricate shrubber blades before and after each use. If you will be using the shrubber for an extended period, it is advisable to oil the blade during use.
Stop the motor.
Install padlock (not included) or lock-out pin into switch trigger hole. Keep both hands away from switch.
Lay the shrubber on a flat surface. Apply light weight machine oil along the edge of the top blade.
Remove padlock or lock-out pin from switch trigger hole.
NOTE: Do not oil while the shrubber is running.
CLEANING THE Shrubber
Stop the motor.
Install padlock (not included) or lock-out pin into switch trigger hole. Keep both hands away from switch.
Slide the scabbard over the blade.
Clean dirt and debris from the body of the shrubber, using a damp cloth with a mild detergent.
Remove padlock or lock-out pin from switch trigger hole.
NOTE: Do not use any strong detergents on the plastic housing or the handle. They can be damaged by certain aromatic oils such as pine and lemon, and by solvents such as kerosene.
BATTERIES
This product is equipped with a nickel-cadmium rechargeable battery. Length of service from each charging will depend on the type of work you are doing.
The battery in this product has been designed to provide maximum trouble-free life. However, like all batteries, it will eventually wear out.
To obtain the longest possible battery life, we suggest removing the product from the charger once it is fully charged and ready for use.
The battery in this product is not meant to be replaced and should be recycled when it will no longer take a charge.
Page 11 — English
 Loading...