


Dirección postal:
Hometouch
Service Center, Dept. 168 3000 Pontiac Trail Commerce Township, MI 48390
correo electrónico: cservice@hometouchproducts.com
Teléfono: Lunes - Viernes
8:30am - 5:00pm (EST)
1.800.466.3342
Garantía limitada por dos años
HoMedics vende sus productos con la intención de que no tengan defectos de fabricación ni de mano de obra por un plazo de dos años a partir de la fecha de compra original, con las siguientes excepciones. HoMedics garantiza que sus productos no tendrán defectos de material ni de mano de obra bajo condiciones de uso y servicio normales. Esta garantía se extiende únicamente a consumidores y no a distribuidores.
Para obtener servicio para su producto HoMedics, envíe por correo el producto y su recibo de compra fechado (como comprobante de compra), con franqueo pago, a la siguiente dirección:
Hometouch
Service Center Dept. 168 3000 Pontiac Trail
Commerce Township, MI 48390
No se aceptarán pagos contra entrega.
HoMedics no autoriza a nadie, incluyendo, pero sin limitarse a, distribuidores, posteriores consumidores compradores del producto a un distribuidor, o compradores remotos, a obligar a HoMedics de forma alguna más allá de las condiciones aquí establecidas. La garantía de este producto no cubre daños causados por uso inadecuado o abuso, accidente, conexión de accesorios no autorizados, alteración
del producto, instalación inadecuada, reparaciones o modificaciones no autorizadas, uso inadecuado de la fuente de energía/electricidad, cortes de energía, caída del producto, funcionamiento incorrecto o daño de una pieza de funcionamiento debido al no cumplimiento del mantenimiento recomendado por el fabricante, daños durante el transporte, robo, descuido, vandalismo, condiciones climáticas, pérdida de uso en el período durante el cual el producto está en una instalación de reparación o a la espera de
piezas o reparación, o cualquier otra condición, sin importar cual sea, que se encuentre fuera del control de HoMedics.
Esta garantía es válida únicamente si el producto es comprado y operado en el país en el cual se compró el producto. Un producto que requiera modificaciones o adaptación para habilitar su funcionamiento
en cualquier país que no sea aquél para el que fue diseñado, fabricado, aprobado y/o autorizado, o la reparación de productos dañados por estas modificaciones no están cubiertos bajo esta garantía.
LA GARANTÍA AQUÍ ESTABLECIDA SERÁ LA ÚNICA Y EXCLUSIVA GARANTÍA. NO HABRÁ NINGUNA OTRA GARANTÍA EXPRESA NI IMPLÍCITA, INCLUYENDO NINGUNA GARANTÍA DE COMERCIALIZACIÓN O APTITUD NI NINGUNA OTRA OBLIGACIÓN POR PARTE DE LA COMPAÑÍA CON RESPECTO A PRODUCTOS CUBIERTOS POR ESTA GARANTÍA. HOMEDICS NO TENDRÁ RESPONSABILIDAD ALGUNA POR NINGÚN DAÑO INCIDENTAL, CONSECUENTE NI ESPECIAL. BAJO NINGÚN CONCEPTO ESTA GARANTÍA REQUERIRÁ MÁS QUE LA REPARACIÓN O CAMBIO DE ALGUNA PIEZA O PIEZAS QUE SE HALLEN DEFECTUOSAS DENTRO DEL PERÍODO DE VIGENCIA DE ESTA GARANTÍA. NO SE
EFECTUARÁN REEMBOLSOS. SI NO HAY PIEZAS DE REPUESTO DISPONIBLES PARA LOS MATERIALES DEFECTUOSOS, HOMEDICS SE RESERVA EL DERECHO DE REALIZAR SUSTITUCIONES EN VEZ DE REPARAR O CAMBIAR.
Esta garantía no se extiende a la compra de productos abiertos, usados, reparados, embalados otra vez y/o abiertos y vueltos a cerrar, incluyendo entre otras cosas la venta de dichos productos en sitios de remate por Internet y/o la venta de dichos productos por revendedores o mayoristas. Todas y cada una de las garantías cesarán y terminarán inmediatamente con respecto a cualquier producto o pieza del mismo que estén reparados, cambiados, alterados o modificados sin el consentimiento previo explícito y por escrito de HoMedics.
Esta garantía le proporciona derechos legales específicos. Es posible que usted tenga derechos adicionales que pueden variar de un país a otro. Debido a las regulaciones de ciertos países, es posible que algunas de las limitaciones y exclusiones no se apliquen en su caso.
Por más información con respecto a nuestra línea de productos en los EE.UU., visítenos en: www.homedics.com
© 2009 HoMedics, Inc. y sus compañías afiliadas, reservados todos los derechos. HoMedics® es una marca registrada de HoMedics, Inc. y sus compañías afiliadas. Home Touch®, PerfectSteam® y Safe Touch® son marcas registradas de HoMedics, Inc. y sus compañías afiliadas. Reservados todos los derechos.
IB-PS250A
PerfectSteam®
commercial garment steamer
Instruction Manual and |
PS-250 |
Warranty Information |
El manual en español empieza a la 2página 13

IMPORTANT SAFEGUARDS
WHEN USING ELECTRICAL PRODUCTS, ESPECIALLY WHEN CHILDREN ARE PRESENT, BASIC SAFETY PRECAUTIONS SHOULD ALWAYS BE FOLLOWED, INCLUDING THE FOLLOWING:
WARNING - TO REDUCE THE RISK OF BURNS, ELECTROCUTION, FIRE OR INJURY TO PERSONS:
•Read all instructions before using.
•To reduce the risk of contact with hot water emitting from steam vents, check appliance before each use by holding it away from your body and operating unit.
•Use appliance only for its intended use.
•To reduce the risk of electric shock, do not immerse the appliance in water or other liquids.
•Never pull cord to disconnect from outlet; instead, grasp plug and pull to disconnect.
•Do not allow cord to touch hot surfaces. Let appliance cool completely before putting away. Loop cord loosely around appliance when storing.
•Always disconnect appliance from electrical outlet when filling with water or emptying, and when not in use.
•Do not operate appliance with a damaged cord, or if the appliance has been dropped or damaged. To reduce the risk of electric shock, do not disassemble or attempt to repair the appliance.
•Return to HoMedics Service Center for examination and repair. Incorrect reassembly or repair could cause a risk of fire, electric shock, or injury to persons when the appliance is used.
•Close supervision is necessary for any appliance being used by or near children. Do not leave appliance unattended while plugged in.
•Never steam a garment while it is being worn.
•Burns could occur from touching hot metal parts, hot water, or steam. Use care when you turn a steam appliance upside down – there may be hot water in the reservoir.
•Let the unit cool for at least 30 minutes before pouring water out of the reservoir.
•Never drop or insert any object into any opening or hose.
•Do not use outdoors or operate where aerosol (spray) products are being used or where oxygen is being administered.
•Surfaces of this appliance may be hot when in use. Do not let eyes or bare skin touch heated surfaces.
•Do not place the steam nozzle directly on any surface or on the appliance power cord while it is hot or plugged in. Use the stand provided.
•Always keep the hose and nozzle elevated above the water container.
•To reduce likelihood of circuit overload, do not operate another high wattage appliance on the same circuit.
•Do not use an extension cord to operate the appliance. If an extension cord is absolutely necessary, a 15 ampere rated cord should be used. Cords rated for less amperage may overheat. Care should be taken to arrange the cord so that the cord cannot be pulled or tripped over.
•Never pour water directly into reservoir. Pour water in water tank only.
•When changing attachments, please be sure the unit is off and no steam is being released to avoid contact with hot water.
•Use caution when changing attachments as they may contain hot water from condensation. Ensure the attachments are dry or cooled off to avoid contact with hot water.
SAVE THESE INSTRUCTIONS
2 |
3 |
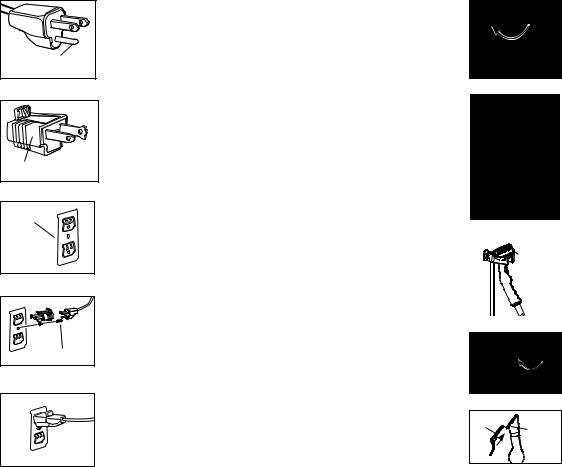
Grounding Pin |
Figure A
 Tab for
Adapter Grounding Screw
Figure B
Grounded
Outlet
Figure C
Metal Screw
Figure D
Figure E
Grounding Instructions |
Pole |
Perfect Steam Features |
|
This product must be grounded. If it should malfunction or |
|
• Safe for use on all types of fabrics |
|
breakdown, grounding provides a path of least resistance for the |
|
• Quick heat-up feature emits steam in 45 seconds |
|
electric current to reduce the risk of electric shock. This product is |
Turn |
• Convenient integrated garment hanger |
|
|
|
||
equipped with a cord having an equipment grounding conductor and |
|
• Telescoping design for compact storage |
|
a grounding plug. The plug must be plugged into an appropriate |
|
• 5 foot flexible hose with Safe Touch® hose cover for safe and |
|
outlet that is properly installed and grounded in accordance with all |
Figure 1 |
comfortable handling |
|
local codes and ordinances. |
• Easy-fill water tank provides 45 minutes of continuous steam |
||
|
|||
|
Hanger |
• Rolling casters for excellent mobility |
|
DANGER |
Attachment |
• Low water auto shut-off for safe use |
|
|
|||
|
|
||
Improper connection of the equipment-grounding conductor |
|
Assembly Instructions |
|
can result in a risk of electric shock. Check with a qualified |
|
||
electrician or serviceman if you are in doubt as to whether |
|
1 Carefully remove all contents from packaging and inspect the |
|
|
product to make sure all components have been received |
||
the product is properly grounded. Do not modify the plug |
Clips |
||
(Fig. 10). |
|||
provided with the product - if it will not fit the outlet, you may |
|
||
|
2. Insert pole into top of unit. Match the grooves on the pole with the |
||
temporarily use an adapter (such as the one shown in Figure |
|
||
|
notches in the pole connector and push down. Securely tighten |
||
B) until you have a proper outlet (such as the one shown in |
|
||
|
the nut on the pole over the connector by turning it clockwise |
||
Figure C) installed by a qualified electrician. |
Figure 2 |
||
(Fig 1). |
|||
|
|||
This product is for use on a nominal 120-volt circuit, and has a |
|
3. To attach the hanger attachment, align tabs in hanger attachment |
|
|
with grooves on pole and push down (Fig. 2). |
||
grounding plug that looks like the plug illustrated in Figure A. |
Fabric |
||
4. Fully extend the telescopic pole. To do so, open the 3 clips on the |
|||
A temporary adapter that looks like the adapter illustrated in Figure B |
Brush |
||
|
pole and pull the pole upwards (Fig. 2). When fully extended close |
||
may be used to connect this plug to a 2-pole receptacle as shown in |
|
||
|
the clips. Make sure that the pole is securely locked into place |
||
Figure D if a properly grounded outlet is not available. The temporary |
|
||
|
and cannot be pushed downward. |
||
adapter should be used only until a properly grounded outlet Figure |
|
||
|
5. Attach the fabric brush to the nozzle by setting into place (Fig. 3). |
||
C can be installed by a qualified electrician. The tab for grounding |
Figure 3 |
||
6. Attach handle & hose assembly to unit. Line up the nut on the |
|||
screw Figure B extending from the adapter must be connected to a |
|||
|
hose with the screw on the hose connector. Turn nut clockwise |
||
permanent ground such as a properly grounded outlet box cover. |
|
||
|
until it is securely tightened on the hose connector, (Fig 4). It |
||
Whenever the adapter is used, it must be held in place by a metal |
|
||
|
should be tightly screwed into place. Then you may hang the |
||
screw. See Figures D and E. |
|
||
Turn |
steamer handle onto the hanger attachment (Fig. 3). |
||
|
|||
|
|
NOTE: Do not hang the hose on the hanger attachment until after |
|
|
Figure 4 |
it has been connected to the base to prevent the hose from falling |
|
|
on you. |
||
|
Crease |
||
|
7. Attach the crease clamp (Fig. 5) onto the nozzle tab and gently |
||
|
Clamp |
||
|
Nozzle |
push into place. |
|
|
Tab |
||
|
NOTE: Do not use the crease clamp and the fabric brush at the |
||
|
|
||
|
|
same time |
|
|
Figure 5 |
|
4 |
5 |

Figure 6
Figure 7
Figure 8
Instructions for Use
1.Remove the water tank from the unit by grasping the handle and turning upside down. Unscrew the cap from the bottom of the water tank. Hold the tank under cold running water and fill to the desired level (Fig. 6). DO NOT fill past the 45 min. fill line. When you have finished filling the tank screw the cap back on and turn over (Fig. 7). Place water tank back into unit and make sure it is sitting properly & securely in the cavity.
NOTE: Only fill the water tank with cold water, DO NOT use HOT water.
2.Plug the steamer cord into a 120V AC electrical outlet.
3.Turn the On/Off switch to the On position. The switch will light to indicate that the garment steamer is on. Steam will emit in 45 seconds from the nozzle.
4.Hang the garment onto the hanger attachment (Fig 8). Steam the garment in an up/down motion starting from the top of the garment to the bottom. Always keep the hose and nozzle elevated above the water container.
5.This unit has a reset button (Fig. 10). When the unit runs out of water it will automatically shut-off to ensure safe use and the red indicator light will come on above the reset button. If you wish to continue your steaming session:
•Turn On/Off switch to “Off” position and unplug the power cord
•Remove and refill water tank by following Step 1 under Instructions for Use
•Plug the steamer cord into a 120V AC electrical outlet.
•Push the reset button on side of unit
•Turn On/Off switch to “On” position
6.When you are finished with your steaming session place the On/Off switch in the Off position and remove the plug from the outlet. NOTE: Be cautious when handling until steamer has fully cooled.
Fabric Brush
Steamer Nozzle |
Hanger Attachment |
|
|
Handle |
|
|
Crease |
Hose |
Clamp |
|
|
|
Pole |
|
Clips |
Pole Connector
Hose Connector |
Water Tank |
|
|
Indicator Light |
On/Off Switch |
Reset Button |
|
|
Casters |
|
Figure 10 |
6 |
7 |
 Loading...