


 Loading...
Access PrePack System
Operator Manual
ML-29268 |
EPP Printer |
ML-29269 |
EPCP Console |
701 S. RIDGE AVENUE TROY, OHIO 45374 www.hobartcorp.com
F-35512 (Mar. 2006)

Access PrePack System Operator Manual
TABLE OF CONTENTS
Chapter 1: Introduction. . . . . . . . . . . . . . . . . . . . . . . . . . . . . . . . . . . . . . . . . . . . . . . . . . . . . . . . . . . . . . .1-1
Welcome. . . . . . . . . . . . . . . . . . . . . . . . . . . . . . . . . . . . . . . . . . . . . . . . . . . . . . . . . . . . . .1-1
FCC Note . . . . . . . . . . . . . . . . . . . . . . . . . . . . . . . . . . . . . . . . . . . . . . . . . . . . . . . . . . . . .1-1
Verify Correctness of Weight and Price. . . . . . . . . . . . . . . . . . . . . . . . . . . . . . . . . . . . . .1-1
Operator Manual Terminology. . . . . . . . . . . . . . . . . . . . . . . . . . . . . . . . . . . . . . . . . . . . .1-2
Chapter 2: Understanding the System . . . . . . . . . . . . . . . . . . . . . . . . . . . . . . . . . . . . . . . . . . . . . . . . . . .2-1
Electrical Connections . . . . . . . . . . . . . . . . . . . . . . . . . . . . . . . . . . . . . . . . . . . . . . . . . . .2-1
Console Communication Connections . . . . . . . . . . . . . . . . . . . . . . . . . . . . . . . . . . . . . . .2-1
Using the Console. . . . . . . . . . . . . . . . . . . . . . . . . . . . . . . . . . . . . . . . . . . . . . . . . . . . . . .2-1
Chapter 3: Using the Access PrePack System . . . . . . . . . . . . . . . . . . . . . . . . . . . . . . . . . . . . . . . . . . . . .3-1 Power Up the System . . . . . . . . . . . . . . . . . . . . . . . . . . . . . . . . . . . . . . . . . . . . . . . . . . . .3-1 Logging onto the System . . . . . . . . . . . . . . . . . . . . . . . . . . . . . . . . . . . . . . . . . . . . . . . . .3-1 Shutting Down the System . . . . . . . . . . . . . . . . . . . . . . . . . . . . . . . . . . . . . . . . . . . . . . . .3-2 Operator Main Menu Screen Softkeys and Flashkeys . . . . . . . . . . . . . . . . . . . . . . . . . . .3-3 Run Screen . . . . . . . . . . . . . . . . . . . . . . . . . . . . . . . . . . . . . . . . . . . . . . . . . . . . . . . . . . . .3-4 Modifying the Run Screen . . . . . . . . . . . . . . . . . . . . . . . . . . . . . . . . . . . . . . . . . . . . . . . .3-5 Automatic Settings . . . . . . . . . . . . . . . . . . . . . . . . . . . . . . . . . . . . . . . . . . . . . . . . . . . . . .3-6 Using Automatic Mode . . . . . . . . . . . . . . . . . . . . . . . . . . . . . . . . . . . . . . . . . . . . . . . . . .3-6 Manual Mode . . . . . . . . . . . . . . . . . . . . . . . . . . . . . . . . . . . . . . . . . . . . . . . . . . . . . . . . .3-10 Running a Product . . . . . . . . . . . . . . . . . . . . . . . . . . . . . . . . . . . . . . . . . . . . . . . . . . . . .3-11 Using the Operator Main Menu Screen Drop-Down Menus . . . . . . . . . . . . . . . . . . . . .3-12 Product Drop-Down Menu . . . . . . . . . . . . . . . . . . . . . . . . . . . . . . . . . . . . . . . . . . . . . . .3-13 Settings Drop-Down Menu. . . . . . . . . . . . . . . . . . . . . . . . . . . . . . . . . . . . . . . . . . . . . . .3-18 Help Drop-Down Menu . . . . . . . . . . . . . . . . . . . . . . . . . . . . . . . . . . . . . . . . . . . . . . . . .3-22
Chapter 4: Maintenance & Cleaning . . . . . . . . . . . . . . . . . . . . . . . . . . . . . . . . . . . . . . . . . . . . . . . . . . . .4-1
Removing Labels . . . . . . . . . . . . . . . . . . . . . . . . . . . . . . . . . . . . . . . . . . . . . . . . . . . . . . .4-1
Loading Labels . . . . . . . . . . . . . . . . . . . . . . . . . . . . . . . . . . . . . . . . . . . . . . . . . . . . . . . . .4-3
Setting the Label Size Plate . . . . . . . . . . . . . . . . . . . . . . . . . . . . . . . . . . . . . . . . . . . . . . .4-6
Cleaning the Printhead . . . . . . . . . . . . . . . . . . . . . . . . . . . . . . . . . . . . . . . . . . . . . . . . . . .4-7
Troubleshooting . . . . . . . . . . . . . . . . . . . . . . . . . . . . . . . . . . . . . . . . . . . . . . . . . . . . . . . .4-8
Index . . . . . . . . . . . . . . . . . . . . . . . . . . . . . . . . . . . . . . . . . . . . . . . . . . . . . . . . . . . . . . . . . . . . . . . . . . . . I-1
F-35512 (Mar. 2006) |
i |
Table of Contents |

Access PrePack System Operator Manual
Table of Contents |
ii |
F-35512 (Mar. 2006) |
Access PrePack System Operator Manual
Chapter 1: Introduction
Introduction
Welcome |
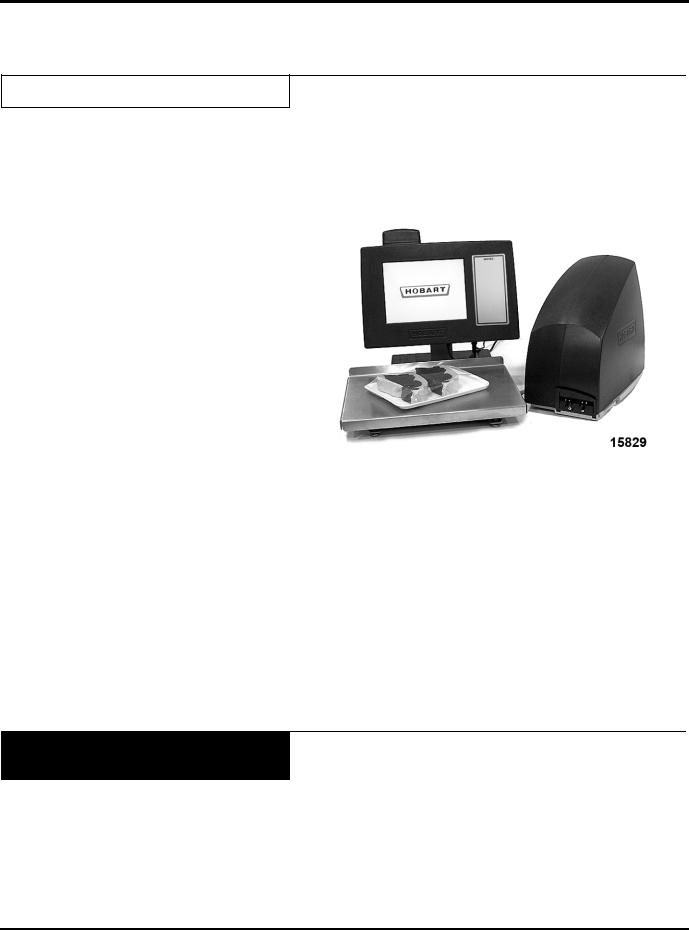
The Access PrePack System was designed as a meat room or pro- |
|
duce back room scale. It gives you merchandising capabilities |
|
|
|
with multiple fonts, graphics, and label types. |
|
Access PrePack System |
|
All necessary operator data appears on the touch screen. |
|
|
FCC Note |
This equipment has been tested and found to comply with the |
|
limits for a Class A digital device, pursuant to Part 15 of the FCC |
|
|
|
rules. These limits are designed to provide reasonable protection |
|
against harmful interference when the equipment is operated in a |
|
commercial environment. This equipment generates, uses and can |
|
radiate radio frequency energy and, if not installed and used in |
|
accordance with the instruction manual, may cause harmful inter- |
|
ference to radio communications. Operation of this equipment in |
|
a residential area is likely to cause harmful interference; in which |
|
case, the user will be required to correct the interference at their |
|
own expense. |
Verify Correctness of
Weight and Price
Routinely verify label information. Check the multiplication of price per pound times weight, and check the scale weight against printed label weight. Weigh the same package several times to verify outcome consistency. Packages that weigh near the middle of the 0.01 lb. increment will normally vary up or down by
0.01 lb. Greater variation than 0.01 lb indicates the system needs adjustment. In such a case, or whenever necessary, contact your local Hobart Representative.
F-35512 (Mar. 2006) |
1-1 |
Introduction |

Access PrePack System Operator Manual
Operator Manual Terminology |
|
This manual uses the following terminology for keystrokes and |
|
|
data manipulation procedures: |
|
||
|
|
• The word TYPE means to touch a series of keys on the Oper- |
|
|
ator Screen Numeric Keypad or the Operator Screen Alpha |
|
|
Keyboard. |
|
|
• The word TOUCH means to activate an entry shown on the |
|
|
Operator Display screen. |
|
|
• The word SELECT means to activate one item from a list |
|
|
brought up on the Operator Screen. |
|
|
The following special instructions are used in the manual: |
|
|
|
|
|
Note |
|
|
|
|
|
A Note is information that you need to know, but is not an actual |
|
|
step in the process. |
|
|
|
|
|
|
|
|
Tip |
|
|
|
|
|
A Tip is additional information that may be useful when you are |
|
|
using the system. |
|
|
|
|
|
|
|
|
Look At This |
|
|
|
|
|
Look At This is information to alert you that you may be doing |
|
|
something that will permanently alter your system. |
|
|
|
Introduction |
1-2 |
F-35512 (Mar. 2006) |

Access PrePack System Operator Manual
Chapter 2: Understanding the System
Understanding the System
The Access EPP Scale System can store information on thousands of products. Retail store information required for product handling and processing, such as PLU number, UPC number, Pricing, Tare, and Self Life is included. Consumer information describing products, such as NutriFacts, Safe Handling, Expanded Text, Health Tips, Meal Planners, Recipes, Cooking Instructions, and Merchandising Graphics is also included.
The scale should be installed and moved only by qualified Hobart Service Technicians. The system can operate in a temperature range from 32°F to 104°F (0°C to 40°C).
The following topics are discussed in this chapter:
|
|
Electrical Connections |
|
|
Console Communication Connections |
|
|
Using the Console |
|
|
|
Electrical Connections |
A power cord is located on the back of the printer. Electric power |
|
|
of 120 or 208/240 volts, 50 or 60 Hz, 1 phase (2-wire plus |
|
|
||
|
ground) is required. |
|
|
|
|
Console Communication |
On the Access PrePack System, in addition to the electrical con- |
|
Connections |
nections, there are several ports that can be configured: |
|
|
• |
RJ-45 Jack for an Ethernet Connector (TCP/IP) |
|
||
|
|
–OR– |
|
• |
Wireless TCP/IP (located on the top of the console). |
|
• |
2 Type A USB Ports |
|
|
|
Using the Console |
Console features: |
|
|
• |
Operator Main Menu Screen - a touch-activated screen that |
|
||
|
|
provides access to product data and displays information to |
|
|
the user. |
F-35512 (Mar. 2006) |
2-1 |
Understanding the System |
Access PrePack System Operator Manual
Operator Main Menu Screen |
The Operator Main Menu Screen is a touch screen that enables |
|
you to enter information and move through the display screens. |
|
Attributes |
Functions |
|
|
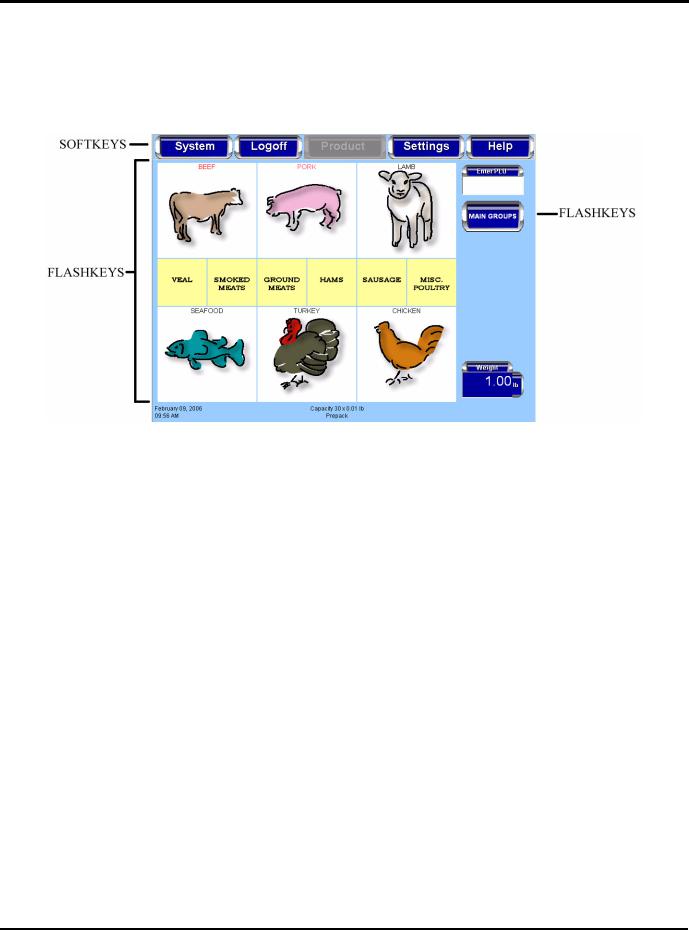
Softkeys |
The softkeys on the Operator Main Menu Screen are used to access the drop-down |
|
menus, which show the subcategories of data available for selection. |
|
|
Check Box |
A check box enables or disables optional functions. A check mark or circle appears in |
|
the box when a function is enabled. |
|
|
Text Box |
A text box is a field into which you enter data. |
|
|
Grayed Field |
A grayed field indicates the field is not available for the current screen or transaction. |
|
|
Flashing Cursor |
The flashing cursor in a text box indicates that the field is currently activated and is |
|
available for data entry. |
|
|
Light Blue Highlighted |
A drop-down menu subcategory shown in light blue indicates the drop-down menu |
Drop-Down Menu |
subcategory has been activated and can be selected. |
|
|
Flashkeys |
The Flashkeys provide quick access to frequently used products and functions. |
|
|
Numeric Keypad |
The numeric keypad appears on the screen when numeric data is to be entered. |
|
|
Alpha Keyboard |
The alpha keyboard appears on the screen when alpha data is to be entered. |
|
|
Understanding the System |
2-2 |
F-35512 (Mar. 2006) |
Access PrePack System Operator Manual
Chapter 3:
Chapter 3: Using the Access PrePack System
Using the Access PrePack
System
Power Up the System |
To power up the Access PrePack System, use the on/off switch |
|
located on the back of the printer. |
|
|
|
|
Logging onto the System |
The Access PrePack System may require each operator to login |
|
before use. Not all system are setup to have operator’s login. |
|
|
|
The instructions for using this system are detailed in this chapter. |
|
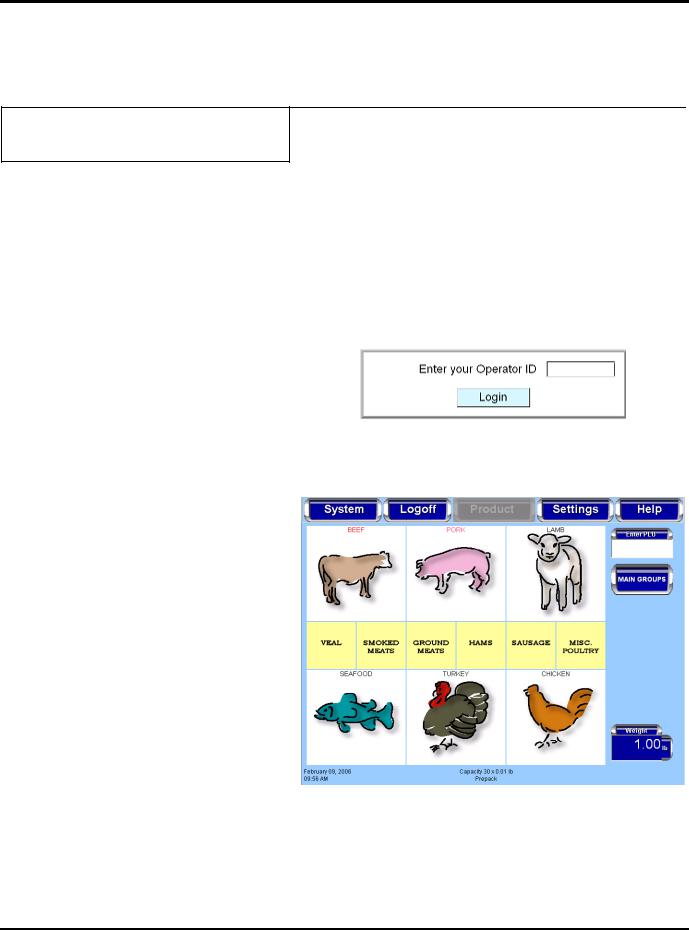
To login to the system you should be at the Operator Login |
|
Screen shown below. |
To Login to the System: TOUCH the Operator ID field and
TYPE your Operator ID. You should now be on the Operator
Main Menu Screen.
To Logoff the Operator Main Menu Screen: TOUCH Logoff on the Operator Main Menu Screen. No further action is required. The Operator Login Screen will be displayed.
F-35512 (Mar. 2006) |
3-1 |
Using the Access PrePack System |

Access PrePack System Operator Manual
Shutting Down the System |
The Shutdown feature is designed to stop all internal functions. |
|
|
Shutdown is required before power can be disconnected from the |
|
|
||
|
system. |
|
|
To Shutdown the System: |
|
|
1. |
From the Operator Main Menu Screen, TOUCH System. |
|
2. |
From the System Menu, TOUCH Shutdown. A screen will |
|
|
appear and ask, “Are you sure you want to shutdown?” |
|
3. |
TOUCH OK. A screen will appear and say, “The scale is |
|
|
shutting down. Please wait....” |
Look At This
Shutdown may take a few minutes to complete depending on the size of the database in the scale. DO NOT disconnect power to the system during shutdown.
4.When the shutdown is complete, a screen will appear and say, “The scale has been shutdown. You may remove power from the scale.
–OR–
Press REBOOT to reboot now.”
5.Remove power by using the on/off switch on the back of the printer.
Look At This
Do not remove power from the system by unplugging it. Always use the on/off switch on the back of the printer to power down the system.
Using the Access PrePack System |
3-2 |
F-35512 (Mar. 2006) |

Access PrePack System Operator Manual
Operator Main Menu Screen
Softkeys and Flashkeys
The Operator Main Menu Screen Softkeys provide access to drop-down menus showing available functions. The use of these keys, the screens accessed, and the functions performed through these keys are described in next section of this manual.
Note
The Product Softkey will only be available when a PLU is entered.
Flashkeys are the keys located below the Operator Main Menu Screen softkeys. These keys are configured individually for each system to provide quick access to products and functions frequently used.
F-35512 (Mar. 2006) |
3-3 |
Using the Access PrePack System |
Access PrePack System Operator Manual
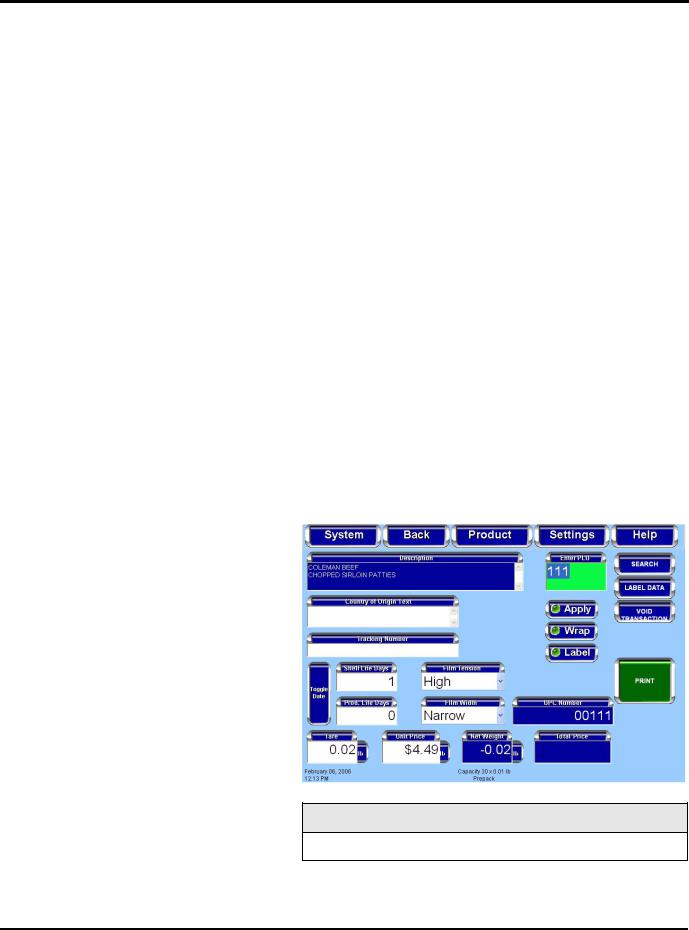
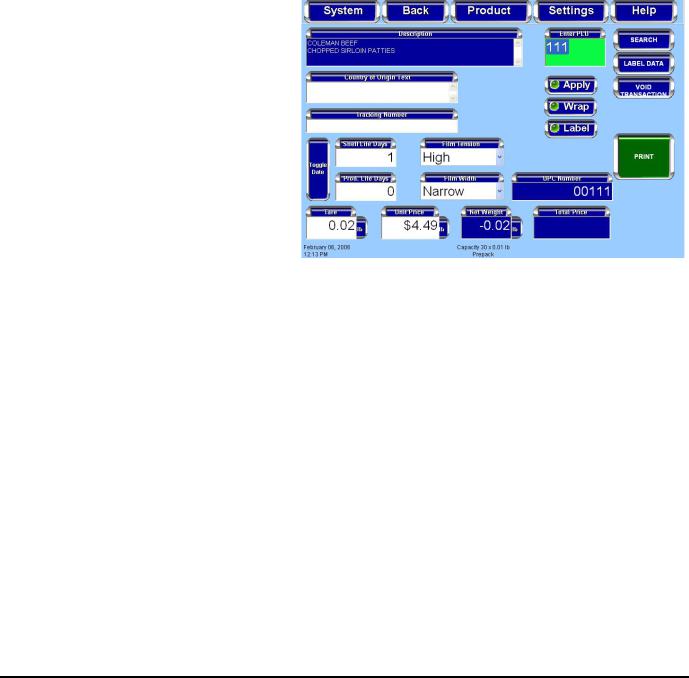
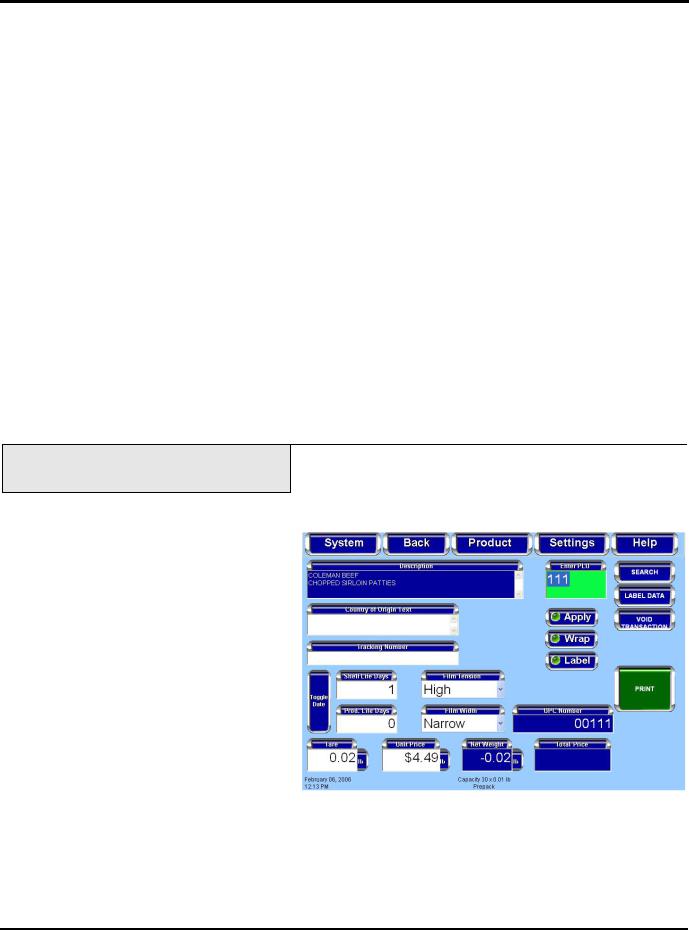
Run Screen |
The Run Screen displays product information for the PLU that is |
|
entered. The type of data displayed depends upon the product |
|
|
|
weigh type of the PLU. |
|
The Run Screen displays the following product information, if |
|
applicable: |
• Enter PLU Number
• Product Description
• Shelf Life Days (toggles to Sell By Date)
• Product Life Days (toggles to Best Before Date)
• Country of Origin Text (COOL)
• |
Tracking Number |
• |
Product Image (optional) |
• |
UPC Number |
• |
Net Weight |
• |
Total Price |
• |
|
• |
Film Tension (wrapper) |
• |
Film Width (wrapper) |
• Automatic Label Apply (toggles on/off)
• Automatic Wrap (toggles on/off)
• Automatic Label Print (toggles on/off)
• Tare (if applicable)
• Unit Price (if applicable)
• By Count (if applicable)
• Exception Price (if applicable)
• Volume (if applicable)
Note
System configuation may show different options.
Using the Access PrePack System |
3-4 |
F-35512 (Mar. 2006) |
|
|
Access PrePack System Operator Manual |
|
|
|
Modifying the Run Screen |
|
The operator can modify certain settings that display on the Run |
|
|
Screen. Only text fields with a white background can be |
|
||
|
|
modified. Text fields with a blue background cannot be edited |
|
|
and provide information only. |
|
|
|
|
|
Note |
|
|
|
|
|
• Changes made at the Run Screen will be in effect for the |
|
|
current product only. The scale will revert to the system |
|
|
default settings when a different PLU is entered. |
|
|
• The Apply button, Wrap button, and Wrapper settings are |
|
|
only displayed on the Run Screen when a wrapper is |
|
|
attached to the system. |
|
|
|
To change Text Field values: TOUCH the text field and SELECT the setting from the list –OR– TYPE the change on the pop-up Numeric Keypad or Alpha Keyboard. TOUCH Enter. The value change will be displayed in the text field.
To change the Film Tension setting: TOUCH the Film Tension field. The settings of High, Medium, and Low will be displayed. SELECT the desired setting. The setting selected will be displayed in the Film Tension field.
To change the Film Width setting: TOUCH the Film Width field. The settings of Narrow, Wide, and Automatic will be displayed. SELECT the desired setting. The setting selected will be displayed in the Film Width field. In the Automatic setting the system will sense the film width needed.
To change COOL: TOUCH the Country of Origin Text field. You should now be on the COOL Screen. See Product Drop-Down Menu - COOL Screen for information about modifying COOL. The setting changes made will be displayed on the Run Screen.
To change Automatic functions: TOUCH the automatic buttons on the screen to turn them on or off. If the indicator is green, then it is in automatic mode. If the indicator is red, then it is in manual mode. See Automatic Settings for more information about the automatic functions available on the Access PrePack System.
F-35512 (Mar. 2006) |
3-5 |
Using the Access PrePack System |
Access PrePack System Operator Manual
Automatic Settings |
|
The Run Screen has settings for automatic or manual modes. In |
|
|
Automatic Mode the operation will be performed without the |
|
||
|
|
operator touching PRINT, as is required in Manual Mode. Auto- |
|
|
matic Mode is changed with the Apply, Wrap, and Label buttons. |
|
|
The button is in the Automatic Mode when the indicator is green |
|
|
and in Manual Mode when the indicator is red. |
|
|
|
|
|
Note |
|
|
|
|
|
The Apply and Wrap buttons are only displayed on the Run |
|
|
Screen when a wrapper is included in the system configuration. |
|
|
|
|
|
|
Using Automatic Mode |
|
There are different automatic modes available for use with the |
|
|
Access PrePack System. If your system is attached to an |
|
|
|
|
|
automatic wrapper you will have more functions available. |
|
|
The automatic functions are: |
|
|
Automatically Wrap, Print and Apply Label |
|
|
Automatically Print Label Only |
|
|
Automatically Print and Apply Label, No Wrap (Prepackaged |
|
|
Products) |
|
|
Automatically Wrap Only |
Automatically Wrap, Print and
Apply Label
To wrap the product and print and apply a label in Automatic Mode: TOUCH the Apply, Wrap, and Label buttons until the indicators are green. The Enter PLU text background color is green.
A product is placed on the wrapper scale. The product will run through the wrapper and will be wrapped. A label will be printed when a stable weight has been sensed by the scale. The label will be applied to the product as the product emerges from the wrapper.
Using the Access PrePack System |
3-6 |
F-35512 (Mar. 2006) |
Loading...