


HL200 MIXER
TECHNICAL MANUAL
SPECIFICATION SHEET INSTALLATION INSTRUCTIONS OPERATION INSTRUCTIONS CLEANING INSTRUCTIONS MAINTENANCE INSTRUCTIONS TROUBLE SHOOTING INSTRUCTIONS WIRING DIAGRAMS
CATALOG OF REPLACEMENT PARTS SMARTPARTS™ USER GUIDE RECOMMENDED SPARE PARTS LIST

Need other Hobart Services?
•Warranty Registration
•Delivery and Installation
•Preventive Maintenance
•Hobart Service Contracts
•Extended Warranty Contracts
•Parts and Accessories
•Specialty Programs
•Water Treatment Programs
HL200 Mixer Technical Manual Page 2 of 111

Item #______________________________________
Quantity____________________________________
C.S.I. Section 11400
|
|
|
|
|
|
|
|
LEGACY® |
|
|
701 S Ridge Avenue, Troy, OH 45374 |
|
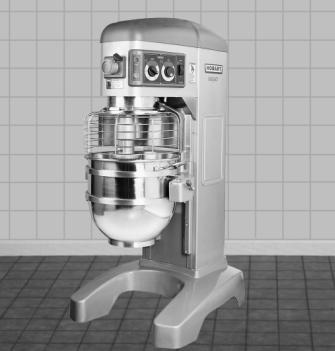
HL200 MIXER |
|
|
|
|
|
|
|
1-888-4HOBART • www.hobartcorp.com |
|
|
|
|
|
|
|
|
|
|
|
|
|
|
|
|
|
|
|
|
|
|
|
STANDARD FEATURES
■Heavy-Duty 1⁄2 H.P. Motor
■Gear Transmission
■Three Fixed Speeds Plus Stir Speed
■Shift-on-the-Fly™ Controls
■Patented soft start Agitation Technology
■15-Minute SmartTimer™
■Automatic Time Recall
■Large, Easy-To-Reach Controls
■Single Point Bowl Installation
■Ergonomic Swing-Out Bowl
■#12 Taper Attachment Hub
■Open Base
■Stainless Steel Bowl Guard
■Metallic Gray Hybrid Powder Coat Finish
ACCESSORY PACKAGES - featuring Hobart Quick Release™ Agitators
Deluxe Accessory Package Includes:
-20 Quart Stainless Steel Bowl
-20 Quart “B” Beater
-20 Quart “D” Wire Whip
-20 Quart Bowl Scraper
-20 Quart Ingredient Chute
Standard Accessory Package Includes:
-20 Quart Stainless Steel Bowl
-20 Quart “B” Beater
-20 Quart “D” Wire Whip
MODELS
HL200 – 20-Quart All Purpose Mixer
HL200C – 20-Quart All Purpose Mixer with
Maximum Security Correctional
Package
OPTIONS
SmartPlus2™ Programmable Recipe Timer
Specifications, Details and Dimensions on Inside and Back.
F-40089 – Legacy® HL200 Mixer |
Page 1 of 4 |
MIXER HL200 ®LEGACY
HL200 Mixer Technical Manual Page 3 of 111

|
|
|
|
|
LEGACY® |
|
|
|
HL200 MIXER |
701 S Ridge Avenue, Troy, OH 45374 |
|
|
|
|
|
|
|
1-888-4HOBART • www.hobartcorp.com |
|
|
|
|
|
|
|
|
|
|
|
|
|
|
|
|
|
SOLUTIONS/BENEFITS
1⁄2 H.P. Motor
Durability
■Heavy-duty to meet the most demanding operations
Gear Transmission
Durability, Reliability
■Ensures consistent performance and minimum downtime under heavy loads
Three Fixed Speeds plus Stir Speed
Flexibility, Reliability, Consistency
■For incorporating, blending, mixing ingredients
■Supports consistent results and thorough mixing
Shift-on-the-Fly™ Controls
Flexibility
■Allows operator to change speeds while mixer is running
Patented soft start Agitation Technology
Sanitation
■Each speed has a soft transition into a higher speed to reduce the chances of product splash-out
15-Minute SmartTimer™
Convenience, Ease of Use, Consistency
■Supports recipe mixing times
■Provides accurate results and eliminates overmixing
Automatic Time Recall
Productivity, Consistency
■Remembers the last time set for each speed
■Great for multiple batches
Ergonomic Swing-Out Bowl
Ease of Use, Convenience
■Easy loading and unloading of products
■Single Point Bowl Installation allows for simple mounting and removal of bowl
■Bowl Interlock ensures mixer bowl is properly in place for mixer to operate
Stainless Steel Bowl Guard
Protection
■Safety interlock prevents operation when front portion of guard is out of position
Hobart Accessories
Durability, Flexibility, Simplicity
■Hobart Quick Release™ agitators allow for simple installation and removal from agitator shaft
■Hobart accessories are designed for long-term usage under heavy-duty conditions
■Large array of accessories provide multiple uses for recipe and product processing
HL200 MIXER CAPACITY CHART
Recommended Maximum Capacities - dough capacities based on 70°F. water and 12% flour moisture.
|
|
AGITATORS |
|
PRODUCT |
|
SUITABLE FOR |
HL200 |
|
|
OPERATION |
|
CAPACITY OF BOWL (QTS. LIQUID) |
20 |
||
Egg Whites |
|
D |
1 qt. |
|
|
|
|
Mashed Potatoes |
|
B & C |
15 lbs. |
|
|
|
|
Mayonnaise (Qts. of Oil) |
|
B or C or D |
10 qts. |
Meringue (Qts. of Water) |
|
D |
11⁄2 pts. |
Waffle or Hot Cake Batter |
|
B |
8 qts. |
|
|
|
|
Whipped Cream |
|
D or C |
4 qts. |
Cake, Angel Food |
|
|
|
(8-10 oz. cake) |
|
C or I |
15 |
Cake, Box or Slab |
|
B or C |
20 lbs. |
|
|
|
|
Cake, Cup |
|
B or C |
20 lbs. |
|
|
|
|
Cake, Layer |
|
B or C |
20 lbs. |
Cake, Pound |
|
B |
21 lbs. |
|
|
|
|
Cake, Short (Sponge) |
|
C or I |
15 lbs. |
|
|
|
|
Cake, Sponge |
|
C or I |
12 lbs. |
Cookies, Sugar |
|
B |
15 lbs. |
|
|
|
|
Dough, Bread or Roll |
|
|
|
(Lt.-Med.) 60% AR |
§ |
ED |
25 lbs.■ |
Dough, Heavy Bread 55% AR § |
ED |
15 lbs.■ |
|
Dough Pie |
|
B & P |
18 lbs. |
Dough, Thin Pizza 40% AR |
|
|
|
(max. mix time 5 min.) |
§‡ |
ED |
9 lbs.■ |
Dough, Med. Pizza 50% AR |
§‡ |
ED |
10 lbs.■ |
Dough, Thick Pizza 60% AR |
§‡ |
ED |
20 lbs.■ |
Dough, Raised Donut 65% AR |
ED |
9 lbs.* |
|
Dough, Whole Wheat 70% AR |
ED |
20 lbs.■ |
|
Eggs & Sugar for Sponge Cake |
B & C or I |
8 lbs. |
|
|
|
|
|
Icing, Fondant |
|
B |
12 lbs. |
Icing, Marshmallow |
|
C or I |
2 lbs. |
|
|
|
|
Shortening & Sugar, Creamed |
B |
16 lbs. |
|
|
|
|
|
Pasta, Basic Egg Noodle |
|
|
|
(max. mix time 5 min.) |
|
ED |
5 lbs. |
NOTE: % AR (% Absorption Ratio) - Water weight divided by flour weight. Capacity depends on moisture content of dough. Above capacities based on 12% flour moisture at 70°F water temperature.
■ 1st Speed * 2nd Speed
† 3rd Speed
§If high gluten flour is used, reduce above dough batch size by 10%.
‡2nd Speed should never be used on 50% AR or lower products.
USE OF ICE REQUIRES A 10% REDUCTION IN BATCH SIZE. 1 gallon of water weighs 8.33 lbs.
NOTE: Attachment hub should not be used while mixing.
Page 2 of 4 |
F-40089 – Legacy® HL200 Mixer |
HL200 Mixer Technical Manual Page 4 of 111

|
|
|
|
|
|
LEGACY® |
|
|
701 S Ridge Avenue, Troy, OH 45374 |
HL200 MIXER |
|
|
|
|
|
|
1-888-4HOBART • www.hobartcorp.com |
|
|
|
|
|
|
|
|
|
|
|
|
|
|
|
|
|
|
SPECIFICATIONS
MOTOR:
1⁄2 H.P. high torque motor.
100-120/50/60/1 |
8.0 Amps |
200-240/50/60/1 |
5.0 Amps |
ELECTRICAL:
100-120/50/60/1, 200-240/50/60/1 – UL Listed.
CONTROLS:
Magnetic contactor with thermal overload protection. Internally sealed “Start-Stop” push buttons. A 15-minute SmartTimer™ is standard.
SmartTimer™ includes Automatic Time Recall, which remembers the last time set for each speed. Optional SmartPlus2™ Programmable Recipe Timer allows operators the ability to program up to 4 recipes with 5 steps per recipe. SmartPlus2™ automatically changes speeds and starts timer count-down without operator intervention.
TRANSMISSION:
Gear-driven. Gears are constant mesh heat-treated hardened alloy steel along with anti-friction ball bearings. Grease lubricants furnished to all gears and shafts.
SPEEDS:
|
Agitator |
Attachment |
|
(RPM) |
(RPM) |
|
|
|
Stir |
59 |
33 |
|
|
|
First (Low) |
107 |
61 |
|
|
|
Second (Intermediate) |
198 |
113 |
|
|
|
Third (High) |
365 |
207 |
|
|
|
BOWL GUARD:
Heavy-duty stainless steel wire front and solid rear portion. Front portion of guard rotates easily to add ingredients and install or remove agitator.
It detaches in seconds for cleaning in dishwasher or sink. Rear portion of guard can be quickly cleaned in position. Guard must be in closed position before mixer will operate. Bowl support interlock provides further protection.
BOWL LIFT:
Ergonomic style, hand crank operated, self-locking in top and bottom position.
FINISH:
Metallic Gray Hybrid Powder Coat finish.
ATTACHMENT HUB:
Comes with front-mounted Hobart standard #12 taper attachment hub for use with Hobart #12 size attachments.
ATTACHMENTS AND ACCESSORIES:
The following are available at extra cost:
Stainless Steel Bowl “B” Flat Beater
“C” Wing Whip
“D” Wire Whip
“E” Dough Hook
“ED” Dough Hook
“P” Pastry Knife Bowl Splash Cover Bowl Scraper Ingredient Chute
12 Quart Accessories 9" Vegetable Slicer
Meat Chopper Attachment Rubber Foot Pads Attachment Tray Support
Hobart Bowl Scraper
Hobart Ingredient Chute
Listed by Underwriters Laboratories Inc. and certified by NSF
International.
F-40089 – Legacy® HL200 Mixer |
Page 3 of 4 |
HL200 Mixer Technical Manual Page 5 of 111

|
|
|
|
|
LEGACY® |
|
|
|
HL200 MIXER |
701 S Ridge Avenue, Troy, OH 45374 |
|
|
|
|
|
|
|
1-888-4HOBART • www.hobartcorp.com |
|
|
|
|
|
|
|
|
|
|
|
|
|
|
|
|
|
SPECIFICATIONS
ELECTRICAL SPECIFICATIONS: 100-120/50/60/1, 200-240/50/60/1 – UL Listed.
WEIGHT: 189 lbs. net; 204 lbs. domestic shipping.
WARRANTY: Unit has full one-year warranty on parts, labor and mileage against manufacturer’s defects. Service contracts are available.
DETAILS AND DIMENSIONS
|
As continued product improvement is a policy of Hobart, specifications are subject to change without notice. |
|
|
|
|
Page 4 of 4 |
F-40089 – Legacy® HL200 Mixer |
F-40089 (REV. 06/07) |
HL200 Mixer Technical Manual Page 6 of 111 Litho In U.S.A. (H-01) |

Models
HL120 ML-134296 ML-134459
HL200 ML-134331 ML-134458
HL200 ML-134289 ML-134457
HL200 ML134455
PRIOR ML’S COVERED IN THIS CATALOG
HL200 |
ML-134308 |
HL200 |
ML-134450 |
F34922 Rev. D (Nov. 2008)
HL200 Mixer Technical Manual Page 7 of 111
TABLE OF CONTENTS |
|
GENERAL ............................................................................................... |
3 |
INSTALLATION............................................................................................... |
3 |
Unpacking ............................................................................................. |
3 |
Location ................................................................................................ |
3 |
Electrical Connections ........................................................................... |
4 |
OPERATION ........................................................................................... |
5 |
Standard Controls ................................................................................. |
6 |
Recipe Timer Control............................................................................. |
7 |
Bowl Placement..................................................................................... |
8 |
Agitator ................................................................................................. |
8 |
Prepare for Mixing ................................................................................. |
9 |
Standard Timer Operation ..................................................................... |
9 |
Recipe Timer Operation ................................................................................ |
11 |
View Recipe .................................................................................................. |
12 |
Programming Recipe Timer .......................................................................... |
12 |
Unloading ............................................................................................ |
14 |
Wire Cage............................................................................................ |
14 |
Agitators and Attachments ................................................................... |
16 |
CLEANING ................................................................................................... |
17 |
MAINTENANCE ............................................................................................ |
18 |
Lubrication ............................................................................................ |
18 |
Adjustments .......................................................................................... |
19 |
TROUBLESHOOTING ............................................................................. |
20 |
Service.................................................................................................. |
20 |
© HOBART 2006
2
HL200 Mixer Technical Manual Page 8 of 111
Installation, Operation and Care of
LegacyTM 12 & 20-Quart Mixers
SAVE THESE INSTRUCTIONS
GENERAL
The Legacy 12-quart mixer is a bench-type mixer which features a SmartTimer™, a manual bowl lift and a #12 attachment hub as standard equipment.
The Legacy 20-quart mixer is a bench-type mixer which features a SmartTimer™, a manual bowl lift and a #12 attachment hub as standard equipment. With the use of special agitators, a 12 quart bowl may be used on the HL200 mixer.
A variety of attachments, agitators and accessories are available. These are described in a separate Use and Applications Handbook, which is furnished on the Legacy Mixer Operator Training CD provided with each mixer.
INSTALLATION
UNPACKING
Immediately after unpacking the mixer, check for possible shipping damage. If this machine is found to be damaged after unpacking, save the packaging material and contact the carrier within 15 days of delivery.
LOCATION
Prior to installation, test the electrical service to assure that it agrees with the specifications on the machine data plate.
Place the mixer on a suitable sturdy level surface. There should be adequate space around the mixer for the user to operate the controls and to install and remove bowls.
Holes are located in the base to permanently secure the mixer, although this is not necessary in normal installations.
3
HL200 Mixer Technical Manual Page 9 of 111

ELECTRICAL CONNECTIONS (Cord Connected Mixers)
The electrical cord on this machine is equipped with a three-pronged
grounding plug which must be connected to a properly grounded receptacle. If the receptacle is not the proper grounding type, contact an electrician. Do Not remove the grounding prong from the plug.
 Electrical and grounding connections must comply with the applicable portion of the national electrical code and/or other local electrical codes.
Check Initial Operation
1.Apply power to the mixer by inserting the cord plug into a properly grounded outlet.
2.Install the bowl and raise into mix position, with the bowl support up and bowl guard wire cage closed.
3.Turn the SPEED dial pointer to STIR.
4.Momentarily run the machine by pushing the START and then STOP buttons.
4
HL200 Mixer Technical Manual Page 10 of 111
OPERATION
 Moving agitator in bowl. Keep hands, clothing, and utensils out of bowl operation. Do Not use without interlocked guard.
The Legacy mixer is equipped with SmartTimerTM controls. Refer to Fig. 1 for operating parts and OPERATION section for their functions.
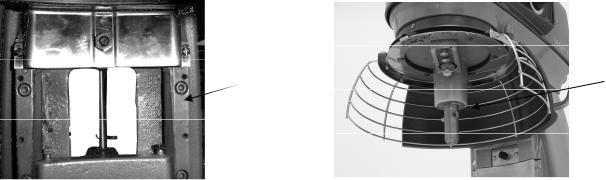
The bowl guard wire cage must be in closed position or the mixer will not operate.
The bowl must remain in mix position on bowl support and the bowl support must be raised (mix position) or the mixer will not operate.
SLOT
CONTROLS
ATTACHMENT
HUB
SPLASH GUARD
DRIP CUP
APRON
BOWL GUARD
WIRE CAGE
BOWL SUPPORT
AGITATOR
Fig. 1
5
HL200 Mixer Technical Manual Page 11 of 111
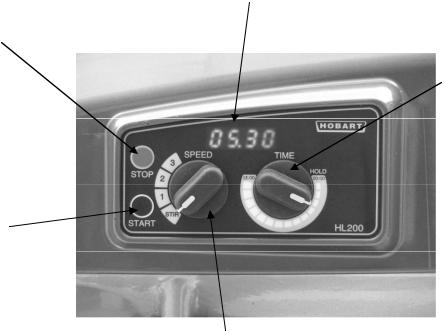
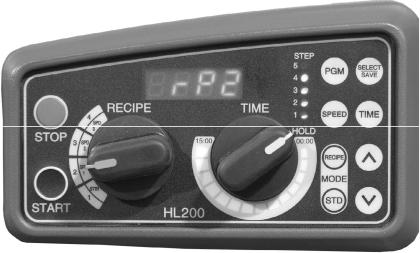
Standard Controls
Models HL120/HL200 (With Three Mix Speeds Plus Stir Speed)
DISPLAY MIXING
TIME
STOPS MIXER
TIME SELECTOR
STARTS MIXER
SPEED SELECTOR |
Fig. 2 |
HL120/HL200 Mixer Speeds
STIR (Slow) |
The lowest speed is for incorporating ingredients. |
SPEED 1 (Low) |
This speed is for heavy mixtures such as pizza dough, heavy batters |
|
and potatoes. |
SPEED 2 (Medium) |
This speed is for mixing cake batters, mashing potatoes and developing |
|
bread dough. |
SPEED 3 (High) |
This speed is for incorporating air into light batches, as well as finishing |
|
whipped items |
6
HL200 Mixer Technical Manual Page 12 of 111
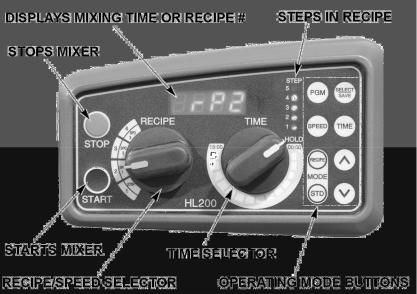
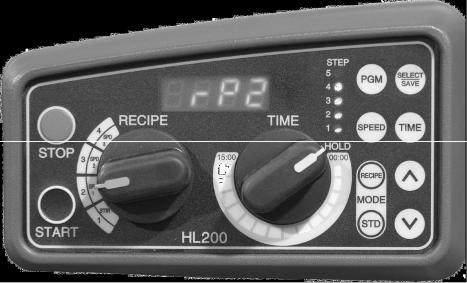
Recipe Timer (Optional)
Models HL120/HL200 (With Three Mix Speeds Plus Stir Speed)
Fig. 15
The SmartPlus2™ recipe timer has two operating modes, Standard (STD) and RECIPE.
Standard Mode
Operates exactly as the standard controls utilizing continuous and timed mixing.
Recipe Mode
xUse mode buttons to switch mixer operation between recipe and standard timed operation.
xUp to 4 recipes can be stored in memory
xEach recipe can contain 5 steps
xEach step can be programmed to operate with the following speeds and time.
SPEED SETTINGS |
TIME SETTINGS |
SPd 1 (DEFAULT) |
00:00 – 15:00 minutes (10 second increments) |
SPd 2 |
End (default) |
SPd 3 |
|
Stir |
|
PAUS (pause – no mixing) |
|
7
HL200 Mixer Technical Manual Page 13 of 111
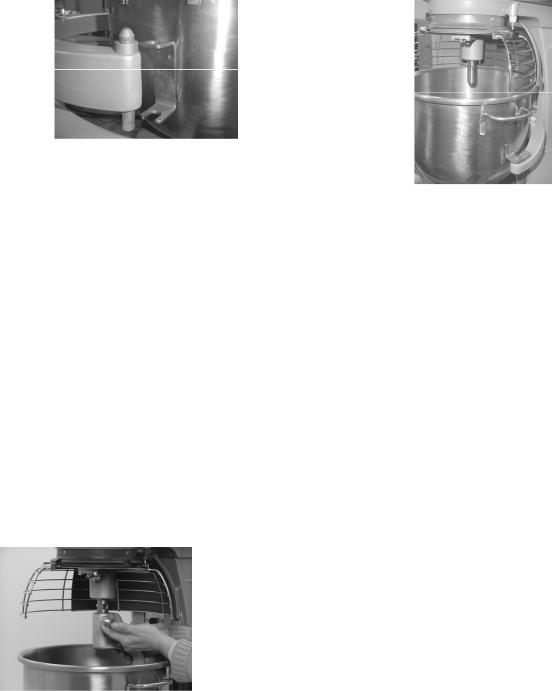
BOWL PLACEMENT
The bowl must be installed before the agitator is installed.
To install the bowl, lower the bowl support and position bowl so the alignment pins on the left side of the bowl support fit in the holes in the bowl tab. (Fig. 3) Place the slotted tab on bowl into the lower part of the pin. Swing the bowl into the mix position on bowl support. (Fig. 4)
Fig. 3 |
|
AGITATOR |
|
To install an agitator, the bowl must be on the bowl support. |
Fig. 4 |
To Install |
|
1.Lower the bowl.
2.Open the bowl guard wire cage.
3.Place the agitator inside the bowl and align the horizontal slot on the agitator with the agitator shaft pin.
4.Slide the agitator up the agitator shaft until it stops and latches. An audible click should be heard when the agitator locks in position.
To Remove
1.Open the bowl guard wire cage.
2.Lower the bowl.
3.Hold the agitator and pull the plunger of the agitator out (Fig. 5). Slide agitator down off the agitator shaft.
Fig. 5
8
HL200 Mixer Technical Manual Page 14 of 111

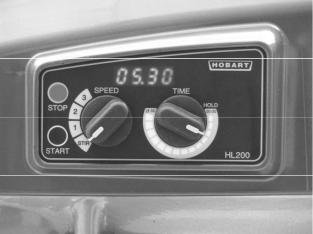
PREPARE FOR MIXING
1.Place the mixing bowl on the bowl support.
2.Pour ingredients into the bowl.
3.Swing the bowl back to the mix position.
4.Place the agitator inside the bowl, and then attach it to the agitator shaft (Fig. 6).
5.Lift bowl support.
6.Correctly close the bowl guard wire cage.
7.The mixer is now ready for mixing. (See TIMER OPERATION.)
Fig. 6
STANDARD TIMER OPERATION
Using the Count-Up Mode (Continuous Mixing)
1.Turn the SPEED dial to select a mix speed (the SPEED setting can be changed at any time during the mixing operation).
NOTE: STIR is to be used for incorporating ingredients. Do not use to develop dough products.
2.Set the timer on hold by turning the TIME selector counterclockwise until HoLd appears in the TIME window.
3.Press the START button to begin mixing. The timer starts counting forward from 00:00. NOTE: If the wire cage is opened at any time, the mixing operation will stop. To resume the mixing operation, close the wire cage and press the START button.
4.Use the STOP button to stop the mixer; the mixing time is displayed in the TIME window.
5.Press the START button to resume mixing if needed.
NOTE: When the timer reaches 15:00 minutes, the beeper will sound momentarily and timer will rollover to 00:01 and continue counting until the STOP button is pressed.
Fig. 7
9
HL200 Mixer Technical Manual Page 15 of 111
Using the Count-Down Mode (Timed Mixing)
1.Turn the SPEED dial to select a mix speed.
a.If the count-up mode was used for the previous batch, the desired time needs to be entered.
b.If the count-down mode was used for the previous batch, the previous time will be displayed. If a different time is needed, turn the TIME selector to the desired time in 10 second increments.
2.Press the START button to begin mixing; the timer starts counting down from the set time.
a.To stop the mixer at any time, press the STOP button. To resume mixing, press the START button. For example: The mixer is started at SPEED 1 for 30 seconds and is stopped after 10 seconds. Pressing the START button will resume the mixing operation.
b.If the mixer is stopped and a new time setting is entered, pressing the START button saves the new time setting on the current speed selection.
For example: The mixer is started at SPEED 1 for 30 seconds and is stopped after 10 seconds. A new time is entered by turning the TIME selector. The new time will replace the initial 30 seconds for SPEED 1 after the START button is pressed.
c.If the time is changed while mixing, the mixer will operate until the new time expires. The adjustment to the time will not be stored.
d.If speed is changed while mixing, the time will change to the previous time for the selected speed and count down.
NOTE: If the wire cage is opened at any time, the mixing operation will stop. To resume the mixing operation, close the wire cage and press the START button.
3.When the timer reaches 00:00, the mixer stops; a beeper sounds for 1 second. The countdown timer then displays the last-stored time.
OPERATING NOTES
xSTIR is to be used for incorporating ingredients. Do not use it to develop dough products.
xIf the mixer is stopped during a mixing operation, the timer also stops. The timer starts again (with the time remaining) when the START button is pressed.
xTurn the TIME selector clockwise to take the mixer out of the hold mode.
Fig. 8
10
HL200 Mixer Technical Manual Page 16 of 111
RECIPE TIMER OPERATION
Recipe Timer Notes
xIf pause is selected as a mix speed, the mixer START button must be pressed to advance to the next recipe step after the pause time has expired.
xIf pause has been selected, the bowl guard can be opened and the time will continue to count down.
xThe recipe step can be interrupted and then resumed by pressing the STOP button and then the START button.
NOTE: If PAUSE has been selected, the STOP button is disabled.
x The recipe can be terminated by stopping the mixer and pressing the STD button.
Using The Recipe Timer
1.Press Recipe mode button.
2.Turn the RECIPE selector to select a recipe.
3.Press START; mixer will operate at the programmed speed for the programmed time.
a.Speed is displayed momentarily.
b.Remaining time for the operating step will be displayed and the step light is flashing.
NOTE: Recipe and Time selectors are disabled.
4.Mixer will continue to perform the programmed speeds and times until the recipe steps are completed.
NOTE: If pause has been programmed for a step speed, the mixer START button must be pressed to advance to the next recipe step after the pause time has expired.
5.When the timer reaches the end of the last programmed recipe step, the mixer stops; the beeper sounds; the selected recipe is displayed.
11
HL200 Mixer Technical Manual Page 17 of 111
View Recipe
When the mixer is in RECIPE mode, you can view the step settings of any recipe.
1.Press the SELECT/SAVE button.
A.Display will alternate between speed and time.
B.The LED of the step being displayed will flash.
2.Use the arrow buttons to view the next step.
3.Use the Recipe selector to view other recipes.
4.Press PGM button to return to the RECIPE mode.
NOTE: If the mixer is performing a recipe, the recipe will continue to operate in normal recipe mode sequence.
PROGRAMMING RECIPE TIMER
Fig. 16
HL200 is powered with display showing a mix time (Standard Mode) or recipe number (Recipe Mode).
1.If a mix time is displayed, Press RECIPE mode button. Display corresponds with position of recipe (speed) selector.
2.Press and hold TIME. Continue holding TIME, then press PGM and hold until rP1 is displayed (with step 1 blinking), buzzer sounds and programmed step LEDs are lit.
3.Use arrows to select recipe number (1-4) for programming.
4.Press SELECT/SAVE to enter program mode for the recipe number selected.
Buzzer sounds and display alternates between speed and time to indicate programming mode.
12
HL200 Mixer Technical Manual Page 18 of 111
NOTES:
xIf a value has been assigned for a step number, that LED will be lit.
xThe LED for the selected step will blink.
xIf the default value is still assigned to a step, the LED will not be lit.
xWhen programming, the Recipe and Time Selectors are disabled.
SPEED SETTINGS |
TIME SETTINGS |
SPd 1 (DEFAULT) |
00:00 – 15:00 minutes (10 second increments) |
SPd 2 |
End (default) |
SPd 3 |
|
Stir |
|
PAUS (pause – no mixing) |
|
5.Use arrows to select step number (1 – 5).
6.Press SPEED. All characters will blink and buzzer will sound.
A.Use arrows to select the mixing speed for selected step.
B.Press SELECT/SAVE to set the speed. SAVE displayed momentarily and buzzer sounds.
7.Display alternates between speed and time to indicate programming mode.
8.Press TIME. Third digit will blink and buzzer will sound.
A.Use arrows to select the mixing time (increments of 10 seconds) for selected step.
NOTE: If all 5 steps are programmed, the recipe will terminate at the end of step 5. If fewer than 5 steps are used, the default time setting of END will terminate the recipe.
B.Press SELECT/SAVE to set the time for the step. SAVE momentarily displayed and buzzer sounds.
9.Display alternates between speed and time to indicate programming mode. NOTE: LED of step programmed will be flashing.
10.Use arrows to select next step.
11.Repeat setting speed and time for additional steps and use SELECT/SAVE to save settings.
12.After all steps for recipe are programmed, press PGM to exit programming mode.
Buzzer sounds and display will show recipe number that was programmed with the number blinking.
13.Press PGM to enter run mode. (Buzzer sounds)
14.Press STD to return to standard mode or set recipe selector to the desired recipe.
15.Select the recipe that you programmed and verify proper operation.
13
HL200 Mixer Technical Manual Page 19 of 111
UNLOADING
1.Open the bowl guard wire cage assembly.
2.Lower bowl support.
3.Remove the agitator from the agitator shaft.
4.Slightly lift the bowl off the pin (right side), pull bowl to the front and remove from the bowl support (left side).
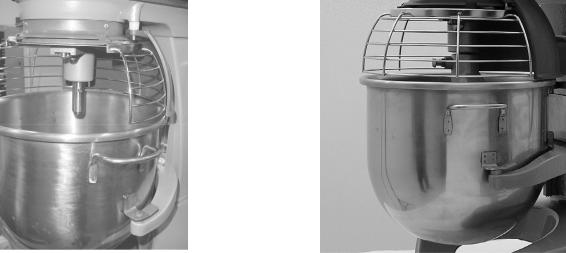
WIRE CAGE
The bowl guard wire cage can be rotated out of the way to add ingredients or to access the bowl and agitator.
Note how the plastic carriers allow the wire cage to ride around the circumference of the planetary drip cup.
xOpen the bowl guard wire cage: rotate it to your left (Fig. 9).
xClose the bowl guard wire cage: rotate it to your right until it stops, closed position (Fig.
10).
NOTE: The bowl guard wire cage must be returned to the closed position for the mixer to operate.
Fig. 9 |
Fig. 10 |
14
HL200 Mixer Technical Manual Page 20 of 111
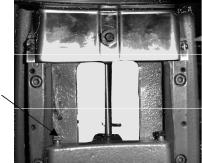
Remove and Clean Bowl Guard Wire Cage (Fig. 11)
1.Rotate wire cage to your left until the three carriers align with the carrier escape slots in the circular ridge of the planetary drip cup.
2.Lift the wire cage straight up so the carriers escape from the slots on the drip cup. The bowl guard wire cage can now be removed by pulling toward you.
Escape Slots
(3)
Fig. 11
3.Wash the bowl guard wire cage in a sink, rinse with clear water, and dry with a clean cloth.
4.The splash guard can be wiped off and/or washed with a cloth or sponge using warm, soapy water. Rinse with clear water and dry with a clean cloth.
Reinstall Bowl Guard Wire Cage
1.Position the ring of the bowl guard wire cage so the carriers are positioned above the slots in the planetary drip cup.
2.Lower the bowl guard wire cage so the carriers pass through the slots.
3.Rotate the bowl guard wire cage to your right until it contacts the stop, closed position.
15
HL200 Mixer Technical Manual Page 21 of 111

AGITATORS AND ATTACHMENTS
Attachments for attachment hub and agitators are covered in a separate Hobart Legacy Mixer Use and Application Handbook on the Mixer Operator Information CD. Follow the instructions accordingly.
Available Agitators and Attachments
12 & 20 Qt. B Flat Beater |
12 & 20 Qt. D Wire Whip |
12 & 20 Qt. ED Dough Hook |
20 Qt. E Dough Hook |
12 & 20 Qt. SST Bowl |
12 & 20 Qt. Scraper |
12 & 20 Qt. Splash Cover |
12 & 20 Qt. C Wing Whip |
16
HL200 Mixer Technical Manual Page 22 of 111
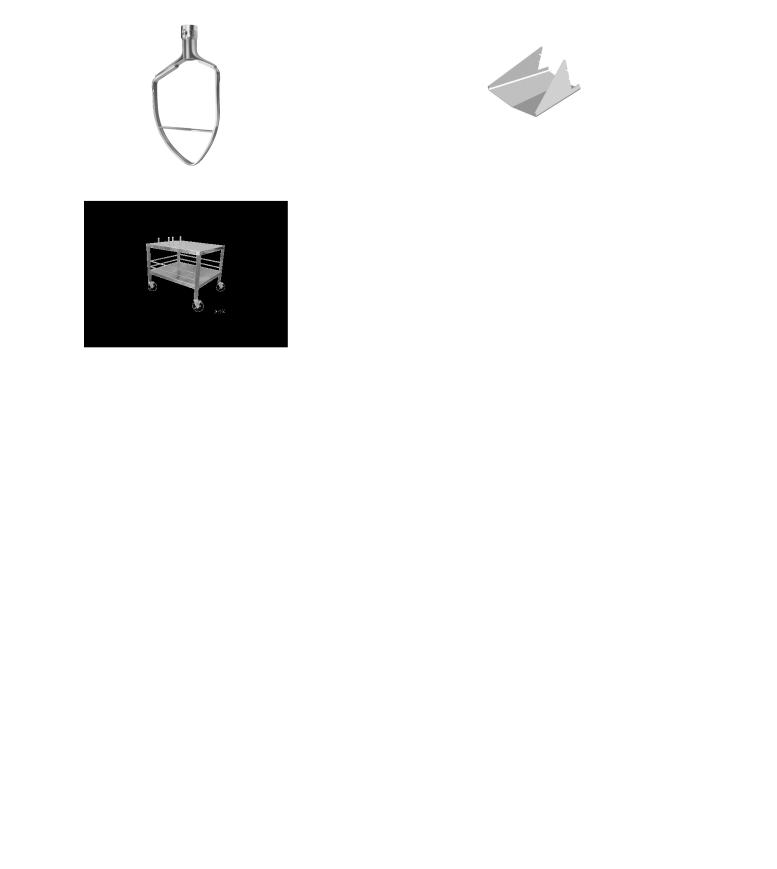
12 & 20 Qt. P Pasty Knife |
12 & 20 Qt. Ingredient Chute |
12 & 20 Qt. Table
 Unplug machine power cord before beginning any cleaning procedures.
The mixer should be thoroughly cleaned daily. DO NOT use a hose to clean the mixer, it should be washed with a clean, damp cloth. The base allows ample room for cleaning under the mixer. The apron (Fig 1), may be removed for cleaning by loosening the screws. The drip cup (Fig. 1) should be removed (which is secured with 3 screws) periodically and wiped clean. For cleaning the bowl guard wire cage refer to page 15.
17
HL200 Mixer Technical Manual Page 23 of 111
 Unplug machine power cord before beginning any maintenance procedures.
Slideway |
Planetary |
|
|
|
Seal |
Fig. 12 |
Fig. 13 |
LUBRICATION Slideways
The slideways (Fig. 12) should be lubricated approximately twice a year. To reach these areas, fully lower the bowl support and remove the apron, which is secured by slotted screws. Wipe a thin coat of Lubriplate 630AA on the bowl pad area of the bowl supports and on each slideway. Install the apron.
Planetary Seal
Occasionally, the planetary seal (Fig. 13) may become dry and begin to squeak. To correct this, work a little lubrication (mineral oil) under the lip of the seal.
18
HL200 Mixer Technical Manual Page 24 of 111
ADJUSTMENTS Agitator Clearance
The agitator clearance should be checked periodically. The agitator must not touch the bowl and the maximum clearance between the bottom of the bowl and the B flat beater is 1/8" (3 mm); the maximum clearance between the bottom of the bowl and the ED dough arm is 5/16”(8 mm).
Install a bowl and agitator (e.g., beater). If the bowl and beater come into contact before the bowl support reaches its stop, adjust the stop screws. Refer to Adjust the Bowl/Agitator Clearance.
Measure Clearance
Pour enough flour in the bowl to cover the bottom of the bowl where the beater travels. With the bowl fully raised (beater should not touch the bottom of the bowl), briefly run the mixer at the lowest speed.
Turn off the mixer, disconnect the electrical power supply, and measure the depth of flour where the beater has traced a path. This measurement should be taken at several points around the bowl to assure accuracy.
Adjust the Bowl/Agitator Clearance
xRemove the apron (which is secured by screws).
xAdjust the clearance by moving the stop screws counterclockwise to increase the clearance or clockwise to decrease the clearance.
x After the adjustments are made, replace the |
Stop |
apron and secure it with the screws. |
Screw |
|
|
x Carefully operate the bowl lift several times to check |
|
the adjustment. |
Fig. 14 |
|
19
HL200 Mixer Technical Manual Page 25 of 111
F34922 Rev D (Nov. 2008) |
PRINTED IN U.S.A. |
20
HL200 Mixer Technical Manual Page 26 of 111
USE AND APPLICATIONS HANDBOOK
For Mixer
Mixer
 ®
®
Attachments and Accessories
FORM 34901 Rev D (May 2007)
HL200 Mixer Technical Manual Page 27 of 111
2
HL200 Mixer Technical Manual Page 28 of 111
Economical, Dependable, Versatile
. . . Your Hobart Mixer
The Hobart Mixer brings profit to your operation every time you use it. Uniform and consistent mixing reduces waste and improves process control. Smooth surfaces and durable construction make cleanup fast and easy. This all means economical operation for you.
Because of its reliability, your Hobart Mixer will give years of dependable, low cost service.
The Hobart Mixer's planetary action assures uniform mixing. The mix arm reaches every part of the batch. It rotates on its axis opposite to the direction that it moves around the bowl. Thorough mixing, blending and aerating of ingredients yields consistent, predictable results every time. You can depend on it.
Hobart Mixers are flexible in the kitchen. They quickly accept attachments to do many different jobs. They are also designed to optimize attachment operating speeds for various operations such as shredding, grinding and slicing. The Hobart Legacy allows for more than one size bowl, and several agitator styles are available to handle your specific mixing tasks. Your Hobart Mixer is adaptable to your needs.
We build them that way for you. Our reputation depends on it.
3
HL200 Mixer Technical Manual Page 29 of 111

Beaters, Whips, Dough Hooks, Pastry Knives
. . . and How to Use Them
This section illustrates and names the various mixer agitators and discusses their applications. General information on how to get the best results from your Hobart mixer is also provided. As is always the case with the art of cooking, your best creations are achieved by carefully proving your methods and formulas and evaluating the results.
The discussions on mixer performance and agitator uses are similar for planetary action mixers regardless of size. That is not to say that the same mix times will apply. This handbook offers suggestions and guidelines only. The cooking is up to you.
Attachments and accessories and their uses are discussed in the last section of the handbook.
CLEANING NEW MIXER BOWLS AND ACCESSORIES
Before using the first time, thoroughly wash new mixer bowls and agitators (beaters, whips, dough hooks and pastry knives). Wash in hot water and a mild detergent solution, rinse with either a mild soda or vinegar solution, and thoroughly rinse with clear water. Also follow this cleaning procedure for bowls and agitators before whipping egg whites or whole eggs.
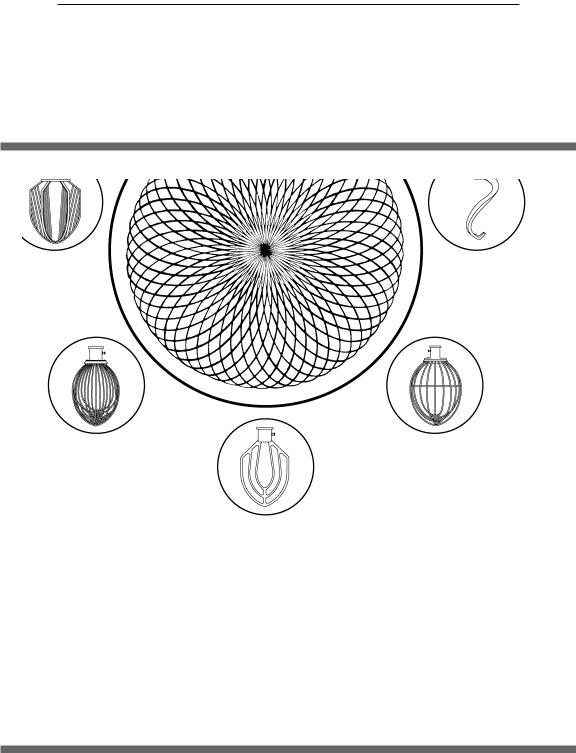
AGITATORS AND THEIR USES
Hobart Quick ReleaseTM agitators are available for the Legacy mixers and for the type of product that is being mixed.
The B Flat Beater is a multi-purpose agitator used for mashing potatoes and mixing cakes, batters or icings. It is also used in applications requiring a creaming or rubbing action and uniform dispersion of ingredients. Use first speed for starting most operations; medium speed for finishing.
The D Wire Whip is designed for maximum blending of air into light products. Uses include: whipping cream, beating egg whites, mixing very light icings, meringues and all similar applications. The D Wire Whip is most commonly used in third and fourth speed.
4
HL200 Mixer Technical Manual Page 30 of 111
 Loading...