


Videorecorder
VTMX910EUK
Operating instructions

&
OPERATING INSTRUCTIONS IN BRIEF
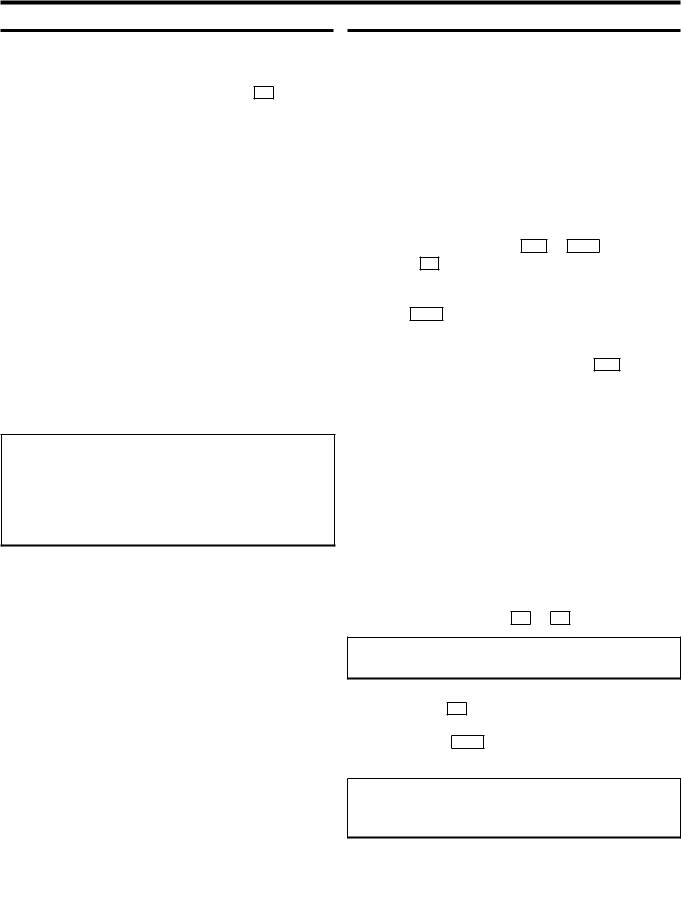
The remote control
VTR/TV
STANDBY m
0-9
SELECT
CLEAR (CL)
REC/OTR n
REC/OTR A
STILL R
TV monitor : To switch between TV reception and VCR playback
Switch on or off : To switch set on or off, interrupt menu function, interrupt a programmed recording (TIMER)
Number buttons: 0 - 9
Select: To select a function
Delete : To delete last entry or clear a programmed recording (TIMER)
Record: To record the programme selected Press REC/OTR n and REC/OTR A at the same time
Button to activate recording
Still picture : To stop the tape and show a still picture
INDEX E Index search: In combination with H /
I : to search for previous or next recording on the cassette
G Playback : To play a cassette
HRewind : During STOP and STANDBY: rewind, during PLAYBACK: reverse scanning
IForward wind: During STOP and STANDBY: forward wind, during PLAYBACK: forward scanning
hPause/Stop: To stop the tape, except during TIMER-recording
;P+ Select: To select the next line or programme number
Q Select: Cursor left
OK Store/Confirm: To store or confirm entry
P Select: Cursor right
MENU Menu : To call up or end main menu
P- = Select: To select the previous line or programme number
TIMER TIMER: To make a TIMER programming with VIDEO Plus+ or to alter or clear a programmed TIMER

&
Front of the set |
|
Back of the set |
|
|
|
Standby : To switch off or on, interrupt a function, interrupt a programmed recording |
|
|
4 |
Mains socket: To connect the mains cable |
|
|
m |
|
|
|
Scart socket 2: To connect a satellite receiver, decoder, video recorder, etc. (programme |
|
|
|
|
(TIMER) |
|
|
|
|
|
|
|
AV2 EXT2 |
||||
|
|
|
TV monitor : To switch between TV reception and VCR playback |
|
|
|
number ’E2’) |
|
VCR/TV |
|
|
|
|
||
|
|
|
|
|
|
|
Scart socket 1: To connect the TV set (programme number ’E1’) |
|
|
|
Select: One line or programme number down |
AV1 EXT1 |
|||
PROG r |
|
|
|
Aerial input socket: To connect the aerial cable |
|||
|
|
|
|
|
|
|
|
|
|
|
Select: One line or programme number up |
|
2 |
||
PROG q |
|
|
|
Aerial output socket: To connect the TV set |
|||
|
|
|
|
|
|
||
|
|
|
Record: To record the programme selected |
3 |
|||
|
REC n |
|
|
|
|
||
HRewind : During STOP and STANDBY: rewind, during PLAYBACK: reverse scanning
IForward wind: During STOP and STANDBY: forward wind, during PLAYBACK: forward scanning
hPause/Stop, eject cassette: To stop the tape and eject the cassette
GPlayback : To play a cassette
JEject: To eject a cassette

OPERATING INSTRUCTIONS HITACHI VT-MX910EUK
Thank you for buying a HITACHI video recorder. The VT-MX910EUK is one of the most sophisticated and simple-to-use video recorders (VCR) on the market. With this VCR you can record and play VHS-standard cassettes.
Please take the time to read this operating manual before using your video recorder.
Safety instructions and other notes
ADanger: High voltage!
Do not remove the top cover as there is a risk of an electrical shock!
AThe video recorder does not contain any components that can be repaired by the customer. When the video recorder is connected to the power supply there are some components that are constantly operational. To switch off the video recorder completely you must disconnect it from the power supply.
BMake sure that air can circulate freely through the ventilation slots on the video recorder.
BMake sure that no objects or liquids enter the video recorder. If liquid is spilt into it, disconnect the video recorder immediately from the power supply and call the After-sales Service for advice.
BThe video recorder should not be used immediately after transportation from a cold to a hot area or vice versa, or in conditions of extreme humidity.
After unpacking the video recorder, it should be allowed to acclimatize for at least three hours before installation.
CThis operating instruction has been printed on nonpolluting paper.
CDeposit old batteries at the relevant collection points.
CPlease make use of the facilities available in your country for disposing of the packaging of the video recorder in a way that helps to protect the environment.
CThis electronic equipment contains many materials that can be recycled. Please inquire about the possibilities for recycling your old set.
•VIDEO Plus+ and PlusCode are registered trademarks of Gemstar Development Corporation. The VIDEO Plus+ system is manufactured under licence from Gemstar Development Corporation.
So that you can identify your machine in the event of theft, enter the serial number (PROD.NO) here. The serial number is printed on the type plate fixed at the rear of the set.
MODEL NO. |
VT-MX910EUK |
PROD.NO: . . . . . .
This product complies with the requirements of the Directive 73/23/EEC + 89/336/EEC + 93/68/EEC.
Interference
The Department of Trade and Industry operates a Radio Investigation Service to help TV licence holders improve reception of BBC and ITC programmes where these are being spoilt by interference.
If your dealer cannot help, ask at a Main Post Office for the booklet ’How to Improve Television and Radio Reception’.
Technical information
Voltage : 220-240V/50Hz
Power consumption : 12,5W
Power consumption (Standby) : less than 4W (clock display off)
Winding time: approx. 100 seconds (Cassette E-180)
Measurements in cm (W / H / D): 38.0 / 9.3 / 26.0 Number of video heads: 2
Recording/Playback time: 4 Hours (Cassette E-240)
8 Hours (LP) (Cassette E-240)
List of accessories
•Operating instructions
•Remote control and batteries
•Aerial cable
•Mains cable
•Quick install guide
1

CONTENTS
1. CONNECTING YOUR VIDEO RECORDER . . . . . . . . . . . . . . 3
Placing the batteries in the remote control . . . . . . . . . . . 3 Connecting your video recorder to the TV set . . . . . . . . . 3 Connecting with a scart cable . . . . . . . . . . . . . . . . . . . . . . 3 Connecting without a scart cable . . . . . . . . . . . . . . . . . . . 4 Connecting other equipment . . . . . . . . . . . . . . . . . . . . . . . . 4
2. INSTALLING YOUR VIDEO RECORDER . . . . . . . . . . . . . . . 5
Initial installation . . . . . . . . . . . . . . . . . . . . . . . . . . . . . . . . . . 5 Allocating a decoder . . . . . . . . . . . . . . . . . . . . . . . . . . . . . . 5 Manual TV channel search . . . . . . . . . . . . . . . . . . . . . . . . . 6 Satellite receiver . . . . . . . . . . . . . . . . . . . . . . . . . . . . . . . . . . 6 Special installation functions . . . . . . . . . . . . . . . . . . . . . . . 7 Automatic TV channel allocation (Follow TV) . . . . . . . . . 7 Automatic TV channel search (Autoinstall) . . . . . . . . . . . 7 Monitor function . . . . . . . . . . . . . . . . . . . . . . . . . . . . . . . . . . 8 Sorting and clearing TV channels manually . . . . . . . . . . . 8 Setting the time and date . . . . . . . . . . . . . . . . . . . . . . . . . . . 8
3. IMPORTANT NOTES FOR OPERATION . . . . . . . . . . . . . . . |
9 |
|
|
General information . . . . . . . . . . . . . . . . . . . . . . . . . . . . . . . |
9 |
|
Saving energy . . . . . . . . . . . . . . . . . . . . . . . . . . . . . . . . . . . . |
9 |
|
Emergency interrupt . . . . . . . . . . . . . . . . . . . . . . . . . . . . . . . |
9 |
|
The symbols on your video recorder display . . . . . . . . . |
10 |
|
Summary of user guide . . . . . . . . . . . . . . . . . . . . . . . . . . . |
11 |
|
User guide (OSD) . . . . . . . . . . . . . . . . . . . . . . . . . . . . . . . . . |
11 |
4. |
PLAYBACK FUNCTIONS . . . . . . . . . . . . . . . . . . . . . . . . . . |
12 |
|
Playing a cassette . . . . . . . . . . . . . . . . . . . . . . . . . . . . . . . . |
12 |
|
Playing NTSC cassettes . . . . . . . . . . . . . . . . . . . . . . . . . . . |
12 |
|
Tape position indication . . . . . . . . . . . . . . . . . . . . . . . . . . . |
12 |
|
Searching for tape position with the picture (picture |
|
|
search) . . . . . . . . . . . . . . . . . . . . . . . . . . . . . . . . . . . . . . . . . |
13 |
|
Still picture . . . . . . . . . . . . . . . . . . . . . . . . . . . . . . . . . . . . . . |
13 |
|
Searching for tape position without the picture (wind |
|
|
and rewind) . . . . . . . . . . . . . . . . . . . . . . . . . . . . . . . . . . . . . |
13 |
|
Easy View . . . . . . . . . . . . . . . . . . . . . . . . . . . . . . . . . . . . . . . |
13 |
|
Tape Finder . . . . . . . . . . . . . . . . . . . . . . . . . . . . . . . . . . . . . |
13 |
|
Automatic search for a tape position (index search) . . |
13 |
|
Automatic search for a blank space on the tape . . . . . |
13 |
|
Skipping commercials automatically . . . . . . . . . . . . . . . . |
14 |
|
Picture interference . . . . . . . . . . . . . . . . . . . . . . . . . . . . . . |
14 |
|
Tracking during playback . . . . . . . . . . . . . . . . . . . . . . . . . |
14 |
|
Tracking during still picture . . . . . . . . . . . . . . . . . . . . . . . |
14 |
5. |
MANUAL RECORDING . . . . . . . . . . . . . . . . . . . . . . . . . . . . |
15 |
|
Recording without automatic switch-off . . . . . . . . . . . . |
15 |
|
Recording with automatic switch-off (OTR |
|
|
one-touch-recording) . . . . . . . . . . . . . . . . . . . . . . . . . . . . . |
15 |
|
Protecting your recordings . . . . . . . . . . . . . . . . . . . . . . . . |
15 |
|
Auto-assembling . . . . . . . . . . . . . . . . . . . . . . . . . . . . . . . . . |
15 |
|
Selecting the recording speed (SP or LP) . . . . . . . . . . . . |
16 |
|
Automatic recording from a satellite receiver (SAT |
|
|
RECORDING) . . . . . . . . . . . . . . . . . . . . . . . . . . . . . . . . . . . . |
16 |
|
’Direct Record’ . . . . . . . . . . . . . . . . . . . . . . . . . . . . . . . . . . . |
17 |
|
Switching ’Direct Record’ on or off . . . . . . . . . . . . . . . . . |
17 |
6. |
PROGRAMMED RECORDING (TIMER) . . . . . . . . . . . . . . . |
18 |
|
’VPS’ (Video Programming System) and ’PDC’ |
|
|
(Programme Delivery Control) . . . . . . . . . . . . . . . . . . . . . |
18 |
|
Programming a recording (with ’VIDEO Plus+’) . . . . . . . |
18 |
|
Programming a recording (without ’VIDEO Plus+’) . . . . |
19 |
|
How to check or change a programmed recording |
|
|
(TIMER) . . . . . . . . . . . . . . . . . . . . . . . . . . . . . . . . . . . . . . . . . |
20 |
|
How to clear a programmed recording (TIMER) . . . . . . |
20 |
7. |
ADDITIONAL FUNCTIONS . . . . . . . . . . . . . . . . . . . . . . . . . |
21 |
|
Switching the TV system . . . . . . . . . . . . . . . . . . . . . . . . . . |
21 |
|
Child lock . . . . . . . . . . . . . . . . . . . . . . . . . . . . . . . . . . . . . . . |
21 |
|
Switching the on-screen display (OSD) off or on . . . . . |
21 |
|
Continuous playback . . . . . . . . . . . . . . . . . . . . . . . . . . . . . |
22 |
|
Automatic switch-off . . . . . . . . . . . . . . . . . . . . . . . . . . . . . |
22 |
|
Reducing picture disturbance - optimizing the |
|
|
modulator . . . . . . . . . . . . . . . . . . . . . . . . . . . . . . . . . . . . . . . |
23 |
|
Switching off the modulator . . . . . . . . . . . . . . . . . . . . . . . |
23 |
8. Before you call an engineer . . . . . . . . . . . . . . . . . . . . . . . |
24 |
|
9. |
GLOSSARY . . . . . . . . . . . . . . . . . . . . . . . . . . . . . . . . . . . . . . |
25 |
|
Technical terms used . . . . . . . . . . . . . . . . . . . . . . . . . . . . . |
25 |
2

1.CONNECTING YOUR VIDEO RECORDER
Placing the batteries in the remote control |
Connecting with a scart cable |
1Open up the battery compartment of your remote control and place the batteries in it as shown in the picture.
2 Close the battery compartment.
Connecting your video recorder to the TV set
We recommend the use of a scart cable. This will give you the best picture and sound quality.
If you install your video recorder for the first time, select one of the following options:
•’Connecting with a scart cable’
If your TV set has a scart socket and you are using a scart cable.
•’Connecting without a scart cable’
If you are not using a scart cable.
1 Switch off the TV set.
2 Remove the aerial cable plug from your TV set and insert it into the 2 socket at the back of the video recorder.
3 Plug one end of the aerial cable provided into the 3 socket on the video recorder and the other end into the aerial input socket on your TV set.
4 Plug one end of a scart cable into the AV1 EXT1 scart socket at the back of the video recorder and the other end into the suitable scart socket on your TV set (see instruction manual TV set).
5 Switch on the TV set.
6Insert one end of the mains cable into the mains socket 4 at the back of the video recorder and the other end
into the wall socket.
7If your TV set automatically switches to programme number e.g.: ’EXT’, ’0’, or ’AV’, this text will appear on the TV screen:
CONGRATULATIONS
YOU NOW OWN A NEW
VIDEO RECORDER
CONTINUEpOK
Note: If your TV set does not switch to programme number e.g.: ’EXT’, ’0’, or ’AV’ automatically, select the programme number for the video recorder manually (see instruction manual TV set).
8Then, read the paragraph ’Initial installation’ in the chapter ’INSTALLING YOUR VIDEO RECORDER’.
3

Connecting without a scart cable |
Connecting other equipment |
||
|
You can connect additional equipment to the |
|
socket. |
|
AV2 EXT2 |
||
|
For example: a decoder, a satellite receiver or a camera |
||
|
recorder. |
||
1 Switch off the TV set.
2 Remove the aerial cable plug from your TV set and insert it into the 2 socket at the back of the video recorder.
3 Plug one end of the aerial cable provided into the 3 socket on the video recorder and the other end into the aerial input socket on your TV set.
4Insert one end of the mains cable into the mains socket 4 at the back of the video recorder and plug the other
end into the wall socket.
5Switch on your TV set and select the programme number that you have chosen for video playback (see instruction manual TV set).
6 Tune in the TV set until this picture appears.
Note: The video recorder will now transmit on channel 35 or 583MHz.
CONGRATULATIONS
YOU NOW OWN A NEW
VIDEO RECORDER
CONTINUEpOK
Note: If the picture quality of TV channels on your TV is poor, please read the section ’Reducing picture disturbance - optimizing the modulator’ in the chapter ’ADDITIONAL
FUNCTIONS’.
7When the TV has been tuned read the paragraph ’Initial installation’ in the chapter ’INSTALLING YOUR VIDEO RECORDER’.
4
2.INSTALLING YOUR VIDEO RECORDER
Initial installation |
|
Allocating a decoder |
1 Confirm the picture on the TV screen with OK on the remote control. ’Autoinstall’ starts. This message will appear:
AUTO INSTALL
SEARCHING
00 TV CHANNELS FOUND
ƒƒƒƒƒƒƒ__________________
PLEASE WAIT...
Wait until all the TV channels have been found. This can take several minutes.
2When all TV channels have been found, ’STORED’ will briefly appear.
The initial installation is now complete.
Note: Check the time and the date. Read the section ’setting the clock and date’ in this chapter.
*If you have connected a satellite receiver, please read the section ’Satellite receiver’.
*If you have connected a decoder, you must install it as described in the next section.
Some TV stations will send coded TV channels, that you can only watch when you use a decoder. You can connect such a decoder (descrambler) to your video recorder. With the following function, the connected decoder will automatically be activated for the TV programme you want to watch.
1Switch on the TV set. If required, select the programme number for the video recorder.
2 On the video recorder, use ;P+ or P- = or number buttons 0-9 on the remote control to select the programme number you want to allocate the decoder to.
3Press MENU on the remote control. The main menu will appear.
4 Select the line ’MANUAL SEARCH’ with ;P+ or
|
P- = |
and confirm with |
OK |
. |
|
|
|
|
|
|
|
MANUAL SEARCH |
|
|
|
|
|
|
|
|
|
PROGRAMME NUMBER |
è P01 |
p |
|||||
|
|
S-CHANNEL |
|
|
|
NO |
|
|
|
|
|
CHANNEL NUMBER |
21 |
|
|
|
|||
|
|
DECODER |
|
|
|
OFF |
|
|
|
________________________________ |
|
||||||||
|
|
EXITpMENU |
STOREpOK |
|
|
|
|||
5 Select the line ’DECODER’ with |
|
|
or |
|
. |
||||
|
P- = |
;P+ |
|||||||
6 Select function ’ON’ with Q or P .
Note: When you select ’OFF’, the decoder will not be allocated.
7 Confirm with OK .
8To end, press MENU .
Your decoder has now been allocated to this TV channel.
Note: When the function is switched on, ’DEC’ will appear in the video recorder display for the TV channel you have selected.
BBC1
5

Manual TV channel search
In certain cases the ’Automatic TV channel search’ may not be able to find all of the TV channels (e.g. coded TV channels). In that case, use this manual method to set the channels.
1Switch on the TV set. If required, select the programme number for the video recorder.
2Press MENU on the remote control. The main menu will appear.
3 Select the line ’MANUAL SEARCH’ with |
|
or |
|||
P- = |
|||||
|
|
and confirm with OK . |
|
|
|
|
;P+ |
|
|
|
|
|
|
MANUAL SEARCH |
|
|
|
|
|
PROGRAMME NUMBER |
è P01 |
p |
|
|
|
S-CHANNEL |
NO |
|
|
|
|
CHANNEL NUMBER |
21 |
|
|
|
|
DECODER |
OFF |
|
|
________________________________
EXITpMENU STOREpOK
4 Select the line ’PROGRAMME NUMBER’ with P- = or
;P+ .
5Select the desired programme number (e.g.: ’P01’) with Q or P .
6In the line ’S-CHANNEL’, use P to select: ’NO’: To enter the channel
’YES’: To enter a special channel
7Enter the channel of the desired TV channel in line ’CHANNEL NUMBER’ with the number buttons 0-9 .
Note: If you don’t know the channel number of the desired TV channel, hold P in line ’CHANNEL NUMBER’ to start
the automatic search.
Repeat automatic search you until have found the desired TV channel. A changing channel number will appear on the TV screen.
8If you want to allocate a decoder, in line ’DECODER’ select ’ON’ with P .
9 Press OK to store the TV channel. ’STORED’ will briefly appear on the TV screen.
Note: If you want to search for further TV channels, start again at step 3.
0 To end, press MENU .
Satellite receiver
You can receive channels from the satellite receiver via the scart socket AV2 EXT2 .
To do this, select programme number ’E1’ with 0 on the remote control and then select programme number ’E2’ with
P- = . You should select the satellite channels on the satellite receiver itself.
6

Special installation functions
You can select one of the following installation functions in order to adapt the video recorder to your own specific requirements.
Automatic TV channel allocation (Follow TV)
With this function, the video recorder stores the channels in the same order as on the TV set. This only works if the video recorder (socket AV1 EXT1 ) and the TV set are connected with a scart cable.
Note: You must switch off any equipment connected to socket AV2 EXT2 .
1Switch on the TV set. If required, select the programme number for the video recorder.
2Press MENU on the remote control. The main menu will appear on the screen.
MENU
CLOCK
AUTO INSTALL
MANUAL SEARCH
FOLLOW TV
TV CHANNEL ALLOC.
RECORD SPEED
AUTO STANDBY
TV SYSTEM
SPECIAL SETTINGS
________________________________
… OK
†
3 Select the line ’FOLLOW TV’ with P- = or ;P+ and confirm with OK . Take notice of the message on the TV screen.
4 Press OK . ’TV01’ will appear in the video recorder display.
TV01
5 Select programme number ’1’ on the TV set.
6Confirm with OK on the video recorder-remote control. The video recorder compares the TV channels on the TV set and the video recorder.
When the video recorder finds the same TV channel as the TV set, then it stores it at ’P01’.
Note: When ’NOTV’ (no signal from TV set) appears in the display, the TV channels can not be allocated automatically. In this case, read paragraph: ’Manual TV channel allocation’.
7 Wait until e.g.: ’TV02’ appears.
8 Select the next programme number, e.g.: ’2’ on the TV set.
9 Confirm with OK on the video recorder-remote control.
Note: If you have allocated the wrong TV channel, you can go back one step with CLEAR (CL) .
0Repeat steps 7to 9until all TV channels have been allocated.
A To end, press MENU .
Automatic TV channel search (Autoinstall)
The video recorder will search for all TV channels. It stores TV channels found in the following sequence: BBC 1, BBC 2, ITV, CH 4, CH 5, SKY, others.
Note: If you want to start the automatic TV channel search again, then follow the instructions below.
1Switch on the TV set. If required, select the programme number for the video recorder.
2Press MENU on the remote control. The main menu will appear.
3 Select the line ’AUTO INSTALL’ with P- = or ;P+ .
4 Press OK . The ’Automatic TV channel search’ starts.
AUTO INSTALL
SEARCHING
00 TV CHANNELS FOUND
ƒƒƒƒƒƒƒ__________________
PLEASE WAIT...
Wait until all TV channels have been found. This can take several minutes.
7
 Loading...