


LCD Color Television
User Manual
L32AX03A
Thank you for purchasing this HITACHI product.
To obtain the best performance and safety, please read this manual carefully. Please keep this manual for future reference.

Thank you for purchasing this HITACHI LCD Color Television.
The instructions in this manual are described mainly with the remote control.
You can also use the buttons on the TV if they have the same names as those on the remote control. To obtain the best performance and safety, please read this manual carefully.
Please keep this manual for future reference.
Contents
Important Safety Instructions |
3 |
|
|
Supplied Accessories |
4 |
|
|
Preparation |
5 |
Stand Installation |
5 |
Detaching the TV Stand for Wall Mounting |
5 |
Positioning the TV Set |
6 |
Antenna and Power Connections |
6 |
Securing the TV Set |
6 |
Remote Control Batteries Installation |
6 |
Functional Overview |
7 |
Front Panel |
7 |
Side Panel |
7 |
Rear Panel |
8 |
Remote Control |
9 |
|
|
Connections |
10 |
|
|
Basic Operation |
11 |
Power On/Off |
11 |
Channel Selection |
11 |
Input Source Selection |
11 |
Volume Adjustment |
11 |
On-Screen Display Selection and Adjustment |
11 |
Stereo/Bilingual Sound Selection |
12 |
Picture Size Selection |
12 |
|
|
Teletext Operation |
13 |
|
|
Menu Operation |
14 |
Picture Menu |
14 |
Audio Menu |
15 |
Timer Menu |
16 |
Function Menu |
17 |
Setup Menu (TV Mode) |
18 |
Setup Menu (RGB Mode) |
20 |
|
|
Troubleshooting |
21 |
|
|
Specification |
22 |
Recommended Signal List |
23 |
|
|
2

Important Safety Instructions
1.Read Instructions - All the safety and operating instructions should be read before the product is operated.
indicated on the marking label. If you are not sure of the type of power supply to your home, consult your appliance dealer or local power company.
2.Retain Instructions - The safety and operating
instructions should be retained for future 11. Power Cord Protection - Power cords should be
reference.
3.Heed Warnings - All warnings on the product and in the operating instructions should be adhered to.
4.Follow Instructions - All operating and use instructions should be followed.
5.Cleaning - Unplug the product from the wall outlet before cleaning. Do not use liquid cleaners or aerosol cleaners. Use a dry cloth for cleaning.
6.Attachments - Only use attachments/ accessories specified by the manufacturer.
7.Water and Moisture - Do not use the product near water, for example, near a bath tub, wash bowl, kitchen sink, or laundry tub, in a wet basement, or near a swimming pool, etc.
8.Accessories - Do not place the product on an unstable cart, stand, tripod, bracket, or table. The product may fall, causing serious injury to a child or adult, and serious damage to the product. Use only with a cart, stand,
tripod, bracket, or table recommended by the manufacturer, or sold with the product. Any mounting of the product should follow the manufacturer’s instructions and should use a mounting accessory recommended by the manufacturer. The product and cart combination should be moved with care. Quick stops, excessive force, and uneven surfaces may cause the product and cart combination to overturn.
9.Ventilation - Slots and openings in the cabinet are provided for ventilation and to ensure reliable operation of the product and to protect it from overheating, and these openings must not be blocked or covered. The openings should never be blocked by placing the product on a bed, sofa, rug, or other similar surface. The product should not be placed in a built-in installation such as a bookcase or rack unless proper ventilation is provided or the manufacturer’s instructions have been adhered to.
10.Power Sources - The product should be operated only from the type of power source
routed so that they are not likely to be walked on or pinched by items placed upon or against them, paying particular attention to cords at plugs, convenience receptacles, and the point where they exit from the appliance.
12.Lightning - For added protection for the product during a lightning storm, or when it is left unattended and unused for long periods of time, unplug it from the wall outlet and disconnect the antenna or cable system. This will prevent damage to the product due to lightning and power-line surges.
13.Power Lines - An outside antenna system should not be located in the vicinity of overhead power lines or other electric light or power circuits, or where it can fall into such power lines or circuits. When installing an outside antenna system, extreme care should be taken to keep from touching such power lines or circuits as contact with them might be fatal.
14.Overloading - Do not overload wall outlets and extension cords as this can result in a risk of fire or electric shock.
15.Object and Liquid Entry - Never push objects of any kind into the product through any openings as they may touch dangerous voltage points or short-out parts that can result in a fire or electric shock. Never spill liquid of any kind on the product.
16.Servicing - Do not attempt to service the product yourself as opening or removing covers may expose you to dangerous voltage or other hazards. Refer all servicing to qualified service personnel.
17.Repairing - Unplug the product from the wall outlet and refer servicing to qualified service personnel under the following conditions:
a.When the power cord or plug is damaged.
b.If liquid has been spilled, or objects have fallen into the product.
c.If the product has been exposed to rain or water.
d.If the product does not operate normally by following the operating instructions. Adjust
3
only those controls that are covered by the operating instructions as an improper adjustment of other controls may result in damage and will often require extensive work by a service technician to restore the product to its normal operation.
e.If the product has been dropped or damaged in any way.
f.When the product exhibits a distinct change in performance this indicates a need for service.
18.Replacement Parts - When replacement parts are required, be sure the service technician has used replacement parts specified by the manufacturer or have the same characteristics as the original part. Unauthorized substitutions may result in fire, electric shock or other hazards.
19.Safety Check - Upon completion of any service or repairs to the product, ask the service technician to perform safety checks to determine that the product is in proper operating condition.
20.Heat - Do not install the product near any heat sources such as radiators, heat registers, stoves, or other products (including amplifiers) that produce heat.
21.Installation Location - Place the product on a firm and flat surface. Avoid placing the product in areas of direct sunlight, heating radiators, closed automobiles, high temperature, high humidity, excessive dust, strong vibration, impact or strong magnetic fields, as the internal parts may be seriously damaged.
22.Hazards of Electrical Shock and Fire - Do not touch the power cord with wet hands. Hold the plug when disconnecting the power cord. Do not pull the power cord. Unplug the power cord from the wall outlet when the product is not used for long periods of time.
23.Hearing Safety - Listen at a moderate volume. Using headphones at high volume can impair your hearing.
• Sometimes, the LCD screen may have some tiny red, blue, white or black spots. This is normal and does not affect the performance.
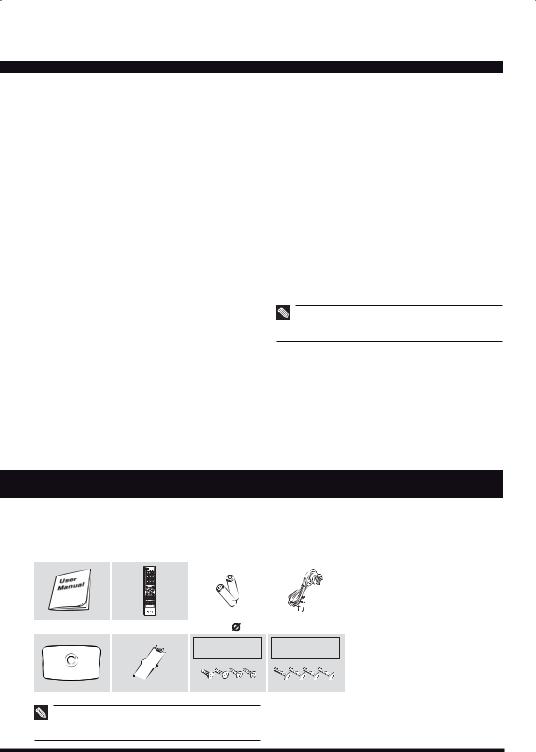
Supplied Accessories
Check the supplied accessories before installation.
In case of missing or damaged, please contact the dealer immediately.
User Manual Remote Control AAA Batteries |
|
Power Cord |
|
|
|
|
|
TV Stand |
Cap |
Screws ( 4x10) |
Screws (M5x15) |
|
|
(For TV stand |
(For wall mount |
|
|
installation) |
bracket installation) |
• The type of power plug provided may be different from the above picture for some countries.
• Please store the screws that are not used.
4

Preparation
Stand Installation
1Carefully place the TV with its front side facing down on a cushioned flat surface.
2Attach the TV stand to the TV as shown.
3Tighten the supplied
 4x10 screws to fix the TV stand securely in
place.
Detaching the TV Stand for Wall Mounting
Before mounting the TV on the wall, the TV stand must be removed.
1Carefully place the TV with its front side facing down on a cushioned flat surface.
2 Unscrew and remove the 4 screws as shown.
3Remove the TV stand with two hands.
 4x10
4x10
• The TV stand may not be securely fixed in place after repeated tightening and loosening the screws.
•During assembling and disassembling the TV stand, please use your hand to support it. Failing to do so may cause the TV stand to fall and result in personal injury.
•After installing the TV stand, please ensure that the screws are tightened firmly. Failure to do so may cause the TV set to tip over or become damage.
4Attach the cap as shown.
• Fasten the wall bracket to the TV using the supplied M5x15 screws.
•For wall bracket installation, refer to the wall bracket instruction guide.
5

|
|
|
|
|
|
|
|
|
|
|
|
|
|
|
|
|
|
|
|
|
|
|
|
|
|
|
|
|
|
|
|
|
|
|
|
|
|
Positioning the TV Set |
|
Securing the TV Set |
||||||||||||||||
|
|
|
|
|
|
|
|
|
|
|
|
|
|
|
|
|
|
|
|
|
|
|
|
|
|
|
|
|
|
|
|
|
|
|
|
|
|
|
|
|
|
|
|
|
|
|
|
|
|
|
|
|
|
|
|
|
|
|
|
|
|
|
|
|
|
|
|
|
|
|
|
|
|
|
|
|
|
|
|
|
|
|
|
|
|
|
|
|
|
|
|
|
|
|
|
|
|
|
|
|
|
|
|
|
|
|
|
|
|
|
|
|
|
|
|
|
|
|
|
|
|
|
|
|
|
|
|
|
|
|
|
|
|
|
|
|
|
|
|
|
|
|
|
|
|
|
|
|
|
|
|
|
|
|
|
|
|
|
|
|
|
|
|
|
|
|
|
|
|
|
|
|
|
|
|
|
|
|
|
|
|
|
|
|
|
|
|
|
|
Place the TV on a firm and flat surface, leaving a space of at least 10cm around the set and 30cm from the top of the set to the wall.
Secure the TV set as shown above using screws that are available in the market.
• If you do not take the above safety measures, the TV set could fall and result in personal injury or physical damage.
Antenna and Power Connections
Remote Control Batteries
Installation
1 2
1Connect the antenna cable into the antenna input terminal at the rear panel and wall antenna socket.
2 Connect the power plug into the wall outlet.
• The type of power plug provided may be different from the above picture for some countries.
1Slide open the battery compartment cover in the direction of the arrow.
2Insert two AAA batteries. Make sure the polarity match the indication inside the battery compartment.
3Slide close the battery compartment cover until it clicks.
• The remote control can be used within the range of 8 meters and about 15° in each direction from the front of the remote control sensor. Make sure there is no obstacle between them.
•If the remote control is not used for a long period of time, remove the batteries to prevent battery leakage.
6
Functional Overview
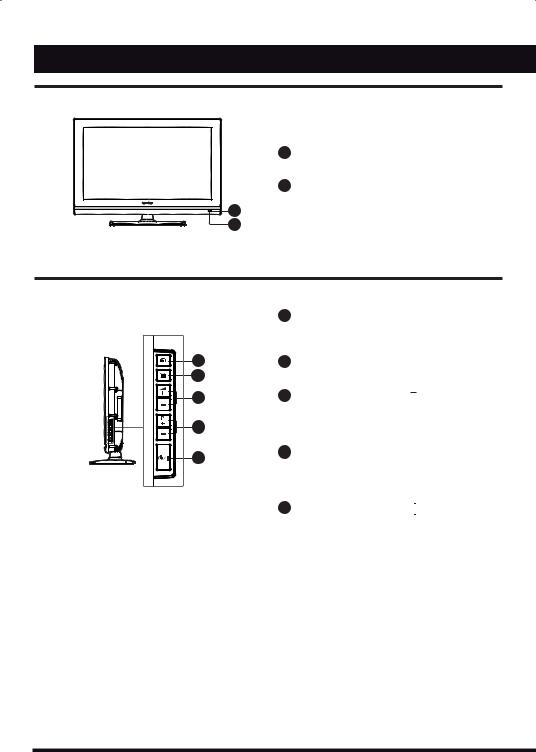
Front Panel
1 |
Remote Control Sensor |
|
Receives signal from the remote control. |
2 |
Power Indicator |
|
Lights up in red when the TV at standby mode. |
1 |
Lights up in green when the TV is turned on. |
2 |
|
Side Panel
3
4
5
6
7
3Input Select (  )
)
Press to select TV, AV1, AV2, AV3, S-VIDEO, AV4, AV5, RGB, HDMI1 or HDMI2 mode.
4Menu (  )
)
Press to enter or exit from the TV menu.
5Volume Up/Down (  /
/  )
)
Press to adjust the volume.
Volume Up/Down buttons also work as Left/ Right Cursor ( 

 ) on TV menu.
6Program Up/Down (  /
/ 
 )
)
Press to select previous/next channel.
Program Up/Down buttons also work as Up/Down Cursor ( 

 ) on TV menu.
7Power On/Standby ( 


 )
)
Press to turn the TV on or standby.
7

Rear Panel
|
8 |
9 |
|
10 |
|
|
|
|
|
|
|
|
|
|
|
|
|
|
|
|
|
|
|
21 22 |
|
|
|
|
|
|
|
|
|
|
|
|
|
|
|
|
|
|
|
|
|
||||
|
|
|
|
|
|
|
|
15 16 17 |
|
|
|
|
|
|
|
|
||||||||
|
|
|
|
|
|
|
|
|
|
|
|
|
|
|
|
|||||||||
|
|
11 |
12 |
13 |
14 |
18 |
19 |
20 |
|
|
||||||||||||||
8 |
Main Power Switch |
|
|
|
|
|
|
|
16 |
AV2 Input terminal |
|
|||||||||||||
|
Press the “ |
” position to turn the main power |
|
|
|
Connect to equipment with composite video |
||||||||||||||||||
|
on or “ ” position to off. |
|
|
|
|
|
|
|
|
|
output. |
|
|
|
|
|
|
|
||||||
9 |
Power Cord Socket |
|
|
|
|
|
|
|
17 |
AV5 Input terminals |
||||||||||||||
|
Connect to power cord. |
|
|
|
|
|
|
|
|
|
Connect to equipment with component video |
|||||||||||||
10 |
HDMI1/ HDMI2 Input terminal |
|
|
|
|
|
|
|
|
|
output. |
|
|
|
|
|
|
|
||||||
|
|
|
|
|
|
18 |
AV2/AV5 Audio Input terminals |
|||||||||||||||||
|
Connect to equipment with HDMI output. |
|
|
|||||||||||||||||||||
11 |
RGB Input terminal |
|
|
|
|
|
|
|
|
|
|
Connect to equipment with audio output. |
||||||||||||
|
|
|
|
|
|
|
|
|
|
|
|
|
|
|
|
|
|
|
|
|
||||
Connect to PC.
12S-VIDEO Input terminal
Connect to equipment with s-video output.
13AV1 Input terminal
Connect to equipment with composite video output.
14AV4 Input terminals
Connect to equipment with component video output.
15AV1/AV4/S-VIDEO Audio Input terminals
Connect to equipment with audio output.
19AV3 Input terminals
Connect to equipment with audio/composite video output.
20Output terminals
Connect to equipment with audio/composite video input.
21RGB/HDMI Analog Audio Input terminal
Connect to equipment using HDMI-DVI connection or PC with audio output.
22Antenna Input terminal
Connect to equipment with antenna output or wall antenna socket.
8
 Loading...