Heath Zenith SL-5573, SL-5575, SL-5571 User Manual

Model SL-5571 - 150 Watts
Model SL-5573 - 300 Watts
Model SL-5575 - 500 Watts
Quartz Halogen Floodlight
The Heath®/Zenith Quartz Halogen Floodlight disperses light over a wide area, attaches to a standard junction box and is for use with 120 VAC. Canopy and halogen lamp included.
FOR PROPER INSTALLATION AND OPERATION, PLEASE READ THESE INSTRUCTIONS CAREFULLY.
To Avoid Fire or Burn Hazards:
•Allow fixture to cool before touching. The bulb and the fixture operate at high temperatures.
•Keep fixture at least 2" (51 mm) from combustible materials. Do not aim at objects closer than 3 feet (1 m).
•Use a lamp that does not exceed the ratings for your model. Maximum ratings are: SL-5571 - 150 Watts Max; SL-5573 - 300 Watts Max; and SL-5575 - 500 Watts Max.
Fixture Installation Instructions
To avoid Electrical Shock:
 WARNING: Turn power off at the circuit breaker or fuse.
•Follow all warnings listed on fixture.
•Grounding and installations must comply with local codes and the National Electric Code.
•This product should be mounted on a grounded junction box and must be used with the canopy included.
•Permanently mount the fixture to a building or pole.
SL-5571: Designed for wall or ceiling mount. SL-5573 & 5575: Designed for wall mount only.
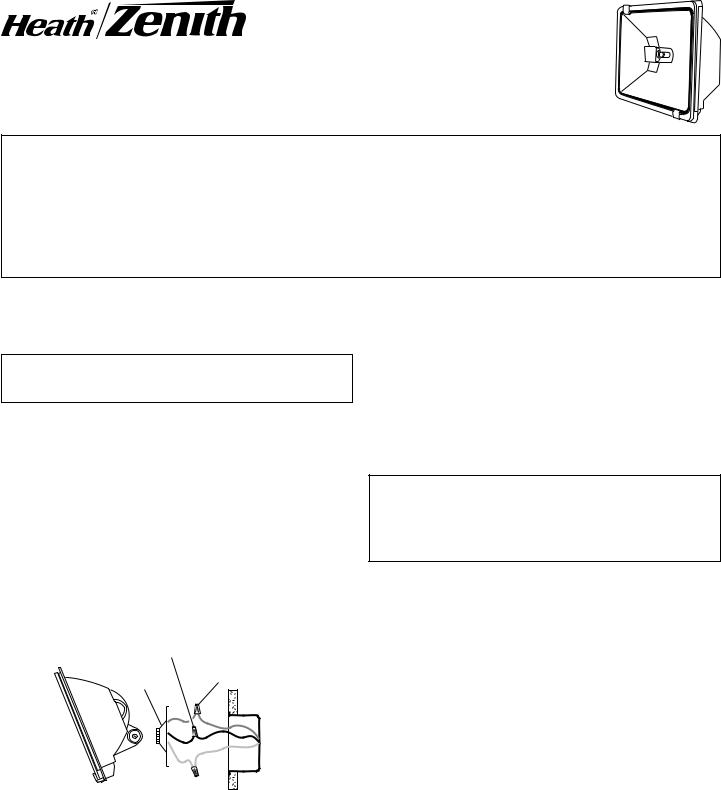
Thread aiming arm into the enclosed canopy and tighten. Apply silicon caulk to joint for a raintight seal. Seal the remaining holes with the enclosed canopy plugs.
Connect the lamp wires to the power source wiring. Secure with wire connectors.
Black to Black |
|
|
|||
Canopy |
Fixture ground to |
||||
junction box ground. |
|||||
|
|
|
|
|
|
|
|
|
|
|
|
|
|
|
|
|
|
|
|
|
|
|
|
|
|
|
|
|
|
|
|
|
|
|
|
Attach the canopy to the junction box (Apply silicon caulk between canopy and junction box for a raintight seal). Keep the fixture horizontal (within +/- 4º) so the bulb inside is horizontal.
If the bulb is not horizontal, the bulb may darken or shatter and fail prematurely.
Loosen the side bolt connected to the arm to aim the fixture up and down.
To avoid water entering fixture, do not aim the fixture above the horizon.
Bulb installation and relamping
Important: Use a clean glove or cloth when handling the new bulb. Oil from your hand may cause the bulb to crack when the fixture heats up and result in premature failure. Use isopropyl (rubbing) alcohol to clean the bulb if it is touched with your bare hands.
When relamping, turn power off and let the fixture cool.
Remove glass cover and remove the old bulb by pushing the bulb towards the right until the left side of the bulb is clear of the left socket.
To insert the new bulb push the bulb into the right socket so the bulb is properly seated in the sockets.
Re-install the glass cover.
Reconnect the power.
White to White 
WIRING FIXTURE
(Product May Vary from Illustration)
No Service Parts Available for this Product
©5982007-1121HeathCo-04 |
LLC |
598-1121-04 |

Modelo SL-5571 - 150 Vatios
Modelo SL-5573 - 300 Vatios
Modelo SL-5575 - 500 Vatios
Faro Halógeno de Cuarzo
El reflector halógeno de cuarzo Heath®/Zenith dispersa la luz sobre una área amplia, se acopla a una caja de empalme estándar y es para usarse con 120V CA. Se incluyen lámpara halógena y toldo.
Para su correcta instalacion y funcionamiento, por favor lea cuidadosamente estas instrucciones.
Para evitar pellgros de fuego o de quemazón:
•Deje que el artefacto se enfríe antes de tocarlo. La bombilla y el artefacto funcionan a altas temperaturas.
•Mantenga el artefacto por lo menos a 51 mm lejos de materiales combustibles. No lo apunte hacia objetos que estén más cerca de 1 m.
•Use una lámpara que no exceda la potencia nominal para su modelo. Las potencias nominales máximas son: SL-5571 - máximo 150 vatios; SL-5573- máximo 300 vatios; y SL-5575- máximo 500 vatios.
Instrucciones para la instalación del artefacto
Para evitar el shock eléctrico:
 ADVERTENCIA: Desconecte la energía en el cortacircuito.
•Obedezca todas las precauciones listadas en este aparato.
•La toma de tierra y la instalación deben cumplir con los códigos locales y con el Código Eléctrico Nacional.
•Este producto debería ser montado en una caja de empalme puesta a tierra y debe ser usado con el toldo incluido.
•Monte permanentemente el artefacto en un deficio o en un poste.
SL-5571: Diseñado para montaje sobre pared o techo. SL-5573 & 5575: Diseñado para montaje sobre pared sola-
mente.
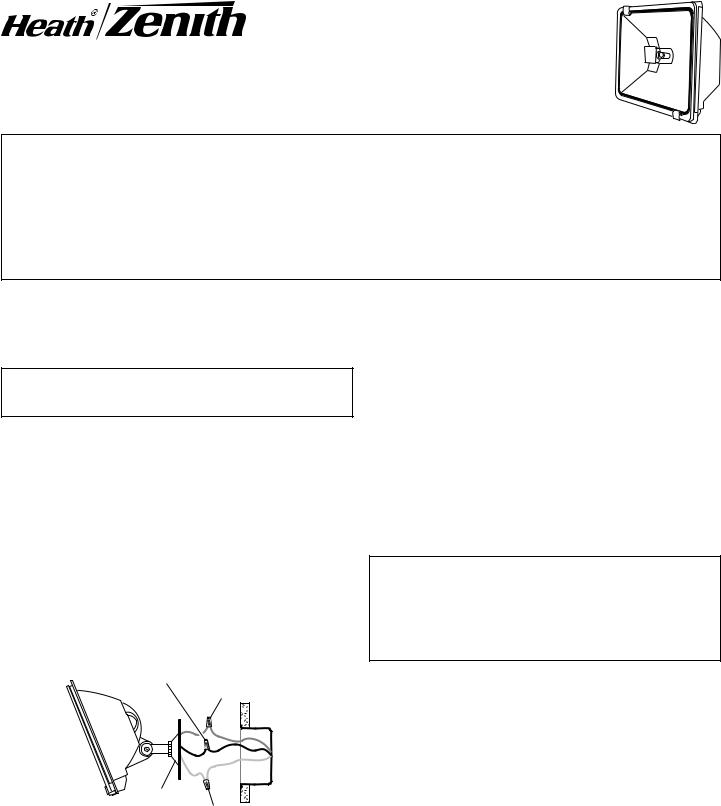
Enrosque el brazo apuntador en el toldo hermético y apriete. Aplique calafateo de silicona a la unión para obtener un sellado impermeable. Selle los orificios restantes con los tapones del toldo hermético.
Alambre a tierra de la Negro a Negro caja de empalme al cable
desnudo del aparato
Toldo
Blanco a Blanco
Conecte los alambres de la lámpara a los alambres de la fuente de energía. Asegúrelos con conectores de alambre.
Acople el toldo a la caja de empalme (Aplique calafateo de silicona entre el toldo y la caja de empalme para obtener un sellado impermeable). Mantenga el aparato horizontal (dentro de +/- 4º) de manera que la bombilla de adentro esté horizontal. Si la bombilla no está horizontal, se puede negrear o astillarse y dejará de funcionar prematuramente.
Afloje la tuerca lateral conectada al brazo para apuntar el aparato hacia arriba o hacia abajo.
Afloje la tuerca lateral conectada al brazo para apuntar el aparato. Evfite el golpe eléctrico y el dañado causado por el agua-man- tenga el aparato abajo del nivel horizontal.
Instalación de la bombilla y cambio de lámpara
Importante: Cuando vaya a colocar la nueva bombilla use un guante limpio, una tela o la espuma que viene con el producto. El aceite de su mano puede hacer que la bombilla se quiebre cuando se caliente y deje de trabajar prematuramente. Use alcohol etílico para limiar la bombilla si la ha tocado con sus manos desprotegidas.
Cuando cambie la lámpara, apague la energía y deje que el aparato se enfríe.
Quite la cubierta de vidrio y quite la bombilla vieja empujándola hacia la derecha hasta que la parte izquierda de la bombilla se haya salido del receptáculo izquierdo.
Para coloca la nueva bombilla, empújela hacia dentro del receptáculo derecho de manera que la bombilla quede correctamente asentada en los receptáculos.
Reinstale la cubierta de vidrio.
Reconecte la energía.
CABLEADO DEL APARATO
(El producto puede ser diferente al de la ilustración)
No hay piezas de servicio disponibles para este producto
© 2007 HeathCo LLC |
598598-1121- -2104-04S |
 Loading...