


TU 970
OWNER’S MANUAL
Power for the Digital Revolution®
Table of Contents
3Introduction
4Front Panel Controls
5Rear Panel Connections
6Remote Control Functions
7Installation and Connections
8Operation
8 Basic Operation
8Station List
9Preset Setting
9 Function Control
9 Station Order
9Signal Error Rate
10Preset Tune
11RDS Operation
12Troubleshooting Guide
13Technical Specifications
Declaration of Conformity
We, Harman Consumer International
2, Route de Tours
72500 Château-du-Loir,
FRANCE
declare in own responsibility, that the product described in this owner’s manual is in compliance with technical standards:
EN 55013/6.1990
EN 55020/12.1994
EN 60065:1993
EN 61000-3-2/4.1995
Carsten Olesen
Harman Kardon Europe A/S
10/03
Typographical Conventions
In order to help you use this manual with the remote control, front-panel controls and rear-panel connections, certain conventions have been used.
EXAMPLE – (bold type) indicates a specific remote control or front-panel button, or rear-panel connection jack
EXAMPLE – (OCR type) indicates a message that is visible on the front-panel information display
1 – (number in a square) indicates a specific front-panel control
– (number in a circle) indicates a rear-panel connection
0– (number in an oval) indicates a button or indicator on the remote
2 TABLE OF CONTENTS

Introduction
Congratulations! With the purchase of the Harman Kardon TU 970 you are about to begin many years of listening enjoyment.
While sophisticated systems are hard at work within the TU 970 to make all of this happen, hookup and operation are simple.
To obtain maximum enjoyment from your new tuner, we urge you to take a few minutes to read through this manual. This will ensure that connections are made properly. In addition, a few minutes spent learning the functions of the various controls will enable you to take advantage of all the power the TU 970 is able to deliver.
If you have any questions about this product, its installation or operation, please contact your dealer. He is your best local source of information.
Description and Features
The TU 970 is equipped with DAB (Digital Audio Broadcast) and RDS (Radio Data System), bringing a wide range of information to radio listeners.
Until now, analogue radio signals such as FM or AM have been subject to numerous kinds of interference on their way from the transmitter to your radio. These problems were caused by mountains, high-rise buildings and weather conditions.
With DAB, you can now receive CD-like quality radio programs without any annoying interference and signal distortion.
Now in use in many countries, RDS is a system for transmitting station identification, a description of the station’s program type, indication of national, regional or local programs and the correct time. RDS also allows you to search for favorite program types. A DOT-matrix display brings all this information to you with high visibility. As more FM stations become equipped with RDS capabilities, the TU 970 will serve as an easy to use center for both information and entertainment.
INTRODUCTION 3
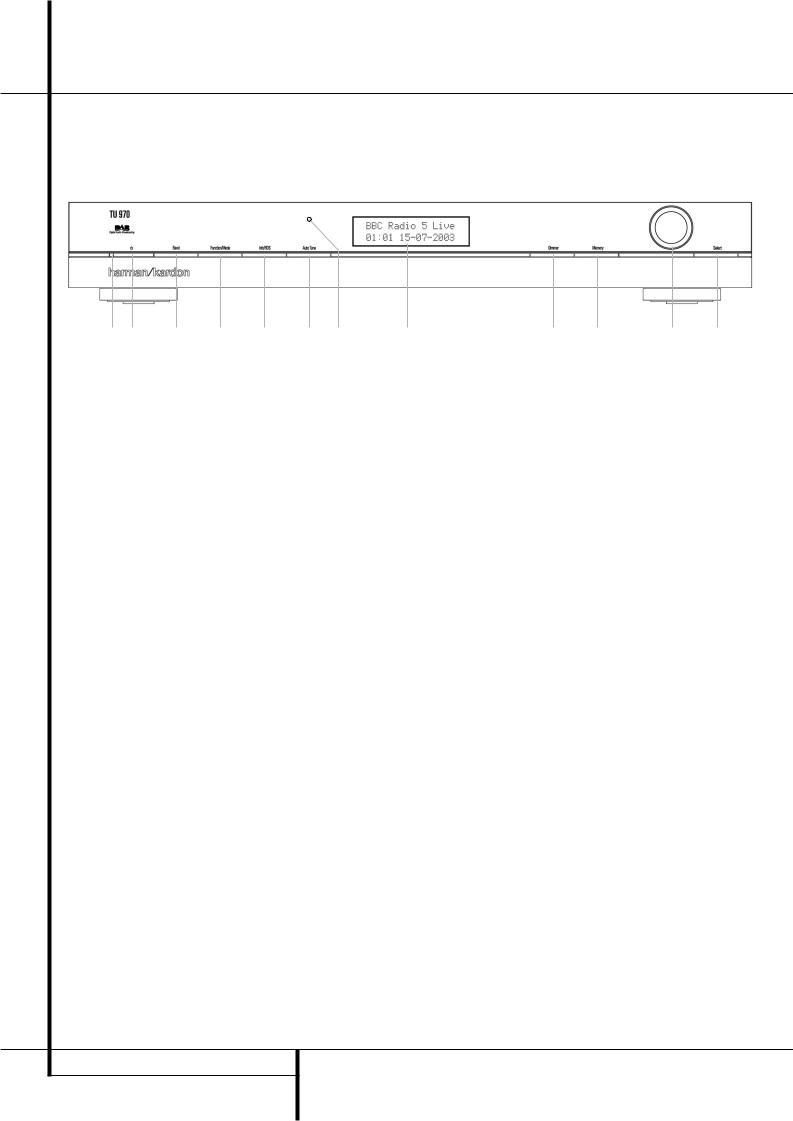
Front Panel Controls
1 2 3 4 5 @ |
6 |
1 Power Indicator
2 System Power Control
3 Band selector
4 Function/FM Mode Selector
1 Power Indicator: This LED will illuminate in amber when the unit is in the Standby mode to signal that the unit is ready to be turned on. When the unit is in operation, the indicator will turn blue.
2 System Power Control: Press this button to turn on the TU 970; press it again to turn the unit off (to Standby). Note that the Power Indicator 1 next to the switch will turn blue when the unit is on.
3 Band Selector: Press this button to change between the DAB, FM and AM frequency bands.
4 Function/FM Mode Selector: In DAB mode, pressing this button will activate station order, signal error rate, preset tune, software version, Dynamic Rate Control or manual tune features. In FM mode, press this button to select the stereo or mono mode for FM tuning. In the stereo mode, the word STEREO will be shown in the Information Display 7, and stereo reception will be provided when stations are transmitting stereo signals. In the mono mode, the left and right signals from stereo broadcasts will be mixed together and reproduced through all channels. Select MONO for better reception of weak signals.
5Info/RDS Button 6 Auto Tune Button 7 Information Display 8 Dimmer
5Info/RDS Button: In DAB mode, pressing this button will change the content of the lower display line of the Information Display. In RDS mode, it will change between the different RDS options.
6Auto Tune Button: In DAB mode, press this button to automatically scan all available local stations. To scan for all available stations, keep the button pressed for three seconds, until
AUTOSCAN FULL is shown in the Information Display 7.
7 Information Display: This dual line display delivers messages and status indications to help you operate the tuner.
8 Dimmer: Press this button to dim the front panel display. The first press of the button will dim the displays to one-half normal brightness; the next press will turn back to normal brightness. The display will return to normal brightness the next time the unit is turned on.
9 Memory Button: Press this button to open the memory position that stores a preset location in the tuner. 10 DAB presets can be stored, as well as 30 FM and 30 AM presets. (See page 9 for more information on tuner presets.)
7 8 |
9 ! |
9 Memory
)Control Ring
!Select
@Remote Control Sensor
) Control Ring: Turn counterclockwise to tune lower frequency stations and clockwise to tune higher frequency stations. When a station with a strong signal is tuned, the Information Display 7 will read TUNED. Turn again to tune to the next frequency increment in Manual Tune Mode, or automatically to the next station with a signal strong enough for acceptable reception in Auto Tune Mode. The ring also controls the parameters in the different menus.
! Select: In FM or AM mode, press this button to select Auto Tune, Manual Tune or Preset Tune. In DAB mode, press this button to select the displayed station.
@ Remote Sensor Window: The sensor behind this window receives infrared signals from the remote control. Aim the remote at this area and do not block or cover it unless an external remote sensor is installed.
4 FRONT PANEL CONTROLS
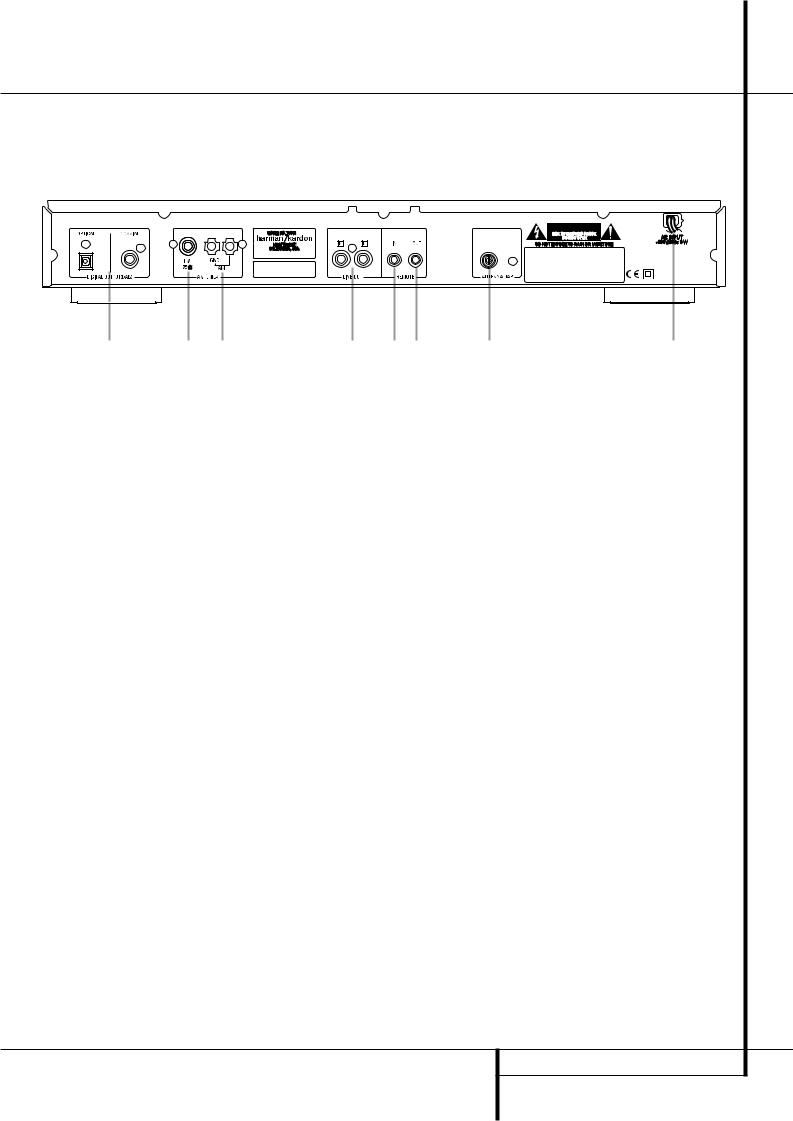
Rear Panel Connections
|
|
|
|
|
|
Optical and Coaxial Digital Outputs
FM Antenna
AM Antenna
Analog Audio Outputs
Optical and Coaxial Digital Outputs:
Connect one of these jacks to the optical or coaxial digital input of your pre amplifier or integrated amplifier, if available.
Note that these digital outputs only contain the digital signal from the DAB stations. For FM/AM reception, you will have to connect the analog outputs at all times.
FM Antenna: Connect an indoor or external FM antenna to this terminal.
AM Antenna: Connect the AM loop antenna supplied with the receiver to these terminals. If an external AM antenna is used, make connections to the AM and GND terminals in accordance with the instructions supplied with the antenna.
DAB Antenna
AC Power Cord
Remote Control Output
Remote Control Input
Analog Audio Outputs: Connect these jacks to the tuner input of your pre amplifier or integrated amplifier for analog audio playback. Be certain to observe proper channel connections using the color-coded cables and connectors so that red connects right channels and white connects left channels.
NOTE: Before making any audio connections, unplug all components of your audio system from their AC power outlets. To reduce the possibility of hum or noise in your system, place all audio interconnection cables away from both AC power cords and speaker wires.
DAB Antenna: Connect a DAB antenna to this terminal.
AC Power Cord: Connect this plug to an AC outlet. If the outlet is controlled by a switch, make certain that it is in the ON position.
Remote Control Output: Connect this jack to the infrared (IR) input jack of another compatible Harman Kardon remote controlled product to have the built-in Remote Sensor on the tuner provide IR signals to other compatible products.
Remote Control Input: Connect the output of a remote infrared sensor, or the remote control output of another compatible Harman Kardon product, to this jack. This will enable the remote control to operate even when the front panel Remote Sensor on the tuner is blocked. This jack may also be used with compatible IR remote control-based automation systems.
REAR PANEL CONNECTIONS 5
 Loading...