


SB 16
Active speaker soundbar
Owner’s Manual
SB 16
Table of Contents
INTRODUCTION |
3 |
DESCRIPTION AND FEATURES |
3 |
INCLUDED ITEMS |
3 |
SOUNDBAR TOP-PANEL CONTROLS |
4 |
SOUNDBAR REAR-PANEL CONTROLS AND CONNECTIONS |
4 |
SUBWOOFER REAR-PANEL CONTROLS |
5 |
SPEAKER PLACEMENT |
6 |
PLACING THE SOUNDBAR ON A TABLE |
6 |
WALL-MOUNTING THE SOUNDBAR |
6 |
PLACING THE SUBWOOFER |
6 |
CONNECTIONS |
7 |
SOURCE CONNECTIONS |
7 |
POWER CONNECTIONS |
8 |
OPERATION |
9 |
TURNING THE SOUNDBAR ON AND OFF |
9 |
TURNING THE SUBWOOFER ON AND OFF |
9 |
ADJUSTING THE SYSTEM’S VOLUME |
9 |
MUTING THE SYSTEM |
9 |
SOUNDBAR SURROUND MODE BUTTON |
9 |
SOUNDBAR SRC (SOURCE) BUTTON |
9 |
SUBWOOFER VOLUME KNOB |
10 |
SOUNDBAR TRIM SWITCH |
10 |
WIRELESS CODE SWITCHES |
10 |
SUBWOOFER CROSSOVER KNOB |
10 |
SUBWOOFER PHASE SWITCH |
10 |
PROGRAMMING THE SOUNDBAR TO RESPOND TO YOUR TV REMOTE |
11 |
TROUBLESHOOTING |
12 |
SPECIFICATIONS |
13 |
2
SB 16
Introduction, Description and Features, Included Items
Introduction |
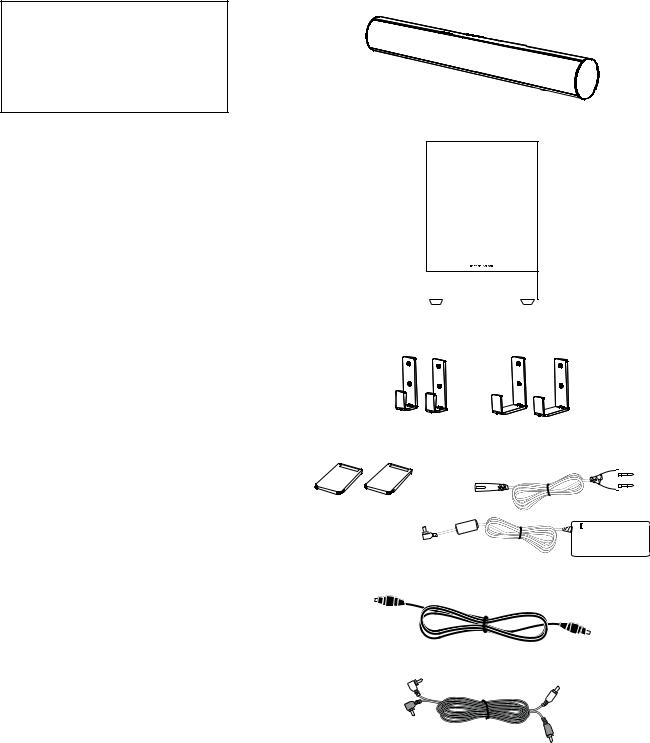
Included Items |
|
One SB 16 CTR soundbar speaker |
Please register your product on our Web site at |
|
www.harmankardon.com. |
|
Note: You’ll need the product’s serial number. |
|
At the same time, you can choose to be |
|
notified about our new products and/or special |
|
promotions. |
|
Thank you for purchasing the harman kardon® SB 16 speaker system, with which you’re about to begin many years of listening enjoyment. The SB 16 has been custom-designed to provide the excitement and power of the cinema experience in your own living room.
While sophisticated electronics and state-of-the-art speaker components are hard at work within the SB 16, hookup and operation are simple.
To obtain maximum enjoyment from your new soundbar speaker system, we urge you to take a few minutes to read through this manual. This will help ensure that the connections you make are correct. In addition, a few minutes spent learning the functions of the various controls will enable you to take advantage of all the power and refinement the SB 16 is able to deliver.
If you have any questions about this product, its installation or its operation, please contact your retailer or custom installer, or visit our Web site at www.harmankardon.com.
Description and Features
The SB 16 is a complete home theater speaker system that includes:
ss! VIDEO SHIELDED STEREO SOUNDBAR SPEAKERA THE 3" #42 WITHHTWO WAY DUAL driver left and right speakers and built-in 25-watt x 2 stereo amplifier
ss!! INCH MM WATT WIRELESSRPOWEREDRSUBWOOFERU THE 3"" 35"
ss7ALL MOUNTMBRACKETS FOR THE SOUNDBAR
ss! FOOT M STEREO AUDIODCABLEBFOROCONNECTING THEHSYSTEM DIRECTLY TO YOUR 46 SS audio output.
The SB 16CTR soundbar contains the system’s left and right speakers and stereo amplifiers, and features digital signal processing with virtual 3D surround circuitry that creates a complete surround-sound experience without any extra speakers or wires. You can set the soundbar on a table in front of your TV; also, the system includes hardware that makes it easy to mount the soundbar on the wall along with your flat-panel TV. You can program the soundbar to respond to your TV remote’s volume, power and source commands.
The SB 16 SUB subwoofer receives its signal from the SB 16CTR soundbar via wireless technology, so you can place it anywhere in your room without having to run any wires. Its 10-inch (250mm) woofer and built-in 100-watt amplifier deliver a movie’s impact and excitement. Other conveniences include a volume control, a phase switch for fine-tuning bass performance to suit your listening environment, and an efficient switching system that senses the presence of an audio signal and automatically switches the subwoofer on.
harman kardon invented the high-fidelity receiver more than 50 years ago. With state- of-the-art features and time-honored circuit designs, the SB 16 system will turn your flat-screen TV into a fun and exciting home theater.
One SB 16 SUB 10-inch (250mm) 100-watt wireless subwoofer
Two sets of wall-mount brackets for the soundbar – one shallow and one extended (for when the optical digital audio input is being used)
Two rubber feet |
One 24V DC power supply and one AC power |
||||
|
cord for the SB 16CTR speaker |
||||
|
|
|
|
|
|
|
|
|
|
|
|
|
|
|
|
|
|
|
|
|
|
|
|
|
|
|
|
|
|
|
|
|
|
|
|
|
|
|
|
|
|
One 1.5m (5-ft) optical digital audio cable
One 2m (6.5-ft) stereo audio cable
Important: If anything is missing, or if any part of your SB 16 system fails to operate properly, contact your dealer immediately.
3

SB 16
Soundbar Top-Panel Controls and
Soundbar Rear-Panel Controls and Connections
Soundbar Top-Panel Controls
|
|
|
Surround |
Volume |
|
|
Source |
|||||||
Power |
|
Mode |
Up/Down |
|
|
Selector |
||||||||
Button |
|
Button |
Buttons |
|
|
Button |
||||||||
|
|
|
|
|
|
|
|
|
|
|
|
|
|
|
|
|
|
|
|
|
|
|
|
|
|
|
|
|
|
|
|
|
|
|
|
|
|
|
|
|
|
|
|
|
|
|
|
|
|
|
|
|
|
|
|
|
|
|
|
Power |
Surround |
Source |
Indicator |
Mode |
Indicator |
|
Indicator |
|
Power Button: When the soundbar is in the Standby mode (the Power Indicator is amber), press this button to turn the SB 16 system on (the Power Indicator turns blue.) NOTE: When the soundbar is in the Standby mode, it will automatically turn on whenever it detects an audio signal at the Source 1 (analog) inputs.
When the SB 16 system is on:
ss-OMENTARILYTPRESSETHEH0OWEREBUTTON TO MUTE THEH3" SYSTEM 4HE 0OWERE)NDICATORO
flashes blue.)
ss(OLD DOWN THEH0OWEREBUTTON FOROTHREERSECONDSOTO PUTUTHEHSOUNDBAR IN THEH3TANDBYN mode. (The Power Indicator turns amber.) NOTE: The subwoofer will remain on for approximately 15 minutes after the audio signal ceases and then will automatically go into the Standby mode.
Surround Mode Button: This button turns the SB 16 system’s 3D Surround processing On and Off. The Surround Mode Indicator turns blue when 3D Surround is active and turns white when 3D Surround is not active (normal stereo sound). See Soundbar Surround Mode Button, on page 9, for more information.
Volume Up/Down Buttons: Press the ( – ) button to reduce the volume; press the ( + ) button to increase the volume.
Source Selector Button: This button switches between the sources connected to the Source 1 (analog) and Source 2 (digital) inputs. When Source 1 is active, the Source Indicator turns white; when Source 2 is active, the Source Indicator turns blue.
Soundbar Rear-Panel Controls and Connections
Wireless Code Switch: Selects between four different channels for the wireless subwoofer signal.
IMPORTANT: Be sure to set the subwoofer’s Wireless Code switch to the same channel that you set the soundbar’s Wireless Code switch. See Wireless Code Switches, on page 10, for more information.
EQ Switch: This switch adjusts the soundbar’s bass for either wall or table mounting. If you’re mounting the soundbar on a wall with the included wall-mount brackets, set this switch to the Wall position for the most natural-sounding bass performance. If you are placing the soundbar on a table, set the EQ switch to the Table position for the most natural-sounding bass performance.
Trim Switch: This switch adjusts the soundbar’s input sensitivity so it will work with TVs that have different audio signal output levels. See Soundbar Trim Switch, on page 10, for more information.
Source 1 Connection (analog): Use the included stereo audio cable to connect the stereo analog outputs of your TV, DVD player or cable/satellite tuner here.
Source 2 Connection (digital): If your TV, DVD player or cable/satellite tuner has a coaxial digital output, you can connect it here.
NOTE: If you connect your TV or another component to the soundbar’s Source 1 connection, you can connect a different component to the Source 2 connection.
Power Connection: Connect the included DC power supply here. See Power Connections, on page 8, for more information.
IMPORTANT: Do not connect the power supply’s AC cord to an AC outlet until you have made and verified all connections.
Power Switch: Set this switch to the On position (press the switch’s white dot) to activate the soundbar. In normal operation, this switch will be left in the On position. See Turning the Soundbar On and Off, on page 9, for more information.
|
|
Source 2 |
|
EQ Switch |
Trim Switch |
(Coaxial Digital) |
Power |
Input |
Switch |
||
Wireless Code |
Source 1 |
Source 2 |
Power |
Switch |
(Analog) |
(Optical Digital) |
Input |
|
Input |
Input |
|
4 |
|
|
|
SB 16
Subwoofer Rear-Panel Connections
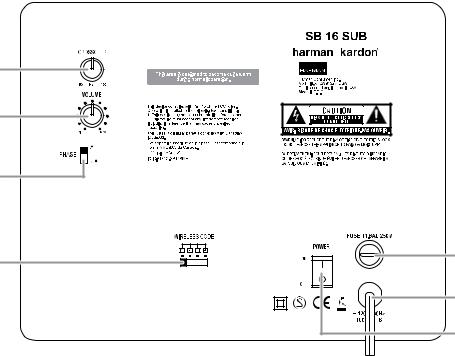
Subwoofer Rear-Panel Controls
Crossover
Knob
Volume
Knob
Phase
Switch
Wireless |
AC |
Code |
Fuse |
Switch |
|
|
Power |
|
Cord |
|
Power |
|
Switch |
Crossover Knob: This knob adjusts the subwoofer’s crossover between 50Hz and 150Hz. The higher you set the Crossover knob, the higher in frequency the subwoofer will operate and the more its bass will “overlap” that of the soundbar. This adjustment helps achieve a smooth transition of bass frequencies between the subwoofer and the soundbar for a variety of different rooms and subwoofer locations. See Subwoofer Crossover Knob, on page 10, for more information.
Volume Knob: Use this control to balance the subwoofer’s volume with that of the soundbar. Turn the knob clockwise to increase the subwoofer’s volume; turn it counterclockwise to decrease the subwoofer’s volume.
Phase Switch: This switch determines whether the subwoofer driver’s piston-like action moves in and out in phase with the speakers in the soundbar. If the subwoofer were to play out of phase with the soundbar speakers, the sound waves from the soundbar could cancel out some of the sound waves from the subwoofers, reducing bass performance and sonic impact. This phenomenon depends in part on the placement of the subwoofer and soundbar relative to each other in the room. See Subwoofer Phase Switch, on page 10, for more information.
Wireless Code Switch: Selects between four different channels for the wireless subwoofer signal.
IMPORTANT: Be sure to set the soundbar’s Wireless Code switch to the same channel as you set the subwoofer’s Wireless Code switch. See Wireless Code Switches, on page 10, for more information.
AC Fuse: The SB 16 SUB is factory-equipped with a T1.6AL/250V AC fuse. If the fuse ever blows:
1.Unplug the power cord from the wall.
2.Use a screwdriver to remove the blown fuse.
3.Replace the fuse with an identical T1.6AL/250V AC fuse.
CAUTION: FOR CONTINUED PROTECTION AGAINST FIRE, REPLACE THE FUSE ONLY WITH THE SAME TYPE AND RATING.
Power Cord: Plug this cord into an active, unswitched AC outlet. See Power Connections, on page 8, for more information.
Power Switch: Set this switch to the On position to activate the subwoofer. In normal operation, this switch will be left in the On position. See Turning the Subwoofer On and Off, on page 9, for more information.
Status Indicator (on top of unit, not shown): Turns blue when the subwoofer’s power switch is in the On position; turns amber when the subwoofer is in Standby; turns off when the subwoofer’s Power switch is in the Off position.
5
 Loading...