


Instruction Manual
HI9017 - HI9218 HI9219 - HI9318
Microprocessor
Bench-top pH Meters with RS232C
ins
rum e  ns
ns
|
|
|
|
|
|
|
|
|
|
|
|
|
|
|
|
|
|
0 |
P |
PR |
|
|
|
|
|
|
|
|
||
|
|
|
|
|
|
|
|
|
|
|
|
|
|
|
|
1 |
P |
|
G |
|
|
GR |
|
|
|
|
|
|
|
|
|
|
|
|
|
|
|
|
|
|
|
|
|
|
2 |
|
|
|
|
M |
to |
A |
|
|
|
|
|
|
|||
|
|
|
|
|
|
|
|
|
|
|
|
|
|
P |
|
G |
|
|
|
ex |
MS |
|
|
|
|
|
||||
|
|
|
|
|
|
|
|
|
|
|
|
3 |
P |
|
G |
|
|
|
to |
|
it |
fro |
|
|
|
|
|
|||
|
|
|
|
|
|
|
|
|
|
4 |
P |
|
G |
|
|
|
to |
|
|
ets |
|
m |
an |
|
|
|
|
|||
|
|
|
|
|
|
|
|
5 |
|
|
|
M |
to |
|
m |
|
|
a |
|
|
|
|
|
|
||||||
|
|
|
|
|
|
|
|
P |
|
G |
|
|
|
|
|
an |
|
mp |
|
y |
|
|
|
|
||||||
|
|
|
|
|
|
6 |
P |
|
G |
|
|
|
to |
p |
|
rint |
|
|
lly |
|
gn |
g |
|
|
||||||
|
|
|
|
|
|
|
|
M |
top |
|
|
ca |
|
|
en |
|
|
u |
|
ra |
|
|
||||||||
|
|
|
|
7 |
P |
|
GM |
|
|
|
rints |
|
|
lib |
ter |
mbe |
m |
|
|
|||||||||||
|
|
8 |
|
|
|
|
|
tos |
|
rints |
|
a |
|
|
|
ra |
|
|
ca |
r, |
|
|
||||||||
|
|
P |
|
|
GM |
|
|
|
|
mp |
|
tion |
|
|
lib |
|
time |
|
||||||||||||
|
9 |
P |
|
GM |
|
|
tos |
|
p |
|
|
mp |
|
|
da |
|
a |
tio |
|
an |
|
|||||||||
CL |
|
GM |
|
|
top |
|
lect |
|
/mV |
|
|
da |
|
|
un |
|
|
|
|
bu |
|
da |
||||||||
EA |
|
|
to |
|
|
rint |
|
|
d |
|
|
|
ala |
|
|
tau |
tils |
|
|
fferv |
te |
|||||||||
|
R toc |
|
enter |
ionco ifferent |
|
rm |
|
|
ntilen |
pec |
|
|
alue |
|||||||||||||||||
|
|
|
|
lea |
|
|
RS |
|
|
nc |
|
wo |
|
|
|
|
dp |
ified |
time |
|
|
|||||||||
|
|
|
|
|
ren |
|
232 |
|
en |
|
|
|
rkin |
|
|
|
|
|
oint |
|
|
|||||||||
|
|
|
|
|
|
|
try |
|
|
C |
|
|
tra |
|
|
g |
|
|
|
|
|
|
|
|
|
|
||||
|
|
|
|
|
|
|
|
|
|
|
|
ES |
|
tion |
|
lan |
|
|
|
|
|
|
|
|
||||||
|
|
|
|
|
|
|
|
|
|
|
|
|
C |
|
|
|
|
|
|
|
gu |
|
|
|
|
|
|
|
||
|
|
|
|
|
|
|
|
|
|
|
|
|
|
co |
|
|
|
|
|
ag |
|
|
|
|
|
|
|
|||
|
|
|
|
|
|
|
|
|
|
|
|
|
|
|
|
de |
|
|
|
|
|
e |
|
|
|
|
|
|
|
|
|
|
|
°C |
|
PAPER |
|
|
|
A |
pH |
|
|
|
||
7 |
|
|
|
|
B |
|
CLEAR |
4 |
8 |
|
|
4 |
|
C |
|
+/- |
5 |
|
SAMPLE |
9 |
|
||
2 |
|
|
DATE |
|
6 |
|
|
. |
|
|
ON |
|
3 |
|
|
PGM |
DATE |
|
OFF |
CAL |
|
|
|
|
|
|
|
|
+ |
|
|
|
/- |
|
RANGE |
|
|
|
|
|
|
CON |
|
|
TEMP. |
|
|
|
|
|
|
|
|
|
|
These Instruments are in |
|
|
|
|
|
|
|
|
|
||
|
|
|
|
|
|
|
|
||
h t t p : / / w w w . h a n n a i n s t . c o m |
|||||||||
Compliance with the CE Directives |
|||||||||

Dear Customer,
Thank you for choosing a Hanna Instruments Product.
Please read this instruction manual carefully before using the instrument.
This manual will provide you with all the necessary information for the correct use of the instrument, as well as a precise idea of its versatility in a wide range of applications.
These instruments are in compliance with CSA, UL and 
 directives (EN 50081-1 and EN50082-1).
TABLE OF CONTENTS |
|
GENERAL DESCRIPTION ........................................................................... |
3 |
PRELIMINARY EXAMINATION ................................................................... |
3 |
FRONT PANEL AND SPECIFICATIONS: |
|
HI9017 ................................................................................... |
5 |
HI9218 & HI9219 ................................................................................. |
7 |
HI9318 ................................................................................... |
9 |
REAR PANEL CONNECTIONS .................................................................. |
11 |
OPERATIONAL GUIDE ............................................................................ |
13 |
PH CALIBRATION ................................................................................. |
18 |
PH VALUES AT VARIOUS TEMPERATURE ................................................. |
26 |
TEMPERATURE CALIBRATION ................................................................. |
26 |
HOW TO SET DATE & TIME (HI9218 & HI9219) .................................... |
27 |
PROGRAMS OF HI9017 ......................................................................... |
28 |
PROGRAMMING LOGGER FUNCTIONS HI9318 ........................................ |
37 |
TROUBLESHOOTING GUIDE ................................................................... |
45 |
INTERFACE WITH COMPUTER ................................................................. |
46 |
ELECTRODE CONDITIONING AND MAINTENANCE ..................................... |
50 |
TEMPERATURE-RESISTANCE CORRELATION FOR |
|
HANNA PH SENSITIVE GLASS ................................................................ |
53 |
ACCESSORIES ................................................................................. |
54 |
ELECTRODE APPLICATION REFERENCE GUIDE .......................................... |
61 |
WARRANTY ................................................................................. |
62 |
CE CERTIFICATE OF CONFORMITY ........................................................... |
63 |
 ISO 9000 Certified
 Company since 1992
2

PRELIMINARY EXAMINATION
Remove the instrument from the packing material and examine it to make sure that no damage has occurred during shipping. If there is any damage, notify your Dealer.
Note: Save all packing material until you are sure that the instrument functions correctly. All defective items must be returned in the original packing with the supplied accessories.
GENERAL DESCRIPTION
HI9017, HI9218, HI9219 and HI9318 are microprocessor-based benchtop meters designed to meet the most stringent demands of the laboratory.
They feature:
•user friendly rubber keyboard
•automatic calibration with memorized buffers values •automatic or manual temperature compensation
•storage of calibration data even after the meters are shut off •error codes to guide the user in calibration and troubleshooting
All these models incorporate a standard RS232C output for communication with a computer.
The HI76405 electrode holder provided will hold your pH electrode and temperature probe directly over the sample vessel which can be placed on the enamel coated base of the holder. A magnetic stirrer can also be placed on the enamel coated base if sample agitation is required. The enamel coating is impervious to most chemicals and the heavy steel base will not tip over easily.
These meters are perfect for use in Q.C. labs, R&D labs, environmental testing, industrial processing, chemical treatment, waste water treatment, drinking water analysis, titration, hydroponics, general agriculture, food processing and anywhere accurate pH measurements are required.
•HI9017 pH/mV/°C meter automatically recognizes three standard calibration buffer values (pH 4.01, 7.01, 10.01). The pH and temperature values are shown separately on the LCDs. A wide mV range and high resolution allow for ORP or ion-selective measurements (the range automatically switches from ISE to ORP when readings exceed ±399.9 mV).
HI9017 comes supplied with HI1131B glass-body combination pH electrode (with 1m/3.3' cable), HI7669/2W temperature probe
3
(with 1m/3.3' cable), 12VDC adapter (HI710005 or HI710006), pH 4.01 & pH 7.01 buffer solutions (20 mL each), HI7071 electrolyte solution (30 mL), HI76405 electrode holder and a dust cover.
•HI9218 and HI9219 are programmable pH/°C meter with builtin printer. They print pH values together with temperature, time and date. These meter provide you with pH and temperature readings simultaneously and separately on the LCDs and feature a unique stability indicator. When the pH electrode stabilizes in the sample, the "NO" on the LCD changes to "YES". This indicates that the reading is correct and can be recorded. They automatically recognize three standard buffers (4.01, 7.01 and 10.01 pH) for calibration purposes. These meters are extremely user-friendly, giving step-by-step instructions on the printer at every stage to help the user.
HI9218 has been specifically designed for the food industry.
HI9218 comes supplied with FC100B plastic-body combination pH electrode (with 1m/3.3' cable) while HI9219 comes with HI1131B glass-body combination pH electrode (with 1m/3.3' cable). HI9218 and HI9219 are also supplied with: HI7669/2W temperature probe (with 1m/3.3' cable), 12VDC adapter (HI710005 or HI710006), pH 4.01 & pH 7.01 buffer solutions (20 mL each), HI7071 electrolyte solution (30 mL), 5 replacement rolls of printer paper, HI76405 electrode holder and a dust cover.
•HI9318 is a pH/mV/°C meter designed for logging data in various applications. This programmable printing meter prints pH or mV values as well as sample number, temperature, time and date. The pH/mV and temperature values are displayed on separate LCDs for ease of reading. It recognizes and memorizes three different standard buffers (pH 4.01, 7.01 and 10.01) for calibration purposes. The printer can be programmed to print in one of 6 different languages (English, French, German, Italian, Spanish or Swedish). Once your language is selected you can simply prompt the meter to calibrate and it will print step-by-step instructions through the entire process making this meter perfect for use by even non-technical staff members.
HI9318 comes supplied with HI1131B glass-body combination pH electrode (with 1m/3.3' cable), HI7669/2W temperature probe (with 1m/3.3' cable), 12VDC adapter (HI710005 or HI710006), pH 4.01 & pH 7.01 buffer solutions (20 mL each), HI7071 electrolyte solution (30 mL), 5 replacement rolls of printer paper, HI76405 electrode holder and a dust cover.
4
FRONT PANEL AND
SPECIFICATIONS OF HI9017
1 |
|
PROGRAMS |
|
|
|
|
|
|
||
to manually enter calibration buffer value |
|
|
|
|
|
|
||||
|
|
ENTER |
ENTER |
|
|
|
|
|
||
1 |
PGM |
1st buffer |
A |
2nd buffer |
B |
|
|
|
|
|
to |
enter |
pH alarm |
|
|
|
°C |
|
pH |
|
|
|
|
ENTER |
ENTER |
|
|
|
|
|
||
2 |
PGM |
upper limit |
A |
lower limit |
B |
|
|
|
|
|
to enter mV alarm |
|
|
|
|
HI 9017 MICROPROCESSOR pH METER |
|||||
|
|
ENTER |
ENTER |
|
||||||
|
|
|
|
|
|
|
||||
3 |
PGM |
upper limit |
A |
lower limit |
B |
|
|
|
|
|
to |
enter |
temperature |
alarm |
|
|
|
|
|
|
|
|
|
ENTER |
ENTER |
ENTER |
ENTER |
CLEAR |
|
ins rum n s |
||
4 |
PGM |
upper limit |
A |
lower limit |
B |
A |
B |
|
|
|
to enter pH end point alarm |
|
|
|
|
|
ON |
OFF |
|||
|
|
ENTER |
ENTER |
|
|
|
||||
5 |
PGM |
end point value |
A |
alert value |
B |
|
|
|
|
|
to enter RS 232 ESC code |
|
7 |
|
8 |
9 |
|
|
|||
|
|
ENTER |
|
|
|
|
|
|
|
|
6 |
PGM |
ESC code |
A |
|
|
|
|
|
|
|
to exit from any program |
|
|
4 |
|
5 |
6 |
|
RANGE |
||
0 |
PGM |
|
|
|
1 |
|
|
|
|
|
to clear entry or silence alarm |
|
|
2 |
3 |
CAL |
CON |
||||
|
|
|
|
|
|
|
||||
CLEAR |
|
|
|
|
|
|
|
|
|
|
|
|
|
|
|
0 |
|
. |
PGM |
+/- |
TEMP |
|
Standard pH buffer - 4.01, 7.01, 10.01 |
|
|
|
|
|
|
|||
2
3
4
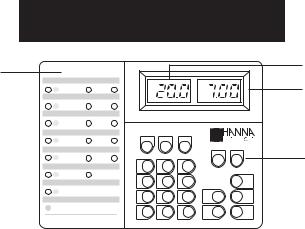
1.Program descriptions
Briefly describes the 6 programs
2.Temperature LCD
This LCD displays the temperature measured by the HI7669/2W probe or the value that was manually set through the keyboard.
If the temperature has been set manually, the "°C" symbol will flash.
When the temperature probe is connected the measured temperature is displayed and the "°C" symbol stops flashing.
When the temperature measured by the probe is out of range (-10 to 125°C) the "Err3" signal appears.
3.pH and mV LCD
This LCD displays the pH or mV reading (pH and mV is toggled with the RANGE key). The corresponding pH or mV symbol will be displayed along with the measured value.
An error signal ("Err1", "Err2", "Err4" or "Err5") will appear on this display to indicate that the range is exceeded or that the buffer used for calibration is not recognized by the meter's microprocessor.
4.Keyboard
ENTER A key used in programming.
ENTER B key |
used in programming. |
CLEAR key |
to clear entry or silence alarm. |
PGM key |
to select a program. |
5
ON key |
|
to switch the instrument on. |
||||
OFF key |
|
to switch the instrument off. |
||||
RANGE key |
to switch range from pH to mV or vice versa. |
|||||
CAL key |
|
used in calibration with standard pH buffers (pH |
||||
|
|
4.01, 7.01, 10.01) |
|
|
|
|
CON key |
|
confirmation of calibration data |
||||
+/- key |
|
entering negative values |
|
|
|
|
TEMP key |
used for manual temperature adjustment |
|||||
0 to 9 keys |
numeric and Decimal keys for numeric data input |
|||||
|
|
|
|
|
|
|
SPECIFICATIONS |
|
HI 9017 |
|
|
|
|
Range |
pH |
|
0.00 to 14.00 |
|
|
|
|
ISE |
|
± 399.9 mV |
|
|
|
|
ORP |
|
±1999 mV |
|
|
|
|
°C |
|
-10.0 to 125.0 |
|
|
|
Resolution |
pH |
|
0.01 |
|
|
|
|
ISE |
|
0.1 mV |
|
|
|
|
ORP |
|
1 mV |
|
|
|
|
°C |
|
0.1 |
|
|
|
Accuracy |
pH |
|
±0.01 |
|
|
|
(@ 20°C/68°F) ISE |
|
±0.2 mV |
|
|
|
|
|
ORP |
|
±1 mV |
|
|
|
|
°C |
|
±0.5 |
|
|
|
Typical EMC |
pH |
|
±0.02 |
|
|
|
Deviation |
ISE |
|
±0.2 mV |
|
|
|
|
ORP |
|
±1 mV |
|
|
|
|
°C |
|
±0.5 |
|
|
|
Calibration |
|
|
2 point with automatic recognition of 3 |
|
|
|
|
|
|
buffers (pH 4.01, 7.01, 10.01) |
|||
Temperature |
|
|
-10° to +125°C (14 to 257 °F) completely |
|
||
|
|
|
automatic with HI7669/2W temperature |
|||
|
|
|
probe; manual by means of keyboard |
|||
Comp. Interface |
|
RS232C |
|
|
|
|
Electrode |
|
|
HI1131B Glass |
body combination |
|
|
|
|
|
pH electrode (included) |
|||
Temperature Probe |
HI7669/2W Temperature probe (included) |
|||||
Input Impedance |
|
1012 Ohm |
|
|
|
|
Power |
|
|
Power socket for 12VDC |
|||
Environment |
|
|
0 to 50°C (32 to 122°F); RH 95% |
|||
Dimensions |
|
|
230 x 170 x 70mm |
(9.1 x 6.7 x 2.7") |
||
Weight |
|
|
1.3 Kg (2.9 lb.); kit w/holder 3.2 Kg (7 lb.) |
|||
|
|
|
|
|
|
|
6
FRONT PANEL AND
SPECIFICATIONS OF HI9218 & HI9219
Foodcare |
|
|
|
|
|
|
2 |
|
|
|
|
|
|
|
|
|
|
|
°C |
|
pH |
|
3 |
To change paper roll or ink ribbon |
|
|
|
|
|
|
|
Slide cover to the left to open. |
|
|
|
|
|
|
4 |
|
|
|
PAPER |
|
|
||
Push ribbon cassette as marked - to release |
|
|
|
|
|||
Insert new paper roll. Pass leading end under guide plate and |
|
|
|
|
|
||
press PAPER to feed paper through the printer. |
|
|
|
|
|
|
|
Pass leading end through ribbon cassette, with ribbon at the |
STABILITY |
INDICATOR |
|
|
|
||
front and press cassette into position |
|
|
|
|
|
||
|
|
|
READY |
Press to check |
ON |
OFF |
5 |
|
|
|
|
|
|||
1 |
|
|
|
reading stability. |
|
|
|
|
|
|
|
|
|
||
|
|
NO |
Wait |
|
|
|
|
|
|
|
YES |
Reading is stable. |
DATE |
TIME |
|
|
|
|
|
|
|
||
|
|
|
Press to obtain |
|
|
|
|
|
|
|
a copy. |
CAL |
CFM |
|
|
|
|
|
|
|
|||
|
|
|
HI 9218 |
|
|
|
|
ins rum |
|
n s |
PRITING pH METER |
UP |
DOWN |
|
|
e |
WITH STABILITY INDICATOR |
|
|||||
|
|
|
|
|
|||
|
|
|
|
|
|
|
|
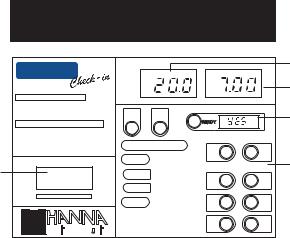
1.Printer
Plain paper printer
2.Temperature LCD
This LCD displays the temperature measured by the HI7669/2W probe or the value that was manually set through the keyboard. If the temperature has been set manually, the "°C" symbol will flash. When the temperature probe is connected the measured temperature is displayed and the "°C" symbol stops flashing. When the temperature measured by the probe is out of range (- 10.0 to 125.0°C) the "Err3" signal appears.
3.pH LCD
This LCD displays the pH reading. The corresponding pH symbol will be displayed along with the measured value. An error signal ("Err1", "Err4" or "Err5") will appear on this display to indicate that the range is exceeded or that the buffer used for calibration is not recognized.
4.Small LCD
This LCD normally displays the time. When the DATE button is pressed, the date will be displayed. When the READY key is pressed, the display shows "NO" while the electrode is stabilizing and "YES" once the reading is stable.
5.Keyboard
ON/OFF key |
to switch the instrument "ON" or "OFF". |
Note: Press OFF before unplugging instrument, otherwise, calibration data and time setting could be lost.
7

DATE/TIME key |
to display date and time. |
|
|
CAL key |
|
to enter calibration mode. |
|
CFM key |
|
to confirm memorized buffers 7.01 and 4.01/10.01. |
|
UP/DOWN key |
|
to set manual temperature compensation and date/time. |
|
PAPER key |
|
manual paper feed control. |
|
PRINT key |
|
prints pH value together with temperature, date |
|
|
|
and time. |
|
READY key |
|
stability indicator to ensure correct pH reading or |
|
|
|
to enable calibration. |
|
|
|
|
|
SPECIFICATIONS |
HI9218 |
HI9219 |
|
Ranges |
pH |
0.00 to 14.00 |
|
|
°C |
-10.0 to 125.0 |
|
Resolution |
pH |
0.01 |
|
|
°C |
0.1 |
|
Accuracy |
pH |
±0.01 |
|
(@20°C/68°F) °C |
±0.5 |
|
|
Typical EMC |
pH |
±0.04 |
|
Deviation |
°C |
±1.5 |
|
Calibration |
|
2 point with automatic |
recognition of |
|
|
3 buffers (pH 4.01, 7.01, 10.01) |
|
Temperature |
|
-10° to 125°C (14 to 257°F) Completely |
|
Compensation |
automatic with HI 7669/2W temperature |
||
|
|
probe; manual by means of keyboard |
|
Comp. Interface |
RS232C |
|
|
Electrode |
|
HI9218: FC100B plastic body combination |
|
|
|
pH electrode (included) |
|
|
|
HI9219:HI1131B Glass body combination |
|
|
|
pH electrode (included) |
|
Temperature |
|
HI7669/2W Temperature probe (included) |
|
Probe |
|
|
|
Input Impedance |
1012 Ohm |
|
|
Display |
|
2 large 4-digit LCD for pH and temperature |
|
|
|
with symbols 1 small LCD for date/time and |
|
|
|
stability indicator |
|
Printer |
|
1 x 16 line dot matrix printer, |
|
|
|
paper width: 44 mm, |
|
|
|
roll diameter: 35 mm |
|
Power Supply |
Power socket for 12VDC |
|
|
Environment |
|
0 to 50°C (32 to 122°F); RH 95% |
|
Dimensions |
|
230x170x70mm (9.1x6.7x2.7") |
|
Weight |
|
1.3 Kg (2.9 lb.); |
|
|
|
kit w/holder 3.2 Kg (7 lb.) |
|
8
|
|
FRONT |
|
PANEL |
AND |
|
|
||||
|
|
SPECIFICATIONS |
OF |
HI9318 |
|
|
|||||
1 |
|
PROGRAMS |
|
|
|
|
|
|
|
|
3 |
|
|
|
|
|
|
|
|
|
|
||
0 |
PGM to exit from any program |
|
|
|
|
|
|
|
|
4 |
|
|
1 |
PGM to set sampling number, time and date |
|
|
|
|
|
|
|||
|
2 |
PGM to manually enter calibration buffervalue |
|
°C |
|
|
pH |
|
|||
|
3 |
PGM to print calibration data |
|
|
|
|
|
|
5 |
||
|
4 |
PGM to print sample data until specified time |
|
|
|
|
|
|
|||
|
5 |
PGM to print sample data until end point |
|
|
|
|
|
|
|||
|
6 |
PGM to set pH/mV alarm |
|
|
|
PAPER |
CLEAR |
|
6 |
||
|
|
|
|
|
|
|
|
|
SAMPLE |
DATE |
|
|
7 |
PGM to select different working language |
|
|
|
|
|
|
|
||
|
8 |
PGM to print ion concentration |
|
|
|
|
|
|
|
|
|
|
9 |
PGM to enter RS232C ESC code |
|
|
|
|
|
|
|
|
|
|
CLEAR to clear entry |
|
|
A |
B |
|
C |
|
|
|
|
|
|
|
|
|
|
|
|
|
ON |
OFF |
|
|
|
|
|
|
7 |
8 |
|
9 |
|
|
7 |
2 |
|
|
|
|
|
|
|
|
|
|
|
|
|
|
|
4 |
5 |
|
6 |
DATE |
|
RANGE |
|
|
|
|
|
|
|
|
|
|
|||
|
|
|
|
|
4 |
2 |
|
3 |
CAL |
|
CON |
|
|
ins rum |
e |
n s |
+/- |
. |
|
PGM |
+/- |
|
TEMP. |
|
|
|
|
|
|
|
|
|
|||
|
|
|
|
|
|
|
|
|
|
|
|
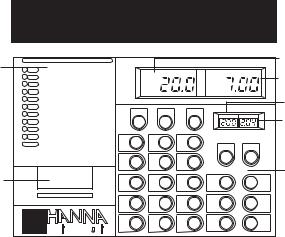
1. |
Program descriptions Briefly describes the 9 programs |
|
2. |
Printer |
Plain paper printer |
3.Temperature LCD This LCD displays the temperature. If the temperature has been set manually, the "°C" symbol will flash. When the temperature probe is connected the measured temperature is displayed and the "°C" symbol stops flashing. When the temperature measured by the probe is out of range (-10 to 125°C) the "Err3" signal appears.
4.pH and mV LCD This LCD displays the pH or mV reading (pH and mV is toggled with the RANGE key). The corresponding pH or mV symbol will be displayed along with the measured value. An error signal ("Err1", "Err2", "Err4" or "Err5") will appear on this display to indicate that the range is exceeded or that the buffer used for calibration is not recognized.
5.Sample LCD Displays the sample number of the current lot.
6.Time and Date LCD Displays the Time as HH.MM. and the date as MM.DD. This LCD also displays any numeric data entered from the keyboard to show the user the entered values.
7.Keyboard
PAPER key |
manual paper feed control. Press and hold this button |
|
and the printer will advance the paper roll |
PRINT key |
prints the time, date, sample #, and pH/mV values |
CLEAR key |
cancels wrong data entered during programming |
ON key |
to switch the instrument on |
OFF key |
to switch the instrument off. |
DATE key |
allows to display the month and day or time in hours |
|
and minutes |
9
RANGE key |
selects pH or mV readings to be displayed on the right LCD |
|||
CAL key |
to enter into the calibration mode |
|
||
CON key |
for confirmation of buffer value during calibration |
|||
+ / - key |
select + or - value for manual temperature compensation |
|||
TEMP key |
allows to |
select temperature manually when the |
||
|
temperature probe is not connected |
|
||
PGM key |
selects any of the 9 available programs |
|
||
0 to 9 keys |
numeric and Decimal keys for numeric data input |
|||
|
|
|
|
|
SPECIFICATIONS |
HI9318 |
|
|
|
Ranges |
pH |
0.00 to 14.00 |
|
|
|
ISE |
0 to ±399.9 mV |
|
|
|
ORP |
0 to ±1999 mV |
|
|
|
°C |
-10.0 to 125.0 |
|
|
Resolution |
pH |
0.01 |
|
|
|
ISE |
0.1mV |
|
|
|
ORP |
1 mV |
|
|
|
°C |
0.1 |
|
|
Accuracy |
pH |
±0.01 |
|
|
(@20°C/68°F) ISE |
±0.2 mV |
|
|
|
|
ORP |
±1 mV |
|
|
|
°C |
±0.5 |
|
|
Typical EMC |
pH |
±0.04 |
|
|
Deviation |
ISE |
±2.5 mV |
|
|
|
ORP |
±3 mV |
|
|
|
°C |
±1.5 |
|
|
Calibration |
|
Automatic at pH 4, 7, 10 |
or at any two |
|
|
|
buffer values with program 2 |
||
Offset |
|
±1pH |
|
|
Slope |
|
From 85 to 105% |
|
|
Input Impedance |
1012 Ohm |
|
|
|
Temperature |
-10° to 125°C (14 to 257°F) completely |
|||
Compensation |
automatic with HI 7669/2W temp. probe; |
|||
|
|
manual by means of keyboard |
||
Display |
|
2 large 4 digit LCDs for pH/mV and |
||
|
|
Temperature with symbols |
and one |
|
|
|
LCD for date/time |
and sample # |
|
Printer |
|
Dot matrix, 44mm wide paper |
||
Power Supply |
Power socket for 12VDC |
|
||
Languages |
|
English, German, French, |
|
|
|
|
Spanish, Italian & Swedish |
|
|
Electrode |
|
HI1131B Glass |
body |
combination |
|
|
pH electrode (included) |
|
|
Temperature Probe |
HI7669/2W Temperature probe (included) |
|||
Environment |
0 to 50°C (32 to 122°F); RH 95% |
|||
Dimensions |
|
230 x 170 x 70mm (9.1 x 6.7 x 2.7") |
||
Weight |
|
1.3kg (2.9 lb.); Kit: 3.4 Kg (7.4lb.) |
||
10
REAR PANEL CONNECTIONS
|
|
DTR |
TXD |
COMBINATION |
|
GND |
RXD |
pH |
REFERENCE |
|
|
ELECTRODE |
ELECTRODE |
|
5ooooo1 |
|
|
||
|
TEMPERATURE |
|
9 oooo6 |
|
|
DSR |
|
|
PROBE |
RESET |
|
|
RS-232 |
||
|
|
|
ooooo |
oooo |
1 |
2 |
3 |
4 |
5 |
6 |
7 |
1)BNC male connector for single or combination electrode. Will accept any pH or ORP electrode with a standard BNC connector.
2)Jack bush connector for reference electrode
3)Banana bush connector for reference electrode
When the electrode attached to the BNC does not have a reference, connect the reference to one of these sockets (2 choices for different diameters).
4)Temperature probe socket for use with the HI7669/2W.
5)Reset button.
6)RS 232C socket for serial communication.
7)DC Power Socket (for HI710005 or HI710006).
Electrode and probe connections
For combination pH (or ORP for HI9017 and HI9318) electrodes (with internal reference) plug the electrode's BNC to the socket provided (#1).
For electrode with separate reference (see page 58), connect the measuring electrode's BNC to the BNC socket (#1) and the reference electrode's jack to the socket provided (#2 or #3).
For temperature measurements and automatic temperature compensation connect the temperature probe to the °C socket (#4).
RESET button
The RESET button (#5) is used when the instrument displays erroneous messages due to strong electrical interference or when the instrument's power supply was disconnected before the meter was switched off. Press the RESET button and restart the entire operation.
11
Power connection
Plug the 12VDC adapter (HI710005 or HI710006) into the DC socket (#7).
Plug the adapter into the mains.
Note: The instrument uses the following configuration.
+  -
-
It is recommendable to use the Hanna HI7710005 or HI710006 voltage adapters (supplied witht the meters) that use the proper polarity configuration.
The meters can also be used with other adapters. In this case, remember to check the correct polarity of your adapter before connecting it to the meter.
Note: Make sure the main line is protected by a fuse.
Note: HI9017, HI9218, HI9219, HI9318 use a rechargeable battery to retain the pH calibration data only. It lasts approximately one month when fully charged. The battery is automatically charged any time the meter is plugged-in (either turned on or off).
Notes:
1)If you need to unplug the instrument, press the OFF key before disconnecting the meter from the mains. Only in this case will the instrument retain the memorized data. Otherwise, the instrument needs to be re-calibrated. In the case of a power failure while the instrument is operational , re-calibration is required.
2)When the instrument is initially switched on, the microprocessor checks if any calibration data is in memory (i.e. if the offset is within ±1 pH and the slope between 70 - 105%). If the calibration data are not memorized, the offset and slope of the instrument will be set to 0 mV and 100% respectively.
12
OPERATIONAL GUIDE
TAKING PH MEASUREMENTS
Make sure that the instrument has been calibrated for pH before taking pH measurements (see page 18).
Connect the pH electrode (combination-type) or the electrode half cells to the appropriate connectors on the rear panel (see page 11).
If automatic temperature compensation is required, connect the HI7669/2W temperature probe to the proper socket on the rear panel
(see page 11).
ON
Press the ON key to turn the meter on. The meter will automatically default to the pH measurement mode.
ON
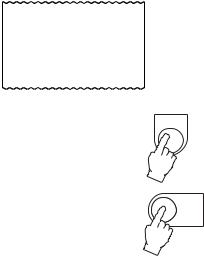
Immerse the electrode and the temperature probe in the sample and shake briefly. Wait for 30 seconds before taking readings.
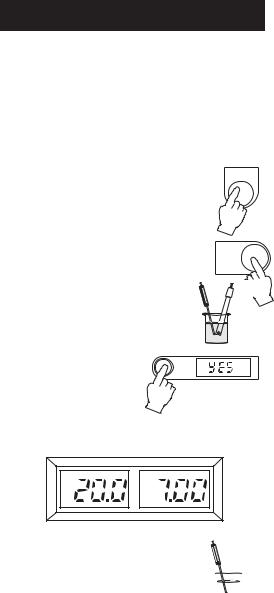
IN HI 9218 AND HI 9219
Press READY: "YES" confirms the reading is stable.
READY
The LCD on the right shows the pH reading compensated for temperature. The temperature reading is displayed on the LCD on the left.
°C |
pH |
Note: the electrode should be submerged approximately 4cm (1½") into the solution.
If the temperature probe is used, it should be located as close to the pH electrode as possible.
cm 4") (1½
If measurements are taken in different samples successively, it is recommended that the electrode is rinsed thoroughly for better conditioning and to eliminate cross-contamination of the sample.
13
For the rinsing process, it is recommended to use a liberal amount of the next solution to be measured.
Using refillable electrodes
Unscrew the small refill cap to open the refill hole during measurements. After measurements replace the refill hole cap.
This will increase the pressure and give a faster response.
FOR HI 9218, HI 9219, HI 9318 ONLY
Press the PRINT key to get a printout at any time.
All the printouts will be complete with date, time, sample No. (for HI9318 only), temperature and pH (or mV with HI9318 only) value.
DATE |
: 01-02-96 |
DATE |
1/02 |
TIME |
: 12:21 Hr |
TIME |
12:21 |
°C |
: 17.9 |
SAMPLE |
1 |
pH |
: 7.18 |
°C |
17.9 |
|
|
pH |
7.18 |
|
HI9218/HI9219 |
HI9318 |
|
|
Sample Printouts |
|
|
MANUAL TEMPERATURE COMPENSATION
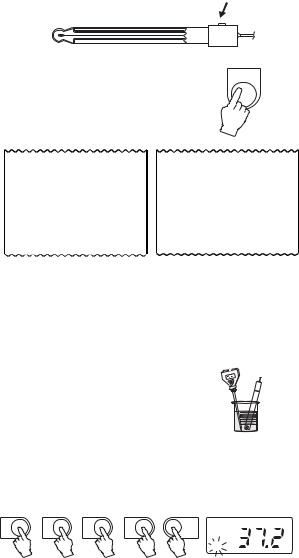
When the temperature probe is not connected, take the temperature of the solution with a ChecktempC or a glass thermometer.
FOR HI 9017 ONLY
To manually set a temperature value (e.g. 37.2°C) proceed as follows:
•press 3
•press 7
•press the key displaying decimal point "."
•press 2
•press TEMP


 °C
°C
3 |
7 |
. |
2 |
TEMP |
°C
14
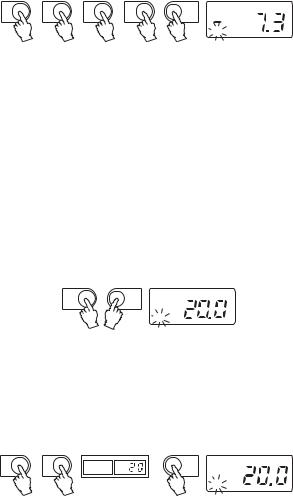
With negative temperature values (e.g. -7.3°C) use the +/- key
•press 7
•press decimal point
•press 3
•press +/-
•press TEMP
7 |
. |
3 |
+/- |
TEMP |
ºC
Notes:
1)For negative value inputs, always key in the value followed by the +/- key.
2)If the +/- key is pressed twice it will toggle°C back to the positive value.
The value will be displayed on the left LCD and "°C" symbol will be flashing.
FOR HI 9218 AND HI 9219 ONLY
Use the UP or DOWN keys to manually adjust the display reading to the value of the ChecktempC or the glass thermometer (e.g. 20°C). The value will be displayed on the left LCD and "°C" symbol will be flashing.
UP |
DOWN |
ºC
FOR HI 9318 ONLY
Press the +/- key (for negative figures) followed by the noted temperature on the numeric keypad (e.g. 20°C). The value will be displayed on the small LCD. Then°C press the TEMP. key and the manually set temperature will be displayed on the left LCD with the "°C" symbol blinking.
|
SAMPLE |
DATE |
2 |
0 |
TEMP. |
ºC
Note: with the temperature probe connected, the "°C" symbol is displayed continuously and it is not possible to manually set the temperature.
°C
15
TAKING TEMPERATURE MEASUREMENTS
Taking a temperature measurement is very easy. Turn the instrument ON.
Make sure the temperature probe is connected and allow the reading to stabilize (1 or 2 minutes).
The temperature value will be displayed on the left LCD.
°C |
pH |
TAKING ORP MEASUREMENTS (FOR HI 9017 AND HI 9318 ONLY)
HI9017 and HI9318 have the capability to take ORP measurements, using an ORP electrode. Hanna Instruments offers a variety of ORP electrodes for this purpose (see page 59). Contact your Dealer for more information.
Just as pH measurements allow the acidity or the alkalinity of a |
|||
substance to be expressed in numbers, oxidation- |
|
|
|
reduction potential (redox) measurements provide |
|
|
|
the quantification of the oxidizing or reducing power |
|
|
|
of any liquid. |
(1½") |
4cm |
|
Connect the ORP electrode to the meter and sub- |
|||
|
|
||
merge the tip (4 cm / 1½") into the sample to be tested.
Note: ORP measurements are taken without temperature compensation.
Press the RANGE key once to enter the mV mode.
RANGE
Allow a few minutes for the reading to stabilize.
The display will indicate the absolute mV value (positive or negative).
When values are less than ±400 mV, tenths of mV
mV are displayed; for values greater than ±400 mV, the decimal digit disappears.
Note that the change in scale (from 0.1 mV to 1 mV as resolution) is automatic.
"Err2" appears if the value exceeds ±1999 mV (out of range).
16
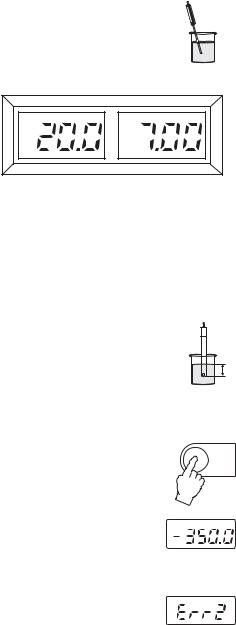
FOR HI 9318 ONLY
Press PRINT key to get a printout at any time.
All the printouts will be complete with date, time, sample No., temperature and mV value.
DATE 1/02 TIME 12:40 SAMPLE 5 °C 20.5 mV -350.0
AFTER MEASUREMENTS
Press the OFF key to switch the instrument OFF.
See page 50 for storage, cleaning and maintenance procedures for electrodes.
OFF
OFF
17
PH CALIBRATION
IMPORTANT
The instrument's pH range should be re-calibrated:
•When the meter is new.
•Whenever the pH electrode is replaced.
•At least once a month.
•After testing aggressive chemicals.
•After cleaning procedure and changing the reference electrolyte.
•For greatest accuracy.
INITIAL PREPARATION
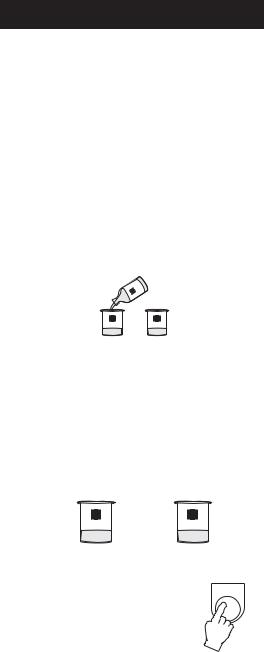
Pour small quantities (about 4cm / 1½" as level) of pH7.01 (HI7007 or HI8007) and pH4.01 (HI7004 or HI8004) or pH 10.01 (HI7010 or HI8010) solution into clean beakers. If possible use plastic beakers to minimize any EMC interferences.
|
4 |
|
0 |
|
0 |
|
7 |
|
I |
|
H |
HI 7004 |
HI 7007 |
If you are measuring in the acid range use pH4.01 as second buffer or pH 10.01 if you are measuring in the alkaline range.
Note: with HI9017 and HI9318, different pH values can be selected for calibration purposes. See page 29 and 39 respectively.
For accurate calibration, use two beakers for each buffer solution; the first for rinsing the electrode, the second for calibration. In this way, contamination of the buffer is minimized.
RINSE |
CALIBRATION |
HI 7007 |
HI 7007 |
PH CALIBRATION FOR HI 9017
Procedure
ON
•Switch the instrument on after connecting the pH electrode and the temperature probe.
18
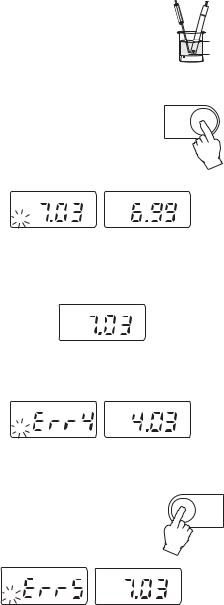
•Immerse the pH electrode and the ATC probe into pH7.01 buffer solution. Shake briefly and wait 1-2 minutes for thermal equilibrium.
cm 4") (1½


 HI 7007
Note: the electrode should be submerged approximately 4 cm (1½") into the solution. The temperature probe should be positioned as close to the pH electrode as possible.
• Press the CAL key. |
CAL |
|
|
The temperature compensated value of the buffer |
|
solution will appear on the left LCD and the pH |
|
symbol will be blinking. |
|
pH |
pH |
E.g. if the buffer temperature is at 25°C, the display on the right will show "pH7.01". If the buffer temperature is at 20°C, the display will show "pH 7.03" (see page26).
pH
If a wrong buffer is used or the electrode is faulty, "Err4" will appear on the left display.
pH |
pH |
• Allow 1-2 minutes for the pH reading to stabilize.
Note: If you are not using the ATC probe, refer to page 25 to manually correct for temperature.
•Press the CON key to accept the buffer value. "Err5" will appear on the left display and the buffer value will be transferred to the right LCD. The first point calibration is now complete.
CON
pH |
pH |
Note: If a single point calibration is required, press the CAL key to leave the calibration mode. However, it is always better to proceed as follows for a 2-point calibration.
19
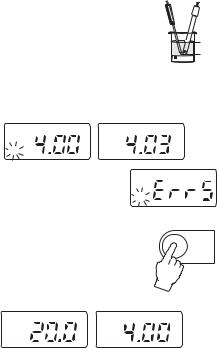
•Rinse the electrode and the temperature probe before immersing them into pH 4.01 or pH10.01 calibration buffer, shake briefly and wait for thermal equilibrium.
cm 4") (1½


 HI 7004
At this moment, "Err5" will disappear. The display will show the temperature compensated value of the second buffer solution and the pH symbol will be blinking.
pH |
pH |
If a wrong buffer or a faulty electrode
has been used, "Err5" remains on the
pH
left display.
•Press the CON key to confirm the pH value. The left display value is then transferred to the right display. The left LCD will show the temperature value to indicate that the meter is now calibrated.
CON
°C |
pH |
ºC |
|
Note: The display on the left will indicate the temperature compensated buffer value e.g. if the temperature is at 25°C, the display will show "pH 4.01" or "pH 10.01", depending on the solution used. If the temperature is at 20°C, the display will show respectively "pH 4.00" or "pH 10.06" (see page 26).
Note: During calibration the pH symbol blinks on the left display, and the right display always shows the measured value.
20
 Loading...