


Hamilton Beach DE-302, DE-301, DE-331, DE-304, DE-332 User Manual
...NPort Server Lite
Hardware Installation Guide
for DE-301/331 & DE-302/304/332/334
Second Edition, Dec 2002
Moxa Technologies Co., Ltd.
Tel: +866-2-8919-1230
Fax: +886-2-8919-1231
www.moxa.com
support@moxa.com.tw
NPort Server Lite
Hardware Installation Guide for
DE-301/331&DE-302/304/332/334
The software described in this manual is furnished under a license agreement and may be used only in accordance with the terms of that agreement.
Copyright Notice
Copyright 2002 Moxa Technologies Co., Ltd.
All rights reserved.
Reproduction without permission is prohibited.
Trademarks
MOXA is a registered trademark of Moxa Technologies Co., Ltd.
All other trademarks or registered marks in this manual belong to their respective manufacturers.
Disclaimer
Information in this document is subject to change without notice and does not represent a commitment on the part of Moxa.
Moxa provides this document “as is,” without warranty of any kind, either expressed or implied, including, but not limited to, the particular purpose. Moxa reserves the right to make improvements and/or changes to this manual or the product(s) and/or program(s) described herein at any time.
Information provided in this manual is intended to be accurate and reliable. However, Moxa Technologies assumes no responsibility for its use, or for any infringements on the rights of fourth parties which may result from its use.
This product could include technical or typographical errors. Changes are periodically made to the information herein, and these changes may be incorporated in new editions of the publication.
MOXA Internet Services
Customer satisfaction is our number one concern. To ensure that customers receive the full benefit of our products, Moxa Internet Services has been set up to provide technical support, driver updates, product information, and user’s manual updates.
The following services are provided:
E-mail for technical support:
address: support@moxa.com.tw
Latest drivers and documents:
address: http://www.moxa.com or http://www.moxa.com.tw
World Wide Web (WWW) site for product information:
address: http://www.moxa.com or http://www.moxa.com.tw
Table of Contents
1. Introduction....................................................................... |
1-1 |
Features...................................................................................... |
1-2 |
Product Specifications ................................................................ |
1-2 |
Package Checklist ...................................................................... |
1-3 |
Front/Top/Rear/Bottom/Right Panel Views................................. |
1-4 |
2. Connecting the Hardware ................................................ |
2-1 |
Choosing a Location................................................................... |
2-1 |
Desktop ................................................................................. |
2-1 |
Wall or Cabinet...................................................................... |
2-2 |
DIN Rail................................................................................. |
2-3 |
Network Connection ................................................................... |
2-5 |
Power Connection ...................................................................... |
2-6 |
Serial Connection ....................................................................... |
2-6 |
3.Using the Built-In LCD Panel to Configure
|
NPort Server Lite .............................................................. |
3-1 |
4. |
Troubleshooting ............................................................... |
4-1 |
|
Installation and Configuration Troubleshooting .......................... |
4-1 |
|
Programming Problems.............................................................. |
4-5 |
A. |
Cable Pinouts .................................................................. |
A-1 |
B. |
Declaration of Conformity .............................................. |
B-1 |

1
Introduction
Welcome to Moxa NPort Server Lite, an Industrial Serial Device Server that greatly enhances the ability of a Windows 95/98/Me/NT/2000/XP host to control multiple serial devices over a TCP/IP based Ethernet network.
This chapter is an introduction to NPort Server Lite and includes the following:
Features
Product Specifications
Package Checklist
Front/Top/Rear/Bottom/Right Panel Views
NPort Server Lite provides a data communications solution for connecting Windows hosts to multiple asynchronous RS-232 (models DE-301/302/304) or RS-422/485 (models DE-331/332/334) serial ports through a TCP/IP network. Each model has one (DE-301/331), two (DE-302/332), or four (DE-304/334) asynchronous serial port connections on one side, and one 10/100 Mbps Ethernet connection on the other, allowing any device that supports the asynchronous communications protocol to attach to a network. NPort Server Lite works like an add-on multiport serial board to the Windows host, but with one major advantage—the TCP/IP network. Since the Windows host communicates with the COM ports on NPort Server Lite over a TCP/IP network, you are able to control asynchronous serial devices from virtually anywhere in the world.
Although it connects through the virtual link of the Ethernet, the ports on NPort Server Lite are recognized as Real COM ports by the Windows operating system. NPort Server Lite provides both the basic transmit/receive data functions, as well as RTS, CTS, DTR, DSR, and DCD control signals.
NPort Server Lite can be used with your existing applications that support serial communication. It also comes with a utility program providing a simple step-by-step installation procedure, and a maintenance wizard that gives you easy access to your asynchronous devices.
1-1
Features
Auto-detecting 10/100 Mbps Ethernet
1/2/4 port RS-232/422/485 serial interface
LCD IP address display and configuration
Built-in Ethernet and TCP/IP protocol
Supports Driver, TCP Server, TCP Client, UDP Server/Client, and Pair Connection (only for DE-301/331) operation modes
Ports on multiport units can be individually configured with different operation modes
Supports Windows Real COM drivers and Linux real tty drivers
Automatic network connection recovery
Suitable for both desktop and DIN-Rail installation
Product Specifications
Hardware
Processor I/O controller:
DE-301/331 DE-302/332 DE-304/334
Memory Connector type
Interface
LAN
Serial
No. of ports
Signals:
RS-232
RS-422
RS-485
Performance
Speed
Max. No. of ports
16 bit CPU
16C550C or compatible × 1 16C550C or compatible × 2 16C550C or compatible × 4
512 KB
Male DB9
Auto-detecting 100Base-TX (10/100 Mbps) RS-232 or RS-422/485
1/2/4
TxD, RxD, RTS, CTS, DTR, DSR, DCD, GND
TxD+/-, RxD+/-, RTS+/-, CTS+/-, GND
Data+/-, GND
50 bps – 230.4 Kbps
256 (per Windows NT/2000/XP host)
128 (per Windows 95/98 host)
1-2
Configuration |
|
Parity |
None, even, odd, space, mark |
Data bits |
5, 6, 7, 8 |
Stop bits |
1, 1.5, 2 |
OS Support
Windows XP, Windows 2000, Windows NT, Windows 95/98/Me, UnixWare SVR4.2, UnixWare7 SVR5, SCO Open Server, SCO UNIX, Linux real tty for 2.0.36 and above, 2.2.x, 2.4.x (Intel x86 running TCP/IP)
Power and Environment |
|
||
Power Requirements |
9 |
– |
30 VDC, 1.05A/9V |
Operating Temp. |
0 |
– |
55 |
Operating Humidity |
5 |
– |
95% RH |
Storage Temp. |
-20 – 85 |
||
Dimensions |
155 × 105 × 33 mm (W × D × H) |
||
Surge Protection |
15 KV ESD for serial ports |
||
Magnetic Isolation |
1.5 |
KV for Ethernet |
|
Regulatory Approvals |
FCC, CE, UL, CUL, TÜV |
||
Note: If you need a product with optical isolation, MOXA Transio A53, a smart RS-232 to RS-422/485 bi-directional converter, can be used with NPort Server Lite to provide up to 2 KV of optical isolation.
Package Checklist
One NPort Server Lite
NPort Server Lite Hardware Installation Guide
NPort Family Software Installation Guide
Cross-over 10/100 Mbps Ethernet cable
Power Adaptor (110V or 230V)
Windows 95/98/Me/NT/2000/XP drivers (on CD)
Optional Accessories
A52: Smart RS-232 to RS-422/485 Bi-Directional Converter
A53: Smart RS-232 to RS-422/485 Bi-Directional Converter; supports optical isolation protection (2 KV)
Metal attachment plates and screws
1-3

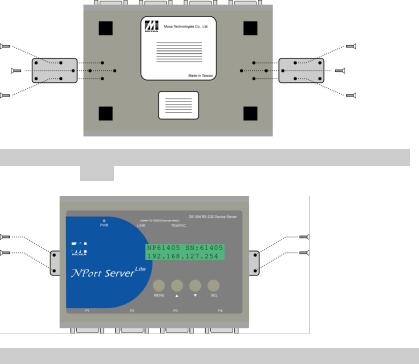
Front/Top/Rear/Bottom/Right Panel Views
1. Male DB9 serial ports
Note: Models DE-301/331 have only one port, and models DE-302/332 have only two ports.
2. PWR LED
3. LINK LED
4. TRAFFIC LED
5. LCD display panel
Note: Before retrieving an IP address from the DHCP/BOOTP server, NPort will display “DHCP/BOOTP fail” every 1 second.
6. Input buttons for LCD display panel configuration
7. Reset button—press continuously for
a. 3 sec to erase password After 3 sec, release the reset button at this time to erase password.
8. 100BaseTx Ethernet port
9. Power input 
10. Rubber base pads
11. Attachment plate screw holes
12. Heat dissipation orifices
1-4

2
Connecting the Hardware
Now that you have been introduced to NPort Server Lite's features and specifications, it’s time to set up the hardware. We cover the following topics in this chapter:
Choosing a Location
•Desktop
•Wall or Cabinet
•DIN Rail
Network Connection
Power Connection
Serial Connection
Choosing a Location
There are three placement options available. NPort Server Lite can be:
•placed on a desktop,
•fixed to a wall or inside a cabinet, or
•fixed to a 35-mm DIN Rail.
Desktop
One option is to place NPort Server Lite on a clean, flat, well-ventilated desktop. There are four rubber pads attached to the bottom of the server, and we recommend leaving sufficient room between NPort Server Lite and neighboring equipment to create enough clearance for air to circulate.
You should also remember not to put anything on top of NPort Server Lite, since this could damage the internal components and obscure the server’s LCD panel.
2-1
Wall or Cabinet
The two metal brackets included with NPort Server Lite can be used to attach the server to a wall, or the inside of a cabinet. Using three screws per bracket, first attach the brackets to the bottom of the server (Fig. 2-1a). Next, use two screws per bracket to attach the server to a wall or cabinet (Fig. 2-1b).
Figure 2-1a. NPort Server Lite—Wall Mounting Brackets (bottom
view)
Figure 2-1b. NPort Server Lite—Wall Mounting Brackets (top view)
2-2
 Loading...