


JC-82G

User Manual-
Guide de l’Utilisateur-
Manual del Usuario-
Gebruiksaanwijzingen-
Bedienungsanleitung-
Istruzioni per l'uso-
Instruçõe-
Wine Cooler
Rafraîchisseur à Vin
Enfriador de Vino
Wijn Koelkast
Wein kühler
Vino refrigerante
Armário para vinh
JC-82G/82GA/82GB
JC-112G/112GA/112GB

SAFETY PRECAUTIONS
Read all of the instructions before using this appliance.
When using this appliance, always exercise basic safety
precautions, including the following:
1) Use this appliance only for its intended purpose as described in this use
and care guide.
2) This wine cooler must be properly installed in accordance with the
installation instructions before it is used. See grounding instructions in the
installation section.
3) Never unplug your wine cooler by pulling on the power cord. Always
grasp the plug firmly and pull straight out from the outlet.
4) Repair or replace immediately, all electric service cords that have become
frayed or otherwise damaged. Do not use a cord that shows cracks or
abrasion damage along its length, the plug or the connector end.
5) Unplug your wine cooler before cleaning or before making any repairs.
Note: If for any reason this product requires service, we strongly
recommend that a certified technician performs the ser vice.
6) If your old wine cooler is not being used, we recommend that you remove
the door and leave the shelves in place. This will reduce the possibility
of danger to children.
7) This wine cooler should not be recessed or built-in an enclosed cabinet. It
is designed for freestanding installation only.
8) Do not operate your wine cooler in the presence of explosive fumes.
9) Do not store foods in wine cooler as interior temperature may not be cool
enough to prevent spoilage.
1
English
English
1
Portugal
12
Armário não trabalha
•Se ficha bem ligada
•Se onâoff e tomada tiver corrente eléctrica
Temperatura de vinho mais alta
•Abrir frequentemente portas
•Conservar vinho em pouco tempo
•Se gaxeta de porta bem hermérica
•Se dever limpar tubo frigorífoco
•Se ajusta bem o sjustador de temperatura
Temperatura de vinho mais baixa
•Se temperatura instalada mais baixa
Trabalho muito frequente
•É normal na estação húmida e de temperatura alta
•Porta aberta por longo tempo ou abrir com grande frequência
•Limpa-se tubo frigorífico
•Se gaxeta de porta está bem hefmética
•Se a porta é bem fechada
Dentro e fora do armário tem gelo
•É normal na estação de alta humidade
•Porta aberta por longo tempo ou abrir com grande frequência
•Se gaxeta de porta está bem hermética
Difício de fechar porta
•Ajusta-se apropriadamente nivelação
•Se tiver engarrafamento, por exemplo: garrafas e prateleira
Pesquisa de avaria
Portugal
12

2
Thank you for using our Haier
product. This easy-to-use manual will
guide you in getting the best use of
your wine cooler.
Remember to record the model and
serial number. They are on a label in
back of the wine cooler.
Model number
Serial number
Date of purchase
Staple your receipt to your manual. You will need it to obtain
warranty service.
For Future Reference Please
SAVE THESE INSTRUCTIONS
DANGER
Risk of child entrapment. Before you throw away your old
wine cooler, take off the doors. Leave the shelves in place so
that children may not easily climb inside.
English
English
2
Portugal
11
Interrupção eléctrica:
•Ao interromper corrente eléctrica por caso de trovão e suva ou qualquer
outra razão, deve-se tirar ficha da tomada. Quando voltar a ter electri-
cidade, liga-se novamente a corrente eléctrica.
Atenção para suspenso de uso e movimento do
armário :
•No caso de suspenso de uso por longo tempo, deve-se tirar macho da
tomada, deve-se limpar armário e gaxeta de porta de acordo com req-
uisição da parte de limpeza. Deixa-se a porta aberta para ter melhor
circulação de ar. Ao deslocar armário, deixa lhe ficar numa posição
bem vertical. É proibido de deslocar em posição horizontal, senão pode
estragar sistema hermético.
Portugal
11

Table Of Contents
PAGE
Safety Precautions ..........................................................................1
Parts And Features ..........................................................................4
Installing Your Wine Cooler ..........................................................5
Unpacking Your Wine Cooler ..................................................................5
Leveling Your Wine Cooler ......................................................................5
Proper Air Circulation ............................................................................5
Electrical Requirements............................................................................6
Wine Cooler
Features And Use ..........................................................7
Initial Set Up ..........................................................................................7
Temperature Adjustment ..........................................................................7
Shelving ................................................................................................9
Interior Light ..........................................................................................9
Door Lock ..............................................................................................9
Normal Operating Sounds ......................................................................9
Proper Wine Cooler Care and Cleaning....................................10
Cleaning and Maintenance ..................................................................10
Power Interruptions ..............................................................................11
Vacation and Moving Care ..................................................................11
Troubleshooting..............................................................................12
English
3
English
3
Portugal
10
Manutenção e lumpeza
Advertência:
para evitar choque eléctrico, antes de fazer limpeza,
deve-se tirar macho da tomada. Senão vai causar
perigo mortal ou ferimento.
Atenção:
antes de fazer limpeza, deve-se ler e respeitar as
instruções e advertências fornecidas por produtor
para que evite sofrimento pessoal ou estragamento
material.
Geralmente:
•prepara-se 3-4 colheres de líquido de limpeza de
bicarbonito misturado com água morna, usa-se
esponja ou pano para limpar o armário com este
líquido.
•Depois de lavar com água morna limpa, seca-se com
pano macio.
•Não pode-se usar produtos químicos violentos, mate-
riais de moenga, amónia, lixívia empó, detergente
concentrado ou líquido metal, porque um destes
materiais pode dissolver, estragar e descorar o
armário.
Gaxeta de porta:
•Deve-se limpar gaxeta uma vez por 3 meses, faz-se
armário ficar sempre limpo, macio e hermético.
•Colocar-se pouca vaselina em gaxeta de porta que
tem dobradiça, dessa maneira deixa gaxeta de
porta macia e hermética.
Portugal
10
123456789101112
JC-82GB
JC-82GA
JC-82G
JC-112GA
JC-112G
JC-112GB
C
White
Red
Light
+
Set
1
12
2
3
4
6
5
8
7
Electronic Unit
10
Mechanical Unit
W
hite
OFF
Mid Range
Coldest
Red
11
9
Mechanical Control
Unit Only
Electronic Controlled
Unit Only
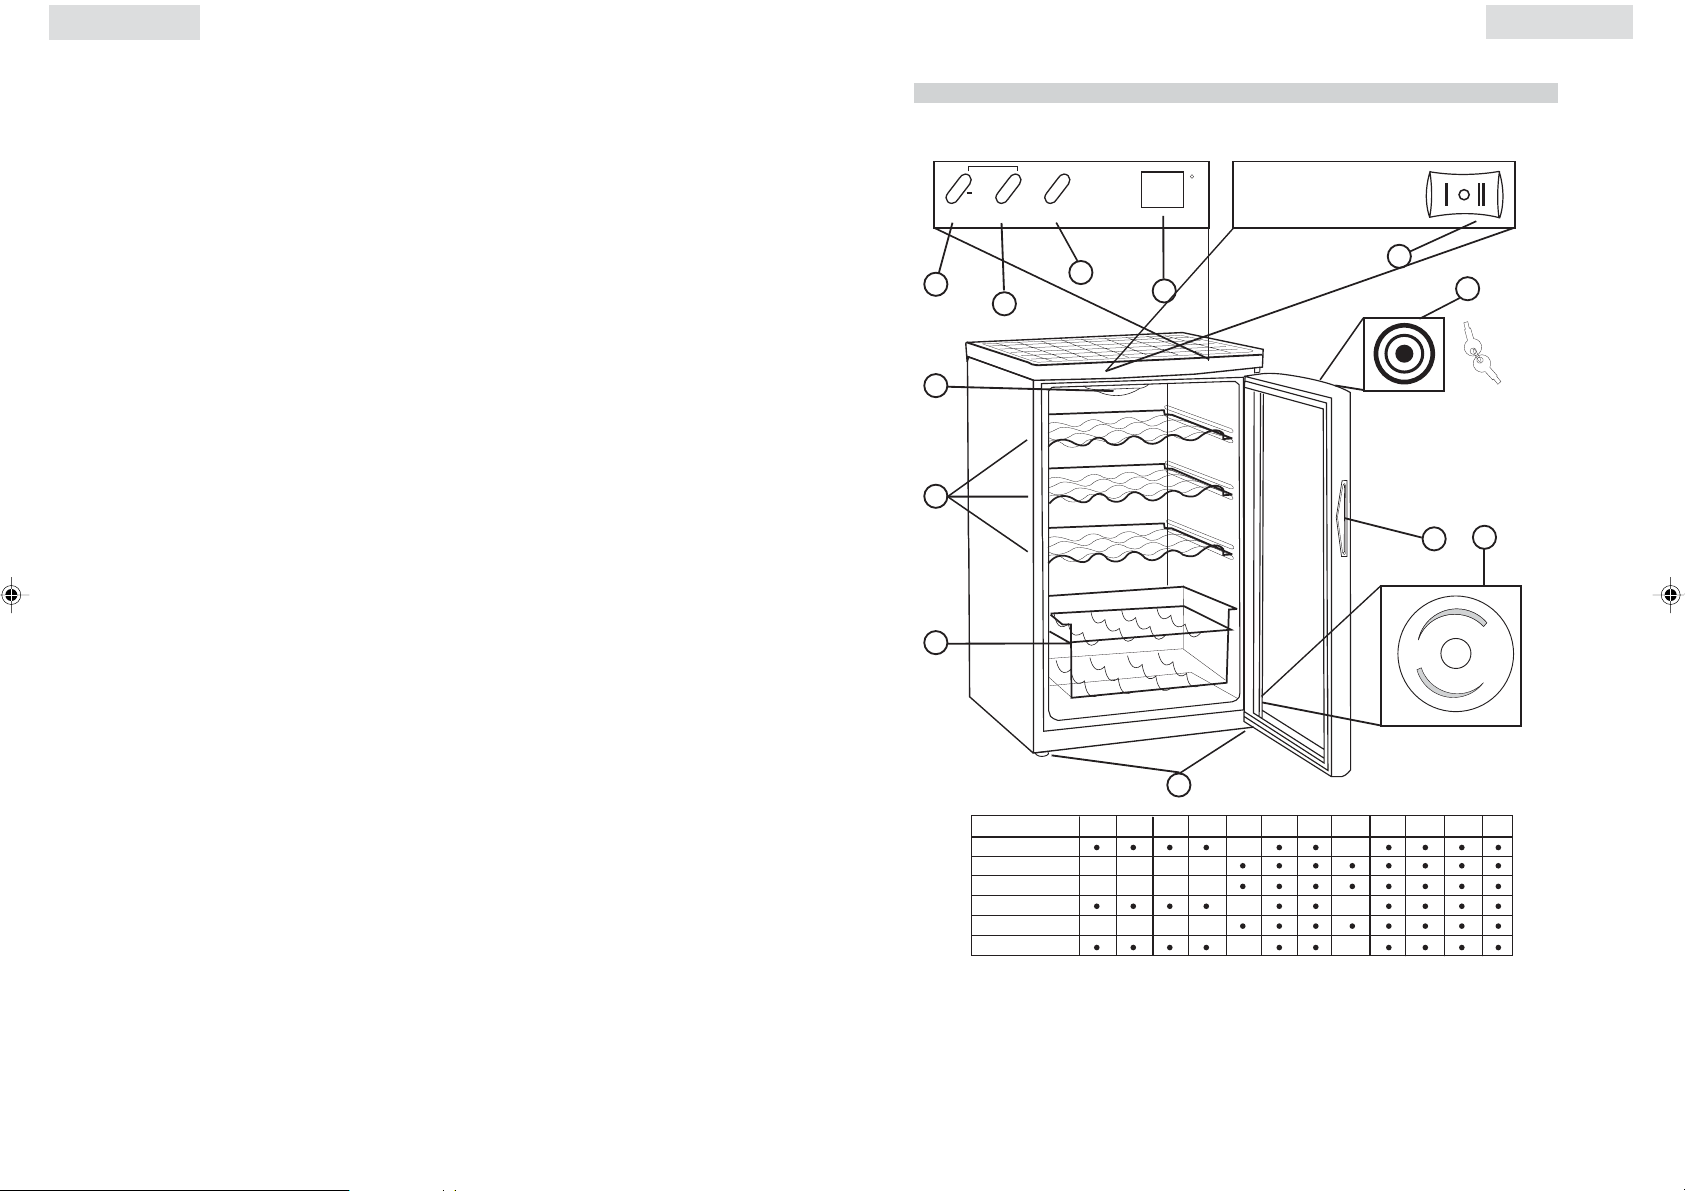
Parts And Features
1. White Wine Button (-)
2. Red Wine Button (+)
3. Interior Light Button (set)
4. LED Temperature Display
5. Light On/Off Switch
6. Door Lock and Key
7. Door Handle
8. Temperature Control
9. Adjustable Leveling Legs
(not shown)
10. 1 Slide-Out Basket
11. Slide-Out Shelves
12. Interior Light
English
4
English
4
•A prateleira é bonita e facilmente de ser limpa. Para adaptar se às
diversas normas de garrafas, a prateleira foi desenhada de forma
móvel, pode se deslocar para cima ou baixo em quaisquer carris. Pode
se pôr garrafas relativamente grandes na prateleira cruzada de base.
Atenção: o desenho de prateleira faz evitar contactos directos entre as
garrafas e facilita a circulação de ar.
Portugal
9
Prateleira
Luz
Fechadura da porta (só usa na forma de controlo electrónico)
Sons normais
•Dentro de armário instala uma luz suave para fazer esta mais bonita.
Carrega botão "Light/Set", a luz acenso, carrega de novo, a luz apa-
gada. Para facilitar a observação, onâoff da luz instalada em frente de
armário para vinho.
•Em consideração de segurança, instala uma fechadura em armário para
evitar acidente com criança, se não tira a chave da fechadura, armário
não é bem fechado.(corresponde ao critério VDE)
•Som como água a ferver e som tremido leve são resultados de circu-
lação de refrigerante.
•Ao começar e parar a circulação, o instrumento de controlo de temper-
atura pode produzir um barulho "ca-ta, ca-ta".
Portugal
9

1. Remove all packaging material. This includes the foam base and all
adhesive tape holding the wine cooler accessories inside and outside.
Slide out and remove plastic or foam guard used to secure the
compressor from shipping damage due to vibration and shock.
2. Inspect and remove any remains of packing, tape or printed
materials before powering on the wine cooler.
• Your wine cooler has four leveling legs which are located in the
front and rear corners of your wine cooler. After properly placing your
wine cooler in its final position, you can level your wine cooler.
• Leveling legs can be adjusted by turning them clockwise to raise your
wine cooler or by turning them counterclockwise to lower
your wine cooler. The wine cooler door will close easier when the
leveling legs are extended.
• To assure your wine cooler works at the maximum efficiency it
was designed for, you should install it in a location where there
is proper air circulation, plumbing and electrical connections.
• The following are recommended clearances around the wine cooler:
Sides……………2 "(50mm)
Top....................2" (50mm)
Back..................2" (50mm)
• Do not over fill your wine cooler for proper internal air circulation.
Installing Your Wine Cooler
Unpacking Your Wine Cooler
Proper Air Circulation
Leveling Your Wine Cooler
5
English
English
5
•A diferença da temperatura estipulada e a temperatura lida na luz indi-
cador é ±3 graus. é o resultado de parada e começo de operação do
armário. Normalmente, a diferença da temperatura de cima para baixo
de armário é 10o. Por isso, se instalar a temperatura para 10˚C e con-
servar branco e tinto juntos, pode se pôr vinho branco na base da
prateleira, zona com temperatura de 7˚C e pôr vinho tinto na parte de
cima da prateleira com temperatura de 13˚C.
Contrôle mecânico(figura 2)
•Os botões do controlador de temperatura estão na parte traseira, com 6
classificação "1" indica a temperatura máxima, a classificação "6", a
mínima. Ajuste a temperatura de acordo com necessidade.
Portugal
8
(Figura1)
(Figura 2)
Portugal
8

English
Electrical Requirement
• Make sure there is a suitable power Outlet (220~240 volts, 15 amps
outlet) with proper grounding to power the wine cooler.
• Avoid the use of three plug adapters or cutting off the third grounding in
order to accommodate a two plug outlet. This is a dangerous practice
since it provides no effective grounding for the wine cooler and may
result in shock hazard.
• Do not install your wine cooler in any location not properly insulated or
heated e.g. garage etc. Your wine cooler was not designed to operate
in temperature settings below 13˚ Centigrade.
• Select a suitable location for the wine cooler on a hard even
surface away from direct sunlight or heat source e.g. radiators,
baseboard heaters, cooking appliances etc. Any floor unevenness
should be corrected with the leveling legs located on the front and rear
bottom corners of the wine cooler.
• Your wine cooler is designed for free-standing installation only. It is not
designed for built-in application.
Install Limitations
6
English
6
Instalação
Controlo eléctrico
Começa-se a ajustar só 30 minutos depois de ligar a fonte eléctrica,
durante este período a luz de vinho tinto acenso.
Controlo mecânico
O aparelho de controlo instalado na traseira de armário tem 6 posições
inclusive posição 0 (off). No início de uso, marca terceira posição. Deixa-
se armário trabalhar em vão pelo menos 30 minutos antes de ajustamen-
to.
Ajustamento de temperatura
ver o quadro:
•Armário já foi bem instalado, adaptado +s exigências de vinho tinto e
vinho branco. Se tiver mais vinho branco, carrega botão branca. A tem-
peratura média dentro de armário mantem 7˚C e 10˚C graus. Carrega
botão vermelha, a temperatura média mantem 13˚C e 16˚C graus.
•Pode-se ajustar temperatura em comformidade com a requisição. Ao
estipular a temperatura, carrega simultaneamente botões branca e vermel-
ha até 3 segundos, neste momento armário está numa situação de tem-
peratura estipulada. Carrega botão branca, a temperatura baixa, se car-
rega botão vermelha , a temperatura aumenta. Carrega botão estipulada
3 vezes, pode-se ajustar 3 graus, carrega 4 vezes, pode-se ajustar 4
graus, carrega 5 vezes, ajusta 5 graus. Quando corresponde à temper-
atura estipulada, carrega botão Light/Set. O processo de armário foi
elaborado. A luz indicador mostra a temperatura actual dentro do
armário.
Portugal
7
Características e uso
Portugal
7

Wine Cooler Features And Use
Electronic Controlled Units:
Once you have plugged the unit into an electrical outlet, let the unit run for
at least 30 minutes to acclimate itself before making any adjustments.
During this time the Red Wine light may stay on.
Mechanical Controlled Units:
The control for this is on the back of the unit. There are 6 settings
plus 0 (OFF). Initially set the temperature setting to 3. Let the unit run for at
least 30 minutes to acclimate itself before making any adjustments.
7
Initial Setup
Electronic Control Unit: See fig. # 1
• The wine cooler is preset from the factory to automatically
accommodate temperature requirements for red or white wines.
If you store mostly white wines, press the "White Wine" button and the
wine cooler will maintain an average temperature between
7˚ to 10˚ C. Pushing the "Red Wine" button will yield an
average temperature between 13˚ to 16˚ C.
• The wine cooler can be set to any temperature you desire to
accommodate your wine storage requirements. To set the temperature,
press both the "White Wine" and "Red Wine" buttons simultaneously
and hold for approximately 3 seconds. Now you are in temperature set
mode. Decrease the temperature by pushing the "White Wine" button
and increase the temperature by pressing the "Red Wine" button.
Pressing the appropriate button 3 times will adjust the temperature 3
degrees, press 4 times equals 4 degrees, 5 times equals 5 degrees, and
so on. Once you have selected the temperature you desire, push the
"Light/Set" button. Now the wine cooler is programmed and the LED
readout will return to current internal temperature reading.
Temperature Adjustments:
English
English
7
Portugal
Requisição eléctrica
• Garante-se que tomada de fonte eléctrica de armário corresponde a
exigência (220-240volt, 15ampério) e liga ao chão corretamente.
• Não se usa ficha de 3 pernas, mesmo com terceira perna cortada,
porque assim não garante armário ligado e ficazmente ao chão e muito
perigoso.
• Não se coloca armário num lugar onde falta de separação de calor. O
valor de ajustamento de temperatura de desenho de armário não pode
ser menos de 13˚C.
• Coloca-se armário num lugar duro e plano, evita contra sol e fora de
fonte de calor, por exemplo: refrigerador, aquecimento, utensílio de coz-
inha etc. Se o chão não é plano, pode-se ajustar através de pés
equilíblios.
•Monta-se armário separatamente e não se encaixa na parede.
Limitações de montagem
6
Portugal
6

• There will be a 3 degree variance +/- between the temperature you
select and the temperature indicated on the LED readout.
This occurs because the wine cooler activates and deactivates
trying to maintain your desired temperature. There is often a
10˚ variance between the top and bottom shelves of the wine cooler.
Therefore, if you have set the wine cooler for 10˚ and have a
mix of red and white wines, you may want to put the white wine
on the bottom shelf where the temperature will be 7˚ C, and place the
red wine on the top shelf where the temperature will be 13˚ C.
Mechanical Control Unit: See fig. # 2
• Your wine cooler has a temperature control knob on the back of the
unit. There are 6 settings: 1 being the warmest and 6 being the coolest.
You can set the temperature of your wine cooler at any
setting you desire.
F
White
Red
Light
+
Set
fig. # 1
8
White
OFF
Mid Range
Coldest
Red
fig. # 2
English
C
English
8
1.desembrulhar totalmente meteriais de embrulho inclusive a base de
esponja e fitas de cola que segura peças assessórias dentro e for a do
armário. Desembrulhar plasticos ou esponjas que serve para defender
compressor de não ser estragado durante transportação.
2.Antes de ligar corrente eléctrica, deve-se examinar e tirar restantes
materiais de embrulho, fitas ou impresso.
•Armário para vinho tem 4 pés equilibrados nos cantos frente e trás. Ao
colocar armário num lugar fixo, pode-se agora ajustar sua nivelação
equilíbria.
• Gira-se pé equilíbrio rumo a direita para mais alto, ao contrário para
mais baixo. Depois de sair pé equilíbrio, pode-se abrir e fechar livre-
mente porta do armário.
• Para garantir máxima eficâcia de desenho, é preciso de ter um ambi-
ente com boa circulação de ar para armário, tubos e ligação de fonte
eléctrica .
•Requisição de espaço a volta do armário:
Aos lados……………2" (50mm)
Ao cima.....................2" (50mm)
Atrás.........................2" (50mm)
•Não coloca demasiados alimentos no armário para vinho para garantir
a boa circulação de ar.
Portugal
Montagem
Desembrulho:
Nivelação
Circulação de ar apropriada
5
Portugal
5

9
• The shelves are designed for flexibility and easy cleaning.
To accommodate different sized bottles the shelves slide out
and can be moved up or down into any of the tracks molded
into the cooler cabinet. Larger bottles or Magnums can be more easily
accommodated on the cross shelves of the bottom basket of the cooler.
You will notice that the shelves are designed so the bottles do
not line-up directly over one another. This allows free air
movement and provides more space.
• To complement the look of your wine collection, a soft light has been
built into the wine cooler. Simply push the "Light/Set" button on the
electronic controlled unit, and the light comes on, push again for off.
On the mechanical control units, the light switch is on the front for your
convenience. For maximum energy efficiency, leave light off when not
viewing your collection.
Shelving
Interior Light
• For safety and security, your wine cooler is equipped with a door lock.
To eliminate the risk of accidental child entrapment, the lock was
designed so that the door will not lock until the key is removed
(consistent with VDE requirements).
• Boiling water, gurgling sounds or slight vibrations that are the result of
the refrigerant circulating through the cooling coils.
• The thermostat control will click when it cycles on and off.
Door Lock (electronic controlled unit only)
Normal Operating Sounds You May Hear
English
English
9
1. botão para vinho branco(-)
2. botão para vinho tinto(+)
3. botão de luz(instalada)
4. mostra de temperatura LCD
5. on/off de luz
6. fechadura de porta e chave
7. puxador de porta
8. controlo de temperatura
9. ajustamento de nivelação dos pés
10. cesto de alimentos móvel
11. prateleira móvel
12. luz interior
Portugal
4
Peças assessórias
controlador electrónico
controlador mecânico
só para controlador
electrónico
só para controlador
mecânico
JC-112GA
JC-82GB
JC-112GB
• • • • • • • •
• • • • • • • •
• • • • • • • • • •
1 2 3 4 5 6 7 8 9 10 11 12
Portugal
4

Warning: To avoid electric shock always unplug your
wine cooler before cleaning. Ignoring this warning
may result in death or injury.
Caution: Before using cleaning products, always read and
follow manufacturer’s instructions and warnings to
avoid personal injury or product damage.
General:
•Prepare a cleaning solution of 3-4 tablespoons of
baking soda mixed with warm water. Use sponge or
soft cloth, dampened with the cleaning solution, to
wipe down your wine cooler.
• Rinse with clean warm water and dry with a soft cloth.
• Do not use harsh chemicals, abrasives, ammonia,
chlorine bleach,concentrated detergents, solvents or
metal scouring pads. SOME of these chemicals may
dissolve, damage and/or discolor your wine cooler.
• Clean door gaskets every three months according to
general instructions. Gaskets must be kept clean and
pliable to assure a proper seal.
• Petroleum jelly applied lightly on the hinge side of
gaskets will keep the gasket pliable and assure a
good seal.
Proper Wine Cooler Care and Cleaning
Cleaning and Maintenance
Door Gaskets:
10
English
English
10
Indice
PAGE
Precauções seguras .....................................................................................1
Peças assessórias ...................................................................................4
Montagem de armário para vinho .........................................................5
Desembrulho de armário para vinho ........................................................5
Nivelação de armário para vinho..............................................................5
Circulação de ar apropriada ...................................................................5
Requisição eléctrica...................................................................................6
Características e uso de armário para vinho..............................................7
Instalações de armário para vinho..............................................................7
Ajustamento de temperatura.......................................................................7
Prateleira ..................................................................................................9
Luz interior ..............................................................................................9
Fechadura de porta .................................................................................9
Sons normais de operação .......................................................................9
Manutenção e lumpeza .........................................................................10
Manutenção e lumpeza............................................................................10
Interrupção de corrente eléctrica ............................................................. 11
Desocupação e movimento
.....................................................................11
Pesquisa e reparação...
.............................................................................12
Portugal
3
Portugal
3

• Occasionally there may be power interruptions due to
thunderstorms or other causes. Remove the power cord from AC outlet
when a power outage occurs. When power has been restored,
replug power cord to AC outlet.
• For long vacations or absences, unplug the wine cooler and clean the
wine cooler and door gaskets according to "General cleaning" section.
Prop doors open, so air can circulate inside. When moving always
move the wine cooler vertically. Do not move with the unit lying down.
Possible damage to the sealed system could occur.
Power Interruptions
Vacation and Moving Care
11
English
English
11
2
Obrigado pelo seu uso do produto
Haier. Guarda bem este manual de
instruções para que se use correcta-
mente.
Transcreve-se o número de modelo e
número de série deste untensílio
marcado atrás do armário.
Número de modelo
Número de série
Data de compra
Guarda bem seu recibo junto com manual de instruções e mostrá-los quando
se exige serviço de reparação de garantia.
Guarda bem este manual de instruções
Perigo!
Será perigoso com a entrada de criança neste armário. Ao
substituir este armário, deve-se desmontar portas para que
prevena a entrada de criança.
Portugal
Portugal
2
Wine Cooler Does Not Operate
• Check if wine cooler is plugged in.
• Check if there is power at the ac outlet, by checking the circuit breaker.
Wine appears too warm
• Frequent door openings.
• Allow time for recently added wine to reach desired temperature.
• Check gaskets for proper seal.
• Clean condenser coils.
• Adjust temperature control to colder setting.
Wine temperature is too cold
• If temperature control setting is too cold, adjust to a warmer setting.
Wine cooler runs too frequently
• This may be normal to maintain constant temperature during
high temperature and humid days.
• Doors may have been opened frequently or for an extended
period of time.
• Clean condenser coils.
• Check gasket for proper seal.
• Check to see if doors are completely closed.
Moisture build up on interior or exterior
of the wine cooler:
• This is normal during high humidity periods.
• Prolonged or frequent door openings.
• Check door gaskets for proper seal.
Wine Cooler door does not shut properly:
• Level the wine cooler.
• Check for blockages e.g. wine bottles, shelves.
TroubleShooting
12
English
English
12
Precauções Segura
Antes de usar este utensílio, le-se totalmente estas instruções e
quando usa este utensílio deve-se respeitar as seguintes
exigências sobre as medidas básicas de segurança.
1
?
?
?
?
?
?
?
?
?
?
?
/Xh?
N)X?g?
?31?g?
?N@Lg?
31g?
N@L?f?
?@1?f?
?@@?f?
?@@?f?
?@@?f?
?@@?f?
?@@?f?
?@@?f?
?@5?f?
J@H?f?
75g?
?J@Hg?
?75?g?
J(Y?g?
.Yh?
?
?
?
?
?
Usa-se este untensílio só segundo as instruções.
2)Monta-se este utensílio de acordo com instruções de montagem.
3)É proibido de puxar fio eléctrico para tirar ficha da tomada. Pode-se segurar
macho e depois tira-se da fonte eléctrica.
4)É proibido de usar ficha de fio eléctrico estragado ou fendido. Se tiver estraga-
mentos ou fendas, deve-se repará-lo ou substituí-lo imediatamente.
5)Antes de fazer limpeza ou reparação, deve-se tirar macho da tomada eléctrica.
Atenção: o serviço de reparação do armário para vinho tem de ser efectuado por
técnicos profecionais.
6)Ao substituir o velho armário para vinho, se este continua ficar no quarto, deve-
se desmontar suas portas com objectivo de evitar perigo para crianças.
7)Este utensílio não é um tipo encaixado, pode-se montar e usar separadamente.
8)Deixa de usar este utensílio no caso de encontro com gás inflamável e explosível.
9)Antes de chegar a temperatura estipulada dentro do armário, não coloca alimen-
tos .
1
Portugal
Portugal
1

Français
MESURES DE SECURITE
Lire l’ensemble des instructions avant d’utiliser l’appareil.
Lors de l’utilisation de cet appareil, prendre toutes les
mesures de sécurité de base, y compris les suivantes:
1) N’utiliser cet appareil que pour l’usage pour lequel il est prévu,
tel qu’il est indiqué dans le guide d’utilisation et d’entretien.
2)
Ce réfrigérateur à vin doit être installé correctement, selon les instructions
d'installation, avant d'être utilisé. Voir les instructions de mise à la terre
dans la section d'installation.
3) Ne jamais débrancher le réfrigérateur à vin en tirant sur le cordon d'alimenta-
tion. Saisissez toujours la fiche fermement et la tirez-la directement de la prise de
courant.
4)
Réparez ou remplacez immédiatement tous les cordons d'alimentation qui sont
frangés ou endommagés. N'utilisez pas de cordon qui présente des fissures ou
de l'abrasion sur le fil ou aux extrémités.
5)
Débranchez votre réfrigérateur avant de le nettoyer ou d'en faire l'entretien
général. Note : N'essayez pas de faire les réparations vous-mêmes. Contactez
un agent de service qualifié pour toute réparation.
6)
Si vous remplacez un vieux réfrigérateur à vin, enlevez les portes avant de
l'entreposer ou de le jeter et laissez les étagères en place. Cela réduira les
dangers potentiels pour les enfants.
7)
Ce réfrigérateur à vin ne doit pas être suspendu ou encastré. Il est conçu pour
être installé de façon indépendante seulement (veuillez vous référer à la section
Installation pour de plus amples informations).
8) Ne faites pas fonctionner le réfrigérateur à vin en présence
d'émanations explosives.
9) N'enregistrez pas les nourritures dans le refroidisseur
de vin car la température intérieure peut ne pas être assez
fraîche pour empêcher la détérioration
1
Français
1
Italy
12
Non funziona
•La spina non attaccata la presa.
•Mancanza di corrente.
Temperatura di vino e` troppo alta
•Apertura di sportello frequente.
•Il tempo di riserva e` pocco.
• La guarnizione di sportello non tiene bene.
• Il tubo di condensamento e` sporco.
• Il termostato non funziona bene.
Temperatura di vino e` troppo bassa.
•La temperatura sistemata e` troppo bassa.
Compressore avvia frequentemente
•Nella stagione calda e umida il tale fenomeno e` normale.
• Apertura di sportello frequente e il tempo di apertura lungo.
• Il tubo di condensamento e` sporco.
• La guarnizione di sportello non tiene bene.
• Lo sportello non chiude bene.
Sul mobile si condensa goccia di acqua.
• Nella stagione umida e calda il tale fenomeno e` normale.
• Apertura di sportello frequente e il tempo di apertura lungo .
• La guarnizione di sportello non tiene bene.
Sportello non chiuso bene
•Spianare il vino refrigerante.
•Lo sportello si blocco.
Riparazione
Italy
12
 Loading...