


GUADAB08IP DAB Radio with iPod docking station User Guide
IMPORTANT: Please read all instructions carefully before use and keep for future reference

Introduction
Thank you for choosing this Grundig DAB Radio with Docking Station. Not only can you listen to your favourite DAB radio stations, but you can also listen to all the songs and albums on your iPod.
It’s really simple to use; you can fully operate your DAB Radio with Docking Station using the supplied Remote Control.
Throughout this User Guide the DAB Radio with Docking Station will be referred to as the DAB Radio.
Safety is important
Use of any electrical equipment should be undertaken with care. Please read the Safety instructions on page 17 before you operate this DAB Radio.
Key Features
DAB radio
DAB (Digital Audio Broadcasting) is the next generation of radio.
DAB was developed in Europe by a consortium of broadcasters and manufacturers.
DAB uses digital audio compression techniques to transform the source material, i.e. music and speech, into digital code before it is transmitted. The code consists of electronic ‘ones and zeros’ called binary digits or bits. The binary code is then multiplexed or grouped together to create a superior signal, when compared with the older, analogue system, with the following key benefits:
•Near CD quality sound
•Interference free reception
•No need to retune
iPod Docking
Any iPod can be connected to the DAB radio to allow all your songs to be played through the DAB radio speakers. Various adaptors are provided to allow all iPods to be connected.
2
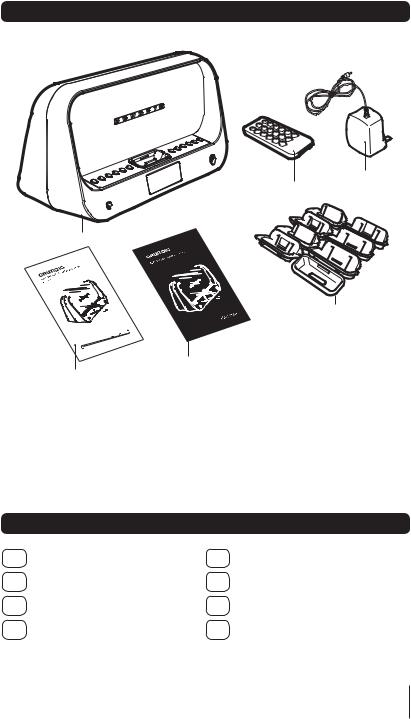
What’s in the box
Power Adaptor
Remote Control
DAB Radio with iPod Docking Station
8 x iPod Adaptors
Quick Start Guide
This User Guide
Contents
01 |
Your DAB Radio ............................ |
4 |
05 |
Troubleshooting.......................... |
15 |
02 |
Get going ..................................... |
6 |
06 |
Specifications............................. |
16 |
03 |
Daily use ...................................... |
9 |
07 |
Warnings.................................... |
17 |
04 |
Advanced features ..................... |
13 |
08 |
Guarantee .................................. |
18 |
3

01 |
Your DAB Radio |
|
|
|
|
FRONT |
|
|
|
|
BASS TREBLE |
SPEAKERS |
IPOD Docking Station |
STANDBY Button |
|
Button |
|
|
|
REMOTE CONTROL |
LCD Display |
HEADPHONE Jack |
Sensor |
VOL+ Button |
PRESET Button |
SCAN Button |
VOL - Button |
|
INFO Button |
LEFT ARROW Button |
RADIO MENU Button |
MODE Button |
SELECT Button |
RIGHT ARROW Button |
REAR |
|
ON/OFF Switch |
AERIAL |
|
|
|
|
|
|
|
|
|
POWER Socket |
LINE OUT Socket |
|
BATTERY Compartment |
|||||
|
||||||||
4
Your DAB Radio |
01 |
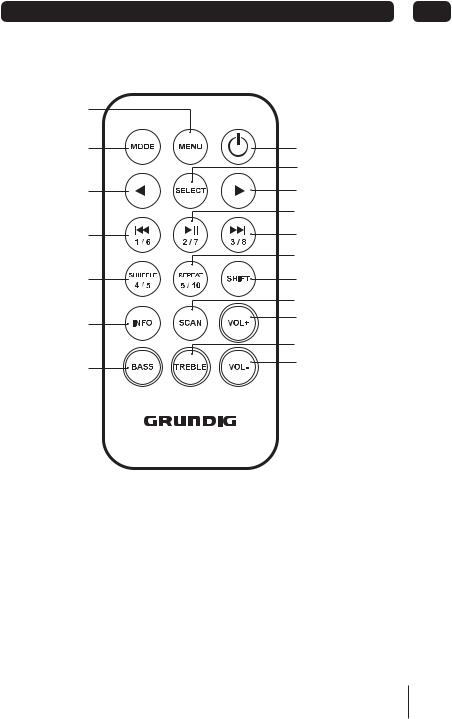
REMOTE CONTROL
MENU Button
MODE Button |
STANDBY Button |
|
SELECT Button |
LEFT ARROW Button |
RIGHT ARROW Button |
|
NUMERIC/PLAY/PAUSE Button |
NUMERIC/RWD Button |
NUMERIC/FWD Button |
|
NUMERIC/REPEAT Button |
NUMERIC/SHUFFLE |
SHIFT Button |
|
|
Button |
SCAN Button |
|
|
INFO Button |
VOL + Button |
|
|
|
TREBLE Button |
BASS Button |
VOL - Button |
|
5

02 Get going
1Setting up the DAB Radio
Insert the connector of the Power Adaptor into the Power Socket of the DAB Radio.
Insert the Power Adaptor into the wall socket and turn the socket on.
Turn the ON/OFF Switch at the rear of the DAB Radio to the ON (I) position.
Unclip and extend the Aerial at the rear of the DAB Radio to ensure the best reception is received.
Press the STANDBY button to turn the DAB Radio on.
When the DAB Radio is switched on for the first time, it will begin to search for all available digital radio stations. Once the search is complete, the first available station will be heard.
2Using the DAB Radio with Batteries
The DAB Radio can be powered by 6 ‘C’ type Batteries. This allows the DAB Radio to be used outside or away from wall sockets.
To remove the Battery Compartment Cover, press firmly and pull away from the DAB Radio.
Insert 6 ‘C’ type batteries into the battery compartment, following the polarity diagram on the inside.
Replace the Battery Compartment Cover.
6
 Loading...