


THANK YOU for your investment in Gravely equipment. It is an investment, for the Gravely will save you work and worry for many years.
You will gain still greater satisfaction from your Gravely if you add the tools you need for your other jobs. From time to time we suggest you consult your dealer for the many Gravely attachments that will eliminate grounds upkeep and garden drudgery.
Your Gravely Tractor and attachments are warranted under terms shown herein. To qualify for this Warranty, you must register your tractor by completing the enclosed Registration Card and returning it. For your own protection, please do this right away.
To continue its program of quality and design improvement, the manufacturer reserves the right to change specifications, design or prices without notice and without incurring obligations.
1
TABLE OF CONTENTS
Safety Instructions |
3 |
Introductions |
4 |
Operation |
5 |
Starting |
5 |
Operating the Tractor |
6 |
Maintenance |
7 |
Specifications |
9 |
Attachments |
10 |
30" Rotary Mower |
10 |
30" Rotary Mower Attachments |
11 |
40" Rotary Mower |
12 |
Sickle Mower |
13 |
Lawn Care |
14 |
Twin Tool Gardening |
15 |
Cultivator Toolholder |
17 |
Snowblower |
18 |
48" Snowdozer |
19 |
Steering Sulky |
20 |
Riding Sulky |
20 |
2
SAFETY INSTRUCTIONS
TRAINING
1. Read the Instruction Manual carefully. Be thoroughly familiar with the controls and proper use of the equipment.
2. Never allow children to operate tractor.
3. Keep the area of operation clear of all persons, particularly small children and pets.
PREPARATION
1. Thoroughly inspect the area where the equipment is to be used, remove all foreign objects.
2. Do not operate equipment when barefoot or wearing open sandals.
3. Check fuel before starting engine. Do not fill gasoline tank indoors, when engine is running or while engine is still hot. Wipe off any spilled gasoline before starting engine.
4. Check to be sure PTO is disengaged and put Forward-Reverse and High-Low in neutral before starting engine.
5. Never attempt to make an adjustment on attachments while engine is running. 6. Operate only in daylight or in good artificial light.
7. Always be sure of your footing; keep a firm hold on the handles and walk; never run.
OPERATION
1. Do not change engine governor settings to overspeed engine.
2. Do not put hands or feet near or under rotating parts. Keep clear of discharge openings at all times.
3. Stop mower attachment when crossing gravel drive, walks or roads.
4. If a foreign object is struck, stop engine and thoroughly inspect the attachment and tractor for any damage, and repair the damage before restarting and operating the attachment.
5. If the equipment should start to vibrate abnormally, stop the engine and check immediately for the cause. Vibration is generally a warning of trouble.
6. Stop engine and wait until all moving parts have come to a complete stop before you leave the equipment.
7. When cleaning, repairing or inspecting, make certain all moving parts have stopped. Disconnect spark plug wire and keep wire away from plug to prevent accidental starting.
8. Do not run engine indoors without proper ventilation.
9. Exercise extreme caution when changing direction on slopes. Do not mow excessively steep slopes.
MAINTENANCE AND STORAGE
1. Keep all nuts, bolts, and screws tight to be sure equipment is in safe working condition.
2. Never store equipment with gasoline in the tank inside of a building where fumes may reach an open flame or spark. Allow engine to cool before storing in any enclosure.
3. Keep engine free of grass, leaves, debris, or excessive grease to prevent overheating and possible fire hazard.
3
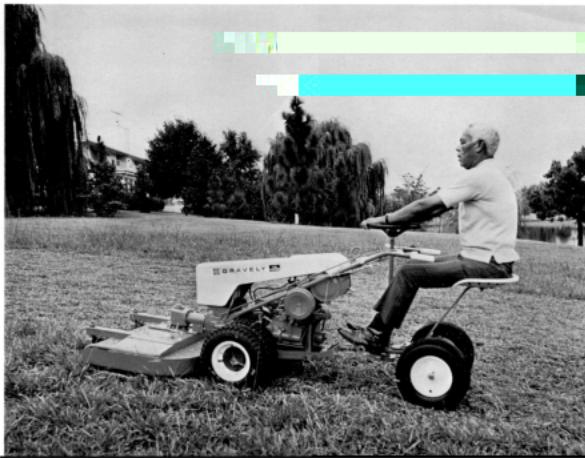
INTRODUCTION
The Gravely Convertible 7.6 Tractor is available in two models - the Custom and the Super. The Super has the added feature of electric starter and governor.
The Convertible 7.6 Tractor is powered by a Gravely engine producing 7.6 horsepower. All gear drive allows power to be transmitted directly from the engine to the power attachment by steel shafts and gears.
The Convertible 7.6 offers year-around, all-season versatility with many different attachments available. Out-front mounting of most attachments gives you maximum visibility and safety.
This tractor will give you highly satisfactory service if maintained and operated as outlined in this manual.
All references to Left Hand and Right Hand; front and rear are given from the operators position, as you stand behind the tractor.
For detailed service information, a service manual is available through your dealer or through the home office.
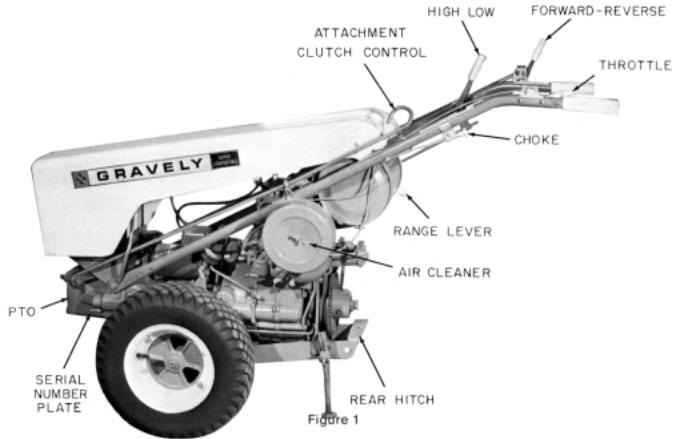
It is important that you know the Serial Number of your tractor. The Serial Number is located on the Left Hand side of the advance casting. See Figure 1. The serial number of your tractor is
For your future reference, please fill in your serial Number as soon as possible.
Please refer to this number on all correspondence concerning your tractor to expedite prompt response to your needs.
4
|
Figure 2 |
OPERATION |
STARTING |
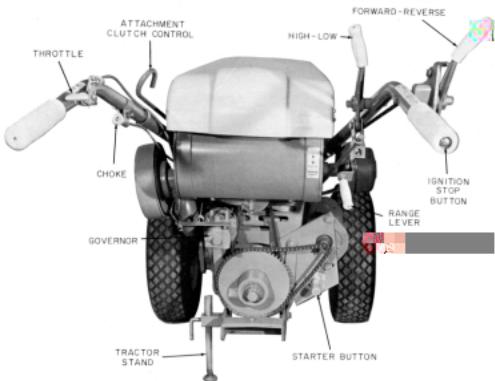
Throttle - Depress the throttle to accelerate engine, raise to decelerate engine.
Choke - Pull to choke; push forward fully for normal operation.
Operating Levers - The operating levers, one for high an ow speeds and one for forward and reverse are located on the right tractor handle.
Range Control - On tractors with the optional eight spee transmission, the range selector lever is on the right by the fuel tank. Push forward fully for low range; pull rearward fully for high range.
Attachment Clutch Control - The attachment clutch control is the attachment clutch lever that enables you to engage or disengage the power attachment from your position at the tractor handles. Pull to engage the attachment; push to disengage.
Ignition Stop Button - To stop engine, depress the ignition stop button. Keep depressed until the engine stops completely.
Whether you have a manual starter or an electric starter, before starting check to see if:
Operating levers are in neutral .
Attachment clutch control is in the disengaged position .
Valve on fuel tank is open and fuel in tank Oil level is on full mark .
Throttle is open approximately half-way .
An attachment or attachment boss cover is secured to the front of the tractor.
Normal Starting - On tractors with the manual starter, attach the strap to the pulley (place the hole in the strap over the pin in the pulley groove) and wind the strap onto the pulley in the direction of the arrow on pulley. Pull the strap hard and fast. Choke as required. With the electric starter, simply press the starter button with your toe. Choke as required.
NOTE: In proper working order, the engine should start with one or two attempts (a few more may be necessary in cold weather). If it doesn't, check the Trouble Shooting section to find and correct the trouble. Do not tamper with the carburetor - this will serve only to complicate things, for even with the carburetor out of adjustment, the engine should start.
Cold Weather Starting - Cold weather starting troubles usually can be avoided if you:
Make sure the proper weight oil is used. Oils heavier than those recommended will stiffen at low temperature thus making starting more difficult . Use fresh high quality regular grade gasoline . Store the tractor in a heated building if possible.
5
OPERATING THE TRACTOR
Figure 3 |
Figure 4 |
When starting the tractor, have high-low and forward-reverse control levers in neutral and the attachment clutch control pushed forward fully in the disengaged position.
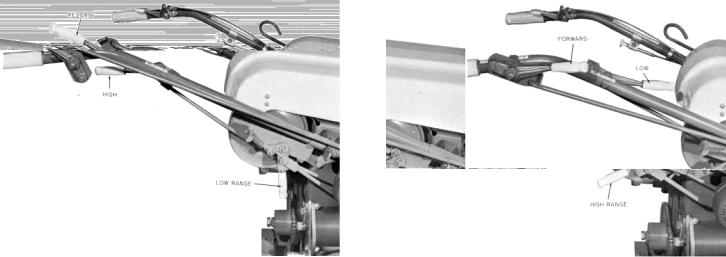
If the tractor is the eight speed transmission model the Range Selection Lever should be in the position for the range in which the tractor will be operated initially.
Engaging wheels - To put tractor in motion, first move the high-low control lever to either the high or low position (figure 3). Then move the forward-reverse control lever into forward or reverse. Depress the throttle to the desired speed.
NOTE: WITH ONLY THE HIGH-LOW CONTROL LEVER IN HIGH OR LOW, THE TRACTOR WILL NOT MOVE.
Engaging Power Attachment - Before attempting to put a power attachment in gear, be sure that the tractor is stopped, with high-low and forward-reverse control in neutral and the engine running at idle speed.
After the attachment is engaged, increase the engine speed to about half-throttle. Move the high-low control lever to high or low.
Braking - The forward-reverse control lever is used as a brake when you must stop. Move the lever out of forward, pass through neutral, and apply pressure at reverse position -enough pressure to stop the forward motion of the tractor.
STANDARD TRANSMISSION - The standard transmission models have four speeds - high and low in forward and high and low in reverse. These speeds control both ground speed and attachment speed, with low gear having about 75% of the speed obtainable in high gear.
EIGHT-SPEED TRANSMISSION - The eight speed transmission models feature a two-speed axle giving the tractor four speeds forward and four speeds in reverse.
Shifting the axle between high and low ranges controls only the tractor's ground speed. Shifting the high-low control lever between high and low provides a further control over ground speed as well as attachment speed.
To change axle ranges: Stop the tractor. Keep the high-low control lever in high or low, but move the forward-reverse control to neutral. Move the range
selection lever to high or low range. Move the forward-reverse control lever back and forth slightly if necessary to allow the gears to mesh.
CAUTION: THIS SHIFT SHOULD ONLY BE MADE ON LEVEL GROUND.
Individual jobs will dictate the combination of axle range and gear to be used. In general, low axle range should be used for plowing, cultivating, snow blowing, heavy mowing, and other jobs where a slower ground speed is needed to give the attachment longer to do its job. High axle range generally is satisfactory for mowing and other lawn jobs.
Other Points - Don't slip the clutch. If you find the ground speed of the tractor too fast for the job, shift to a lower gear. If you can't shift any lower, take a smaller cut - one on which the attachment can do the job with the tractor fully in gear. Repeated clutch slipping causes undue wear and should be avoided.
STOPPING
To shut off the engine, depress ignition stop button (figure 2) after disengaging attachment and moving both operating levers to neutral.
6
 Loading...