


®
EXT-HD-DSMP
User Manual
www.gefen.com

ASKING FOR ASSISTANCE
Technical Support
Telephone (818) 772-9100
(800) 545-6900
Fax |
(818) 772-9120 |
Technical Support Hours:
8:00 AM to 5:00 PM Monday through Friday, Pacific Time
Write To:
Gefen, LLC
c/o Customer Service 20600 Nordhoff St Chatsworth, CA 91311
ds@gefen.com www.gefen.com
Notice
Gefen, LLC reserves the right to make changes in the hardware, packaging and any accompanying documentation without prior written notice.
Hi-Def Digital Signage Media Player is a trademark of Gefen, LLC
HDMI, the HDMI logo, and High-Definition Multimedia Interface are trademarks or registered trademarks of HDMI Licensing in the United States and other countries.
© 2011 Gefen, LLC, All Rights Reserved
All trademarks are the property of their respective owners.
Rev A4

CONTENTS
1Introduction
2Operation Notes
3Features
4Front Panel Layout
5Front Panel Descriptions
6Back Panel Layout
7Back Panel Descriptions
8IR Remote Layout
9IR Remote Descriptions
10IR Remote Installation
11Connecting the Hi-Def Digital Signage Media Player
11Wiring Diagram
12Operating the Hi-Def Digital Signage Media Player
12Powering the Hi-Def Digital Signage Media Player
13Accessing the Main Menu
15Safely Removing the USB Storage Device
17How the Hi-Def Digital Signage Media Player works
17Directory and File Nomenclature
18Renaming Files and Directories
19Operating Modes
20Stand-Alone Mode
20Using Stand-Alone Mode
22Viewing the Schedule File
24Editing the Playlist File
25Viewing the Settings.xml file
25Checking Our Work
27Adding More Video Content to the Playlist
27Changing the Playlist Order
28Scheduling Content
29The Default Event
28Understanding the Default Event
30Network Mode
30Using Network Mode
30The FTP Client and FTP Server
30Push Mode
31 |
Configuration using the OSD |
34 |
Configuration using the Settings.xml file |
35 |
Configuring the FTP Client |
38 |
Pull Mode |
38 |
Configuration using the OSD |
41 |
Configuration using the Settings.xml file |
44Configuring the FTP Server
45The Settings.xml file
45 Understanding the Settings.xml file
47 Settings.xml Summary
55 Firmware Update
57 Specifications
58 Warranty

INTRODUCTION
Congratulations on your purchase of the Hi-Def Digital Signage Media Player. Your complete satisfaction is very important to us.
Gefen
Gefen delivers innovative, progressive computer and electronics add-on solutions that harness integration, extension, distribution and conversion technologies. Gefen’s reliable, plug-and-play products supplement cross-platform computer systems, professional audio/video environments and HDTV systems of all sizes with hard-working solutions that are easy to implement and simple to operate.
The Gefen Hi-Def Digital Signage Media Player
The Hi-Def Digital Signage Media Player provides an effective means to playback and schedule digital signage content on both digital and analog connections. By connecting the Hi-Def Digital Signage Media Player to a network, content can
be pushed to the box using a computer and FTP client program. When a more elaborate setup is required, a number of units can be installed to pull content from a local or external FTP server based on a schedule. The Hi-Def Digital Signage Media Player acts as both an FTP client and server with live logging of various important statistics, such as playback, system status, and uploaded content. For precise time synchronization, the Hi-Def Digital Signage Media Player can be set up to access an external NTP server. Many audio and video file formats are supported with NTSC and PAL output resolutions up to 1080p Full HD. HDMI, Composite, and Component outputs with separate analog and digital audio outputs provide flexibility when connecting to various displays. Two USB 2.0 ports provide connection to the included USB flash drive or to an external hard drive. The Hi-Def Digital Signage Media Player enclosure features integrated mounting brackets for a secure installation on any flat surface or
directly to the back of the display. For complete management of multiple devices in multiple locations, Gefen provides a CMS (Content Management Software) solution which can be run in a virtual environment. The Gefen CMS will allow you to easily manage all of your units in the field from any compatible browser with access to logs, schedules, content, and playlists.
How It Works
The Hi-Def Digital Signage Media Player can connect to a display using either analog or digital video connectors. Connect an HDMI, Component, or Composite cable between the Hi-Def Digital Signage Media Player and the display. If using the networking capabilities of the Hi-Def Digital Signage Media Player, connect your network cable to the Ethernet port. Optionally, the digital or analog audio output connector can be used to connect the Hi-Def Digital Signage Media Player to an external audio processor or amplifier. Connect the included USB flash drive to the rear panel of the unit. Connect the 12 V DC power supply to the unit and connect the AC power cord to an available electrical outlet.

OPERATION NOTES
READ THESE NOTES BEFORE INSTALLING OR OPERATING THE HI-DEF DIGITAL SIGNAGE MEDIA PLAYER
•This unit DOES NOT contain any internal memory. Memory must be supplied by the user in the form of a USB 2.0 flash drive.
The following file systems are compatible with this player:
NTFS
The main settings, schedules, playlists, and subdirectories will be located on the attached USB device. The default directories and settings file (settings. xml) can be downloaded and placed into the root directory of the USB device. These files can be downloaded from the Gefen Web site at this location:
www.gefen.com/downloads
•Power must be disconnected from the Hi-Def Digital Signage Media Player before the USB drive is attached.
•The Gefen Hi-Def Digital Signage Media Player has both analog (Component and composite) and Digital (HDMI) connectors. The following output resolutions are available:
Analog Connectors:
Composite: 480i and 576i (NTSC/PAL) Component: 720p, 1080i, and 1080p (NTSC / PAL)
Digital Connectors:
HDMI: 720p, 1080i, and 1080p (NTSC/PAL)
The Gefen Hi-Def Digital Signage Media Player can operate in two modes:
•Stand-Alone Mode - This is the default mode. In this mode the unit supports all scheduling and playlist features but cannot be updated remotely via the FTP server or client. For more information on operating the Media Player in Stand-Alone mode, see page 20.
•Network Mode - In this mode all scheduling and playlist features available. Remote management is possible by utilizing the FTP server and client that are built into the Hi-Def Digital Signage Media Player. For more information on operating the Media Player in one of the two Network Modes, refer to page 30.
2

FEATURES
Features
•Supports resolutions up to 1080p Full HD
•HDMI, Component, and Composite A/V outputs active simultaneously
•Text-based scheduling and playlist using a text editor
•CMS for multiple units*
•Supports MPEG 1/2/4, DivX 3/4/5/6, XVid, and H.264/AVC video codecs
•Supports MP3, MPEG, WMA, PCM, LPCM, ADPCM, FLAC, WAV, AAC, OGG, and MKA audio formats
•Wall-mountable enclosure for excellent heat dissipation and durability
•Integrated OSD Menu for device configuration
•Built-in FTP server and client to push and pull content
•Full media scheduling and accounting logs
•NTP client for time synchronization
•USB 2.0 ports used for storage
•Programmable PIN code prevents unauthorized access to OSD
•Compatible file systems: NTFS
•IR remote control unit
Package Includes
(1) Hi-Def Digital Signage Media Player (1) 6 ft. Locking HDMI cable (M-M)
(1) USB 2.0 flash drive
(1) IR Remote Control Unit (1) 12V / 3A DC Power Supply (1) Quick-Start Guide
*Content Management Software (CMS) allows you to manage content, playlists, and schedules for multiple units on a network. See the Content Management
Software User Manual for more information.
3
FRONT PANEL LAYOUT
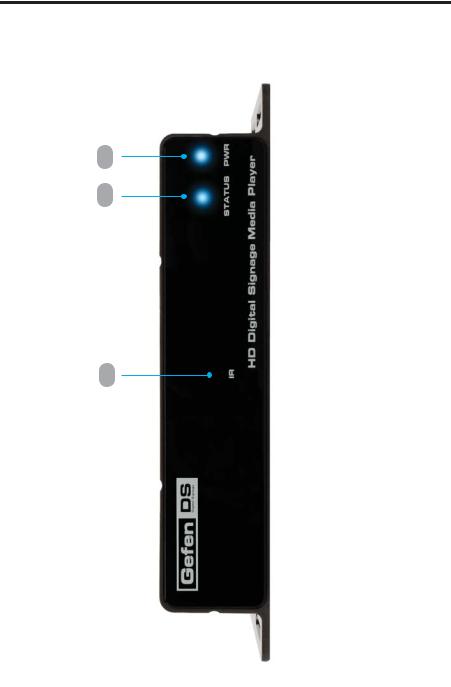
Front Panel
2 3
1
4

FRONT PANEL DESCRIPTIONS
Front Panel
1IR
This IR window receives signals from the IR Remote Control Unit.
2STATUS
This LED indicator will flash bright blue to indicate network traffic when the Media Player is connected to a network.
3PWR
Power LED indicator. When power is applied to the unit, this LED will glow bright blue. When no USB device is connected, the LED will alternate blue and red. When the Media Player is booting, this LED will flash red when accessing the USB drive.
5
BACK PANEL LAYOUT
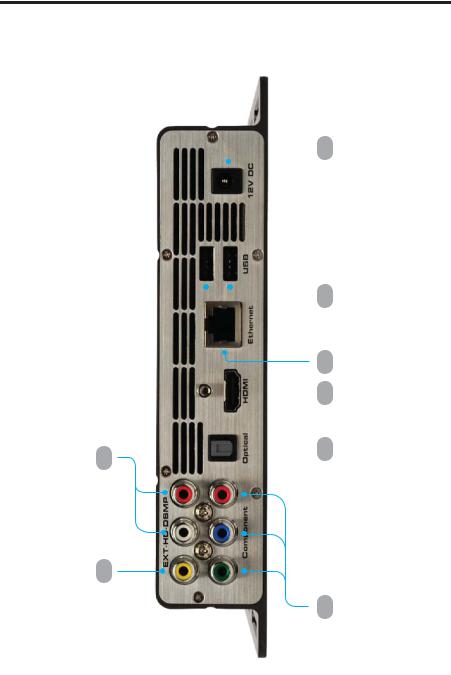
Back Panel
 6
6
 5
5
7  2 3 4
2 3 4
8
1
6

BACK PANEL DESCRIPTIONS
1Component
Connect three (3) RCA cables from the Green, Blue, and Red outputs to the component video input of a display or other video output device.
2Optical
TOSLINK audio ouput connector. Connect an optical cable from this connector to an audio output device.
3HDMI
Connect an HDTV display to this port using the included locking HDMI cable.
4Ethernet
Connects the Hi-Def Digital Signage Media Player to a network using 10/100 Mbps Ethernet cable.
5USB
USB 2.0 output ports. Connect up to two (2) USB devices to these ports.
612V DC
Connect the included 12 V DC power supply to this power receptacle.
7Analog Audio Output
Connect a L/R RCA stereo pair from these outputs to an L/R RCA stereo input pair on an audio output device.
8Component Output
Connect a single RCA cable from this output to the component video input of a display or other video output device.
7
IR REMOTE LAYOUT
1
2
3
4
5
6
7
8
EXT-HD-DSMP-IR Remote Control Unit
15
14
13
12
11
10
9
8

IR REMOTE DESCRIPTIONS
1Power
This button will toggle between the ON and STANDBY power states. A RED LED will be active when the unit is in Standby power state. The Power LED will glow bright blue when the Media Player is powered ON.
2Numeric Keypad (0 - 9)
Used to enter values when using the Menu System.
3
Press this button to increase the volume level of the audio output.
4Back
Press this button to move up one level in the Menu System or return from a submenu.
5
Press this button to decrease the volume level of the audio output.
6Aspect
Changes the aspect ratio between 16:9, 16:10, Pan Scan 4:3, and Letter Box 4:3
7◄ (Cursor Left)
Press this button to move (to the left) between fields in the Main Menu.
8▼ (Cursor Down)
Press this button to move the selection cursor down or to decrease values within the Main Menu.
9OK
Confirms the current setting.
10► (Cursor Right)
Press this button to move (to the right) between fields in the Main Menu.
11Output
Selects the output resolution.
12 ▲ (Cursor Up)
Press this button to move the selection cursor up or to increase values within the Main Menu.
13Eject button
Press this button to eject the USB drive, before removing the USB drive.
14Home
Press this button to display the Input PIN Code screen.
15Mute
Press this button to mute the output signal.
9
IR REMOTE INSTALLATION
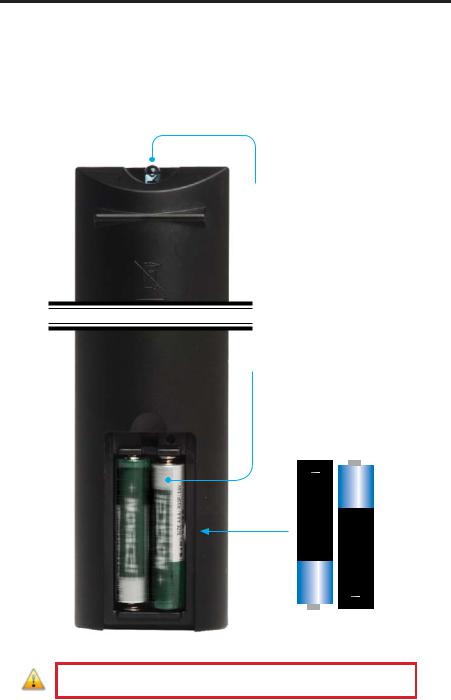
Installing the Batteries
1.Remove the battery cover on the back of the IR Remote Control Unit.
2.Insert the included AA batteries into the open battery slot.
3. Replace the battery cover.
IR emitter
Transmits the IR commands to the Media Player
Battery Slot
(shown with batteries)
Battery alignment
The batteries should be installed in the following position:
WARNING: Risk of explosion if battery is replaced by an incorrect type. Dispose of used batteries according to the instructions.
10
CONNECTING THE HI-DEF DIGITAL SIGNAGE MEDIA PLAYER
How to Connect the Hi-Def Digital Signage Media Player
1.Connect Hi-Def Digital Signage Media Player to the display using the included HDMI cable.
NOTE: If using the Hi-Def Digital Signage Media Player with an analog display, then connect the Hi-Def Digital Signage Media Player to the display using user-supplied composite or component video cables.
2.OPTIONAL: Connect the analog or digital audio outputs of the Hi-Def Digital Signage Media Player to an audio receiver/processor using RCA (analog) or Optical (digital) cables.
3. Connect the included USB 2.0 flash drive (or external USB 2.0 hard drive) to the USB port located on the rear panel of the Hi-Def Digital Signage Media Player unit.
IMPORTANT: The USB drive must always be connected to the Media Player before power is applied.
4.Connect the included 12V DC power adapter between the power input
of the Hi-Def Digital Signage Media Player and an available electrical outlet.
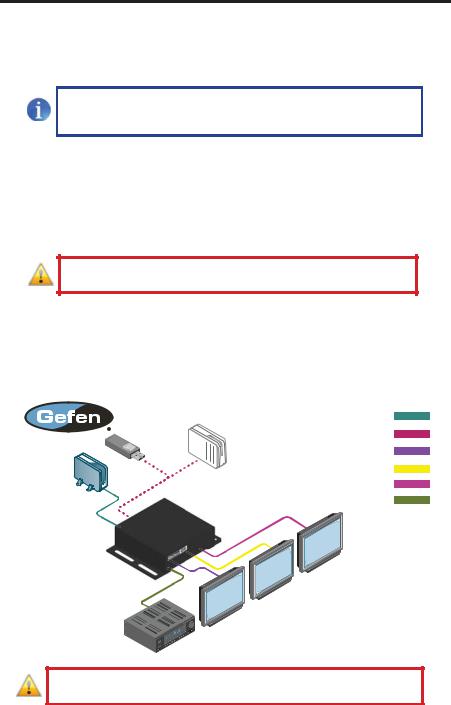
Wiring Diagram for the Hi-Def Digital Signage Media Player
USB Flash Drive
or
USB External HDD
Router
CAT-5 / ETHERNET
USB CABLE
HDMI CABLE
COMPOSITE CABLE
COMPONENT CABLE
TOSLINK
Display using Component
Display using Composite
Display using HDMI
EXT-HD-DSMP
Audio Receiver
ATTENTION: This product should always be connected to a grounded electrical socket.
11
OPERATING THE HI-DEF DIGITAL SIGNAGE MEDIA PLAYER
Powering the Hi-Def Digital Signage Media Player
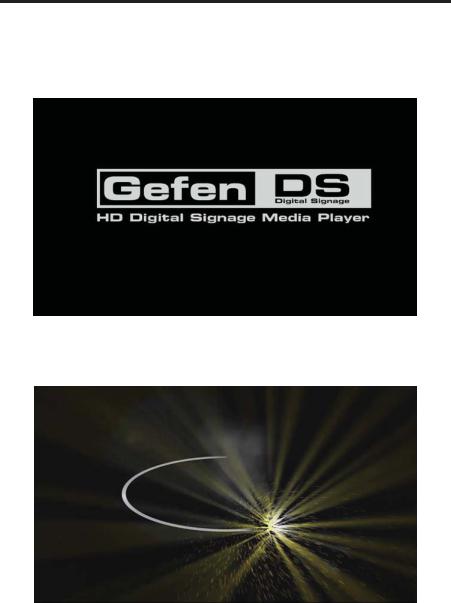
1.Once power has been connected to the Hi-Def Digital Signage Media Player, the following screen will be displayed while the unit completes the booting process.
2.After the boot process has been completed, any schedules, playlists, and content will be automatically begin playing:
If no content has been scheduled, then the PIN code screen will be displayed. See next page for details on using the PIN code screen.
12
OPERATING THE HI-DEF DIGITAL SIGNAGE MEDIA PLAYER
Accessing the Main Menu
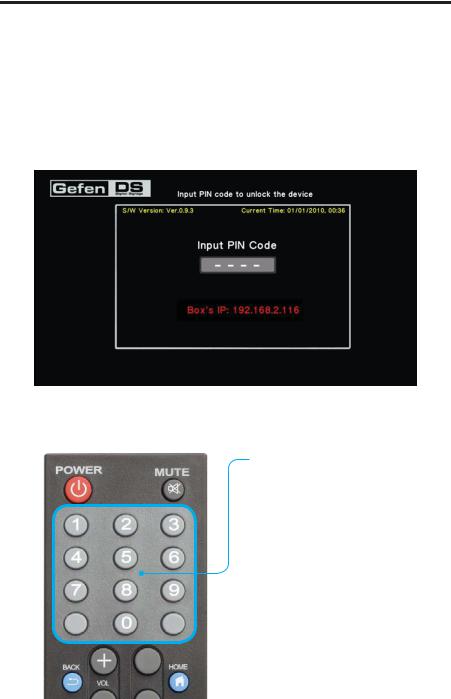
If no media is scheduled to play after the Media Player has finished booting, then the PIN code screen will be displayed. The PIN code screen provides a secure gateway to the Main Menu. The PIN code screen can be displayed at any time by pressing the Home button on the IR Remote Control.
1.Press the Home button on the IR Remote Control.
2.The Input PIN code screen will be displayed.
3. Use the numeric keypad on the included IR Remote Control to enter the PIN code. The default PIN code is: 0000.
Numeric Keypad
Use the numeric keypad on the
IR Remote Control to enter the
PIN code.
The Main Menu will automatically be displayed if the correct PIN code is entered.
13
OPERATING THE HI-DEF DIGITAL SIGNAGE MEDIA PLAYER
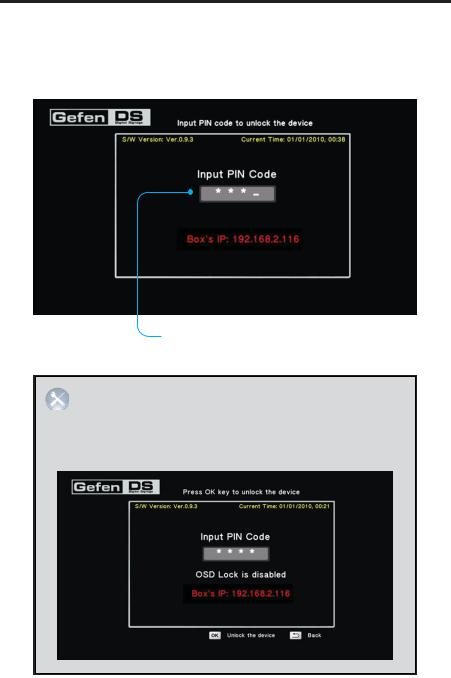
As the PIN code is entered, each of the numbers will be masked for security purposes. Although not required, a PIN code is recommended to prevent unauthorized access to the Main Menu. The PIN code can be disabled (see page 48).
PIN code is always masked during entry.
ADVANCED: If the PIN code has been disabled within the settings.xml file, then pressing the HOME button on the IR
Remote Control will access the Input PIN Code screen (see page 48 for more information on enabling / disabling and setting the PIN code). From the Input PIN Code screen, press the OK button to access the
Main Menu.
14
OPERATING THE HI-DEF DIGITAL SIGNAGE MEDIA PLAYER
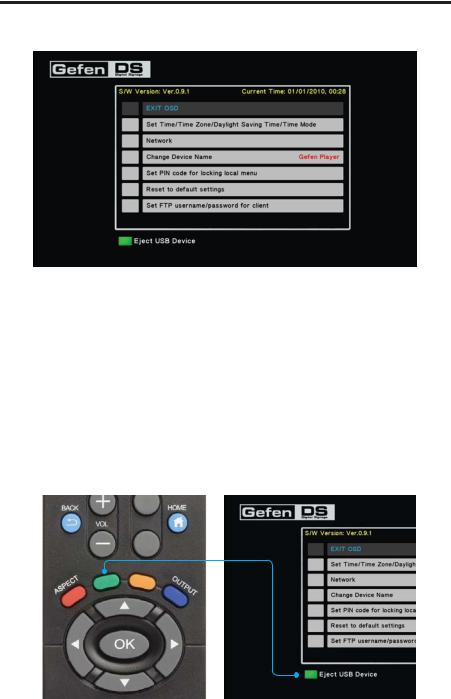
4.After entering the correct PIN code, the Main Menu will be displayed.
Safely Removing the USB Storage Device
In Stand-Alone Mode, it will be necessary to remove the USB
storage device from the Media Player in order to update schedule files, playlist files, and content. To safely remove the USB storage device, use the EJECT button on the IR Remote Control Unit.
1.Access the Main Menu in order to stop the playback of all content.
2.Press the EJECT button on the IR Remote Control Unit. Note that the bottom portion of the Main Menu also identifies the EJECT button on the IR Remote Control Unit.
15
OPERATING THE HI-DEF DIGITAL SIGNAGE MEDIA PLAYER
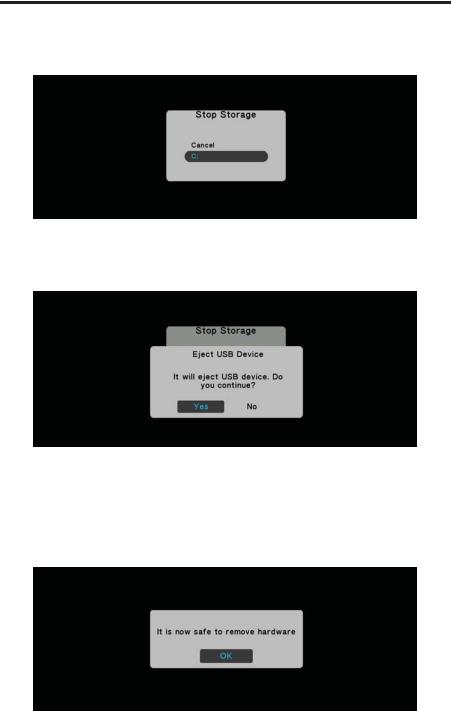
3. The Media Player will prompt you to select which device to stop. In the example below, only one USB device is connected to the Media Player. Additional storage would be identified as D, E, F, etc.
4.Highlight the USB device you wish to stop and eject, using the ▲ and ▼ buttons on the IR Remote Control, then press the OK button. The Media Player will prompt you to confirm the operation:
Select Yes to confirm the operation. Select No to cancel and return to the Main Menu.
5. If you select Yes, then the following screen will be displayed, indicating that you may now remove the USB device from the back of the Media Player:
16
 Loading...