


Ge JBP26, JBP45, JBP48, JBP47, JBP46 User Manual
...UseandCare&InstallationGuide
Self-Cleaning Electric Range
Safety Instructions |
................... 3–5 |
Anti-Tip Device ................................ |
3, 26, 30 |
Operating Instructions, Tips |
|
Aluminum Foil.......................... |
5, 14, 18–20 |
Clock and Timer ................................... |
10, 11 |
Features....................................................... |
6, 7 |
Oven ........................................................ |
12–25 |
Auto Oven Shut Off................................. |
12 |
Baking ................................................. |
13, 14 |
Broiling................................................ |
20, 21 |
Control Panel..................................... |
10, 11 |
Control Settings.......................................... |
8 |
Roasting ............................................. |
18, 19 |
Self-Cleaning Instructions ............. |
22–25 |
Timed Baking .................................... |
15, 16 |
Power Outage.............................................. |
11 |
Surface Cooking..................................... |
8–10 |
Canning Tips................................................ |
9 |
Control Settings.......................................... |
8 |
Cooktop Comparison ................................ |
8 |
Cookware Tips ............................................ |
9 |
Care and Cleaning................... |
26–29 |
Anti-Tip Device ............................................ |
26 |
Cooktop.................................................. |
27, 29 |
Lift-Off Oven Door....................................... |
28 |
Oven Light..................................................... |
28 |
Self-Cleaning Instructions ................. |
22–25 |
Surface Units................................................ |
26 |
Problem Solver ...................... |
|
35, 36 |
Thermostat Adjustment– |
|
|
Do It Yourself............................................ |
|
17 |
More questions ?…call |
|
|
GE Answer Center® 800.626.2000 |
|
|
Installation ................................. |
|
30–34 |
Anti-Tip Device ..................................... |
|
30, 34 |
Flooring Under the Range......................... |
|
31 |
Leveling ......................................................... |
|
34 |
Consumer Services.................. |
|
39 |
Appliance Registration................................. |
|
2 |
Important Phone Numbers....................... |
|
39 |
Model and Serial Number Location |
.......... 2 |
|
Warranty ....................................... |
Back Cover |
|
Models: JBP19 |
JBP26 |
JBP21 |
JBP45 |
JBP24 |
JBP46 |
JBP25 |
JBP47 |
|
JBP48 |
|
|
GE Appliances
164D2966P232 |
3 |
49-8721 |
|
10-95 CG |

HELP US HELP YOU
Before using your range, read this guide carefully.
It is intended to help you operate and maintain your new range properly.
Keep it handy for answers to your questions.
If you don’t understand something or need more help, call:
GE Answer Center® 800.626.2000
24 hours a day, 7 days a week
Write down the model and serial numbers.
You’ll find them on a label behind the range door or behind the storage drawer.
These numbers are also on the Consumer Product Ownership Registration Card that came with your range. Before sending in this card, please write these numbers here:
Model Number
Serial Number
Use these numbers in any correspondence or service calls concerning your range.
If you received
a damaged range…
Immediately contact the dealer (or builder) that sold you the range.
Save time and money. Before you request service…
Check the Problem Solver in the back of this guide. It lists causes of minor operating problems that you can correct yourself.
IF YOU NEED SERVICE
To obtain service, see the Consumer Services page on the inside back cover.
We’re proud of our service and want you to be pleased. If for some reason you are not happy with the service you receive, here are 3 steps to follow for further help.
FIRST, contact the people who serviced your appliance. Explain why you are not pleased. In most cases, this will solve the problem.
NEXT, if you are still not pleased, write all the details—including your phone number—to:
Manager, Consumer Relations GE Appliances
Appliance Park
Louisville, KY 40225
FINALLY, if your problem is still not resolved, write:
Major Appliance Consumer Action Program
20 North Wacker Drive
Chicago, IL 60606
2
IMPORTANT SAFETY INSTRUCTIONS
Read all instructions before using this appliance.
IMPORTANT SAFETY NOTICE
•The California Safe Drinking Water and Toxic Enforcement Act requires the Governor of California to publish a list of substances known to the state to cause birth defects or other reproductive harm, and requires businesses to warn customers of potential exposure to such substances.
•The fiberglass insulation in self-clean ovens gives off a very small amount of carbon monoxide during the cleaning cycle. Exposure can be minimized by venting with an open window or using a ventilation fan or hood.
•Fluorescent light bulbs contain mercury.
If your model has a surface light, you must recycle the fluorescent light bulb according to local, state and federal codes.
When using electrical appliances, basic safety precautions should be followed, including the following:
•Use this appliance only for its intended use as described in this guide.
•Be sure your appliance is properly installed and grounded by a qualified technician in accordance with the provided installation instructions.
•Do not attempt to repair or replace any part of your range unless it is specifically
recommended in this guide. All other servicing should be referred to a qualified technician.
•Before performing any service, DISCONNECT THE RANGE POWER SUPPLY AT THE HOUSEHOLD DISTRIBUTION PANEL BY REMOVING THE FUSE OR SWITCHING OFF THE CIRCUIT BREAKER.
 WARNING—
All ranges can tip and injury could result. To prevent accidental tipping
of the range, attach it to the wall and floor by installing the Anti-Tip device
supplied.
To check if the device is installed and
engaged properly, remove the kick  panel or storage drawer and inspect the rear leveling leg. Make sure it fits securely into the slot.
If you pull the range out from the wall for any reason, make sure the device is properly engaged when you push the range back against the wall. If it is not, there is a possible risk of the range tipping over and causing injury if you or a child stand, sit or lean on an open door.
Please refer to the Anti-Tip device information in this guide. Failure to take this precaution could result in tipping of the range and injury.
•Do not leave children alone—children should not be left alone or unattended in an area where an appliance is in use. They should never be allowed to sit or stand on any part of the appliance.
•Do not allow anyone to climb, stand or hang on the door, kick panel or storage drawer or cooktop. They could damage the range and even tip it over, causing severe personal injury.
•CAUTION: ITEMS OF INTEREST TO CHILDREN SHOULD NOT BE STORED IN CABINETS ABOVE A RANGE OR ON THE BACKSPLASH OF A RANGE—CHILDREN CLIMBING ON THE RANGE TO REACH ITEMS COULD BE SERIOUSLY INJURED.
•Do not store flammable materials in an oven or near the cooktop.
•Never wear loose-fitting or hanging garments while using the appliance. Be careful when reaching for items stored over the range. Flammable material could be ignited if brought in contact with hot surface units or heating elements and may cause severe burns.
• Use only dry pot holders—moist or
damp pot holders on hot surfaces may result in burns from steam. Do not let
pot holders touch hot surface units or heating elements. Do not use a towel or other bulky cloth.
(continued next page)
3
Instructions Safety Important

IMPORTANT SAFETY INSTRUCTIONS
(continued)
•For your safety, never use your appliance for warming or heating the room.
•DO NOT STORE OR USE COMBUSTIBLE MATERIALS, GASOLINE OR OTHER FLAMMABLE VAPORS AND LIQUIDS IN THE VICINITY OF THIS OR ANY OTHER APPLIANCE.
•Keep the hood and grease filters clean to maintain good venting and to avoid grease fires.
•Do not let cooking grease or other flammable materials accumulate in or near the range.
• Do not use water on grease fires.
Never pick up a flaming pan.

 Smother flaming pan on surface unit by covering pan completely with well-fitting lid, cookie sheet or flat tray, or if available, use dry chemical or foam-type extinguisher.
Flaming grease outside a pan can be put out by covering with baking soda or, if available, a multipurpose dry chemical or foam-type fire extinguisher.
Flame in the oven can be smothered completely by closing the oven door and turning the oven control to OFF or use a dry chemical or foamtype fire extinguisher.
•Do not touch the surface units, the heating elements or the interior surface of the oven.
These surfaces may be hot enough to burn even though they are dark in color. During and after use, do not touch, or let clothing or other flammable materials contact the surface units, areas nearby the surface units or any interior area of the oven; allow sufficient time for cooling, first.
Potentially hot surfaces include the cooktop, areas facing the cooktop, oven vent opening, surfaces near the opening, crevices around the oven door and metal trim parts above the door.
Remember: The inside surface of the oven may be hot when the door is opened.
•When cooking pork, follow the directions exactly and always cook the meat to an internal temperature of at least 170°F. This assures that, in the remote possibility that trichina may be present in the meat, it will be killed and the meat will be safe to eat.
4
Oven
•Stand away from the range when opening the oven door. Hot air or steam which escapes can cause burns to hands, face and/or eyes.
•Do not heat unopened food containers.
Pressure could build up and the container could burst, causing an injury.
• Keep the oven vent duct unobstructed.
•Keep the oven free from grease buildup.
•Place the oven shelf in desired position while the oven is cool. If shelves must be handled when hot, do not let pot holder contact the heating elements.
•Pulling out the shelf to the shelf stop is a convenience in lifting heavy foods. It is also a precaution against burns from touching hot surfaces of the door or oven walls.
•When using cooking or roasting bags in the oven, follow the manufacturer’s directions.
•Do not use your oven to dry newspapers.
If overheated, they can catch fire.
•Do not use oven for a storage area. Items stored in an oven can ignite.
•Do not leave paper products, cooking utensils or food in the oven when not in use.
Self-Cleaning Oven
•Do not clean the door gasket. The door gasket is essential for a good seal. Care should be taken not to rub, damage or move the gasket.
•Do not use oven cleaners. No commercial oven cleaner or oven liner protective coating of any kind should be used in or around any part of the oven. Residue from oven cleaners will damage the inside of the oven when the self-clean cycle is used.
•Clean only parts listed in this Use and Care Guide.
•Before self-cleaning the oven, remove the broiler pan, grid and other cookware.
•Be sure to wipe up excess spillage before starting the self-cleaning operation.
•If the self-cleaning mode malfunctions, turn the oven off and disconnect the power supply. Have it serviced by a qualified technician.

Surface Cooking Units
• Use proper pan size— Select
cookware having flat bottoms large enough to cover the surface unit
heating element. The use of undersized cookware will expose a portion of the surface unit to direct contact and may result in ignition of clothing.
Proper relationship of cookware to surface unit will also improve efficiency.
•Never leave the surface units unattended at high heat settings. Boilovers cause smoking and greasy spillovers that may catch on fire.
•Be sure the drip pans and the vent duct are not covered and are in place. Their absence during cooking could damage range parts and wiring.
•Do not use aluminum foil to line the drip pans or anywhere in the oven except as described in this guide. Misuse could result in a shock, fire hazard or damage to the range.
•Only certain types of glass, glass⁄ceramic, earthenware or other glazed containers are suitable for cooktop service; others may break because of the sudden change in temperature.
•To minimize the possibility of burns, ignition of flammable materials and spillage, the handle of a container should be turned toward the center of the range without extending over nearby surface units.
•Always turn the surface units off before removing cookware.
•To avoid the possibility of a burn or electric shock, always be certain that the controls for all surface units are at the off position and all coils are cool before attempting to lift or remove a unit.
•Do not immerse or soak the removable surface units. Do not put them in a dishwasher. Do not self-clean the surface units in the oven.
•Clean the cooktop with caution. If a wet sponge is used to wipe spills on a hot cooktop, be careful to avoid steam burns.
•When flaming foods are under the hood,
turn the fan off. The fan, if operating, may spread the flame.
•Keep an eye on foods being fried at high or medium high heat settings.
•Foods for frying should be as dry as possible.
Frost on frozen foods or moisture on fresh foods can cause hot fat to bubble up and over the sides of the pan.
•Use little fat for effective shallow or deep-fat frying. Filling the pan too full of fat can cause spillovers when food is added.
•If a combination of oils or fats will be used in frying, stir together before heating, or as fats melt slowly.
•Always heat fat slowly, and watch as it heats.
•Use a deep fat thermometer whenever possible to prevent overheating fat beyond the smoking point.
SAVE THESE
INSTRUCTIONS
5
Instructions Safety Important

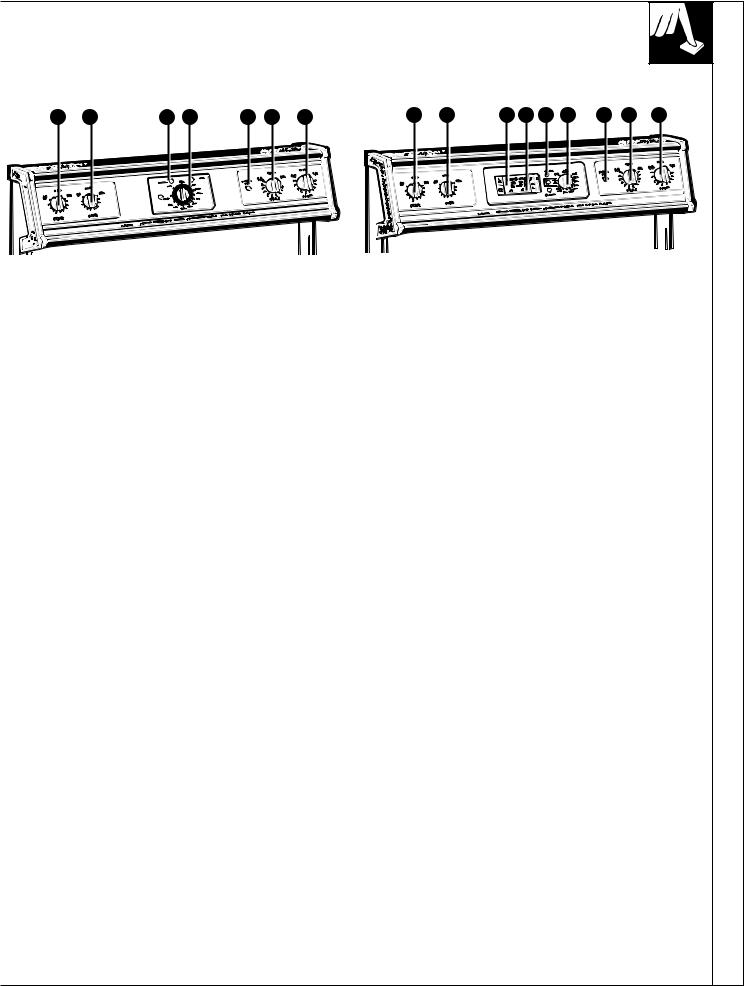
FEATURES OF YOUR RANGE
Not all features are on all models.
8 |
8 |
9 |
10 11 |
12 |
13 |
14 |
8 |
8 |
|
|
|
Support Rods |
|
|
|
Some models |
|
|
Drip Wells |
have lift-up |
|
|
cooktops for |
|
|
|
|
|
15 |
16 |
|
easier cleaning. |
|
JBP24 |
7 |
JBP25 |
|
JBP26 |
6 |
JBP45 |
|
JBP46 |
17 |
JBP47 |
5 |
JBP48 |
|
|
18 |
|
19 |
|
4 |
20 |
|
|
|
21 |
|
22 |
3 |
|
2 |
|
1
(appearance may vary)
23 |
Broiler Pan and Grid |
(not included on all models) |
6
8 |
8 |
12 |
13 |
14 |
8 |
8 |
JBP19
|
|
Explained |
Feature Index Not all models have all features. |
on page |
|
|
|
|
1 |
Storage Drawer (on some models) |
3, 29 |
|
|
|
2 |
Anti-Tip Device |
3, 26, 30 |
|
See the Installation Instructions. |
|
|
|
|
3 |
Anti-Tip Label |
– |
|
|
|
4 |
Bake Element May be lifted gently |
3, 4, 22, |
|
for wiping the oven floor. |
29 |
|
|
|
5 |
Broil Element |
3, 4, 20, |
|
|
22, 29 |
|
|
|
6 |
Oven Door Latch |
13, 15, 18, |
|
Use for self-cleaning only. |
20, 22–25 |
|
|
|
7 |
Surface Units, Drip Pans |
3–5, 8–10, |
|
|
26 |
|
|
|
8 |
Surface Unit Control Knobs |
8, 27 |
|
|
|
9 |
Oven Light Switch |
13 |
|
(for models with oven window) |
|
|
|
|
10 |
Automatic Oven Light |
13 |
|
(on some models) |
|
|
|
|
11 |
Clock and Timer (on some models) |
10, 11 |
|
|
|
12 |
Oven On Light |
10, 12, |
|
Latch Door Light |
15–17 |
|
Preheated Light |
|
|
|
|
13 |
Oven Temperature Knob |
10, 11, 17, |
|
|
18, 20, |
|
|
22–25, 27 |
|
|
|
8 |
8 |
10 |
11 |
12 |
13 |
14 |
8 |
8 |
JBP21
|
|
Explained |
Feature Index Not all models have all features. |
on page |
|
|
|
|
14 |
Surface Unit “On” Indicator Light |
8 |
|
|
|
15 |
Cooktop/Lift-Up Cooktop |
3, 5, 8–10, |
|
(on some models) |
27, 29 |
|
|
|
16 |
Oven Vent |
4, 27 |
|
Located under right rear surface unit. |
|
|
|
|
17 |
Oven Interior Light |
12, 22, 28 |
|
(on some models) Comes on |
|
|
automatically when door is opened. |
|
|
|
|
18 |
Oven Shelf Supports |
12, 18, 21 |
|
Shelf positions for cooking are |
|
|
suggested in the Baking, Roasting |
|
|
and Broiling sections. |
|
|
|
|
19 |
Oven Shelf with Stop-Locks |
12–15, |
|
(number may vary) |
18, 23, 29 |
|
|
|
20 |
Model and Serial Number Location |
2 |
|
Behind the storage drawer. |
|
|
|
|
21 |
Lift-Off Oven Door with |
4, 20, |
|
Broil Stop Position |
22, 28 |
|
Easily removed for cleaning. |
|
|
|
|
22 |
Oven Door Gasket |
4, 22, 28 |
|
|
|
23 |
Broiler Pan and Grid |
4, 18, |
|
(on some models) |
20–22, 29 |
|
|
|
7
Range Your of Features
HOW DOES THIS COOKTOP COMPARE
TO YOUR OLD ONE?
Your new cooktop has electric coil surface units.
If you are used to cooking with gas burners or other types of electric cooktops, you will notice some differences when you use electric coils.
The best types of cookware to use, plus heat-up and cool-down times, depend upon the type of burner or surface unit you have.
The following chart will help you to understand the differences between electric coil surface units and any other type of cooktop you may have used in the past.
Type of Cooktop |
Description |
How it Works |
|
|
|
Electric Coil |
Flattened metal |
Heats by direct contact with the pan and by heating the air under the pan. For best cooking |
|
tubing containing |
results, use good quality pans. Electric coils are more forgiving of warped pans than radiant |
|
electric resistance |
or solid disks. Heats up quickly but does not change heat settings as quickly as gas or |
|
wire suspended |
induction. Electric coils stay hot enough to continue cooking for a short time after they are |
|
over a drip pan. |
turned off. |
|
|
|
Radiant |
Electric coils |
Heat travels to the glass surface and then to the cookware, so pans must be flat on the |
(Glass Cooktop) |
under a glass |
bottom for good cooking results. The glass cooktop stays hot enough to continue cooking |
|
cooktop. |
after it is turned off. Remove the pan from the surface unit if you want cooking to stop. |
|
|
|
Induction |
High frequency |
Pans must be made of ferrous metals (metal that attracts a magnet). Heat is produced by |
|
induction coils |
a magnetic circuit between the coil and the pan. Heats up right away and changes heat |
|
under a glass |
settings right away, like a gas cooktop. After turning the control off, the glass cooktop is |
|
surface. |
hot from the heat of the pan, but cooking stops right away. |
|
|
|
Solid Disk |
Solid cast iron |
Heats by direct contact with the pan, so pans must be flat on the bottom for good cooking |
|
disk sealed to the |
results. Heats up and cools down more slowly than electric coils. The disk stays hot |
|
cooktop surface. |
enough to continue cooking after it is turned off. Remove the pan from the solid disk if |
|
|
you want the cooking to stop. |
|
|
|
Gas Burners |
Regular or sealed |
Flames heat the pans directly. Pan flatness is not critical to cooking results, but pans |
|
gas burners use |
should be well balanced. Gas burners heat the pan right away and change heat settings |
|
either LP gas |
right away. When you turn the control off, cooking stops right away. |
|
or natural gas. |
|
|
|
|
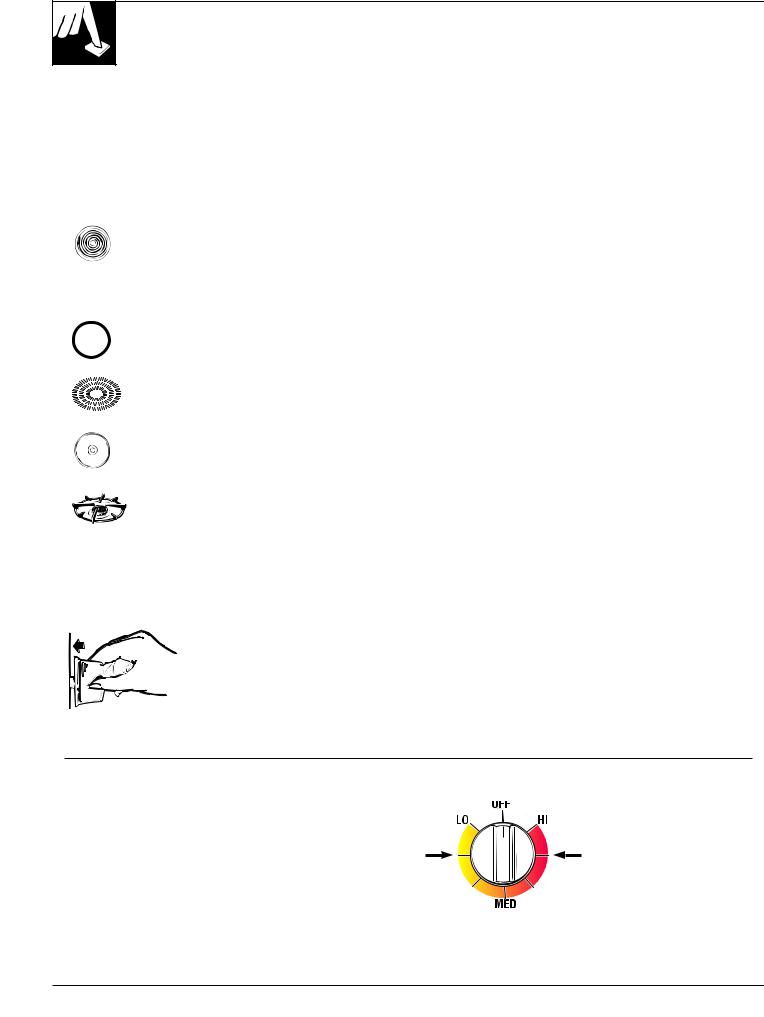
SURFACE CONTROLS
How to Set the Controls
Push the knob in and turn in either direction to the heat setting you want.
Be sure you turn control to
OFF when you finish cooking.
The surface unit “on” indicator light will glow when ANY heat on any surface unit is on.
At both OFF and HI the control “clicks” into position. You may hear slight “clicking” sounds during cooking, indicating the control is keeping the unit at the heat level or power level you set.
Switching heats to higher settings always shows a quicker change than switching to a lower setting.
Cooking Guide for Using Heat Settings
HI—Used to begin cooking or to bring water to a boil. Reduce heat setting after water boils.
Medium High—(Setting halfway between HI and MED) Maintains a fast boil on large amounts of food.
MED—Sauté and brown; keeps food at a medium boil or simmer.
Medium Low—(Setting halfway between MED and LO) Cook after starting at HI; cooks with little water in covered pan.
8
Medium |
Medium |
Low |
High |
LO—Used for long slow cooking (simmering) to tenderize and develop flavors. Use this setting to melt butter and chocolate or to keep foods warm.
NOTE: The surface unit “on” indicator light may glow between LO and OFF, but there is no power to the surface units.
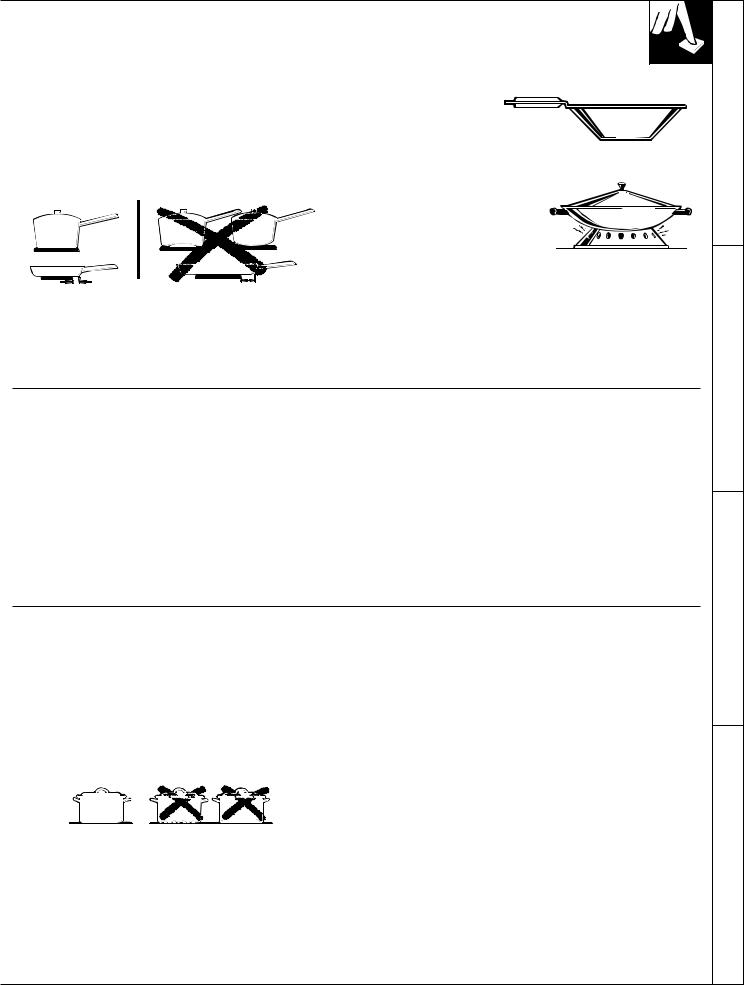
SURFACE COOKWARE TIPS
Cookware
Use mediumor heavy-weight cookware. Aluminum cookware conducts heat faster than other metals. Cast-iron and coated cast-iron cookware are slow to absorb heat, but generally cook evenly at low to medium heat settings. Steel pans may cook unevenly if not combined with other metals.
RIGHT |
|
WRONG |
|
||
|
|
|
Not over 1 inch |
Over 1 inch |
For best cooking results, pans should be flat on the bottom. Match the size of the saucepan to the size of the surface unit. The pan should not extend over the edge of the surface unit more than 1 inch.
Wok Cooking
We recommend that you use only a flatbottomed wok. They are available at your local retail store.
Do not use woks that have support rings. Use of
these types of woks, with or without the ring in place, can be dangerous. Placing the ring over the surface
unit will cause a build-up of heat that will damage the porcelain cooktop.
Do not try to use such woks without the ring.
You could be seriously burned if the wok tipped over.
HOME CANNING TIPS
Canning should be done on surface units only.
Pots that extend beyond 1 inch of surface unit’s drip pan are not recommended for most surface cooking. However, when canning with water-bath or pressure canner, larger-diameter pots may be used. This is because boiling water temperatures (even under pressure) are not harmful to the cooktop surfaces surrounding the surface units.
HOWEVER, DO NOT USE LARGE DIAMETER CANNERS OR OTHER LARGE DIAMETER POTS FOR FRYING OR BOILING FOODS OTHER THAN WATER. Most syrup or sauce mixtures—and all types of frying—cook at temperatures much higher than boiling water. Such temperatures could eventually harm the cooktop surfaces surrounding the surface units.
Observe the Following Points in Canning
1.Be sure the canner fits over the center of the surface unit. If your range or its location does not allow the canner to be centered on the surface unit, use smaller diameter pots for good canning results.
2.For best results, use canners with flat bottoms. Canners with flanged or rippled bottoms (often found in enamelware) don’t make good contact with the surface unit and take a long time to boil water.
Flat-bottomed canners are recommended.
3.When canning, use recipes and procedures from reputable sources. Reliable recipes and procedures are available from the manufacturer of your canner; manufacturers of glass jars for canning, such as Ball and Kerr; and the United States Department of Agriculture Extension Service.
4.Remember that canning is a process that generates large amounts of steam. To avoid burns from steam or heat, be careful when canning.
NOTE: If your house has low voltage, canning may take longer than expected, even though directions have been carefully followed.
The process time will be shortened by:
(1)using a pressure canner, and
(2)starting with HOT tap water for fastest heating of large quantities of water.
9
Controls Surface Comparison Cooktop
Tips Cookware
Tips Canning Home
FEATURES OF YOUR OVEN CONTROL
Not all features are on all models. Appearance may vary.
1 |
2 |
3 |
4 |
5 |
5 |
6 |
7 |
8 |
|
9 |
|
|
|
|
|
|
|
|
|
OVEN ON |
|
OFF |
|
||
|
|
|
|
|
|
|
|
|
WM |
|||
|
|
AUTOMATIC OVEN |
|
|
|
|
|
BROIL |
|
|||
COOK |
|
+ |
+ |
|
|
|
|
|
||||
TIMER |
|
|
|
|
|
|
|
|
200 |
|||
TIME |
ON/OFF |
|
|
|
|
|
AUTO |
|
|
|
||
ON/OFF |
|
|
|
LATCH |
|
|
|
250 |
||||
|
|
|
|
HOUR |
MIN. |
|
DOOR |
|
SELF |
|
|
|
|
|
|
|
|
|
|
CLEAN |
|
|
300 |
||
|
|
|
|
– |
– |
|
|
|
|
|
|
|
START |
CLOCK |
|
|
|
|
|
|
550 |
|
350 |
||
TIME |
HR |
MIN |
|
PREHEATED |
|
|||||||
|
|
|
|
500 |
|
400 |
||||||
ON/OFF |
|
|
|
|
|
|
|
450 |
||||
|
|
|
|
|
|
|
|
|
|
|
|
|
10 |
11 |
5 |
5 |
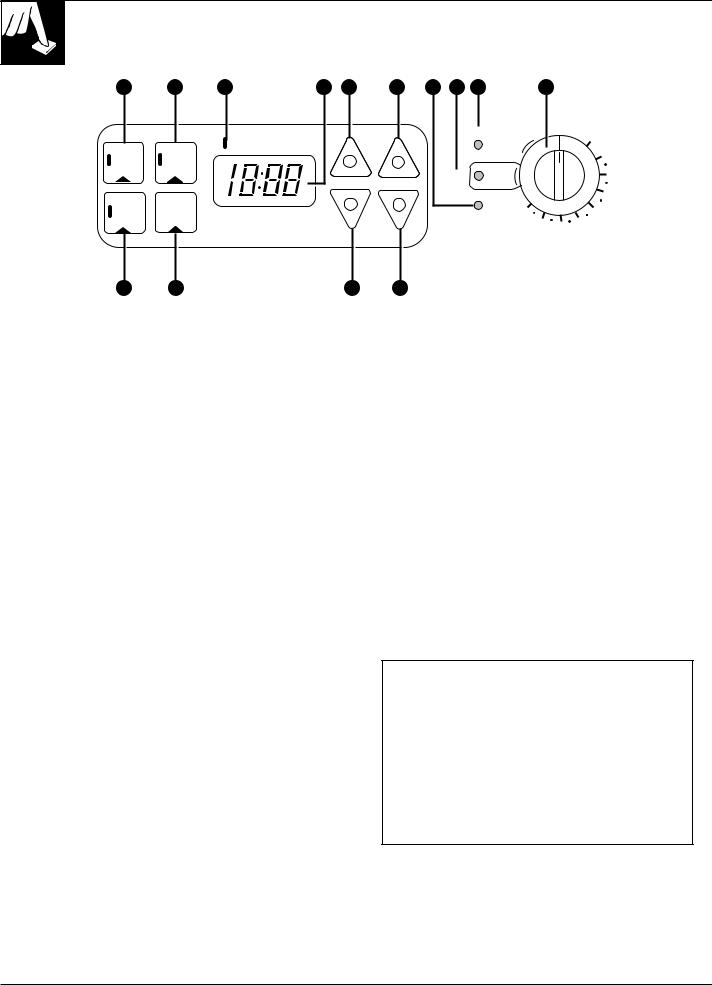
1.COOK TIME ON/OFF. Press this pad and then press the HOUR and MIN. pads to set the amount of time you want your food to cook. Turn the Oven Temperature knob to the desired temperature. The oven will shut off after the Cook Time has run out.
2.TIMER ON/OFF. Press this pad to select the timer feature. The timer does not control oven operations. The timer can time up to 11 hours and 59 minutes.
To set the timer, first press the TIMER ON/OFF pad. Press the HOUR and MIN. pads to change the time.
To cancel the timer, press the TIMER ON/OFF pad until the display clears.
3.AUTOMATIC OVEN Light. This lights anytime the oven has been programmed.
4.TIME DISPLAY. Shows the time of day and the times set for the timer on automatic oven operations.
5.HOUR and MIN. pads. These pads allow you to set times up to 11 hours and 59 minutes.
6.PREHEATED Indicator Light. Glows when the oven reaches your selected temperature.
7.LATCH DOOR Light. Glows when the oven is in the Self-Clean cycle. After the Self-Clean Cycle, the light will flash. Unlatch the door and turn the Oven Temperature knob to OFF.
8.OVEN ON Light. Glows anytime the oven is heating. The light will flash when the oven automatically turns off to remind you to turn the Oven Temperature knob to OFF.
9.Oven Temperature Knob. Turn this knob to the temperature or function you want. See the Baking, Roasting, Broiling and Self-Cleaning sections.
10.START TIME ON/OFF. Press this pad and the HOUR and MIN. pads to delay the starting of your oven up to 11 hours and 59 minutes.
11.CLOCK. Press this pad before setting the clock. To set the clock, first press the CLOCK pad. Then press the HOUR and MIN. pads to change the time of day.
If “F—and a number” flash in the display and the oven control signals, this indicates a function error code. If the function error code appears during the self-cleaning function, check the oven door latch—the latch handle may have been moved, even if only slightly, from the latched position. Make sure the handle is to the right as far as it will go. Turn the Oven Temperature knob to off. Allow the oven to cool for one hour. If the function error code repeats, disconnect power to the range and call for service.
10
OVEN CONTROL, CLOCK AND TIMER
Not all features are on all models
The oven controls serve several purposes. Follow the directions for the controls that apply to your model.
Automatic Clock |
To Set the Clock |
||
The clock must be set for the automatic oven timing |
|
1. |
Press the CLOCK pad. |
functions to work properly. The time of day cannot be |
CLOCK |
2. |
Press the HOUR and MIN. pads to set |
changed during a Timed Baking or Self-Cleaning cycle. |
|
||
|
|
the time of day. |
|
|
|
|
|
|
|
|
|
Timer
The timer is a minute timer only.
The timer does not control oven operations. The maximum setting on the timer is 11 hours and 59 minutes.
To Set the Timer
TIMER |
1. Press the TIMER |
ON/OFF pad. |
|
ON/OFF |
|
2.Press the HOUR and MIN. pads until the amount of time you want shows in the display. The timer will start automatically within a few seconds of releasing the pad.
To Reset the Timer
If the display is still showing the time remaining, you may change it by pressing the HOUR and MIN. pads until the time you want appears in the display.
If the remaining time is not in the display, recall the remaining time by pressing the TIMER ON/OFF pad and then pressing the HOUR and MIN. pads until the new time you want shows on the display.
To Cancel the Timer |
End of Cycle Tones (on some models) |
To cancel the timer, the remaining time must be in |
The end of cycle tone can be cleared by pressing the |
the display. To recall the time remaining, press the |
TIMER ON/OFF pad or, on some models, by pressing |
TIMER ON/OFF pad once. To cancel the timer press |
the COOK TIME ON/OFF pad depending on which |
the TIMER ON/OFF pad again. |
function you are using. |
|
|
Power Outage
On some models, after a power outage the oven will automatically resume its setting once the power is restored.
For models with a CLOCK pad, when the power is restored the display will flash the time of day until a pad is pressed or the knob is turned. Reset the clock to the correct time of day.
If the oven was in operation when the power outage occurred, the Oven Temperature knob must be turned back to OFF. Then reset the knob to the way it was before the power outage.
If your model has a COOK TIME ON/OFF pad and your oven was set for timed baking or roasting when the power outage occurred, the clock and all programmed functions must be reset. To reset them, first turn the Oven Temperature knob back to OFF, reset the clock, functions and knob back to the way they were before the power outage.
Oven Temperature Knob
The oven temperature knob maintains the temperature you set from WARM (170°F.) to BROIL (550°F.).
It also has an OFF and an AUTO SELF CLEAN setting.
|
OVEN ON |
|
OFF |
PREHEATED |
|
BROIL |
|
|
WM |
|
|
|
|
|
|
|
|
|
200 |
LATCH |
AUTO |
|
|
250 |
SELF |
|
|
||
DOOR |
|
|
||
|
CLEAN |
|
|
300 |
|
|
|
|
|
|
550 |
|
|
350 |
|
|
500 |
450 |
400 |
|
|
|
|
Appearance may vary.
The PREHEATED light glows when the oven reaches your selected temperature.
The OVEN ON light will glow any time the Oven Temperature knob is not in the OFF position and is set on a temperature or a function.
11
Control Oven Your of Features
Timer and Clock Control, Oven
USING YOUR OVEN
Before Using Your Oven
1.Look at the controls. Be sure you understand how to set them properly.
2.Check the oven interior. Look at the shelves. Take a practice run at removing and replacing them properly to give sure, sturdy support.
3.Read over the information and tips that follow.
4.Keep this guide handy so you can refer to it, especially during the first weeks of using your new range.
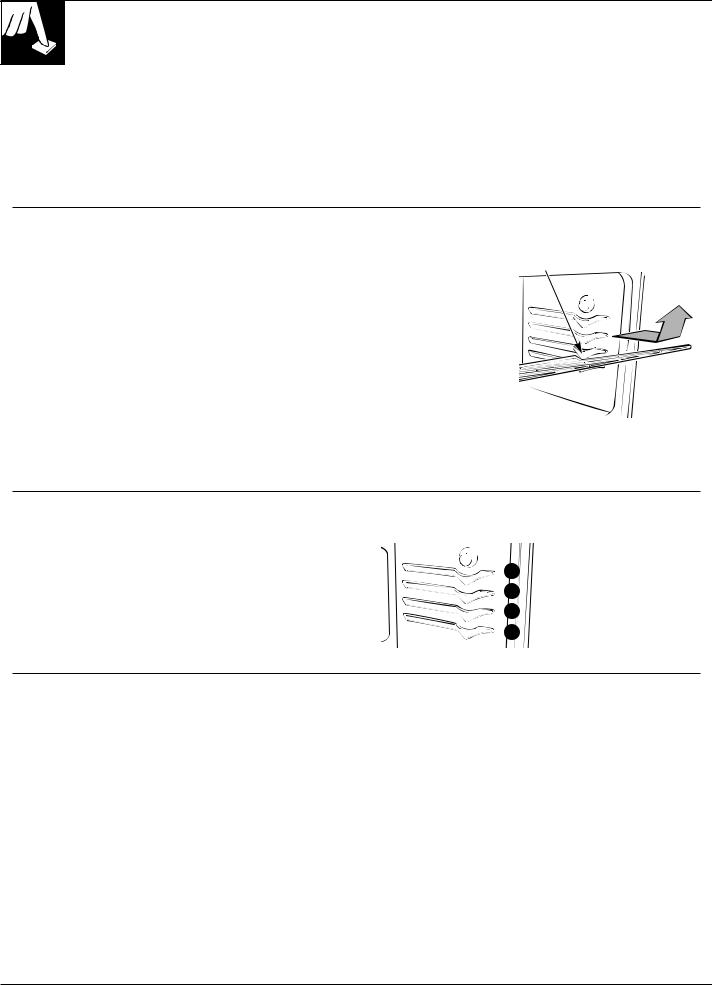
Oven Shelves
The shelves are designed with stop-locks so that when placed correctly on the shelf supports, they will stop before coming completely out from the oven, and will not tilt when removing food from or placing food on them.
When placing cookware on a shelf, pull the shelf out to the bump on the shelf support. Place the cookware on the shelf, then slide the shelf back into the oven.
This will eliminate reaching into the hot oven.
To remove a shelf from the oven, pull it towards you, tilt the front end upward and pull it out.
To replace, place |
Bump |
the shelf on the shelf |
|
support with the |
|
stop-locks (curved |
|
extension under the |
|
shelf) facing up toward |
|
the rear of the oven. |
|
Tilt up the front and |
|
push the shelf toward |
|
the back of the oven |
|
until it goes past the |
|
bump on the shelf support. Then lower the front of the
shelf and push it all the way back.
Shelf Positions
The oven has 4 shelf supports as identified in this illustration as A (bottom), B, C and D (top).
Shelf positions for cooking food are suggested in the Baking, Roasting and Broiling sections.
D
C
B
A
Oven Light (on some models) |
Automatic Oven Shut Off |
The light comes on automatically when the oven door is opened.
On models with an oven window, use the switch to turn the light on and off when the door is closed.
As a safety feature, this oven will automatically shut itself off after 12 hours. On models with touch pad clock controls this feature may be deactivated to allow the oven to be left on for more than 12 hours.
To deactivate the Automatic Oven Shut-Off, press and hold both the increase and decrease minute pads for about 4 seconds. The display will change from time of day to show “off”.
To reactivate the feature, press and hold both the increase and the decrease minute pads for about 4 seconds. The display will change from time of day to show “on”.
12
 Loading...