


GE E1240, E1040, G1, E1030, A830 User Manual
...
ii

WARNING
To prevent fire or shock hazard, do not expose the unit to rain or moisture.
For customers in the U.S.A. Tested To Comply With FCC Standards
FOR HOME OR OFFICE USE
FCC Statement
This device complies with part 15 of the FCC Rules. Operation is subject to the following two conditions:
(1) This device may not cause harmful interference, and (2) this device must accept any interference received, including interference that may cause undesired operation.
For customers in Europe
"CE"markindicatesthatthisproduct complies with the European requirements
for safety, health, environment and customer protection."CE"markcamerasareintendedfor sales in Europe.
This symbol [crossed-out wheeled bin
 WEEE Annex IV] indicates separate collection of waste electrical and electronic equipment in the EU countries. Please do not throw the equipment into the domestic refuse. Please use the return and collection systems available in your country for the disposal of this product.
Declaration of Conformity
Model Name |
: G1/A730/A830/ |
|
E850/E1030/E1040/E1240 |
Trade Name |
: GE |
Responsible Party |
: General Imaging Co. |
Address |
: 2158 W.190th Street, |
|
Torrance, CA 90504, USA |
Telephone Number : 1-800-730-6597
Conforms to the following Standards: |
|
EMC: EN 55022:1998/A1:2000/A2:2003 Class B |
|
EN 55024:1998/A1:2001/A2:2003 |
|
EN 61000-3-2:2000/A1:2001 |
|
EN 61000-3-3:1995/A1:2001 |
|
following the provision of the EMC Directive |
|
(89/336/EEC,2004/108/EEC) |
iii |

SAFETY PRECAUTIONS
Camera notes:
 Do not store or use the camera in the following types of locations:
•In the rain, very humid and dusty places.
•In a place where the camera can be exposed
directly to the sunlight or subject to high temperature, e.g. Inside a closed car in summer.
•In a place where the camera is subject to a high magneticfield,e.g.nearmotors,transformersor
magnets.
Do not place the camera on a wet surface or places where dripping water or sand may come in contact with the camera, which may cause irrepairable faults.
If the camera will not be used for a long period of time, we suggest you remove the battery and the memory card.
If you carry the camera suddenly from a cold location to a warm place, moisture may condense inside the camera. We suggest you wait for a while before turning on the camera.
No compensation for loss of recordings. Loss of recordings cannot be compensated for if a malfunction of your camera or recording media, etc,
iv makestheplaybackofrecordingsnotpossible.
Battery notes:
Incorrect use of the batteries may cause them to leak,becomehot,igniteorburst.Alwaysobservethe precautions given below.
•Donotexposethebatteriestowater,andtake particularcaretokeeptheterminalsdry.
•Donotheatthebatteriesorthrowthemintoafire.
•Do not attempt to deform, disassemble or modify the batteries.
•UseGEchargerinthepackagetochargethe
lithium battery only (for G1 and E series).
Keep the batteries out of reach of babies and small children.
In cold locations, battery performance deteriorates and the time for which they can be used shortens markedly.
Memory card notes:
When using a new memory card, or a memory card has been initialized by a PC, be sure to format the card with your digital camera before using it.
To edit image data, copy the image data to the PC's hard disk and then format memory card if upgrade thefirmware.
Do not change or delete the directory names, or file names in the memory card from your PC, as this may makeitimpossibletousethecardinyourcamera.

BEFORE YOU START
Preface
ThankyouforpurchasingGEdigitalcameras. Pleasereadthismanualcarefullyandkeepitina safe place for future reference.
Copyright
© Copyright 2007 General Imaging Company All rights reserved.
No part of this publication may be reproduced, transmitted, transcribed, stored in a retrieval system, or translated into any language or computer language, in any form, by any means, without the prior written permission of General Imaging Company.
Trademarks
Alltrademarksmentionedinthismanualareused foridentificationpurposesonlyandmaybeproperties of their respective owners.
Safety information
Please read the following important information carefully before using the product.
•Donottakeapartorattempttoservicethe camera yourself.
•Donotdroporknockthecamera.Improper handling may damage the product.
•Turnoffthecamerabeforeinsertingorremoving the battery and memory card.
•Use only the type of battery and charger that came with your camera. Using other types of batteries or chargers may damage the camera and invalidate the warranty.
•When using Li-ion batteries in this product, ensure that they are inserted correctly. Inserting the batteries upside down can cause damage to thecameraandpossiblystartafire.
•Do not touch the camera lens.

•Do not expose the camera to moisture, or extreme temperatures. Extreme environments may shorten the life of your camera or damage the batteries.
•Do not use or store the camera in dusty, dirty, or sandy areas, as its components may be damaged.
•Do not expose the lens to direct sunlight for extended periods.
•Download all pictures and remove the batteries from the camera if you are going to store the camera for long periods.
•Do not use abrasive cleansers, alcohol-based, or solvent-based cleaners to clean the camera. Wipe the camera with a slightly damp soft cloth.
About this manual
This manual provides you with instructions on howtouseyourGEdigitalcamera.Everyeffort has been made to ensure that the contents of this manual are accurate, but General Imaging
Companyreservestherighttomakechanges without notice.
Symbols used in this manual
Throughout this manual, the following symbols areusedtohelpyoulocateinformationquickly and easily.
Indicates the useful information to
know.
Indicatestheprecautionstobetaken while operating the camera.

CONTENTS
WARNING |
|
SAFETY PRECAUTIONS |
|
BEFORE YOU START................................. |
1 |
Preface............................................................. |
1 |
Copyright.................................................. |
1 |
Trademarks.............................................. |
1 |
Safety information........................................ |
1 |
About this manual......................................... |
2 |
Symbols used in this manual................ |
2 |
CONTENTS................................................ |
3 |
GETTING READY....................................... |
7 |
Unpacking....................................................... |
7 |
Camera Views: G1.......................................... |
8 |
: A730/A830........................ |
10 |
: E850................................... |
12 |
: E1030................................. |
14 |
: E1040/E1240.................... |
16 |
Charging the battery.................................. |
18 |
Inserting the battery.................................. |
19 |
Inserting an optional SD/SDHC card....... |
22 |
Turningonandoff....................................... |
23 |
Using the Mode Dial.................................... |
24 |
Setting display language, date, and time |
|
Setting the Date and Time.................. |
25 |
Setting the Language........................... |
26 |
About the LCD screen................................. |
27 |
BASIC OPERATION................................. |
28 |
Shooting in Auto mode............................... |
28 |
Usingthezoomfunction............................ |
28 |
Usingtheflash............................................. |
29 |
Using the self-timer.................................... |
29 |
Using Macro mode...................................... |
30 |
Exposure compensation............................ |
30 |
Advanced function menu........................... |
31 |
WB (White Balance).............................. |
31 |
|
|

ISO............................................................ |
32 |
Quality..................................................... |
33 |
Size........................................................... |
34 |
Color......................................................... |
35 |
|
USING THE MODES................................ |
38 |
|
|
LCD Screen display...................................... |
38 |
|
|
Still shooting mode display................. |
38 |
|
|
Video shooting mode display............. |
40 |
|
|
Playbackmodedisplay........................ |
41 |
|
|
Scene mode................................................... |
42 |
|
|
Sport......................................................... |
42 |
|
|
Children................................................... |
42 |
|
|
Indoor...................................................... |
42 |
|
|
Leaf........................................................... |
42 |
|
|
Snow......................................................... |
43 |
|
|
Sunset...................................................... |
43 |
|
|
Fireworks................................................ |
43 |
|
|
Glass......................................................... |
43 |
|
|
|||
|
|
||
|
|
|
Museum................................................... |
43 |
Landscape............................................... |
43 |
Night landscape.................................... |
43 |
Night portrait......................................... |
43 |
Return to the scene mode palette..... |
44 |
Panorama mode.......................................... |
44 |
Imagestabilizationmode.......................... |
46 |
Face detection.............................................. |
47 |
PLAYBACK............................................... |
48 |
Viewing photos and videos....................... |
48 |
Editing video........................................... |
50 |
Thumbnail view............................................ |
53 |
Usingzoomplayback |
|
(for still pictures only)................................. |
52 |
Using the delete button............................. |
53 |
USING THE MENUS................................ |
54 |
Still menu...................................................... |
54 |
AF mode (Auto-Focus mode)............... |
55 |

AF-assist beam...................................... |
55 |
Cont. AF (Continuous AF)..................... |
56 |
Expo Metering (Exposure Metering).. |
56 |
Cont.Shot (Continuous shot)............... |
57 |
Grid........................................................... |
57 |
QuickReview.......................................... |
58 |
Digital Zoom........................................... |
58 |
Histogram............................................... |
59 |
Slow shutter........................................... |
59 |
Movie menu.................................................. |
60 |
Cont. AF (Continuous AF)..................... |
60 |
Expo Metering (Exposure Metering)..61 |
|
Stabilization........................................... |
61 |
Playbackmenu............................................. |
62 |
Protect..................................................... |
62 |
Delete....................................................... |
63 |
DPOF (Digital Print Order Format)..... |
64 |
Info. Box (Information Box).................. |
65 |
Trim.......................................................... |
65 |
Resize....................................................... |
66 |
Rotate...................................................... |
66 |
Slide show............................................... |
67 |
Red-eye removal................................... |
68 |
Setup menu................................................... |
69 |
Format Memory..................................... |
69 |
Beep......................................................... |
70 |
LCD Brightness...................................... |
71 |
Power Saver............................................ |
71 |
Date/Time............................................... |
72 |
World time.............................................. |
72 |
File Numbering...................................... |
73 |
Language................................................ |
73 |
Video system.......................................... |
73 |
Copy to Card (Copy internal memory |
|
to memory card).................................... |
74 |
Reset Settings........................................ |
75 |
FW Ver. (Firmware version)................. |
75 |

CONNECTIONS....................................... |
76 |
Connecting to a TV...................................... |
76 |
Connecting to a PC...................................... |
77 |
Setting the USB mode.......................... |
78 |
TransferringfilestoyourPC............... |
78 |
Connecting to a PictBridge compatible |
|
printer............................................................ |
79 |
Setting the USB mode.......................... |
80 |
Using the PictBridge menu........................ |
82 |
Print with date....................................... |
82 |
Print without date................................. |
83 |
Print index............................................... |
84 |
Print DPOF.............................................. |
85 |
Exit............................................................ |
85 |
Appendices............................................. |
86 |
Specifications: |
|
G1............................................................... |
86 |
A730/A830................................................ |
90 |
E850/E1030/E1040/E1240..................... |
94 |
Error messages.......................................... |
100 |
Troubleshooting......................................... |
102 |
GETTING READY
Unpacking
Yourpackageshouldcontainthecameramodelyoupurchasedalongwiththefollowingitems.
If anything is missing or appears to be damaged, please contact your vendor. (The accessories will vary based on model purchased and are noted below.)
User |
Man |
|
|
|
ual |
Rechargeable |
AA-sizealkaline |
User Manual |
Quickstartguide |
Wrist strap |
Lithium-ion battery |
batteries X2 |
|
|
|
(except A730/A830) |
(A730/A830 only) |
|
|
|
|
|
|
|
|
USB cable |
AV cable |
Battery charger |
CD-ROM |
Warranty card |
|
|
(except A730/A830) |
|
|
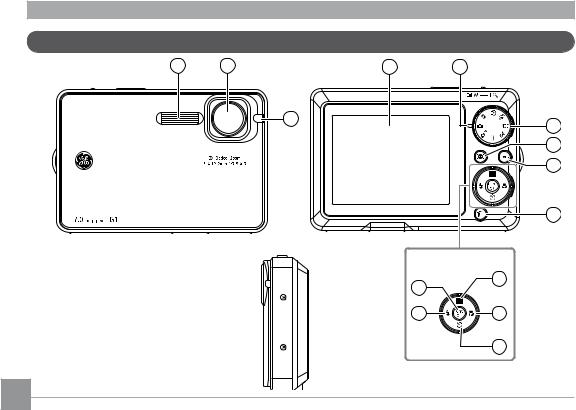
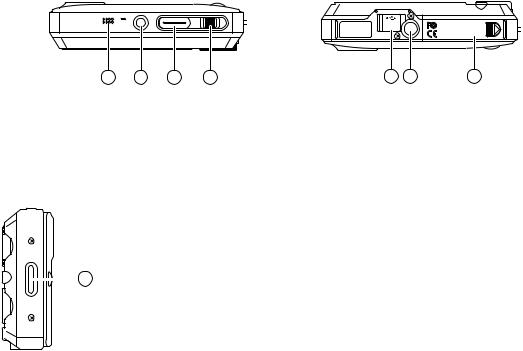
Camera views : G1
Front View |
1 |
2 |
Back View ĵ |
Ķ |
|
|
|
3 |
ķ |
|
|
|
|
|
|
|
|
|
ĸ |
|
|
|
|
Ĺ |
|
|
|
|
ĺ |
|
|
|
Right View |
|
|
|
|
Navigation Pad |
|
|
|
|
IJĵ |
IJı |
|
|
|
|
|
|
|
|
IJĴ |
IJIJ |
|
|
|
|
IJij |
|
|
|
|
|
|
|
Top View |
Bottom View |
|||||
|
|
|
|
|
|
|
|
|
|
|
|
|
|
|
power |
|
|
IJĶ |
IJķ |
IJĸ |
IJĹ |
A/V |
memory card |
OUT |
|
|
battery |
IJĺ ijı |
ijIJ |
|
|
|
|
|
|
|
|
|
|
|
|
1 |
Flash |
12 |
Self-timer/ Down button |
|
|
|
|
|
|
|
|
|
|
|
|
|
|
2 |
Lens |
13 |
Flash mode/ Left button |
|
|
|
|
|
|
|
|
|
|
|
|
|
|
3 |
AF assist beam/Timer indicator |
14 |
Func/okbutton |
|
|
|
|
|
|
|
|
|
|
|
|
|
|
4 |
LCD screen |
15 |
Speaker |
|
|
Left View |
5 |
Status LED |
16 |
Power button |
|
|
|||||||||||
|
|
|
|
|
|
|
|
|
|
|
|
6 |
Mode dial |
17 |
Shutter button |
|
|
|
|
|
|
|
|
|
|
|
|
|
|
|
|
||||
|
|
|
|
|
|
|
|
|
|
|
|
|
|
||||
|
|
|
|
|
|
|
|
|
|
|
|
7 |
Face detection AF button |
18 |
Zoom scroll wheel |
|
|
|
|
|
|
|
|
|
|
|
|
|
22 |
8 |
Menu button |
19 |
USB/ AV port |
|
|
|
|
|
|
|
|
|
|
|
|
|
|
|
|||||
|
|
|
|
|
|
|
|
|
|
|
|
|
|||||
|
|
|
|
|
|
|
|
|
|
|
|
|
|||||
|
|
|
|
|
|
|
|
|
|
9 |
Erase button |
20 |
Tripod mount point |
|
|
||
|
|
|
|
|
|
|
|||||||||||
|
|
|
|
|
|
|
|
|
|
|
|
||||||
|
|
|
|
|
|
|
|
|
|
|
|
10 |
Exposure compensation/ |
21 |
Memory card/ |
|
|
|
|
|
|
|
|
|
|
|
|
|
|
|
Up button |
|
Battery compartment |
|
|
|
|
|
|
|
|
|
|
|
|
|
|
|
|
|
|
||
|
|
|
|
|
|
|
|
|
|
|
|
11 |
Macro mode/ Right button |
22 |
Wrist strap mount |
|
|
|
|
|
|
|
|
|
|
|
|
|
|
|
|
||||
|
|
|
|
|
|
|
|
|
|
|
|
|
|||||
|
|
|
|
|
|
|
|
|
|
|
|
|
|
|
|
|
|
|
|
|
|
|
|
|
|
|
|
|
|
|
|
|
|
|
|
|
|
|
|
|
|
|
|
|
|
|
|
|
|
|
|
|
|
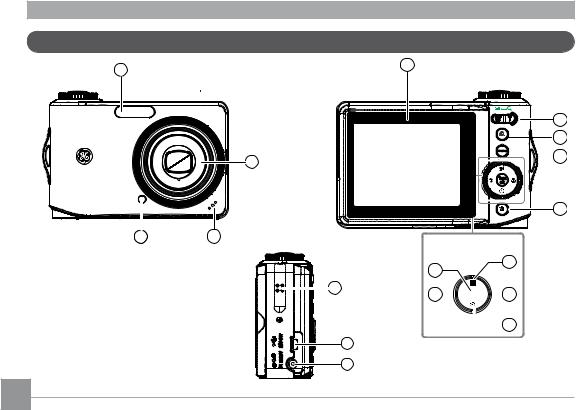
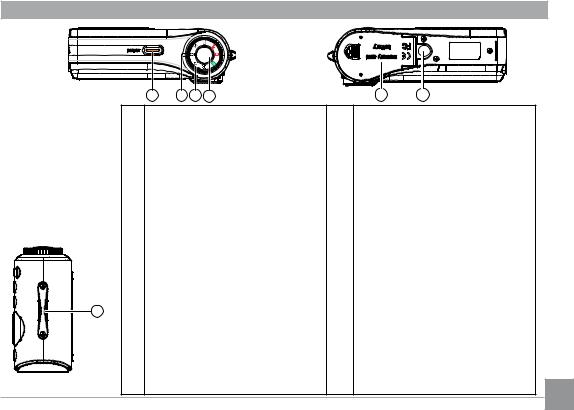
Camera views : A730/A830
Front View 1 |
Back View 5 |
|
|
|
cus Zo |
o |
|
|
|
|
|
|
|
|
o |
|
|
|
|
|
|
||
|
F |
|
|
m |
e |
|
||||
|
o |
|
|
|
|
|
|
|||
u |
t |
|
|
|
|
L |
|
|||
|
|
|
|
|
n |
|
||||
|
|
|
|
|
|
|
|
s |
|
|
A |
|
|
|
|
|
|
|
|
|
2 |
3 |
|
|
|
|
|
|
4 |
.8 |
||
|
3 |
|
|
|
|
|
|
|
||
X |
|
|
|
|
|
|
|
|
|
|
|
6 |
|
|
|
|
- |
|
|
||
|
- |
|
|
|
.8 |
|
|
|
||
|
|
1 |
0 |
|
:2 |
|
|
|
|
|
|
|
|
8 mm1 |
|
|
|
|
|
||
7.0 megapixel A730 |
|
|
|
|
|
|
|
|
|
|
4 |
|
|
|
|
|
|
|
|
3 |
Right View |
15
16
17
6
7
 8
8
9
Navigation Pad
10
14
13 

 11
11
 12
12
10
Top View |
Bottom View |
|
|
18 |
19 |
20 |
21 |
|
22 |
23 |
|
|
1 |
Flash |
|
|
|
13 |
Flash mode/ Left button |
|
|
|
2 |
Lens |
|
|
|
14 |
Func/okbutton |
|
|
|
3 |
Mic |
|
|
|
15 |
Speaker |
|
|
|
4 |
AF assist beam/Timer indicator |
16 |
USB/ AV port |
|
||||
|
5 |
LCD screen |
17 |
DC IN port |
|
|
|||
Left View |
6 |
T&W button |
18 |
Power button |
|
||||
|
7 |
Face detection AF button |
19 |
Status LED |
|
|
|||
|
8 |
Menu button |
20 |
Mode dial |
|
|
|||
|
9 |
Erase button |
21 |
Shutter button |
|
||||
|
24 |
Exposure compensation |
22 |
Memory card |
|
||||
|
10 |
|
|||||||
|
|
/Up button |
|
/ Battery compartment |
|
||||
|
11 |
Macro mode/ Right button |
23 |
Tripod mount point |
|
||||
|
12 |
Self-timer/ Down button |
24 |
Wrist strap mount |
11 |
||||
|
|
|
|
|
|
|
|
|
|

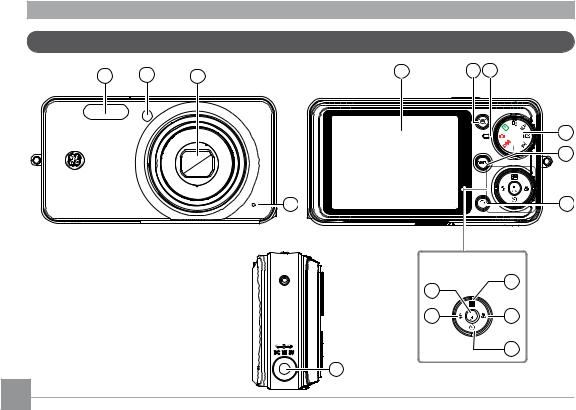
Camera views : E850
Front View 1 |
2 |
3 |
Back View 5 |
6 |
|
|
|
|
7 |
|
|
|
|
8 |
|
|
|
|
9 |
|
|
|
4 |
10 |
|
|
|
|
|
|
|
|
Right View |
|
Navigation Pad
11
14
15 

 12
12
 13
13
12
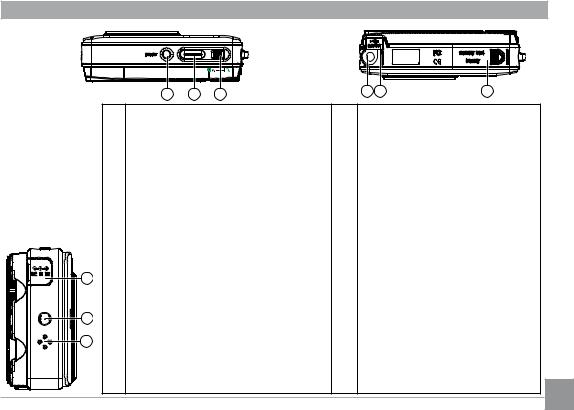
Top View |
Bottom View |
|
|
16 |
17 |
18 |
|
19 |
20 |
21 |
|
|
|
|
|
|
|||
|
1 |
Flash |
|
|
13 |
Self-timer/ Down button |
||
|
2 |
Mic |
|
|
14 |
Func/okbutton |
|
|
|
3 |
Lens |
|
|
15 |
Flash mode/ Left button |
||
|
4 |
AF assist beam/Timer indicator |
16 |
Power button |
|
|||
|
5 |
LCD screen |
|
|
17 |
Shutter button |
|
|
Left View |
6 |
Status LED |
|
|
18 |
Zoom scroll wheel |
|
|
7 |
Face detection AF button |
19 |
Tripod mount point |
|
||||
|
|
|||||||
22 |
8 |
Mode dial |
|
|
20 |
USB/ AV port |
|
|
|
9 |
Menu button |
|
21 |
Memory card |
|
||
23 |
|
|
|
|
|
/ Battery compartment |
|
|
|
|
|
|
|
|
|
|
|
24 |
10 |
Erase button |
|
22 |
DC IN port |
|
||
|
|
|
|
|
|
|
|
|
|
11 |
Exposure compensation/Up button |
23 |
Wrist strap mount |
|
|||
|
12 Macro mode/ Right button |
24 |
Speaker |
13 |
||||
|
|
|
|
|
|
|
|
|
Camera views : E1030 |
|
|
|
|
|
|
|
|
|
|
|
|
|||
Front View 1 |
2 |
|
|
|
|
|
3 |
|
|
|
Back View |
5 |
6 |
7 |
|
|
|
|
|
|
|
|
|
|
|
|
|
|
|
W |
T |
|
|
|
|
|
|
|
us Zo |
o |
|
|
|
|
|
|
8 |
|
|
|
|
|
oc |
m |
|
|
|
|
|
||||
|
|
|
|
F |
|
|
|
|
|
|
|
||||
|
|
|
o |
|
|
|
|
|
L |
|
|
|
|
||
|
|
|
|
|
|
|
|
|
e |
|
|
|
|
||
|
|
t |
|
|
|
|
|
|
|
n |
|
|
|
|
|
|
A |
u |
|
|
|
|
|
|
|
|
s |
|
|
|
9 |
|
|
|
|
|
|
|
|
|
|
|
|
|
|
|
|
|
X |
|
|
|
|
|
|
|
.9 |
|
|
|
|
||
|
3 |
|
|
|
|
|
|
|
-4 |
|
|
|
|
||
|
|
|
3 |
|
|
|
|
|
|
|
|
|
|
||
|
|
|
|
5 |
|
|
|
|
.8 |
|
|
|
|
||
|
|
|
|
|
- |
|
:2 |
|
|
|
|
|
|||
|
|
|
|
|
|
10 |
5mm1 |
|
4 |
|
|
|
|
||
10.1 megapixel E1030 |
|
|
|
|
|
|
|
|
|
|
|
|
|
10 |
|
|
|
|
|
|
|
|
|
|
|
|
|
|
|
|
|
|
|
|
|
|
|
|
|
|
|
|
Right View |
|
|
|
|
|
|
|
|
|
|
|
|
|
|
|
|
Navigation Pad |
|||
|
|
|
|
|
|
|
|
|
|
|
|
14 |
|
|
11 |
|
|
|
|
|
|
|
|
|
|
|
|
|
|
|
|
|
|
|
|
|
|
|
|
|
|
|
|
15 |
|
|
12 |
|
|
|
|
|
|
|
|
|
|
|
|
|
|
|
13 |
|
|
|
|
|
|
|
|
|
|
|
16 |
|
|
|
|
14
Top View
 W T
W T
17 |
18 |
19 |
Bottom View 
20 |
21 |
22 |
23 |
|
|
1 |
Flash |
13 |
Self-timer/ Down button |
|
|
|
2 |
Mic |
14 |
Func/okbutton |
|
|
|
3 |
Lens |
15 |
Flash mode/ Left button |
|
|
|
4 |
AF assist beam/Timer indicator |
16 |
DC IN port |
|
|
|
5 |
LCD screen |
17 |
Power button |
|
Left View |
|
6 |
Status LED |
18 |
Shutter button |
|
|
|
7 |
Face detection AF button |
19 |
Zoom scroll wheel |
|
|
|
8 |
Mode dial |
20 |
Speaker |
|
|
24 |
9 |
Menu button |
21 |
Tripod mount point |
|
|
10 |
Erase button |
22 |
USB/ AV port |
|
|
|
|
|
||||
|
|
11 |
Exposure compensation/Up button |
23 |
Memory card |
|
|
|
|
|
|
/ Battery compartment |
|
|
|
12 Macro mode/ Right button |
24 |
Wrist strap mount |
15 |
|
|
|
|
|
|
|
|
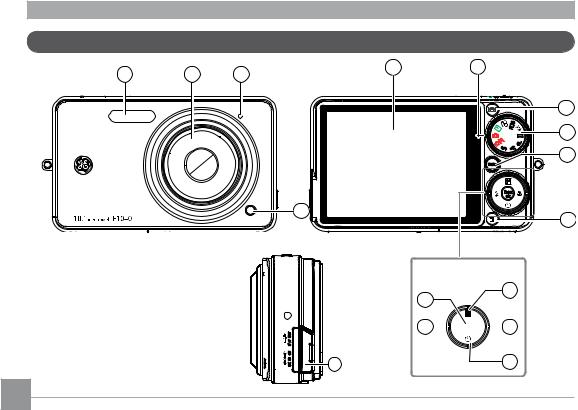
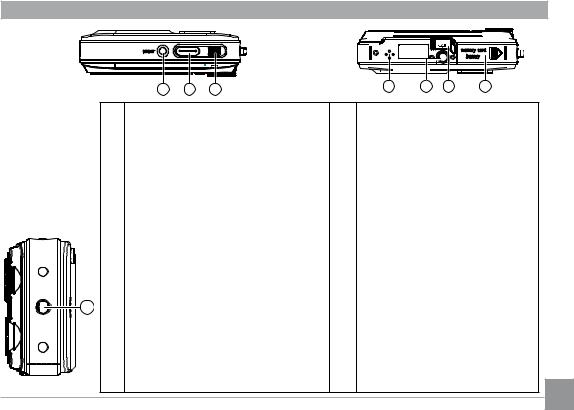
Camera views : E1040/E1240 |
|
|
|
|
||
Front View |
1 |
2 |
3 |
Back View |
5 |
6 |
|
|
|
|
|||
|
|
|
|
|
|
7 |
|
|
|
|
|
|
8 |
|
|
|
|
|
|
9 |
|
|
|
|
|
|
menu |
func ok
4
10
Right View
Navigation Pad
11
14
15 

 12
12
16 |
13 |
|
16
Top View |
Bottom View |
|
|
17 |
18 |
19 |
|
20 |
21 |
22 |
|
|
|
|
|
|
|||
|
1 |
Flash |
|
|
13 |
Self-timer/ Down button |
||
|
2 |
Lens |
|
|
14 |
Func/okbutton |
||
|
3 |
Mic |
|
|
15 |
Flash mode/ Left button |
||
|
4 |
AF assist beam/Timer indicator |
16 |
DC IN port (USB/ AV port) |
||||
|
5 |
LCD screen |
|
17 |
Power button |
|
||
Left View |
6 |
Status LED |
|
18 |
Shutter button |
|||
|
7 |
Face detection AF button |
19 |
Zoom scroll wheel |
||||
|
8 |
Mode dial |
|
20 |
Speaker |
|
|
|
23 |
9 |
Menu button |
|
21 |
Tripod mount point |
|||
10 |
Erase button |
|
22 |
Memory card |
|
|||
|
|
|
|
|
|
/ Battery compartment |
||
|
11 |
Exposure compensation/Up button |
23 |
Wrist strap mount |
||||
|
12 Macro mode/ Right button |
|
|
|
17 |
|||
|
|
|
|
|
|
|
|
|
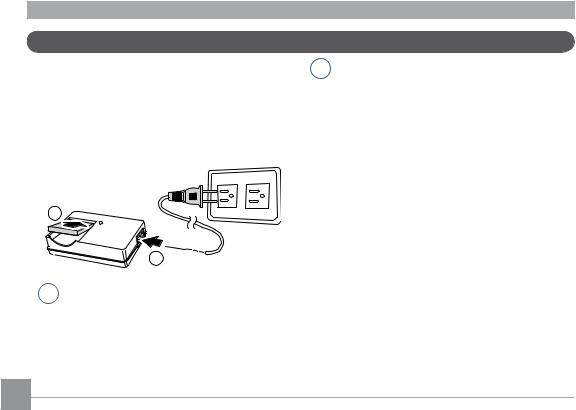
Charging the battery (except A730/830)
1.Place the battery into the charger as shown.
2.Plug one end of the connecting cable into the charger base.
3.Plug the other end of the connecting cable into a wall outlet.
 Throughout the rest of the manual, the following illustrations show the G1 model as an example.
(A730, A830, E850, E1030, E1040, and E1240 operate similarly.)
1
2 
 Leave the battery to charge until the charger light goes green.
(Tomaximizebatterylife,thefirstcharge should be at least 4 hours)
18
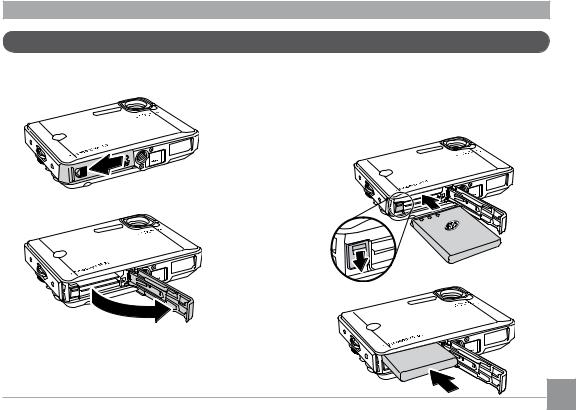
Inserting the battery
1. Open the battery compartment.
TUO /VA
2.Insert the battery while observing the correct polarity. Use the side of battery to press down the stopper as shown, allowing the battery to be inserted properly.
19
3. Close the battery compartment. |
Inserting the battery (A730/A830) |
|
1. Open the battery compartment. |
TUO /VA
 Battery capacity decreases with usage.
20
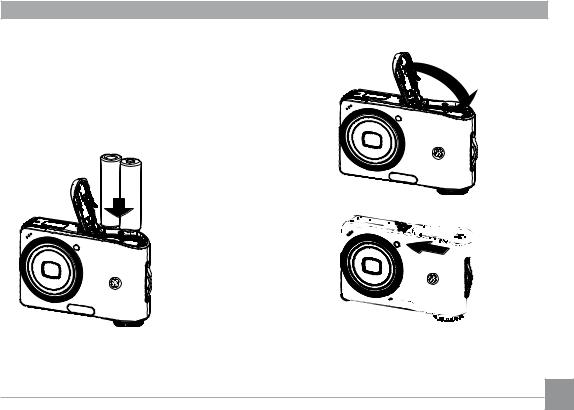
2.Insert the battery while observing the correct polarity. Use the side of battery to press down the stopper as shown, allowing the battery to be inserted properly.
3. Close the battery compartment.
21
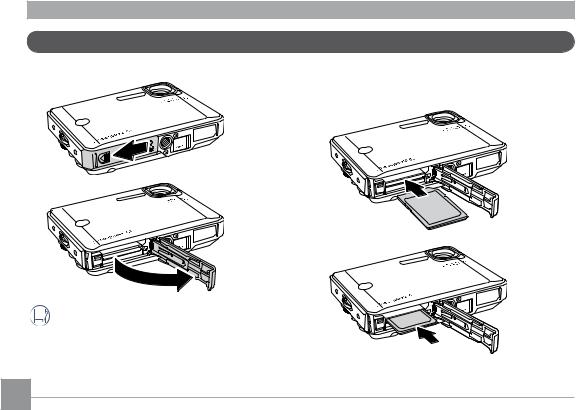
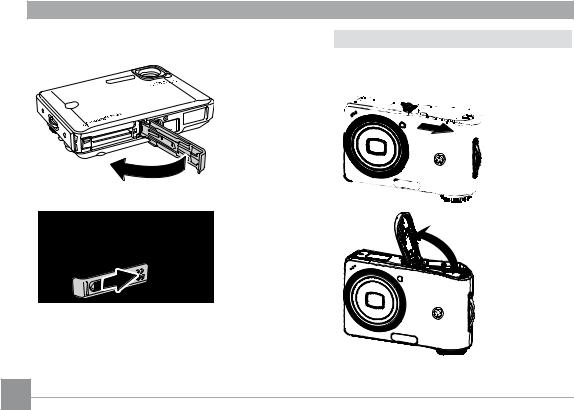
Inserting an optional SD/SDHC card
1. Open the battery compartment.
TUO /VA
2.Insert an optional SD/SDHC card into the memory card slot as shown.
 Optional SD/SDHC cards are not included.
  The use of 64MB to 4GB memory cards from recognizedmanufacturerssuchasSanDisk,
Panasonic and Toshiba is recommended for
reliable data storage.
22
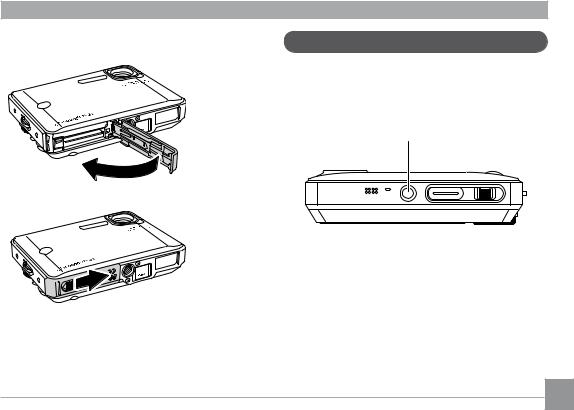
3. Close the battery compartment.
Turningonandoff
Press the Power button to turn the camera on.Toturnoffthecamera,pressthePower button again.
Power Button
power |
TUO /VA
To remove the SD/SDHC card, open the battery compartment and gently push the card to release it. Pull the card carefully.
When turned on, the camera will enter the mode according to the mode dial setting. You can also turn the mode dial to change the modes after the camera is turned on.
23

Using the Mode Dial
TheGEcameraprovidesaconvenientmodedialthatallowsyoutoswitchbetweendifferent modes with ease. All the available modes are listed as follows.
|
|
Mode Name |
Icon |
Description |
|
|
|
Auto |
|
Switchtotakestillpictures.(Thecamerausesthedefaultpro- |
|
|
|
|
|
grammed automatic settings.) |
|
|
|
Playback |
|
Switch to view the pictures/videos stored in the memory card and |
|
|
|
|
|
internal memory. |
|
|
|
Movie |
|
Switch to record videos. |
|
|
|
|
|
|
|
|
|
Image Stabili- |
|
SwitchtouseImageStabilizationwhentakingstillpictures. |
|
|
|
zation |
|
|
|
|
|
Scene |
|
Switchtouseapresetscenemodefortakingstillpictures. |
|
|
|
|
|
There are 12 scenes in total. |
|
|
|
Portrait |
|
Switchtoportraitmodewhentakingclose-upportraitphotos. |
|
|
|
|
|
|
|
|
|
Panorama |
|
Switch to capture a sequence of shots and stitch them together into a |
|
|
|
|
|
panoramic photo. |
|
|
|
Manual |
|
Switchtotakestillpicturesinmanualmode,wheremanycameraset- |
|
|
|
|
|
tingscanbeconfigured.(Recommendedforadvancedusersonly) |
|
24 |
|
|
|
||
|
|
|
|
|
|
|
|
|
|
|
|
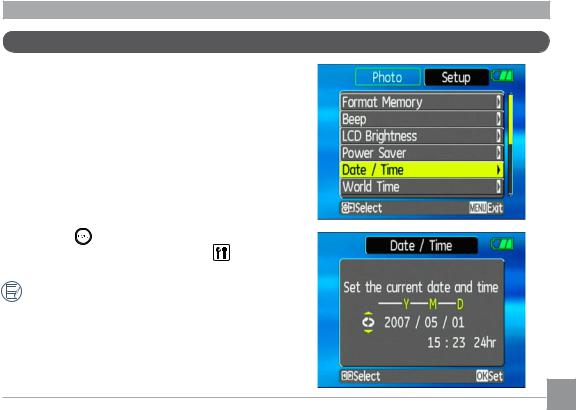
Setting display language, date, and time |
|
To set the language, date, and time, the following |
|
settingsneedtobeconfiguredintheSetup |
|
menu. |
|
• Date / Time |
|
• Display language |
|
To access the Setup menu, do the following: |
|
1 .Press Power to turn the camera on. |
|
2. Press the button and use Up/Down/Left/ |
|
Right to select the Setup menu ( ). |
|
Whenusingthecameraforthefirsttime,the |
|
language menu will appear automatically. |
|
Setting the Date and Time |
|
1. Use the Up/Down to select Date/Time. |
|
Then press the Right to enter the setting. |
25 |
|
2.Press the Left/Right tohighlighteachfield and use the Up/Down to adjust the value.
3.Press the  buttontoconfirmthesetting.
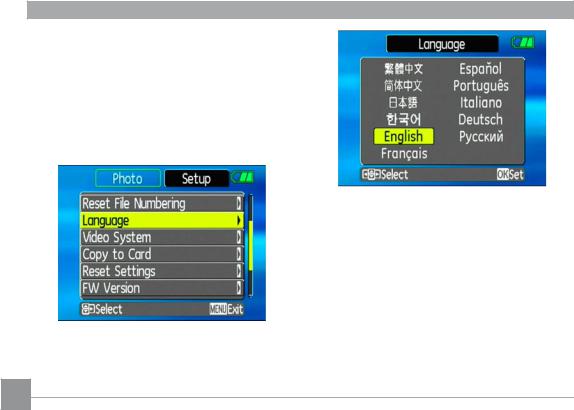
Setting the Language
1.Use the Up/Down to select Language. Then press the Right to enter the setting.
2. Use the navigation buttons to select the desired language.
3. Press the  buttontoconfirmthesetting.
26
 Loading...