


slow cooker
Model Number 169200
UPC: 681131692007
Customer Assistance
1 877 207 0923 (US)
1 877 556 0973 (Canada)
Thank you for purchasing this GE appliance.
In keeping with the GE ecomagination initiative, please consider the option to recycle the packaging material and donate the appliance you are no longer using.
To read more about GE's ecomagination commitment, visit: ge.ecomagination.com

IMPORTANT SAFEGUARDS
When using electrical appliances, basic safety precautions should always be followed to prevent the risk of fire, electric shock, burns, or other injuries or damages.
•Read all instructions before use.
•Do not touch hot surfaces. Use handles.
•To protect against electrical shock do not immerse cord, plug, or the appliance in water or other liquids.
•Close supervision is necessary when any appliance is used by or near children.
•Unplug from outlet when not in use and before cleaning. Allow it to cool before putting on or taking off parts.
•Do not operate appliance with a damaged cord or plug, or after the appliance malfunctions or has been dropped or damaged in any manner. Call our tollfree customer assistance number for information on examination, repair, or adjustment.
•The use of accessory attachments not recommended by the appliance manufacturer may cause injuries.
•Do not use outdoors.
•Do not let cord hang over edge of table or counter, or touch hot surfaces.
•Do not place on or near a hot gas or electric burner, or in a heated oven.
•To disconnect, depress the power button, then remove plug from the wall outlet.
•Do not use this appliance for anything other than its intended use.
•Do not operate the appliance unattended with temperature set to high.
•Extreme caution must be used when moving an appliance containing hot oil or other hot liquids. Do not move during operation.
•Always close and lock the tempered glass lid when transporting food inside the non-stick insert.
•The supplied non-stick insert is only suitable for use with the base unit. Do not set the hot non-stick insert on a non heat-resistant surface. The surface may be damaged.
•Never use appliance without the supplied non-stick insert.
•Always leave the tempered glass lid on the non-stick insert when cooking.
•Always use pot holders when removing the tempered glass lid with sealing, nonstick insert or when moving the base unit.
•Caution: To prevent damage or shock hazard, do not cook directly inside the base unit. Cook only in container provided. Do not immerse in any liquid (ill. k ).
save these instructions!

Additional Safeguards
This appliance is for HOUSEHOLD USE ONLY.
DO NOT OPERATE APPLIANCE IF THE LINE CORD SHOWS ANY DAMAGE OR IF APPLIANCE WORKS INTERMITTENTLY OR STOPS WORKING ENTIRELY.
EXTENSION CORDS
A short power-supply cord is to be provided to reduce the risk resulting from becoming entangled in or tripping over a longer cord. Longer detachable power-supply cords or extension cords are available and may be used if care is exercised in their use. If a longer detachable power-supply cord or extension cord is used,
1)The marked electrical rating of the cord set or extension cord should be at least as great as the electrical rating of the appliance, and
2)The longer cord should be arranged so that it will not drape over the countertop or tabletop where it can be tripped over, snagged, or pulled on unintentionally (especially by children).
POLARIZED PLUG
This appliance has a polarized plug (one blade is wider than the other). To reduce the risk of electric shock, this plug is intended to fit into a polarized outlet only one way. If plug does not fit fully into the outlet, reverse the plug. If it still does not fit, contact a qualified electrician. Do not attempt to modify the plug in any way.
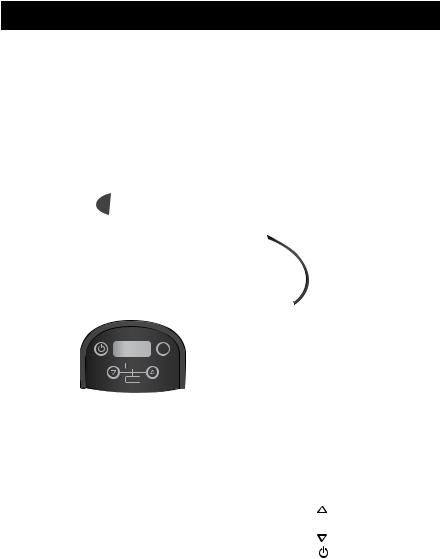
PARTS
temp
timer preset
 1
1
 2
2
 3
3  4
4
 5
5
 6
6  7
7
 8
8


 9
9
10
11
|
16 |
15 |
14 |
13 |
12 |
|
|
1. |
Lid handle |
|
|
|
|
10. |
LCD |
2. |
Tempered glass lid with gasket |
11. |
temp button |
||||
3. |
Lid lock |
|
|
|
|
12. |
timer button |
4. |
Non-stick insert handles |
|
13. |
Arrow button |
|||
5. |
Non-stick insert |
|
|
|
14. |
8 preset programs button |
|
6. |
Base unit |
|
|
|
|
15. |
Arrow button |
7. |
Base unit handle |
|
|
|
16. |
Power button |
|
8.Retractable cord
9.Polarized plug
4

ILLUSTRATIONS
j
5

ILLUSTRATIONS
|
|
|
|
|
|
|
|
|
|
|
|
|
|
|
|
|
|
|
|
|
|
|
|
|
|
|
|
|
|
|
|
|
|
|
|
|
|
|
|
|
|
|
|
|
|
|
|
|
|
|
|
|
|
|
|
|
|
|
|
|
|
|
|
|
|
|
|
|
|
|
|
|
|
|
|
n |
|
|
|
||||
m |
|
|
|
o |
|||||||
6

operation
Before first use
• |
Unpack the slow cooker and remove all packaging material. |
unpack the |
|
non-stick insert (5). |
|
• |
Clean the tempered glass lid (2), non-stick insert (5) and base unit (6) |
Cleaning). |
NOTE: For the first use, fill the non-stick insert (5) with 3 cups of water and let the slow cooker run for 30 minutes. Due to residues of the manufacturing process the slow cooker may emit a slight odor during first use.
Assembly
•Place the base unit (6) on a stable and dry surface.
•Put the non-stick insert (5) into the base unit (6) (ill. a ).
•Pull the retractable cord (8) out of the cord storage located on the base unit (6) (ill. o ).
Operating instructions
The slow cooker is intended for cooking food at low temperatures for an extended time.
•Prepare a recipe suitable for slow cooking (for examples  Recipes).
•Place the prepared food into the non-stick insert (5) (ill. b ) ( Tips & Tricks).
• Do not fill the non-stick insert (5) to the rim (ill. i ).
•Cover the non-stick insert (5) with the tempered glass lid (2) (ill. c ). Do not lock the tempered glass lid (2) during operation.
•Connect the power plug (9) to a wall outlet. The power icon  (16) turns on with 25% brightness, LCD turns on with ‘high’ and ‘04:00’ flashing.
•Press (16) to directly start cooking. An audible tone indicates the beginning of the cooking process, the power icon
 (16) switches to full brightness, ‘high’ and ‘04:00’ stop flashing, and timer starts counting down.
•Lifting the tempered glass lid (2) during the cooking process will increase cooking time.
•Press (16) to stop the cooking process at any time. The slow cooker will switch to standby mode. The power icon
  (16) switches to 25% brightness with ‘high’ and ‘04:00’ flashing.
CAUTION: Do not fill liquids or food directly into the base unit (6) (ill. l ), always use the non-stick insert (5).

operation
Changing temperature and time before cooking
• |
|
|
|
following |
|
|
|
|
|
|
|
|
Press temp |
Setting |
|
Default time |
|
|
|
|
|
|
|
|
1 time |
low |
(slow cooking) |
06:00 hours |
|
|
|
|
|
|
|
|
2 times |
warm |
(keeping food warm) |
03:00 hours |
|
|
|
|
|
|
|
|
3 times |
high |
(faster cooking) |
04:00 hours |
|
|
|
|
|
|
|
•Press timer (12). Increase or decrease the time setting with the arrow buttons
 (13) or
 (15).
(15).
-Time will increase or decrease in 30 minute increments.
-The shortest selectable time is 30 minutes, the longest 12 hours.
•Note: After selecting the cooking time, the temperature can be changed by pressing temp (11) repeatedly. The temperature setting will switch in the following order, the set time will not be changed:
Press temp |
Setting |
|
|
|
|
1 time |
low |
(slow cooking) |
|
|
|
2 times |
warm |
(keeping food warm) |
|
|
|
3 times |
high |
(faster cooking) |
|
|
|
•Press (16) to start cooking. An audible tone indicates the beginning of the cooking process and the power icon
 (16) switches to full brightness. The temperature icon and the timer stop flashing and the timer will count down.

|
|
|
operation |
|
Changing temperature and time during cooking |
||||
• |
|
|
will switch in the following |
|
|
|
|
|
|
|
Press temp |
Setting |
|
|
|
|
|
|
|
|
1 time |
low |
(slow cooking) |
|
|
|
|
|
|
|
2 times |
warm (keeping food warm) |
|
|
|
|
|
|
|
|
3 times |
high |
(faster cooking) |
|
|
|
|
|
|
The icons ‘low’, ‘warm’ or ‘high’ are flashing during setting; the time will not flash and will not be changed.
•Press timer (12) during cooking. Increase or decrease the time setting with the arrow buttons (13) or
 (15). Time will increase or decrease in 30 minute increments.
The time will flash during setting; the temperature icon will not flash and will not be changed.
After setting, the time will continue to flash for 5 seconds.
NOTE: Cooking time may differ due to factors like room temperature or amount of food in the non-stick insert (5). The cooking time can be adjusted any time.
End of cooking
•The end of the cooking process will be indicated by an audible tone. The cooker switches to ‘warm’ and time counts up for 3 hours.
•A second audible tone indicates the end of the warming process. ‘3:00’ and ‘warm' will flash. The LCD (10) switches to 25% brightness and the unit stops heating.
•You can also press (16) to stop the cooking process at any time. The slow cooker will switch to standby mode. The power icon
 (16) switches to 25% brightness with ‘high’ and ‘04:00’ flashing.
•Disconnect the slow cooker from the wall outlet.
•To remove the tempered glass lid (2) always use pot holders to grasp the lid handle (1) (ill. d ).
•Always use pot holders when removing the non-stick insert (5) from the base unit (6) (ill. f ).

operation
CAUTION: When lifting the tempered glass lid (2), hot steam may cause serious injuries. Always lift the tempered glass lid so that the steam is diverted away from you. Let the condensed hot water drip into the non-stick insert (ill. e ).
Transport food
For easy transport of food you should lock the tempered glass lid (2) on top of the nonstick insert (5).
• Slide the lid lock (3) in direction of the lid handle (1) to lock the tempered glass lid (2) (ill. m ). CAUTION: Never use the lid handle (1) to lift up the locked non-stick insert (5) (ill. n ). Always grasp the the two non-stick insert handles (4) using pot holders. Never exert excessive downward force on the tempered glass lid (2), the non-stick insert (5) or the base unit handles (7).
•Before transporting the entire unit make sure to unplug the power plug (9) from the wall outlet. Retract the cord.
Preset cooking functions
•Press the preset button (14). ‘P1’ and ‘preset’ will flash.
•Press the arrow buttons (13) or
 (15) to switch between the different preset modes P1 to P8.
•After mode selection, press  (16) to start cooking. An audible tone indicates the beginning of the cooking process and the power icon
  (16) switches to full brightness. The LCD (10) shows the total time of the preset program, the corresponding temperature, the preset icon, and the lock icon. The timer starts to count down. The temperature icon will change automatically according to the preset program.
•The end of the cooking process will be indicated by an audible tone. The cooker switches to ‘warm’ and time counts up for 3 hours.
•A second audible tone indicates the end of the warming process. ‘3:00’ and ‘warm’
will flash. The power icon  (16) switches to 25% brightness with ‘high’ and ‘04:00’ flashing and the unit stops heating.
•To unlock the preset function during cooking, press the preset button (14). The lock icon will no longer be displayed. The time and the temperature and preset icons will flash.
•Press the preset button (14) again within 5 seconds. The cooker will continue the previously selected preset mode.
•Press timer (12) or temp (11) or do not press any button within 5 seconds, the cooker will switch to normal cooking mode. Time and temperature can now be changed as described above  Changing temperature and time during cooking).
10
 Loading...