


GSD 21
Sounder
Module
installation instructions
© Copyright 2006 Garmin Ltd. or its subsidiaries |
|
|
Garmin International, Inc. |
Garmin (Europe) Ltd. |
Garmin Corporation |
1200 East 151st Street, |
Unit 5, The Quadrangle, |
No. 68, Jangshu 2nd Road, |
Olathe, Kansas 66062, U.S.A. |
Abbey Park Industrial Estate, |
Shijr, Taipei County, Taiwan |
Tel. 913/397.8200 or 800/800.1020 |
Romsey, SO51 9DL, U.K. |
Tel. 886/2.2642.9199 |
Fax 913/397.8282 |
Tel. 44/0870.8501241 |
Fax 886/2.2642.9099 |
|
Fax 44/0870.8501251 |
|
All rights reserved. Except as expressly provided herein, no part of this manual may be reproduced, copied, transmitted, disseminated, downloaded, or stored in any storage medium, for any purpose without the express prior written consent of Garmin. Garmin hereby grants permission to download a single copy of this manual onto a hard drive or other electronic storage medium to be viewed and to print one copy of this manual or of any revision hereto, provided that such electronic or printed copy of this manual must contain the complete text of this copyright notice and provided further that any unauthorized commercial distribution of this manual or any revision hereto is strictly prohibited.
Information in this document is subject to change without notice. Garmin reserves the right to change or improve its products and to make changes in the content without obligation to notify any person or organization of such changes or improvements. Visit the Garmin Web site (www.garmin.com) for current updates and supplemental information concerning the use and operation of this and other Garmin products.
Garmin®, DCG®, CANet TM, UltrascrollTM, and DynacolorTM are trademarks and registered trademarks of Garmin Ltd. or its subsidiaries and may not be used without the express permission of Garmin.
Safety Information
WARNING:This product, its packaging, and its components contain chemicals known to the State of California to cause cancer, birth defects, or reproductive harm. This Notice is being provided in accordance with California’s Proposition 65. If you have any questions or would like additional information, please refer to our Web site at http://www.garmin.com/prop65.
Limited Warranty
This Garmin product is warranted to be free from defects in materials or workmanship for one year from the date of purchase. Within this period, Garmin will at its sole option repair or replace any components that fail in normal use. Such repairs or replacement will be made at no charge to the customer for parts or labor, provided that the customer shall be responsible for any transportation cost. This warranty does not cover failures due to installation errors, abuse, misuse, accident, or unauthorized alteration or repairs.
THE WARRANTIESAND REMEDIES CONTAINED HEREINARE EXCLUSIVEAND IN LIEU OFALL OTHER WARRANTIES EXPRESS OR IMPLIED OR STATUTORY, INCLUDINGANY LIABILITYARISING UNDERANYWARRANTY OF MERCHANTABILITY OR FITNESS FORAPARTICULAR PURPOSE, STATUTORY OR OTHERWISE. THIS WARRANTY GIVES YOU SPECIFIC LEGAL RIGHTS, WHICH MAYVARY FROM STATE TO STATE.
IN NO EVENT SHALL GARMIN BE LIABLE FORANY INCIDENTAL, SPECIAL, INDIRECT OR CONSEQUENTIAL DAMAGES, WHETHER RESULTING FROM THE USE, MISUSE, OR INABILITYTO USE THIS PRODUCT OR FROM DEFECTS IN THE PRODUCT. Some states do not allow the exclusion of incidental or consequential damages, so the above limitations may not apply to you.
Garmin retains the exclusive right to repair or replace the product or offer a full refund of the purchase price at its sole discretion. SUCH REMEDYSHALL BE YOUR SOLEAND EXCLUSIVE REMEDY FORANY BREACH OF WARRANTY.
Products sold through online auctions are not eligible for rebates or other special offers from Garmin. Online auction confirmations are not accepted for warranty verification. To obtain warranty service, an original or copy of the sales receipt from the original retailer is required. Garmin will not replace missing components from any package purchased through an online auction.
To obtain warranty service, contact your local Garmin authorized dealer or call Garmin Product Support for shipping instructions and an RMAtracking number. The product should be securely packed with the tracking number clearly written on the outside of the package. The product should then be sent, freight charges prepaid, to any Garmin warranty service station.Acopy of the original sales receipt is required as the proof of purchase for warranty repairs.
February 2006 |
Part Number 190-00630-00 Rev.A |
Printed in Taiwan |
INTRODUCTION
INTRODUCTION
Thank you for choosing the Garmin GSD 21. The GSD 21 is a CANetTM compatible, remote sounder module designed to include powerful features found in other Garmin sounders, including Color Depth Control Gain (DCG®), DynacolorTM, and auto gain features technology. When used with compatible Garmin chartplotters, it provides full-featured depth sounder functions. It can interface to multiple head units, providing complete sounder control from multiple stations, including transmit frequency, range, and gain adjustments. To get successful results from your GSD 21, take time to read through this installation guide. If any items are missing, please contact your Garmin dealer immediately.
Included Equipment:
•GSD 21 Sounder Module
•6 ft (0.30 m) Power/Data Cable
•40 ft (12.19 m) CANet/Serial Extension Cable
•2 CANet Terminators
•7 3-Wire Connectors
•The GSD 21 Sounder Module Installation Instructions
Optional Transducers
The transducer acts as the eyes and ears of your new sonar. The transducer transmits sound waves toward the bottom in a cone shape. The larger the cone angle, the larger the coverage area at a given depth.
Proper transducer selection and installation are critical to the operation of your unit. Since mounting locations vary, see your local dealer or contact Garmin Product Support for further information.Afull list of transducers can be found at www.garmin.com.
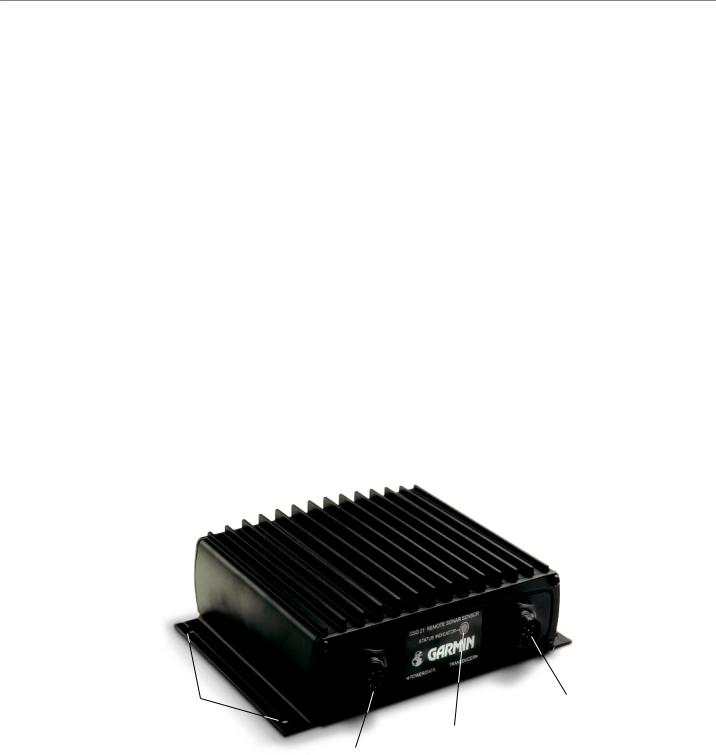
Mounting Holes |
Transducer |
|
Connector |
|
LED Status Indicator |
|
Power/Data |
|
Connector |
GSD 21 Sonar Module |
1 |
INSTALLATION INSTRUCTIONS
INSTALLATION INSTRUCTIONS
The GSD 21 must be properly installed according to the following CANet or Serial installation instructions to get the best possible performance. To complete the installation, you need appropriate fasteners. If you experience difficulty with the installation, contact Garmin
Product Support.
CANet is a high-speed sonar network. If you are connecting a CANet compatible unit, follow the CANet installation instructions. Using the CANet installation optimizes the performance of the CANet-compatible units. CANet compatible unit devices features, such as UltrascrollTM, are affected if a serial installation is used.
The module should be mounted in an out-of-the-way location that is dry and well ventilated.Avoid mounting the module where it can be submerged in liquids or exposed to extreme temperatures. Be sure to mount the module so that the LED is visible.
NOTE: When using the chartplotter and GSD 21 on battery power only (engines off) for extended periods of time, be sure there is enough available amperage to run the units for the time period. Running other onboard devices at the same time can lower the available amperage, causing the chartplotter and/or GSD 21 to shut off. Check with your local marine dealer/installer if problems persist.
To install the GSD 21 sounder module:
1.After the location is chosen, place the unit. Be sure to allow enough clearance for attaching the cables. Using the module as a template, mark the location of the four mounting holes. If needed, additional mounting holes can be drilled in the side mounting flanges of the module.
2.Attach the GSD 21 to the mounting location using appropriate fasteners.
3.Mount the transducer according to the instructions provided with the transducer.
4.Route the cables according to the CANet or Serial instructions to the mounting locations of the display unit. Use the appropriate tie-wraps, fasteners, and sealant to secure the cable along the route and through any bulkhead or deck.
5.After installing the GSD 21 module, connect the power/data and transducer cables to the appropriate receptacle.
6.Refer to the following CANet and serial wiring diagrams for connecting the GSD 21 to compatible Garmin units.
NOTE: You can extend the CANet wiring of the GSD 21 power/data cable up to 80 ft (24.38 m) total length using the CANet Connections Kit.
NOTE: You can extend the serial/power wiring of the GSD 21 power/data cable up to 100 ft (30 m) total length. Use the CANet Extension Cable or 22AWG, 4-conductor shielded cable for data connections and 18AWG for power. Transducer cable extensions are available through your Garmin dealer.
WARNING: Do not connect or disconnect the transducer while the MFD and GSD 21 are connected and turned on . Doing so might damage the GSD 21.
2 |
GSD 21 Sonar Module |

Module Sonar 21 GSD
3
CANet Wiring for the Garmin GSD 21
|
CANet |
See the CANet Terminator |
|
CANet |
|
|
|
Terminator |
|
Terminator |
GARMIN GSD 21 |
|
|
|
Connection Diagram Below |
|
|
|||
|
|
|
|
|
SOUNDER MODULE |
|
|
|
GREEN |
|
GREEN |
|
|
|
|
WHITE |
CANet |
WHITE |
|
|
|
|
Extension Cable |
|
|
||
|
|
|
|
|
|
|
|
ORANGE |
|
ORANGE |
TO |
|
|
|
|
|
|
|
|
|
|
|
BLACK |
|
BLACK |
TRANSDUCER |
|
|
|
DRAIN |
|
BLACK |
|
|
|
|
|
|
|
|
|
|
|
|
|
RED |
|
|
|
|
|
|
FUSE |
|
|
|
|
|
|
2A |
|
|
3 wire connector |
|
|
BATTERY |
|
|
|
3 wire connector |
|
10-35 VOLTS DC |
|
|
|
|
|
|
|
|
|
|
|
Green |
|
Green |
|
CANet |
CANet |
CANet |
|
|
|
|
Unit |
Unit |
Unit |
White |
|
White |
|
|
|
|
Green |
White |
|
|
|
|
|
|
The CANet Extension Cable can be cut to any length |
|
CANet |
1 ft to 80 ft and a CANet compatible device can be |
CANet |
CANet Terminator |
inserted on the cable at any point between the two CANet |
|
Terminators. |
|
|
CANet Terminator Connection |
|
|
|
|
|
Multiple CANet Unit Connection |
|
|
Notes: |
|
|||
|
|
|||
1. |
Power and ground wires require 18 AWG. You can extend the CANet wiring of the GSD 21 power/data cable up to 80 ft (24.38 m) total length using the |
|
||
|
CANet Connections Kit. |
|
|
|
2. |
The CANet Extension Cable can support a maximum of two display units and one sonar unit. |
|
|
|
3. |
The maximum length of cable from the CANet Extension Cable to the sonar or display units is 6 ft. |
|
NSTALLATIONI |
|
5. |
Ground the drain wire at the first display unit. Do not ground the drain wire on the subsequent display units or sonar unit. |
|||
4. |
Refer to the chartplotter’s installation instructions for wiring the GPS 17 sensor and other devices. |
|
NSTRUCTIONSI |
|
6. |
The CANet Extension Cable Black wire is reserved for future use. When inserting a CANet unit on the CANet Extension Cable, reconnect all wires according |
|||
|
to their color. |
|
|
|
7. |
When crimping the 3-wire connector, use a standard pair of pliers and make sure the button is fully depressed into the connector. |
|
||
 Loading...