


eMap
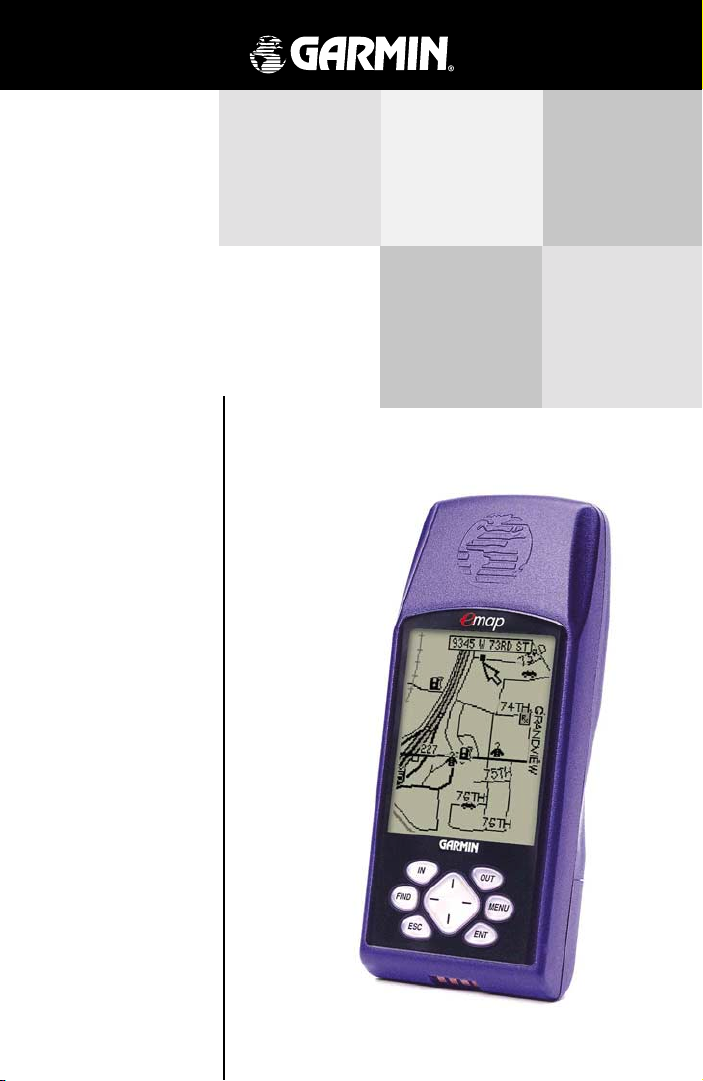
eMap
electronic map
owner’s
manual
and
reference
guide
!

© 1999-2001` GARMIN Corporation
GARMIN International, Inc.
1200 E 151
st
Street, Olathe, Kansas 66062 U.S.A.
Tel. 913/397.8200 or 800/800.1020
Fax. 913/397.8282
GARMIN (Europe) Ltd.
Unit 5, The Quadrangle, Abbey Park Industrial Estate, Romsey, SO51 9AQ U.K.
Tel. 44/1794.519944
Fax. 44/1794.519222
GARMIN (Asia) Corporation
No. 68, Jangshu 2nd Road, Shijr, Taipei County, Taiwan
Tel. 886/2.2642.9199
Fax. 886/2.2642.9099
All rights reserved. Except as expressly provided herein, no part of this manual may be
reproduced, copied, transmitted, disseminated, downloaded or stored in any storage medium, for
any purpose without prior written consent of GARMIN Corporation. GARMIN Corporation
hereby grants permission to download a single copy of this manual onto a hard drive or other
electronic storage medium to be viewed for personal use, provided that such electronic or
printed copy of this manual contains the complete text of this copyright notice and provided
further that any unauthorized commercial distribution of this manual is strictly prohibited.
Information in this manual is subject to change without notice. GARMIN Corporation reserves
the right to change or improve its products and to make changes in the content without
obligation to notify any person or organization of such changes. Visit the GARMIN website for
current updates and supplemental information concerning the use and operation of this and other
GARMIN products.
Web site address: www.garmin.com
®
GARMIN
, AutoLocate®, and TracBack® are registered trademarks, eMapTM and MapSourceTM ar e
trademarks of GARMIN Corporation and may not be used without the express permission of
GARMIN Corporation.
July 2001 Part Number 190-00152-00 Rev. D Printed in Taiwan

SECTION 1
Thank you for choosing the GARMIN eMap. To get
the most from your new eMap, take time to read through
this owner’s manual in order to understand all of the
operating features. This manual is organized into four
sections.
The Introduction section provides FCC and safety
information and the Table of Contents.
The Getting Started section introduces you to basic
features and methods for operating the eMap.
The Reference section provides details about using
the features of the eMap according to topic.
Introduction
About This
Manual
The Appendices contain information on items such
as Accessories, Specifications, a Troubleshooting Guide
and an Index by Subject.
Standard Package Contents:
eMap Unit
Lanyard
Owner’s Manual
Quick Start Guide
i

Introduction
FCC Compliance
Statement
Warnings
and
Precautions
NOTE: This device complies with Part 15 of the FCC limits
for Class B digital devices FOR HOME OR OFFICE USE
(“home” or “office” interference requirements are more stringent
than “outdoor” requirements). Operation of this device is
subject to the following conditions: (1) This device may not
cause harmful interference, and (2) this device must accept any
interference received, including interference that may cause
undesired operation.
The eMap does not contain any user-serviceable parts.
Repairs should only be made by an authorized GARMIN service
center. Unauthorized repairs or modifications could result in
permanent damage to the equipment, and can void your warranty
and your authority to operate this device under Part 15
regulations.
CAUTION: The Global Positioning System (GPS) is
operated by the government of the United States, which is
solely responsible for its accuracy and maintenance. The
system is subject to changes which could affect the
accuracy and performance of all GPS equipment.
Although the eMap is a precision electronic NAVigation
AID (NAVAID), any NAVAID can be misused or misinter-
preted and, therefore, become unsafe.
CAUTION: IT IS THE USER’S RESPONSIBILITY TO
USE THIS PRODUCT PRUDENTLY. THIS PRODUCT IS
INTENDED TO BE USED ONLY AS A TRAVEL AID AND
MUST NOT BE USED FOR ANY PURPOSE REQUIRING
PRECISE MEASUREMENT OF DIRECTION, DISTANCE,
LOCATION, OR TOPOGRAPHY. THIS PRODUCT
SHOULD NOT BE USED AS AN AID TO DETERMINE
GROUND PROXIMITY FOR AIRCRAFT NAVIGATION.
ii
Introduction
MAP DATA INFORMATION: One of the goals of
GARMIN is to provide customers with the most complete
and accurate cartography that is available to us at a
reasonable cost. We use a combination of governmental and
private data sources, which we identify as required in
product literature and copyright messages displayed to the
consumer. Virtually all data sources contain inaccurate or
incomplete data to some degree. This is particularly true
outside the United States, where complete and accurate
digital data is either not available or prohibitively
expensive.
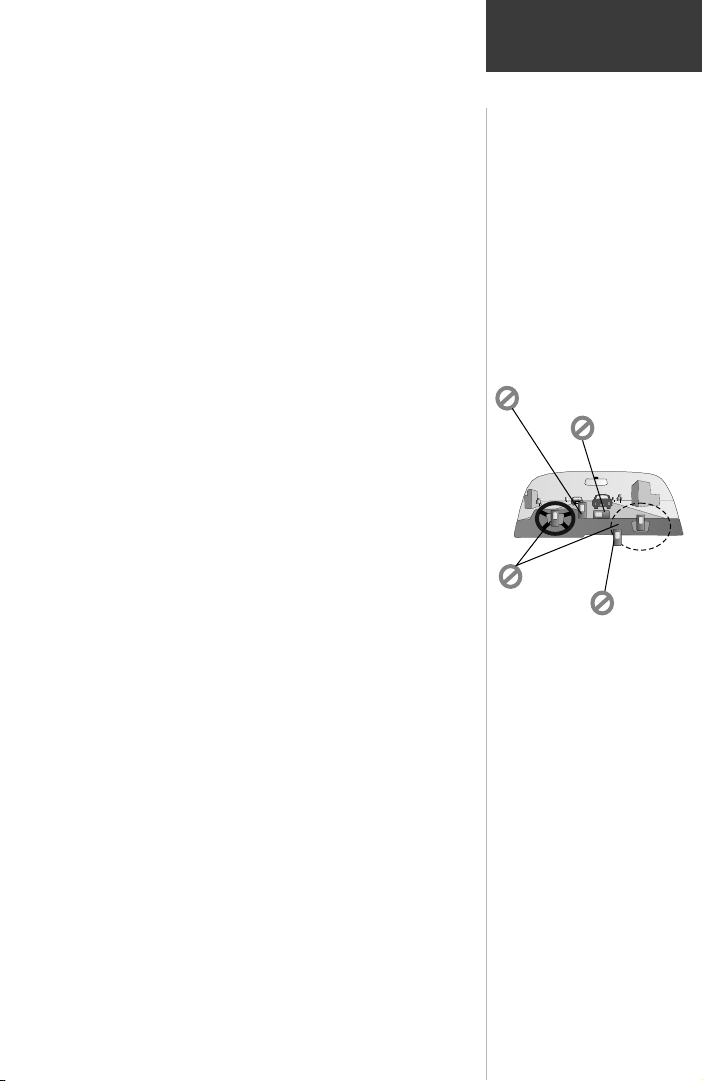
WARNING: For use in vehicles, it is the sole
responsibility of the owner/operator of the eMap to secure
the GPS unit so that it will not interfere with the vehicle’s
operating controls, obstruct the driver’s view of driving
conditions, or cause damage or personal injury in the event
of an accident. Do not mount the eMap over air bag panels
or in the field of air bag deployment. AIr bags expand with
a rapid force that can propel objects in their path toward
the driver or passengers, causing possible injury. Refer to
air bag safety precautions contained in the vehicle owner’s
manual. Do not mount the eMap in a place where the
driver or passengers are likely to impact it in an accident
or collison. The mounting hardware provided by GARMIN
is not warranted against collision damage or the consequences thereof.
Warnings
and
Precautions
#!"#$"%#&"'(%#;<+,+#!,.*+,=4
#5.+37#"6#>.4."(#.4#/3"?@+7
!"#$"%#230?+
A(4+?',+7#"(
%<+#>+<.?3+#!04<
!"#$"%#&"'(%
)*+,# -.,# /01
20(+34
!"#$"%#&"'(%
.(#5,"(%#"6#0(
-.,# /01# 5.+37
"6#!+83"9:+(%
WARNING: When used in vehicles, it is the sole
responsibility of the driver of the vehicle to operate the
vehicle in a safe manner, maintain full surveillance of all
driving conditions at all times, and not become distracted
by the eMap to the exclusion of safe driving practices. It is
unsafe to operate the controls of the eMap while you are
driving. Failure by the driver of a vehicle equipped with an
eMap to pay full attention to operation of the vehicle and
road conditions while the vehicle is in motion could result
in an accident or collision with property damage and
personal injury.
iii

Introduction
Table of
Contents
Section One – Introduction
About This Manual................................i
FCC Compliance Statement...................ii
Warnings and Precautions........................ii-iii
Section Two - Getting Started
eMap Key Function.......................................1
BatteryInstallation...................................2
Start-Up.....................................................2
Determining Your Location..........................3
Using the Map Page...............................3-5
The Map Page Options Menu........................6
The Main Menu............................................7
The Find Menu..........................................8
Contrast Settings.......................................9
Backlighting..............................................9
Setting the Time.........................................9
Beeper Tones.........................................9
Map Data Card Installation.........................10
Transferring Map Data............................10
Section Three - Reference
Option Menus....................................11
On-Screen Buttons.................................11
Entering Data......................................12
Check Boxes...............................................12
The Map Page......................................13-14
Map Page Options.................................15-17
Waypoints...................................................18
Creating a Waypoint..............................18-19
Editing a Waypoint................................20
Location Averaging.....................................20
Saving as a Waypoint.............................20
Using the Find Menu............................21-25
Using Goto.........................................26
The Main Menu...........................................27
The Trip Computer......................................27
Tracks Page.......................................28
Route Page........................................29
The GPS Info Page...................................30
Sun and Moon Page..................................31
MapSource Info....................................31
System Info Page..................................31
System Setup Options............................32-34
Section Four - Appendices
Appendix A: Accessories.......................35
Appendix B: Specifications....................36
Appendix C: Messages..........................37
Appendix D: Maintenance......................38
Appendix E: Wiring/Interfaces................39
Appendix F: UTC Time Offset Chart.........40
Appendix G: MapSource Data.................41
Appendix H: Limited Warranty...............42
Appendix I: Index.............................43-44
.
iv
SECTION 2
Getting Started
-./
/012'&3
2);CD+4$3
Press and release to
turn the eMap On.
Press and hold to
turn the eMap Off.
/-EFGHIJBK
E)$BD-LB
4$3
Press and release to
turn backlighting On
or Off.
Press and hold to
adjust backlight/
contrast.
H$+4$3
Displays increasingly
smaller map areas with
more detail.
Press and release to
zoom in by
increments.
Press and hold to
zoom in rapidly.
5H$!+4$3
Press and release to display a
menu of waypoints, cities,
exits (also points of interest,
streets and intersections when
using MapSource
Press and hold to display the Goto,
Track, or Route currently being
navigated.
TM
map data).
CLE-2C+4$3
Press and release to return to the previous
page, restore a previous value, cancel data
entry or return from the panning arrow to
map scrolling.
Press and hold, at any time, to return to the
Map Page.
!"#$%"&'
()*+,"#$""&
D)EFCD+4$32&5
Press and release to highlight menu options, enter
data, move through lists on pages, and highlight data
fields.
Press and hold to move the panning arrow on the Map
Page or... scroll through lists.
Key Function
)AB+4$3
Displays increasingly
larger map areas with less
detail.
Press and release to
zoom out by
increments.
Press and hold to
zoom out rapidly.
&C$A+4$3
Press and release to
display a menu of
options for the
current page.
Press twice to display
the Main Menu.
C$BCD+4$3
Press and release to
select a highlighted
menu option, initiate an
entry, accept selected
data, or acknowledge
a message.
Press and hold, at
any time, to mark
your current location
eMap
1
Getting Started
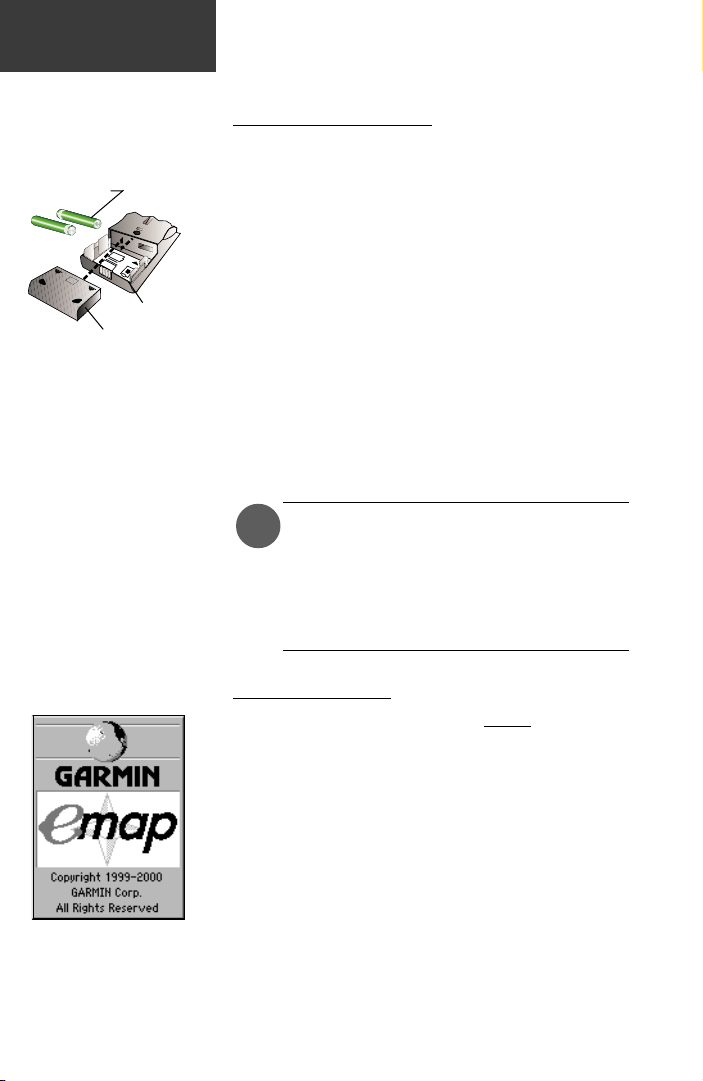
Battery
Installation
>?@+,,++,'8&'0"$
++++++6&##$%0$1
6&78+9:
$;&2
<"0#
.9=$%
Remove battery compartment
cover, observe polarity markings,
install batteries and reinstall
cover.
NOTE: When using fully charged
rechargeable batteries, the
Battery Capacity Indicator may
typically indicate less than full.
This is a characteristic of
rechargeables and does not
necessarily indicate that they
will not last as long as
disposable Alkaline batteries.
Start Up
Installing the Batteries
The eMap operates on two AA batteries, which are
installed by removing the cover on the back of the unit. These
batteries will provide up to 12 hours of continuous use.
Rechargeable NiCad, NiMH, or Lithium batteries may be also
used. Stored data will not be lost when the batteries are
removed. Refer to battery care information on page 38.
To install the batteries:
1. Open the battery compartment on the back of the
unit by pressing the two arrows on the cover. Slide
it back and then lift up to remove.
2. Install the batteries according to the polarity markings
in the battery compartment. Use only new batteries.
Do not mix battery types, (i.e. alkaline, NiCad, Lithium)
3. Press the cover onto the compartment then slide
forward until it clicks back in place.
NOTE: If you have purchased a MapSource
.
CD-ROM and a Data Card for use with the
eMap, refer to page 10 for Data Card
installation and map data transfer instructions. For more information about
MapSource, refer to Appendix G.
Start Up The eMap
To Start Up the eMap, take the unit outside and find an
open area where the built-in antenna has a clear view of the
sky. Hold the receiver at a comfortable height with the front of
the eMap pointing up.
The Title Page followed by
information pages will be
displayed when the eMap is
turned on.
2
Press and release the POWER key to turn the
eMap On.
The Title Page and Information Pages will be displayed,
and then followed by the Map Page.

Getting Started
Each time you turn on the eMap it must determine its
location. The first time you use your eMap, this may take
from five to fifteen minutes. After first use, the eMap should
determine your location in less than one minute.
When your location has been determined, the Compass
in the upper left corner of the Map Page will display
Cardinal letters (North, South, East, West) and your current
location will be shown on the map beneath it.
If there are not enough satellites in view to determine
its location, the eMap will display a ‘Poor Satellite
Reception’ message with four options. A brief explanation
for each option will appear when it is highlighted.
Use the ROCKER keypad to highlight the logical
option and then press the ENTER key to activate it.
If the time displayed in the time field on the Map Page
is not correct, you will need to set the time zone for your
current location. Detailed instructions for setting the time
zone are contained on pages 32 and 40 of this manual.
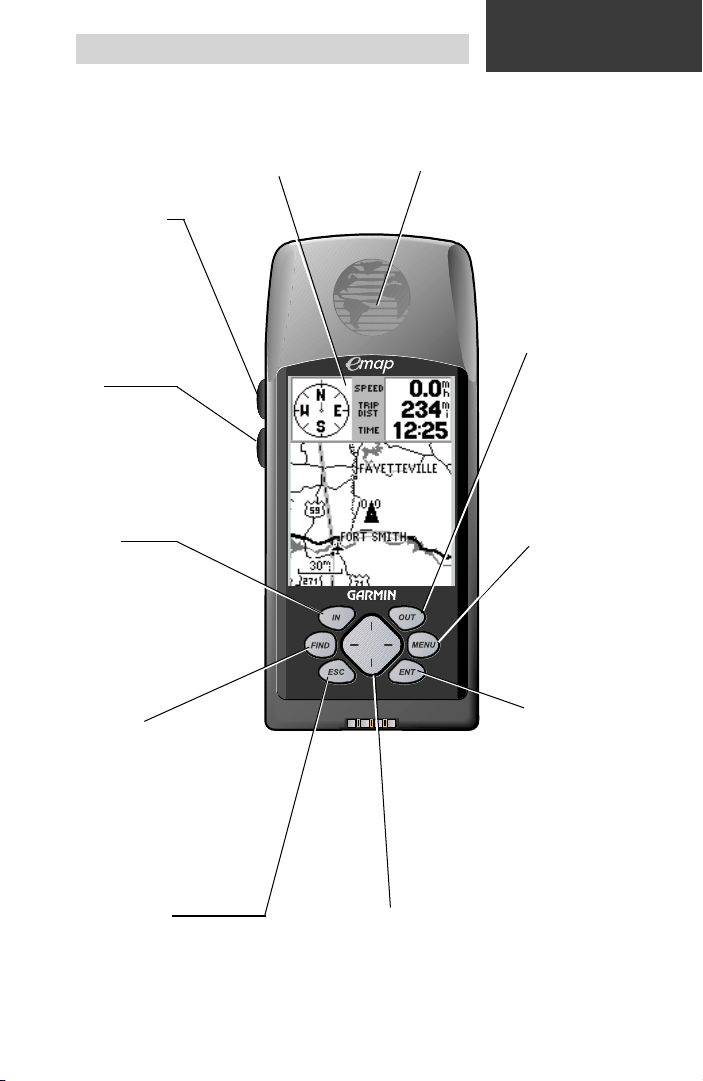
About the Map Page
The Map Page is the main operating page of the eMap.
It graphically shows you map details, your current
location, marks your route to a destination with a route line,
and leaves a trail (track log) of where you’ve been.
It tells you what direction to go or the direction you are
traveling.
It tells you your speed, the distance you have traveled,
or the distance to travel, and the time of day or the time
remaining before reaching a destination.
Determining Your
Location
Using the
Map Page
Direction Field
Position Icon
Map Scale
The Map Page
Speed Field
Trip Distance or
Distance to Go
Field
Time or
Time To Go
Field
Geographical
Features
3
Getting Started
Using the
Map Page
A Goto
A Track
A Route
Travel when not on a Goto,
Track, or Route
Direction Fields
Direction to Go when stopped
on a Goto, Track or Route
Direction to
Go when moving on a Goto,
Track, or Route
Direction you are moving
when not on a Goto,
Track, or Route
4
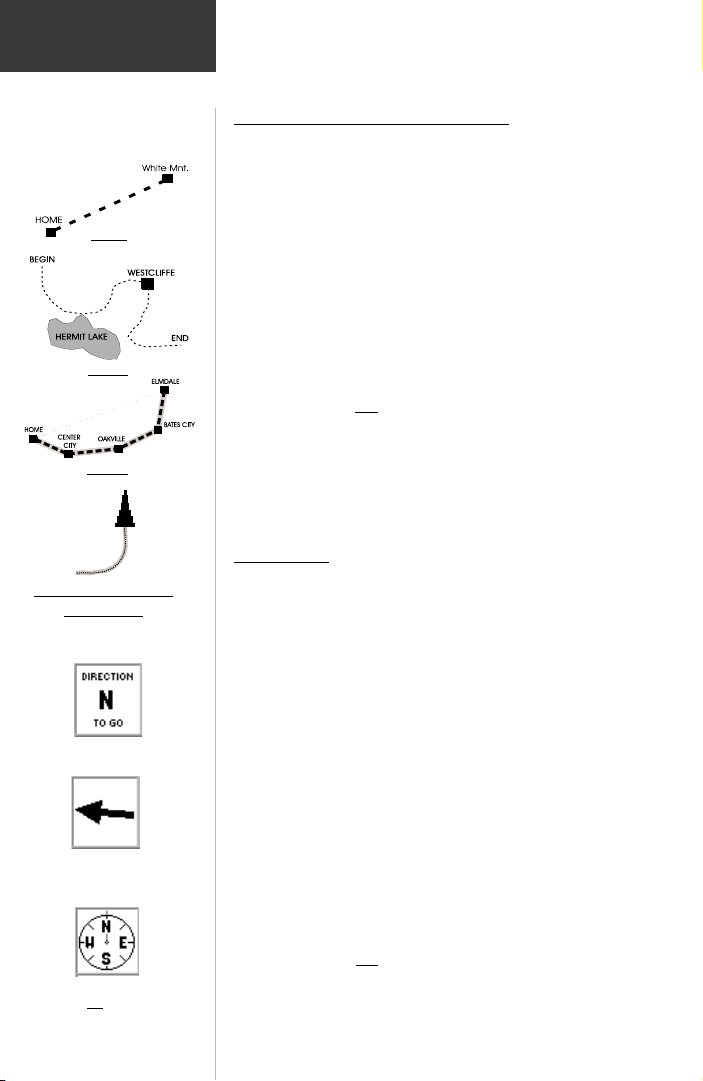
Using the Map Page to Navigate
The Map Page provides graphic display for the four
methods of eMap navigation:
Goto - A direct path to a map location, (waypoint, city,
address, etc.)
Track - A previous path of travel that has been stored
(logged) in the eMap. A Track allows you to repeat a
path or to return to your starting point on the same path
using the GARMIN TracBack
®
feature.
Route - A path to a destination consisting of landmarks
along the way (waypoints, cities, highway exits, points
of interest, intersections, etc.)
Travel when
not on a Goto, Track or Route - This is
best described as travel without entering a destination
in the eMap. The Map Page displays your real time
movement as you travel with the unit turned on and
receiving satellites. It can be saved (logged) as a Track.
Data Fields
Several Data Fields support the Map Page and consist of
the following elements.
Direction Fields
There are three types of direction fields, each providing
direction information dependent on whether you are
stopped while navigating, navigating to a destination, or
traveling without a recorded destination.
Direction To Go (N. S. E. W.) - Cardinal letters
indicate the direction to go when starting out or to
resume after having stopped while on an active Goto,
Track or Route. These letters can be changed to degrees.
Refer to page 33.
Direction To Go (Arrow) - An arrow that points to the
direction you should be traveling when moving on an
active Goto, Track or Route.
Compass - A compass that shows the direction you are
moving when
not on a an active Goto, Track or Route.
Getting Started
Speed, Distance and Time Fields
Speed - Your rate of travel can be displayed in miles
per hour, kilometers per hour, or nautical miles per hour.
Distance - When traveling on a Goto, Track or Route
the distance remaining to go to a destination will be
displayed. When not on a Goto, Track or Route, the
accumulated Trip Distance will be displayed.
Time - When on a Goto, Track or Route, the time to go
before reaching a destination is displayed. When not on
a Goto, Track or Route, the time for the current time
zone is displayed in either 12 or 24 hour format.
The Map Display
The map display shows your present position and
direction of movement as a triangular ‘Position Icon’ in the
center of the map. As you travel, the map display leaves a
“trail” (track log) of where you’ve been. The map display also
shows the map scale and geographic details such as lakes,
rivers, highways, and towns.
Use the IN and OUT keys to change the map scale to
show more map area with less detail, or less map area with
more detail. Press and hold to zoom the map scale rapidly.
In many instances the map will display an ‘Accuracy
Circle’ surrounding the ‘Position Icon’. The eMap uses both
map resolution and GPS accuracy in defining your location to
a point within the circle. The smaller the circle, the more
accurate your location.
More detailed map features as well as information about
those features can be displayed using a data card containing
map data transferred from a GARMIN MapSource CD-ROM.
When using MapSource data, the word “MapSource” will appear
below the map scale whenever you zoom in to view map details.
Using the
Map Page
Speed Data Field
‘Distance’ Data Fields
‘Time To Go’ Data Field
Hours Minutes
Minutes Seconds
When counting down to
minutes and seconds the ‘Time
To Go’ Data Field will move
minutes to the former hour
position and display smaller
digits to indicate seconds.
Position Icon
Zooming Map Scales
Zoom IN
The Panning Arrow (Map Pointer)
The Panning Arrow is controlled by the ROCKER
keypad and is used to identify map objects and move the map
in order to view areas of the map not currently within the
display. The Panning Arrow can be used to establish a ‘Point of
Reference’ when measuring distance between map items. It can
be used to create a waypoint or to move a waypoint to a new
location. Refer to pages 14, 16, 18, and 19 for detailed
information about these applications.
Press the ROCKER keypad at an angle to move diagonally.
Press and hold the ROCKER keypad to move to new areas of
the map. Press the ESCAPE key to cancel the panning arrow.
Accuracy Circle
MapSource Indicator
Zoom OUT
Panning Arrow
5

Getting Started
Map Page Options
Map Page Options Menu
The Map Page Options
Map Page options allow a variety of operating and
customizing features for the eMap.
Pressing the MENU key from the Map Page will
display the Map Page Options Menu.
Not all of the Map Page options are available at the same
time. Many are replaced by another option when they are
selected, while others are methods of canceling an option when
you no longer want to use it.
You can choose an option by highlighting and pressing
the ENTER key:
Use Indoors -
receiving satellites.
Use Outdoors - Returns to receiving satellites for use
outdoors.
Full Screen Map - Expands the map to fill the entire
screen.
Show Data Fields - Displays data fields on the Map Page.
Show Next Street - Displays the names of upcoming
streets.
Hide Next Street - Removes the display of upcoming
streets.
Stop Navigation - Stops any active Goto, Track or
Route navigation. Will be appear gray if no active
navigation is taking place.
Resume Navigation - Returns to active navigation.
Measure Distance - Allows you to measure the
distance from your current location to another point on
the map or to measure between two points on the map.
Stop Measuring - Stops the Measuring Distance option.
Setup Map - Displays the Setup Map Pages, which
allows you to tailor the map display to your requirements, such as changing text size, map orientation, and
map detail.
Allows operation indoors without
More detailed information about using Map Page
Options can be found on pages 15 through 17 of the
Reference Section.
6

Getting Started
The Main Menu
The Main Menu provides access to additional eMap feature
pages. The pages listed below provide either enhancements to
eMap operation or display data about operating information.
Press the MENU key twice to display the Main
Menu.
Trip Computer Page - This page provides information
such as distance traveled, average speed, and elapsed time.
Tracks Page - Provides access to the track log and saved
tracks.
Route Page - Allows you to create and store routes for
repeated use.
GPS Information Page - provides you with information
about speed, location, elevation and the satellites that the
GPS receiver is tracking.
Sun and Moon Page - Provides sun and moon
information according to date, time, and location.
MapSource Information Page - Provides information
about MapSource map data loaded on the data card, if
installed.
System Information Page - Displays the eMap
software version and unit i.d. number.
Setup Options - Allow tailoring of items such as
backlighting timeout, time format, time zone selection,
beeper tones, and interface setups.
The Main Menu
Information about the status of backlighting, stored data
space used, and unit power are displayed in small windows at
the bottom of the Main Menu.
For more detailed information about the Main Menu
options, refer to page 27 of the Reference Section.
7
Getting Started
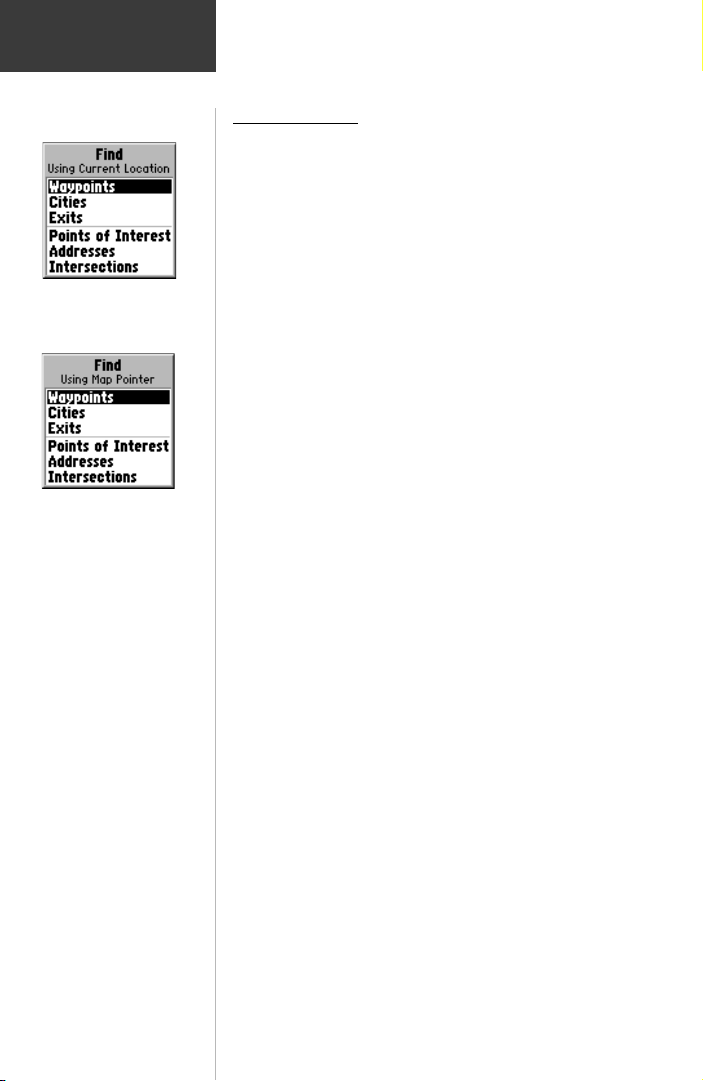
The Find Menu
The Find Menu referencing
items from your current location
The Find Menu referencing
items from the location of
the panning arrow (Map Pointer).
The Find Menu
The Find Menu allows you to find stored locations
(waypoints) and map items (cities, exits, etc.). They can be
found by name or those nearest to your Current Location
(Position Icon) or to the Map Pointer (Panning Arrow).
Press the FIND key to access the Find Menu.
When you select a category from the menu, you will also
be able to choose from two methods of listing. The ‘By Name’
list contains every item in the map database for the selected
category, while the ‘Nearest’ list contains only those items that
are near to your location or the Map Pointer.
The Find Menu allows you to locate or travel to:
Waypoints - Marked and saved locations on the map
used as a destination or points on the way (waypoints)
to a destination. Refer to pages 18 and 19 to mark or
create a waypoint.
Cities - A list of cities on the maps.
Interstate Exits - A list of all Exits on the nearest
Interstate Highway, categorized by ‘All Types’, ‘Services’,
‘Rest Areas’, and ‘Other’ (weigh stations, etc.).
Points of Interest - A list of restaurants, museums,
hospitals, lodging, etc.
Addresses - A page with data entry fields for address
number, street name, city and postal code, used to
define an address.
Intersections - A page with data entry fields for two
streets, a city, and postal code, used to define an
intersection.
These pages are structured with a set of sub-menus and
location information pages that guide you through the
process of finding locations (waypoints, cities, points of
interest, etc.). Use them to construct a Route, establish a
direct line of travel (Goto), or to merely find them on the map
when gathering information.
The Points of Interest, Addresses, and Intersections
options require a data card with MapSource data. If
MapSource data is not used, these three options will
appear gray and will not be accessible.
More detailed information about using these features is
8
contained in the Reference Section of this manual.

Getting Started
Setting the Screen Contrast
You may adjust the contrast setting for best viewing of the
display screen.
To Set the Screen Contrast:
1. Press and hold the BACKLIGHT/CONTRAST key
on the side of the unit until the Backlight/Contrast
page appears.
2. Press the LEFT or RIGHT side of the ROCKER
keypad to adjust the level of contrast, (Left to
lighten and Right to darken). Press the ENTER key
to save.
Using the Backlighting Feature
You may turn on the screen backlighting for easy viewing in
dim and dark lighting conditions. The backlight is set at the
factory to turn Off after 15 seconds to extend battery life. To
select from shut-off time options, refer to the section on Setup
Options.
To turn the backlighting On and Off:
1. Press and release the BACKLIGHT/CONTRAST key
to toggle the backlight ON and OFF.
2. You can also turn the backlight function ON or OFF
by pressing and holding the BACKLIGHT/
CONTRAST key until the ‘Backlight/Contrast’
window appears. Then, press the ROCKER keypad
UP for ON or DOWN for OFF.
If set for automatic time-out, it will shut-off automatically
after the last key press. Pressing any key will reactivate the
backlight. If the timeout is set for ‘Stays On’ it will not turn off.
Extended use of backlight will significantly reduce battery life.
Setting the Correct Time
If the time displayed in the ‘Time’ field of the Map Page is
not the correct time for your Time Zone, you will need to set
the time. Refer to ‘Time Settings’ on page 32.
What Beeper Tones Mean
The eMap Beeper produces three types of signals.
Single Beep - Indicates that a key has been pressed.
Two Beeps - Indicate that a message has been
displayed with information about unit operation.
Multiple Beeps - Indicate an incorrect key press.
Refer to ‘Beeper’ on page 32 for detailed information.
Contrast
Settings
To adjust the screen contrast,
use the LEFT or RIGHT
ROCKER keys to move the
contrast adjustment lever.
Backlighting
Use the UP or DOWN
Rocker keys to move the
Backlighting switch up for ON
or down for OFF.
Setting the Time
Beeper Tones
9

Getting Started
Map Data
Card
Installation
/&#&+.&%5+*'9#
Install the map data card in
the slot inside the battery
compartment. Push in
carefully, until it is completely
inserted.
AB#%&7#9%
C&"5'$
Pull out the extractor handle
to remove the map data card
from the eMap battery
compartment.
Transferring
Map Data
Data
Connection
10
Interface Cable Plug
Indexing Slot
Installing an Optional Map Data Card
GARMIN map data cards allow your unit to display
detailed mapping data. Data can be transferred to a map data
card from a GARMIN MapSource
data for a specific area, MetroGuide
TM
CD-ROM (a collection of
®
U.S.A., World Map, etc.)
using a PC and interface cable. If you have already purchased
MapSource and a data card, you will want to install the data card
before continuing. If you would like to order MapSource, refer to
Appendix A for information.
To install a map data cards:
1. Open the battery compartment cover on the back of
the unit by pressing the arrows, sliding back, and
then lifting up and away.
2. Remove the batteries to expose the card slot inside
the compartment.
3. Insert the card in the slot with the label facing you.
Be certain the connector end is inserted into the slot
and not the end with the extractor handle. Press
the card completely in place until the handle is flush
with the side of the compartment.
4. To remove the card, use a fingernail to pull out the
extractor handle and then slide the card free of the
slot.
5. Reinstall the batteries, noting polarity, and close
the cover.
Map Data Transfer
After you have installed a data card in the eMap, it must be
loaded with map data from a MapSource CD-ROM. In order to
transfer map data you will need to install MapSource on your
PC and connect the eMap PC Interface Cable to your PC and the
eMap unit.
Instructions for using MapSource are provided with the
CD-ROM. Instructions for transferring map data are
contained in the Reference section of the same manual
under the title “Transferring Data”.
To make the Interface Cable connection:
1. Connect the RS232 Serial Port Connector portion of
the Interface Cable to the serial port on your PC.
2. Slide the eMap Connector into the Data Connection
at the base of the eMap. The connector is indexed
to fit only one way. (See the illustration to the left)
 Loading...