


® |
GB |
GARDENA |
|
F
NL
S
|
DK |
|
|
C 1030 plus Art. 1862 |
|
GB Operating Instructions |
RUS |
|
Water Computer |
||
|
FMode d’emploi
Programmateur d’arrosage
NL Instructies voor gebruik
Besproeiingscomputer
SBruksanvisning
Bevattningscomputer
DK Brugsanvisning
Vandingscomputer
RUS Инструкция по эксплуатации
Компьютер для полива
GB
GARDENA Water Computer C 1030 plus
Welcome to the Garden of GARDENA...
Translation of the original instructions from German.
Please read these operating instructions carefully and observe the notes given. Use these instructions to familiarise yourself with the Water Computer and its proper use as well as the notes on safety.
For safety reasons, children and young people under 16 as well as anyone who is not
APersons with reduced physical or mental abilities may use the product only if they are supervised or instructed by a responsible person.familiar with these operating instructions should not use the Water Computer.
|
v Please keep these operating instructions in a safe place. |
|
|
Contents |
1. |
Where to Use Your GARDENA Water Computer . . . . . . . . . . . . . |
. 2 |
|
2. |
Safety Instructions . . . . . . . . . . . . . . . . . . . . . . . . . . . . . . . . . . . . . . . . . . . . |
. 2 |
|
3. |
Function . . . . . . . . . . . . . . . . . . . . . . . . . . . . . . . . . . . . . . . . . . . . . . . . . . . . . . . |
. 3 |
|
4. |
Putting Your Water Computer into Operation . . . . . . . . . . . . . . . . . |
. 5 |
|
5. |
Programming . . . . . . . . . . . . . . . . . . . . . . . . . . . . . . . . . . . . . . . . . . . . . . . . . |
. 6 |
|
6. |
Putting Your Water Computer out of Operation . . . . . . . . . . . . . . |
10 |
|
7. |
Maintenance . . . . . . . . . . . . . . . . . . . . . . . . . . . . . . . . . . . . . . . . . . . . . . . . . . |
10 |
|
8. |
Troubleshooting . . . . . . . . . . . . . . . . . . . . . . . . . . . . . . . . . . . . . . . . . . . . . . . |
11 |
|
9. |
Available Accessories . . . . . . . . . . . . . . . . . . . . . . . . . . . . . . . . . . . . . . . . |
11 |
|
10. |
Technical Data . . . . . . . . . . . . . . . . . . . . . . . . . . . . . . . . . . . . . . . . . . . . . . . . |
12 |
|
11. |
Service / Warranty . . . . . . . . . . . . . . . . . . . . . . . . . . . . . . . . . . . . . . . . . . . . |
12 |
1. Where to Use Your GARDENA Water Computer
Intended use: |
The GARDENA Water Computer is intended for private use in |
|
domestic and hobby gardens, exclusively for outdoor use, to |
|
control sprinklers and watering systems. |
|
The Water Computer can be used for automatic watering during |
|
holidays. |
|
|
Please note: |
The GARDENA Water Computer must not be used for |
|
industrial purposes or in conjunction with chemicals, |
|
foodstuffs, easily flammable and explosive materials. |
|
|
2. Safety Instructions
Battery:
To ensure the Water Computer runs safely, only a 9V alkaline manganese battery (alkaline) type IEC 6LR61 must be used.
In order to stop the Water Computer from failing because of a weak battery if you are away for a long time, the battery must be replaced when the battery display still shows only 1 bar.
Setting up
Warning!
The Water Computer must not be used indoors.
v Only use the Water Computer outdoors.
2

The Water Computer may only be set up vertically with the sleeve nut to the top to prevent water penetrating into the battery compartment.
The minimum water output to ensure that the Water Computer functions correctly is
20 - 30 l/h.
For example, at least 10 x 2-litre Drip Heads are required to control the Micro-Drip-System.
At high temperatures (over 60 °C at the display) the LCD display may extinguish. This does not affect the program in any way.
When the computer cools down the LCD display illuminates again.
The max. temperature for the water flow is 40 °C.
v Only use clear fresh water.
The minimum operating pressure is 0.5 bar, the maximum operating pressure is 12 bar.
Avoid tensile strain.
vDo not pull the hose connected to the
Water Computer.
Programming
vProgram the Water Computer with the tap turned off.
In this way you can avoid getting wet when trying out the manual On / Off function (man.
On/Off). You can remove the control unit from the housing to program the Water Computer.
If the controller is removed when the valve is open, the valve remains open until the controller is fitted again.
3. Function
Controls:
1 |
4 |
2 |
3 |
Display levels:
With the Water Computer, the garden can be watered fully automatically up to 3 times a day at any time of day (every 8 hours).
Sprinklers, a sprinkler system or a drip head watering system can be used for watering.
The Water Computer carries out watering fully automatically according to the set program and can therefore also be used during holidays. Early in the morning or late in the evening, evaporation and therefore water consumption is lowest.
The watering programme is easily entered using the controls.
Control |
Function |
|
1 |
Rotary button |
Changes the adjustable values. |
2 |
OK button |
Applies the values set with the rotary |
|
|
button. |
3 |
Menu button |
Changes to the next programme level. |
4 |
Man. button |
For switching the water throughput on or |
|
|
off manually. |
The 6 display levels, |
|
|
• |
Level 1: |
Normal display |
•Level 2: Current time and day of the week
• |
Level 3: |
Watering start time |
• |
Level 4: |
Watering duration |
•Level 5: Watering frequency
•Level 6: Switches programme on and off
can be selected one after the other by pressing the Menu key.
GB
3
GB
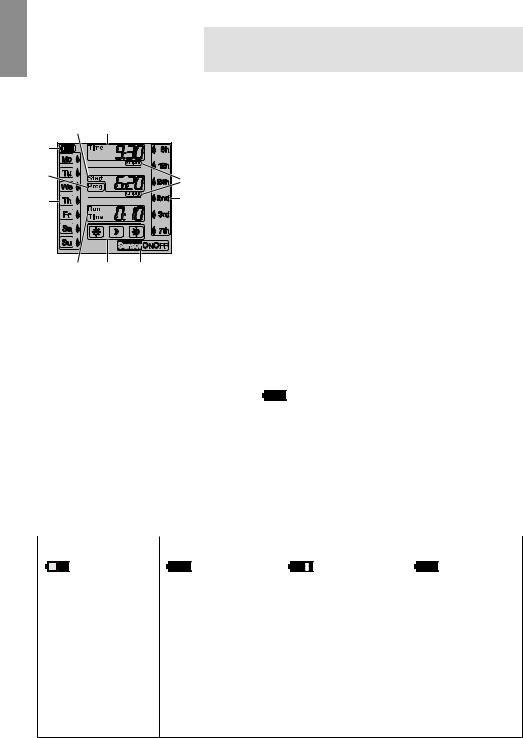
Display |
|
|
8 |
6 |
|
D |
|
|
A |
|
7 |
|
|
|
5 |
|
0 |
9 |
B |
C |
You can change the display level at any time, even during programming. All the programme data which have been confirmed up to that point with the OK key are stored.
|
Display |
Description |
|
||||||||
|
|
|
|
|
|
|
|
|
|
|
|
5 |
Weekdays |
Current weekday or programmed |
|||||||||
|
(Mo), (Tu), ... |
watering days. |
|
||||||||
|
|
|
|
|
|
|
|
|
|
|
|
6 |
Time |
Flashes when in input mode for the current |
|||||||||
|
|
|
|
|
|
|
|
|
|
data (hours, minutes, day of the week). |
|
|
|
|
|
|
|
|
|
|
|
||
7 am / pm |
Display for 12 hour clock (e. g. in USA, |
||||||||||
|
|
|
|
|
|
|
|
|
|
Canada). |
|
|
|
|
|
|
|
|
|
|
|
|
|
8 |
Start |
Flashes when in input mode for watering |
|||||||||
|
|
|
|
|
|
|
|
|
|
start time. |
|
|
|
|
|
|
|
|
|
|
|
|
|
9 |
Run Time |
Watering duration (flashes when in input |
|||||||||
|
|
|
|
|
|
|
|
|
|
mode). |
|
|
|
|
|
|
|
|
|
|
|
|
|
0 |
8h, 12h, 24h, |
Watering cycle (with drop symbol |
|||||||||
|
2nd, 3rd, 7th |
activated). Every 8 / 12 / 24 hours; |
|||||||||
|
|
|
|
|
|
|
|
|
|
every 2nd / 3rd / 7th day. |
|
|
|
|
|
|
|
|
|
|
|
||
A Prog ON /OFF |
Watering programme on (ON ) / off (OFF ). |
||||||||||
|
|
|
|
|
|
|
|
|
|
||
B Automatic |
Watering is controlled automatically via |
||||||||||
|
mode sensor |
the sensor. |
|
||||||||
|
|
|
|
|
|
|
|
|
|
||
C Sensor ON / OFF |
Sensor ON (watering) / |
||||||||||
|
|
|
|
|
|
|
|
|
|
Sensor OFF (watering is not carried out). |
|
|
|
|
|
|
|
|
|
|
|
||
D Battery |
|
|
|
|
|
|
|
|
Indicates 5 battery levels: |
||
|
|
|
|
||||||||
|
|
|
|
||||||||
|
|
|
|
|
|
|
|
|
|
3 bars: |
Battery fully charged |
|
|
|
|
|
|
|
|
|
|
2 bars: |
Battery half full |
|
|
|
|
|
|
|
|
|
|
1 bar : |
Battery low |
|
|
|
|
|
|
|
|
|
|
1 bar flashing: |
Battery almost flat |
|
|
|
|
|
|
|
|
|
|
0 bar : |
Battery flat |
If no bars are displayed, the valve is no longer opened. A valve opened by the programme will also close again if the battery is flat. The battery display is reset when the battery is changed.
2 Bars |
1 Bar |
1 Bar flashing |
0 Bar |
|||||||||||
|
|
|
|
|
|
|
|
|
|
|
|
|
|
|
|
|
|
|
|
|
|
|
|
|
|
|
|
|
|
|
|
|
|
|
|
|
|
|
|
|
|
|
|
|
|
|
|
|
|
|
|
|
|
|
|
|
|
|
|
Battery half full |
Battery low |
Battery almost flat |
Battery flat |
|||||||||||
|
|
|
|
|
|
|
|
|
|
|
|
|
|
|
Valve opens. |
Valve opens. |
Valve still opens. |
Valve does not open. |
|||||||||||
|
|
|
|
|
|
|
|
|
|
|
|
|
|
|
The Water Computer |
The Water Computer |
The Water Computer |
The Water Computer |
|||||||||||
is guaranteed to |
will continue to work |
stops working soon. |
stops working. |
|||||||||||
work for a minimum |
for no more than |
|
|
|
|
|
|
|
||||||
of 4 more weeks. |
4 weeks. |
|
|
|
|
|
|
|
||||||
|
|
|
|
|
|
|
|
|
|
|
|
|
|
|
|
|
|
|
It is advisable to |
The battery must be |
The battery must be |
||||||||
|
|
|
|
change the battery. |
changed soon. |
changed. |
||||||||
|
|
|
|
|
|
|
|
|
|
|
|
|
|
|
v Replace battery (see 4. Putting Your Water Computer into Operation “Inserting battery” ).
4

4. Putting Your Water Computer into Operation
Insert battery:
E |
Connect Water Computer:
H |
G |
I |
The Water Computer must only be operated with a 9 V alkalimanganese (alkaline) battery type IEC 6LR61.
1. Remove controller E from the housing of the Water Computer.
2. Insert battery in the battery |
|
|
compartment F. Observe |
zP |
|
P |
F |
|
correct polarity z. The display |
|
|
shows all the LCD-symbols for |
|
|
2 seconds and then moves to |
|
|
the time / day of week level. |
|
|
3. Install controller E on the housing again.
The Water Computer is fitted with a sleeve nut G for taps with (G 1" ) (33.3 mm) thread. The adaptor supplied H allows the
Water Computer to be connected to taps with a (G ³⁄ " ) thread
(26.5 mm).
1.For tap with a G ³⁄ " (26.5 mm) thread:
Screw adaptor H on to the tap manually (do not use pliers).
2.Screw sleeve nut G of the Water Computer on to the adaptor thread by hand (do not use pliers).
3.Screw tap connector I on to the Water Computer.
GB
Connect soil moisture or rain sensor (optional):
E |
J |
Apart from scheduled watering there is also the option of including how damp the soil is or rainfall into the watering programme.
If the soil is damp enough, the programme will be stopped, or a programme will be prevented from starting. Manual operation via
Man. On / Off is unaffected by this.
The “Soil moisture sensor-controlled watering” mode can only be selected when using a soil moisture sensor.
1.Remove controller E from the housing of the Water Computer.
2.Place soil moisture sensor in the watered area
– or –
place rain sensor (with extension cable if necessary) outside the watered area.
3.Insert the sensor in the sensor connection J of the Water Computer.
An adapter cable may be required to connect older sensors, which can be purchased from GARDENA Service,
GARDENA Adapter cable Art. No. 1189-00.600.45.
5
 Loading...