


CONTENTS
GETTING STARTED |
2 |
STARTING UP |
3 |
GAME CONTROLS |
4 |
MAIN MENU |
5 |
THE STORY SO FAR ... |
6 |
STARTING A NEW GAME |
7 |
PLAYING THE GAME |
8 |
HUD (HEADS UP DISPLAY) READOUT |
9 |
MOVEMENT |
11 |
INVENTORY |
13 |
AUGS AND SKILLS |
15 |
GOALS/NOTES/IMAGES |
18 |
TEXT AND READOUTS |
19 |
STEALTH |
19 |
BREAKING AND ENTERING |
20 |
USING EQUIPMENT |
21 |
COMMUNICATING |
22 |
COMBAT |
23 |
THE WORLD |
26 |
CREDITS |
28 |
Is the GAME playing YOU?
Call the EIDOS Interactive Hint Line
U.S.: 1-900-773-4367
Canada: 1-900-643-4367
Cost of call: $0.99-$1.49/minute
Must be 18 years of age or have parent’s permission Touch-tone phone required
1
GETTING STARTED |
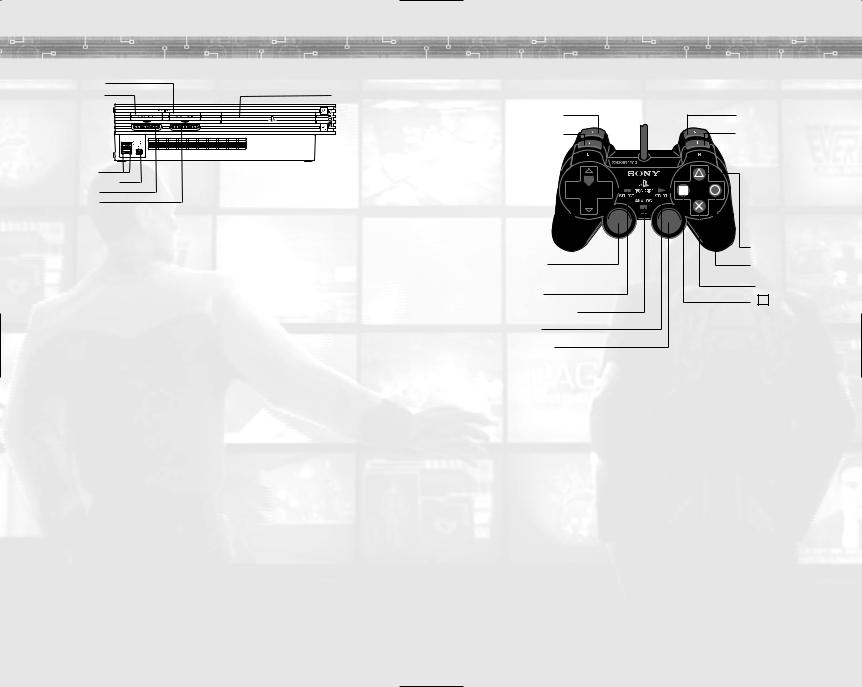
STARTING UP |
MEMORY CARD slot 2
MEMORY CARD slot 1
USB connector
S400 i.LINK connector controller port 1 controller port 2
disc tray
 RESET button
 (OPEN) button
Set up your PlayStation®2 computer entertainment system according to the instructions in its Instruction Manual. Make sure the MAIN POWER switch (located on the back
of the console) is turned on. Press the RESET button.
When the power indicator lights up, press the open button and the disc tray will open. Place the DEUS EX: THE CONSPIRACY™ disc on the disc tray with the label side facing up. Press the open button again and the disc tray will close.
Attach game controllers and other peripherals, as appropriate. Follow on-screen instructions and refer to this manual for information on using the software.
DUALSHOCK®2 ANALOG CONTROLLER CONFIGURATIONS
L2 button |
R2 button |
L1 button |
R1 button |
directional 

 buttons
 button left analog stick
  button
(L3 button when pushed down)
button
SELECT button
button
ANALOG mode button
START button
right analog stick
(R3 button when pushed down)
CONTROLLER
•The controller should be connected to controller port 1. Do not insert or remove the controller or accessories once the power is turned on.
•The DUALSHOCK®2 analog controller’s ANALOG mode button and mode indicator are always ON, indicating that the controller is in analog mode.
•When the controller’s vibration function is set to ON (default), the controller will vibrate in response to game events.
MEMORY CARD
If you wish to save your progress in DEUS EX: THE CONSPIRACY™, make sure that you have a memory card (8MB) (for PlayStation®2) inserted in MEMORY CARD slot 1
with 600KB of free space, before you start your game.
2 |
3 |

GAME CONTROLS
GAMEPLAY CONTROLS
Íbutton
-lean toggle
-plant & aim
Åbutton - jump
directional buttons - */@ next/
previous weapon
-$ drop/throw object in hand
-^ holster item
left analog stick
-forward/back (*/@)
-strafe ($/^)
 button
- crouch toggle
SELECT button
- mission/notes
START button
- pause/Main Menu
MENU CONTROLS
directional buttons */@ – highlight menu item
˛button |
– select menu item |
¸button |
– exit/return to previous screen |
Ïbutton
- scope toggle
Îbutton
-use/fire object in hand
Çbutton
-quick augs
¸button
-augs/skills
˛button
-interact/use object in world
◊button
-inventory
right analog stick - look/aim
 button
- reload weapon
Note: This guide assumes that you are using the default controls. If you select an alternate control scheme, the controls and commands listed in this guide may vary.
MAIN MENU
When DX: THE CONSPIRACY loads you see the Main Menu with several menu choices. You can return to the Main Menu at any time during play by pressing the START button. Use the directional buttons * and @ to navigate the menu choices. The following choices are available from the Main Menu:
NEW GAME — Begin a completely new game, starting with choosing a difficulty level, creating a character name and selecting your character’s initial skills.
SAVE GAME — Save a game in progress to your memory card (8MB)
(for PlayStation®2). The Save Game choice is only active if you visit the Main Menu from gameplay.
LOAD GAME — Resume a previously saved game from a memory card. This option becomes active when you have at least one DX: THE CONSPIRACY game saved on the memory card.
TRAINING — Begin the tutorial training mission. It is not necessary to complete the training mission before playing DX: THE CONSPIRACY, but training is strongly recommended for first-time players.
OPTIONS — Customize your control, sound and other game settings. See the following section for more details.
OPTIONS
On the Options Menu, press the directional buttons * or @ to make your selection, and $ or ^
to adjust a setting. Press the ˛button to display a submenu.
CONTROLLER SELECT — View the Controller Layout Menu, and press the Åand Î buttons to switch between four controller configurations. Press the ˛button to select the configuration that suits you.
GAME OPTIONS — You have the ability to further modify your game options, covered in detail on page 6.
BRIGHTNESS — Adjust the game screen brightness.
MUSIC VOL — Adjust background music volume.
EFFECTS VOL — Adjust sound effects volume.
SPEECH VOL — Adjust the volume of speech sound.
CREDITS — Display the game’s credits.
VIEW CINEMATICS — View the Intro Movie and up to three different End-Game Movies, depending on which path you choose ... if you succeed.
4 |
5 |
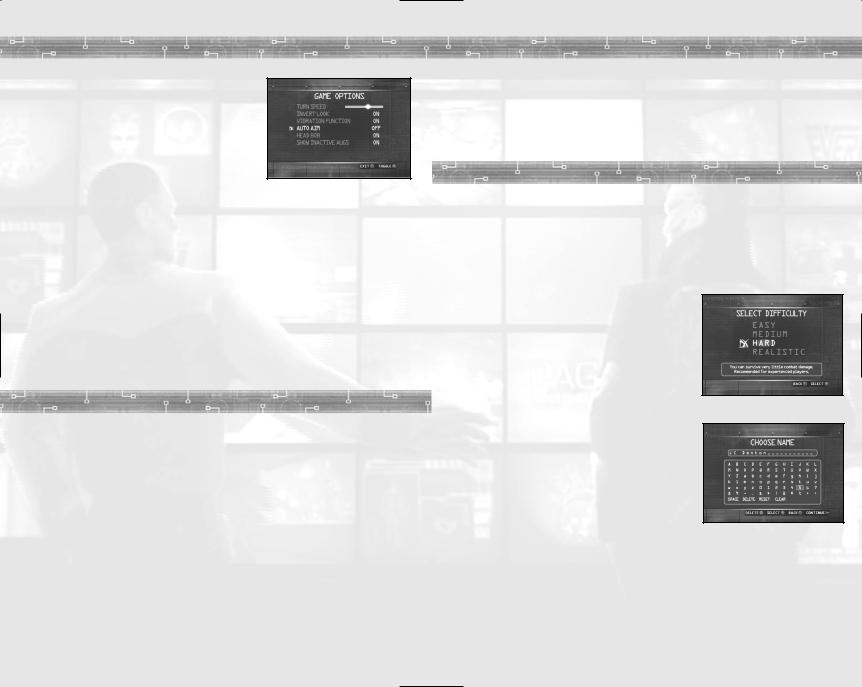
GAME OPTIONS
TURN SPEED — Press the directional buttons $ or ^ to adjust how quickly you turn and look in the world. This option affects both the left and right analog sticks (you can’t adjust them independently).
INVERT LOOK — Press the ˛button to toggle this option ON/OFF (default ON). This will switch the direction you look when you move the right analog stick * or @.
VIBRATION FUNCTION — Press the ˛button to toggle the controller vibration ON/OFF (default ON). When this option is ON, the DUALSHOCK®2 analog controller will vibrate in response to game events.
AUTO-AIM — Press the ˛button to toggle this option ON/OFF (default ON). When this option is ON, it automatically targets an enemy when the crosshairs are close enough. When OFF, you must manually target the enemy. Playing the game
at Realistic level with Auto-Aim OFF is the ultimate challenge!
HEAD BOB — Press the ˛button to toggle whether the screen “bobs” when you run (default ON).
SHOW INACTIVE AUGS — Press the ˛button to toggle whether the entire list of Augs is displayed, or just the Augs you are currently using (default ON).
THE STORY SO FAR ...
DX: THE CONSPIRACY takes place in the near future, in a world on the brink of collapse. Divisions and hostility have been aggravated by the growing gap between the rich
and the poor. A privileged few live high above the dangerous city streets, in protected penthouses, while the majority of the population struggles below to survive. Besides
the daily threats of violence, the average person also has to deal with an increase in fatal epidemics, the cures for which are available only to the wealthy or the heavily armed.
The United Nations Anti-Terrorist Coalition (UNATCO) struggles to maintain order
in the face of international attacks, borne out of this fragmentation and disillusionment. At this time the organization is dealing with the Gray Death, a worldwide plague. Although there is a cure, called Ambrosia, the development and distribution of it have been slow. The National Secessionist Force (NSF), a reputed terrorist organization, claims the cure is being blocked by secret government organizations, so they have taken terrorist countermeasures.
In the game, you play J.C. Denton, a rookie agent for UNATCO. You follow in the footsteps of your older brother Paul, who is also an agent for the coalition. You’ve both been selected as prototypes for the nano-technological augmentation program.
When the game begins, Paul has been an active agent for a few years, and you are on your first mission. Assigned to retrieve a hijacked shipment of Ambrosia on Liberty Island in New York, you will finally have the chance to put your Augs and your training to the test in the field.
STARTING A NEW GAME
In DX: THE CONSPIRACY, you are agent “J.C. Denton,” a nano-augmented covert operative for UNATCO, the United Nations Anti-Terrorist Coalition. To begin a new game, select the NEW GAME option from the Main Menu and press the ˛button. If you haven’t already done so, it is highly recommended that you complete the Training Mission before starting a new game. The Training Mission will ensure that you are adequately prepared to play DX: THE CONSPIRACY.
COMBAT DIFFICULTY LEVEL
When you start a new game of DX: THE CONSPIRACY, your first choice is selecting a difficulty level. There are four difficulty level settings: EASY, MEDIUM, HARD and REALISTIC. At higher difficulty levels your character has less health and is more susceptible
to combat damage. Once you select a difficulty level, you cannot change it without starting a new game.
CHARACTER CREATION
After you’ve selected your starting difficulty level, you are automatically taken to the Choose Name screen. Before beginning play, you must give your game character a name. Use the directional buttons to scroll through the letters and create a name. This will become your “real” name in the game, but you will usually be addressed by your code name,
“J.C. Denton.” Your code name cannot be changed.
After you have named your game character, you will
be taken to the Select Skills screen. You can enhance the abilities of your character
in 11 different “Skills” by assigning Skill Points. You do not have to upgrade your Skills before starting a new game. Skill upgrades can be made at any time during gameplay provided you have enough Skill Points.
A recommendation for UNATCO agents — spend a little time in the field to discover which Skills might be most useful to you before you upgrade. The situations you encounter and your individual play style will help determine which Skills you need to upgrade and which ones you don’t.
6 |
7 |
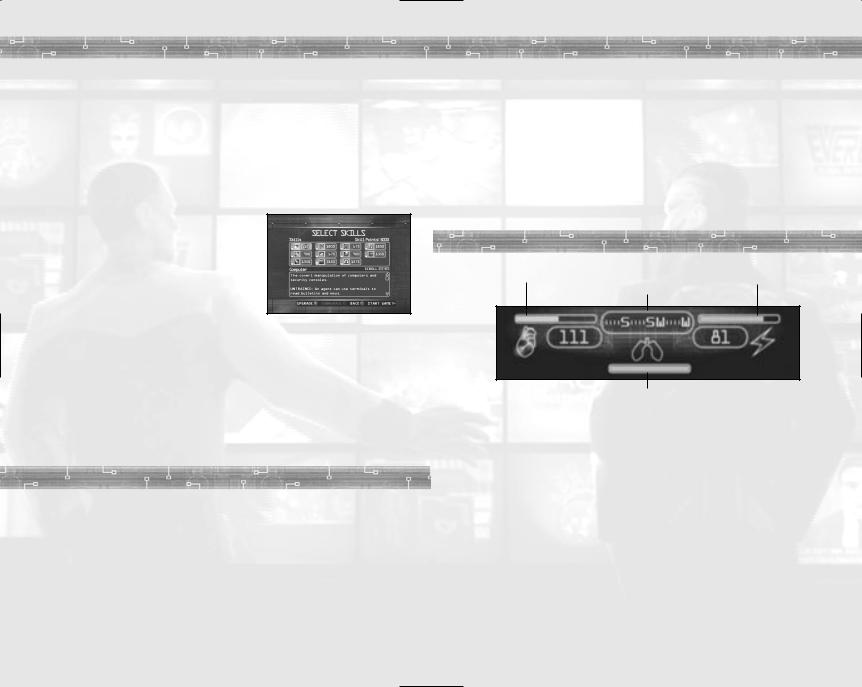
There are 11 Skills listed on the Character Creation screen: Computer, Medicine, Weapons-Low Tech, Multitool, Swimming, Weapons-Pistol, Environmental Training, Weapons-Demolition, Weapons-Rifle, Lock-Picking, and Weapons-Heavy. Use
the directional buttons to scroll between the different Skills in the list. Each Skill is described in detail in the description window below the Skill selection. Scroll through the description text for each Skill by using the Íand Ïbuttons.
Each Skill has four levels of mastery: Untrained, Trained, Advanced and Master. You begin the game with each Skill at the Untrained level (except for Weapons-Pistol, which begins at Trained level), and you are given 5,000 points with which to increase your Skills.
The cost for the next level in each Skill is listed next to the icon.
There are four menu options available in the Select Skills screen:
˛button – UPGRADE — Highlight a Skill
and press the ˛button to increase that Skill by one level. You can only increase a Skill if you have sufficient Skill Points available.
◊button – DOWNGRADE — Highlight a Skill and press the ◊button to reduce that Skill
by one level (minimum level, Untrained), which
will return the associated points to your point pool. You can downgrade your initial pistol Skill to increase your point total for other Skills, but this is not recommended for first-time players.
¸button – CANCEL — Return to the Choose Name screen without starting a new game.
START button – START GAME — Save your Skill choices and start the game. From this point, you can only make further modifications to your Skills through normal advancement in the game.
PLAYING THE GAME
This guide is written with the assumption that you are using the default control scheme. If you have selected an alternate control scheme, the controls and commands listed below may vary.
LOOKING AROUND
The first thing you’ll want to do when you start a mission or begin training is take a good look around. Your point of view is controlled by the DUALSHOCK®2 analog controller.
•Use the right analog stick to rotate your view $ and ^ or look * and @.
•Push the left analog stick * to move forward and @ to move backward.
•To strafe (side-step), push the left analog stick $ or ^.
TARGETING AND FOCUS
Your targeting/aiming cursor always appears at the center of the screen. To interact with an object in the world, you must “focus” on the object by approaching it
and centering your cursor on the object. The name of the object will appear and brackets will surround it.
While you are focused on an object, press the ˛button to attempt to interact
with that object in the most appropriate way (pick up an item, open a door, read a book, talk to another character, etc.).
HUD (HEADS UP DISPLAY) READOUTS
Health Meter |
Bio-Energy Meter |
|
Compass |
Air Supply Meter
Your internal nano-processors constantly make diagnostic checks on your physical status. This information is transmitted directly to your optic nerve in the form
of a passive status readout. This information is displayed on your HUD, which is centered at the top of your screen.
HEALTH METER — On the left side of your HUD is your Health Meter. This bar and the number below it track your current health status. The number below
the bar represents your health points. If the bar is full, your health is fully charged. When your health points reach zero your character is dead.
BIO-ENERGY METER — On the right side of the HUD is your Bio-Energy Meter. This bar and the number below it track the amount of bio-energy currently
available to power your augmentations. When it is fully depleted you will be unable to use your augmentations until you find a repair bot or biocell to replenish
your bio-energy.
COMPASS — In the center of the HUD is the Compass. The nano-systems in your body can detect variations in the earth's electromagnetic field. By using the Geomagnetic North Pole as a reference, you are effectively equipped with a Compass
to aid navigation.
8 |
9 |
 Loading...