


INSTRUCTIONS
::::...::....:::.....:::::.......::::::...........

.:.::.::: CONTENTS |
:3: |
SYSTEM REQUIREMENTS . . . . . . . . . . . . . . . . . . . . . . . . . . . . . . . . . . . . . . :5:
SECTION 1
INSTALLATION . . . . . . . . . . . . . . . . . . . . . . . . . . . . . . . . . . . . . . . . . . . . . . :7:
SECTION 2
STARTING THE GAME . . . . . . . . . . . . . . . . . . . . . . . . . . . . . . . . . . . . . . . . . :9:
SECTION 3
OPTIONS MENU . . . . . . . . . . . . . . . . . . . . . . . . . . . . . . . . . . . . . . . . . . . . :12:
SOUND SETTINGS . . . . . . . . . . . . . . . . . . . . . . . . . . . . . . . . . . . . . . . . . . :12:
ADVANCED SETTINGS . . . . . . . . . . . . . . . . . . . . . . . . . . . . . . . . . . . . . . . :13:
INPUT DEVICES . . . . . . . . . . . . . . . . . . . . . . . . . . . . . . . . . . . . . . . . . . . . :13:
GRAPHICS CARD / 3D CARD . . . . . . . . . . . . . . . . . . . . . . . . . . . . . . . . . . . :15:
SELECT LOGO . . . . . . . . . . . . . . . . . . . . . . . . . . . . . . . . . . . . . . . . . . . . . :16:
LOAD SCORE . . . . . . . . . . . . . . . . . . . . . . . . . . . . . . . . . . . . . . . . . . . . . . :16:
SELECT SCREENSHOT INDEX . . . . . . . . . . . . . . . . . . . . . . . . . . . . . . . . . . :17:
EXIT GAME DURING INTRO . . . . . . . . . . . . . . . . . . . . . . . . . . . . . . . . . . . :17:
CLOSE PROGRAM . . . . . . . . . . . . . . . . . . . . . . . . . . . . . . . . . . . . . . . . . . :17:
BACK TO GAME . . . . . . . . . . . . . . . . . . . . . . . . . . . . . . . . . . . . . . . . . . . . :17:
KEYBOARD CONFIGURATION . . . . . . . . . . . . . . . . . . . . . . . . . . . . . . . . . . :17:
SECTION 4
RETURN TO THE SECTORS REPRESENTING THE WORLD . . . . . . . . . . . . . . . :20:
YOUR SHIP . . . . . . . . . . . . . . . . . . . . . . . . . . . . . . . . . . . . . . . . . . . . . . . . :20:
PRE-INSTALLED ENHANCEMENTS . . . . . . . . . . . . . . . . . . . . . . . . . . . . . . . :21:
SECTION 5
DETAILED OPERATION OF YOUR SHIP . . . . . . . . . . . . . . . . . . . . . . . . . . . . :23:
SECTION 5B
COCKPIT INSTRUMENTS IN DETAIL . . . . . . . . . . . . . . . . . . . . . . . . . . . . . . :28:
COMPARISON OF DISPLAYS - ARGON BUSTER / BORON EEL 31
SECTION 5C
ON-BOARD COMPUTER AND MENUS . . . . . . . . . . . . . . . . . . . . . . . . . . . . :34:
MAIN MENU . . . . . . . . . . . . . . . . . . . . . . . . . . . . . . . . . . . . . . . . . . . . . . :34:
SALVAGE INSURANCE (SAVE GAME) . . . . . . . . . . . . . . . . . . . . . . . . . . . . :35:
BEST PURCHASE/SALE PRICE . . . . . . . . . . . . . . . . . . . . . . . . . . . . . . . . . . :35:
DIALOG MENU . . . . . . . . . . . . . . . . . . . . . . . . . . . . . . . . . . . . . . . . . . . . . :36:
PROPERTY . . . . . . . . . . . . . . . . . . . . . . . . . . . . . . . . . . . . . . . . . . . . . . . . :36:
CARGO MENU . . . . . . . . . . . . . . . . . . . . . . . . . . . . . . . . . . . . . . . . . . . . . :37:
GALAXY MAP . . . . . . . . . . . . . . . . . . . . . . . . . . . . . . . . . . . . . . . . . . . . . :37:
TRADING MENU . . . . . . . . . . . . . . . . . . . . . . . . . . . . . . . . . . . . . . . . . . . :38:
INFO MENU . . . . . . . . . . . . . . . . . . . . . . . . . . . . . . . . . . . . . . . . . . . . . . . :40:

:4: |
|
|
LOG BOOK |
:40: |
|
|
|
||
|
|
|
SHIP INFORMATION . . . . . . . . . . . . . . . . . . . . . . . . . . . . . . . . . . . . . . . . . |
:40: |
|
|
|
SECTOR MAP . . . . . . . . . . . . . . . . . . . . . . . . . . . . . . . . . . . . . . . . . . . . . . |
:41: |
|
|
|
PILOT INFORMATION . . . . . . . . . . . . . . . . . . . . . . . . . . . . . . . . . . . . . . . . |
:42: |
|
|
|
WARP DRIVE . . . . . . . . . . . . . . . . . . . . . . . . . . . . . . . . . . . . . . . . . . . . . |
:42: |
|
|
|
SECTION 6 |
|
|
|
|
STEP-BY-STEP INSTRUCTIONS FOR BUDDING TRADERS . . . . . . . . . . . . . . . |
:44: |
|
|
|
SECTION 7 |
|
|
|
|
SALVAGE INSURANCE . . . . . . . . . . . . . . . . . . . . . . . . . . . . . . . . . . . . . . . |
:54: |
|
|
|
BEST PURCHASE PRICE/BARGAIN FINDER . . . . . . . . . . . . . . . . . . . . . . . . . |
:54: |
|
|
|
BEST SALE PRICE . . . . . . . . . . . . . . . . . . . . . . . . . . . . . . . . . . . . . . . . . . . |
:55: |
|
|
|
DOCKING COMPUTER |
:55: |
|
|
|
||
|
|
|
. . . . . . . . . . . . . . . . . . . . . . . . . . . . . . . . . . . . . . . .ECLIPTIC PROJECTOR |
:55: |
|
|
|
CARGO SCANNER . . . . . . . . . . . . . . . . . . . . . . . . . . . . . . . . . . . . . . . . . . |
:56: |
|
|
|
||
|
|
|
HOLD EXTENSIONS |
:56: |
|
|
|
||
|
|
|
GUN TURRET . . . . . . . . . . . . . . . . . . . . . . . . . . . . . . . . . . . . . . . . . . . . . . |
:57: |
|
|
|
TRADING COMPUTER EXPANSION . . . . . . . . . . . . . . . . . . . . . . . . . . . . . . |
:57: |
|
|
|
BATTLE DRONES . . . . . . . . . . . . . . . . . . . . . . . . . . . . . . . . . . . . . . . . . . . |
:58: |
|
|
|
LASERS AND ENERGY SHIELDS . . . . . . . . . . . . . . . . . . . . . . . . . . . . . . . . . |
:58: |
|
|
|
||
|
|
|
CARGO BAY LIFE-SUPPORT SYSTEM . . . . . . . . . . . . . . . . . . . . . . . . . . . . . |
:59: |
|
|
|
MINES . . . . . . . . . . . . . . . . . . . . . . . . . . . . . . . . . . . . . . . . . . . . . . . . . . . |
:59: |
|
|
|
MINERAL SCANNER . . . . . . . . . . . . . . . . . . . . . . . . . . . . . . . . . . . . . . . . . |
:59: |
|
|
|
TACTICAL NAVIGATION SYSTEM . . . . . . . . . . . . . . . . . . . . . . . . . . . . . . . . |
:60: |
|
|
|
POLICE LICENSES . . . . . . . . . . . . . . . . . . . . . . . . . . . . . . . . . . . . . . . . . . |
:60: |
|
|
|
MISSILES . . . . . . . . . . . . . . . . . . . . . . . . . . . . . . . . . . . . . . . . . . . . . . . . . |
:61: |
|
|
|
RUDDER OPTIMISATION . . . . . . . . . . . . . . . . . . . . . . . . . . . . . . . . . . . . . |
:61: |
|
|
|
SATELLITES . . . . . . . . . . . . . . . . . . . . . . . . . . . . . . . . . . . . . . . . . . . . . . . |
:62: |
|
|
|
SHIELDS . . . . . . . . . . . . . . . . . . . . . . . . . . . . . . . . . . . . . . . . . . . . . . . . . . |
:62: |
|
|
|
DIGITAL VISION ENHANCEMENT SYSTEM . . . . . . . . . . . . . . . . . . . . . . . . . |
:63: |
|
|
|
SINGUALARITY TIME DISTORTION DRIVE . . . . . . . . . . . . . . . . . . . . . . . . . |
:63: |
|
|
|
WARP DRIVE . . . . . . . . . . . . . . . . . . . . . . . . . . . . . . . . . . . . . . . . . . . . . |
:64: |
|
|
|
CONTROL JET EXPANSION . . . . . . . . . . . . . . . . . . . . . . . . . . . . . . . . . . . . |
:64: |
|
|
|
TRANSPORTER . . . . . . . . . . . . . . . . . . . . . . . . . . . . . . . . . . . . . . . . . . . . . |
:65: |
|
|
|
. . . . . . . . . . . . . . . . . . . . . . . . . . . . . . . . . . . . . . . . . . . . .DRIVE TUNING |
:65: |
|
|
|
||
|
|
|
TURBO-BOOST |
:66: |
|
|
|
||
|
|
|
||
|
|
|
TARGET-PROJECTION EXPANSION |
:66: |
|
|
|
SECTION 8
SHIP DATABASE . . . . . . . . . . . . . . . . . . . . . . . . . . . . . . . . . . . . . . . . . . . . :68:
|
SECTION 9 |
|
|
|
|
|
THE SEVEN EGG-GREEN RULES OF THE PROSPECTIVE DEALER |
:71: |
|
||
|
||
|
CALL TO THOSE WITH A WILD SPIRIT |
:72: |
|
||
|
||
|
SECTION 10 |
|
|
|
|
|
|
|
|
|
|
|
|
|
|
CREDITS . . . . . . . . . . . . . . . . . . . . . . . . . . . . . . . . . . . . . . . . . . . . . . . . . |
:74: |

.:.::.:::SYSTEM REQUIREMENTS |
:5: |
Operating System: Windows 95/98 |
|
Computer: 100% Windows 95/98 DirectX compatible computer required |
|
CPU: Pentium 200 MHz or faster |
|
Working memory: 32 MB RAM (64 MB recommended) |
|
CD-ROM: 2 x CD-ROM drive required |
|
Video: 3D Graphic Card required |
|
Sound: 16-bit Soundcard or better |
|
Input devices: Mouse and keyboard, other input devices optional |
|
DirectX: DirectX 7 is included on the CD and needs to be installed before playing.
Windows Media Player. Windows Media Player is included on the CD and will have to be installed before playing.
IMPORTANT: even if you have already installed a version of Media Player you must ensure that you have installed a version with ALL Codecs (including MP3 Music codec!)
Note: your system may require the latest Windows 95/98 drivers for your hardware.
SECTION 1:::.::.:.

.:.::.:::INSTALLATION |
:7: |
1.Start your operating system (Windows 95/98) and insert the X-tension CD into your CD-ROM drive.
2.The installation screen should now appear automatically. If this is not the case double-click on the “My Computer” symbol on your desktop and then double-click on your CD-ROM drive to start the installation. You can also start the installation manually by clicking on Start on the Taskbar (bottom left corner of the screen) and then on Run. Now enter D:\Setup (if your CDROM drive is assigned to a letter other than D:\, please enter this in place of D:\) and click on OK
3.Once the installation program has been started, click on Install and follow
the instructions on the screen. Select the installation type according to your system. Although a more comprehensive installation requires more hard disk space, it does accelerate the game.
4.Note: this game requires DirectX7.0. The installation program Checks whether you have the correct DirectX version. It will install Version 7.0 if necessary.
5.Once the installation has been completed, click on X start to begin the
game. Alternatively you can start it at any time from the Start menu.
SECTION 2:::.::.:.
.:.::.:::STARTING THE GAME |
:9: |
Start the game from the Start menu: click on Start -> Programs. If you have kept the default settings during the installation, click on the X-tension sub-menu and start the game from there. If you have installed your own program group during the installation, you will need to launch the game from there.
The Start screen will now be displayed on your monitor. Click on X-start.
Note: When starting the game for the first time, it determines the optimum configuration for your system and enters this in the Windows registry file. Any changes to your hardware configuration may mean that X-tension might not start. If this happens deactivate the checkmark in the “Keep settings” box before launching X-tension.
The Title screen will be displayed after the loading screen. There are several options available here:
Start Game: Select Start Game using the arrow keys and confirm using [ENTER] or press [S] to start a new game. After another intro, you enter the game automatically and begin with the training sequence.
Load Game: Select load game using the arrow keys and confirm using [ENTER] or press [L] to load a previously saved game.
Exit: Select Exit using the arrow keys and confirm using [ENTER] or press [Shift + Q] to return to Windows.
Intro: Select Intro using the arrow keys and confirm using [ENTER] or press [I] to see the Intro again.

:10: |
|
|
|
Options: Select Options using the arrow keys and confirm using [ENTER] or |
|
|
|
|
|
|
|
|
|
press [F8] to enter the Options menu. The Options menu will be explained in |
|
|
|
|
more detail later. |
|
|
|
|
Credits: Select Credits using the arrow keys and confirm using [ENTER] or |
|
|
|
|
press [C] to see the credits for X-tension. |
|
|
|
|
|
|
|
|
|
|
|
|
|
|
|
|
|
|
|
|
|
|
|
|
|
|
|
|
|
|
|
|
|
|
|
|
|
|
|
|
|
|
|
|
|
|
|
|
|
|
|
|
|
|
|
|
|
|
|
|
|
|
|
|
|
|
|
|
|
|
|
|
|
|
|
|
|
|
|
|
|
|
|
|
|
|
|
|
|
|
|
|
|
|
|
|
|
|
|
|
|
|
|
|
|
.:.::.:::SECTION 3
:12: THE OPTIONS MENU:::.::.:.
You can access the Options Menu from the Title Screen as well as pressing [F8] at any time during the game]. You can access the Graphics Settings directly by means of [F11], and [F12] calls up the Sound Settings. The Options Menu provides you with several settings you can modify. You can even choose your own logo for the texture of your spaceship. If your settings cause the game to crash on starting or they cause other problems, or if you want to cancel changes you have made but no longer remember earlier previous settings, Deactivate the option keep options on the Start Screen. The default values will then be recorded in the registration file again so that the game should start without problems.
The various menus in detail:
SOUND SETTINGS:::.::.:.
Music volume/effect volume/language:
Move the slide bar to the right in order to increase the volume and to the left to decrease it.
The ship computer can provide extended information:
Deactivate this option if you do not want to access additional explanations and information.
.:.::.:::ADVANCED SETTINGS |
:13: |
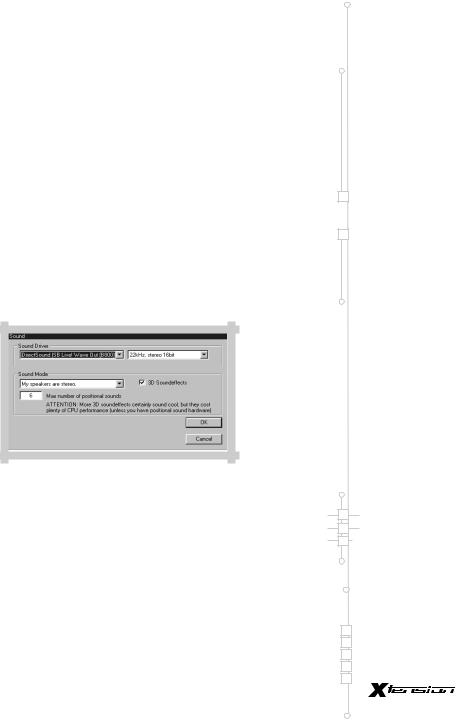
Click on this button to open a sub-menu where you can modify the sound options for your system.
Sound Driver:
Here you can set a different sound driver or a different sound quality. Simply click on the arrow pointing to the right next to the text box and select the desired setting.
Play Mode:
Here you can specify whether you are using, for example, a stereo speakers or headset for the sound output. Click on the arrow next to the text box and select the desired option. In addition, you can activate or de-activate the 3D sound effects by changing this option by clicking on it. With the 3D sounds activated, the maximum number of 3D sounds can be set. But remember that too many 3D sounds may slow down the game.
Click on OK to confirm your changes and close the menu or click on Cancel to reject the changes made.
.:.::.:::INPUT DEVICES
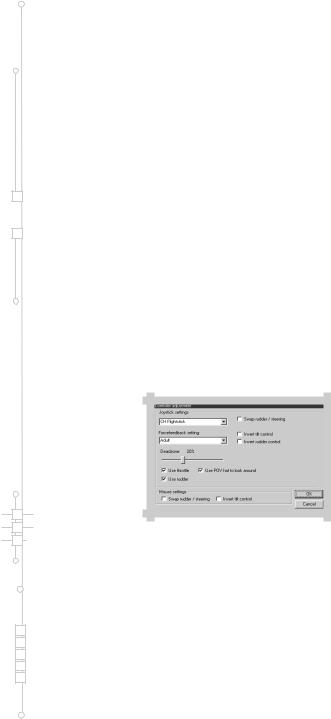
Select your preferred input device here.
Joystick Selection.
Click on the arrow next to the text box and select the desired input device.
Force Feedback Strength:
If you are using a force feedback joystick, set the desired strength of the force feedback effect here. Click on the arrow next to the text box and select the effect strength required.
:14: |
Deadzone |
|
|
|
Here you can set the Deadzone for your joystick. Move the slide bar to the right |
|
in order to increase the value and to the left to decrease it. |
Swap rudder/ steering:
If you are using rudder pedals or a joystick with rudder control, activating this option you can move your ship to the left and right using the rudder. The roll movements of the ship are controlled by the X-axis (left/right) of your joystick or mouse.
Use Throttle.
Activate this option if you have and wish to use an input device with speed control (throttle)
Use rudder:
If you are using rudder pedals or a joystick with a rudder control, activating this option will enable you to use the rudder function. Read also the section Swap rudder/steering.
Use POV-panorama view:
If your joystick has a POV (coolie-hat), you can use it to control your view from the cockpit (keyboard: numpad) Activate this option for this purpose.
Click on OK to confirm your changes and leave the menu or click cancel to reject the changes made.
GRAPHICS CARD/3D-CARD |
:15: |
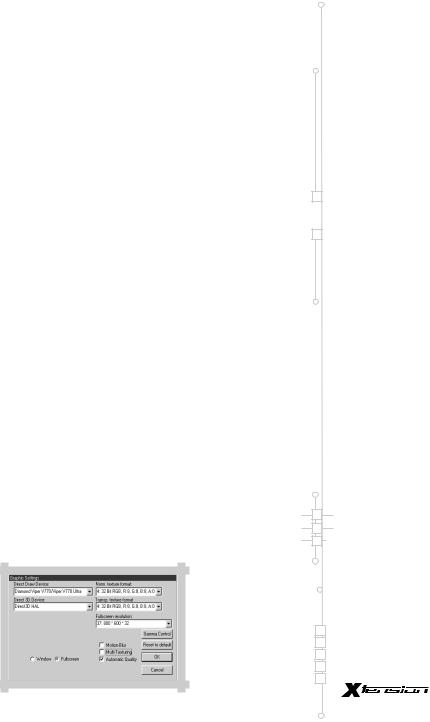
Here you can adapt settings in accordance with your graphic card or 3D-card.
Most settings will be adapted to your hardware during the game using the
Automatic Quality Control (AQC) to ensure an optimum frame rate.
Furthermore, you can change the following settings:
Graphics Card
If you have more than one graphics card or a separate 3D-accelerator-card, here you can set which graphics card the game is to use. Click on the arrow next to the text box and select the desired graphics card.
3D-accelerator: Use this to choose a 3D-acceleration method. The default is Direct3D HAL. Do not change this setting!
Note: X-tension requires a 3D HAL (hardware acceleration through Direct 3D).
It is not possible to play X-tension with one of the software emulation packages.
Texture format/extended (transparent) texture format:
Here you can determine the format of the textures for objects in the game. The default is 16 bit RGB, R:5, G:6, B:5, A:0, whereby 16-bit represents the colour resolution of the textures and the other figures indicate the division of the 16 bit (red, green, blue, alpha-channel). If you have a fast computer or a fast graphics card, you should try setting the texture format to 32-bit colour resolution. Choose the setting 32 bit RGB, R:8, G:8, B:8, A:0 or similar. Please note that these settings require a lot more graphics memory and for this reason will not function on all systems! 32 or 24-Bit textures will only bring optimum quality in conjunction with 32 or 24-bit screen resolution (see below).
Resolution:
Use this to set the desired screen resolution for the game. Click on the arrow next to the text box and select your desired resolution. If the game slows down too much, decrease the resolution again.
Window/Full Screen:
Stipulate here whether the game is to run in a window or in full-screen mode.
Not all graphic cards support window mode.
:16: |
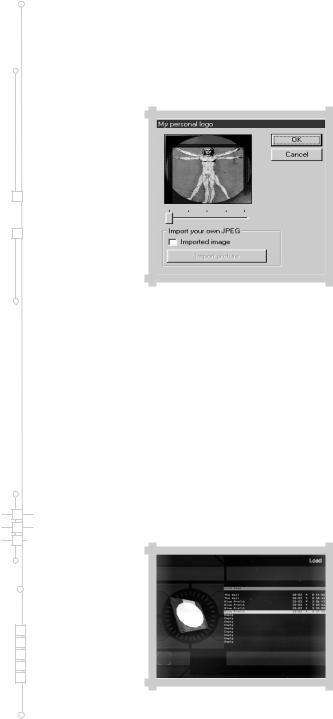
SELECT LOGO:::.::.:. |
With this menu you can choose the logo for your spaceships, factories and gun turrets . With the slide bar, choose one of the logos etc, or import your own Image in JPG format with the Logo function. The logo size needs to be 128 x 128 pixels.
LOAD SCORE:::.::.:.
With this screen you can keep your terminated salvage insurance in the game or in other words: load a score. For this purpose select, with the arrow keys, one of the maximum of ten saved scores and confirm with [INPUT] to load it. You can find the following information in the status line of a saved score (from left to right):
a)Name of the sector in which the save took place,
b)X/Y co-ordinates of the sector in which save took place,
c)Version number of the game, with which the score was saved (or asterisk if with the same as current game version),
d)Note of the time elapsed in the game in hours, minutes and seconds.

.:.::.:::SELECT SCREENSHOT INDEX |
:17: |
By selecting this point you can choose an index, in which X tension stores screen photos by pressing the F9 key! Caution, large quantities of data are written onto your hard drive when this feature is used. Ensure that you have sufficient space!
.:.::.:::END GAME TO INTRO
The game is ended and the intro is started again.
.:.::.:::END PROGRAM
Click on this button to quit the game and return to Windows.
.:.::.:::CONTINUE GAME
Click on this button to get back to the point of the game, where you accessed the options menu.
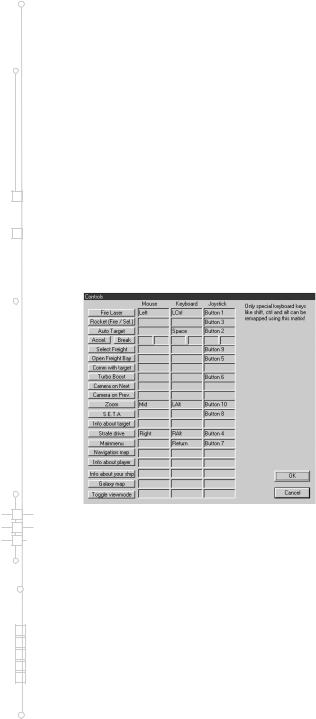
.:.::.:::KEYBOARD CONFIGURATION
Here you can change the default keyboard and/or joystick settings to your own preferences. Click on the key you want to change and press the new key, mouse button or joystick button. Click on OK to confirm your changes and leave the menu or click on cancel to reject the changes made. NOTE: The configuration of your keyboard can be changed only to a limited Extent. Only special keys can be redefined, the keys specified in the instructions are fixed!
The following functions can be reconfigured:
Control left |
[FIRE LASER] |
page 58 |
|
Control right |
[FIRE MISSILES] |
page 61 |
|
T |
[AUTOMATIC TARGET ] |
page 28 |
|
A |
[ACCELERATION] |
page 23 |
|
|
|||
|
|
|
|
|
|
|
|
|
|
|
|
|
|
|
|
|
|
|
|
|
|
|
|
|
|
|
|
|
|
|
|
:18: |
|
|
|
|
V |
[BRAKING] |
Page 23 |
||
|
|
|
|
|
|||||
|
|
|
|
|
F |
[CARGO SELECTION] |
Page 23 |
||
|
|
|
|
|
O |
[OPEN CARGO BAY] |
Page 23 |
||
|
|
|
|
|
C |
[HAIL TARGET] |
Page 36 |
||
|
|
|
|
|
Shift + J |
[TURBO BOOST] |
Page 66 |
||
|
|
|
|
|
|
|
[CAMERA FORWARD] |
Page 30 |
|
|
|
|
|
|
|
|
[CAMERA BACK] |
Page 30 |
|
|
|
|
|
|
Alt left |
[ZOOM] |
Page 63 |
||
|
|
|
|
|
J |
[SINZA] |
Page 63 |
||
|
|
|
|
|
I |
[TARGET INFO] |
Page 40 |
||
|
|
|
|
|
Alt right |
[SIDEWARDS MOVEMENT ] |
Page 64 |
||
|
|
|
|
|
INPUT |
[MAIN MENU] |
Page 34 |
||
|
|
|
|
|
N |
[NAVIGATION MAP] |
Page 29 |
||
|
|
|
|
|
P |
[PLAYER INFO] |
Page 42 |
||
|
|
|
|||||||
|
|
|
|
|
S |
[PLAYER’S SHIP INFO] |
Page 40 |
||
|
|
|
|
|
SHIFT + N |
[GALAXY MAP] |
Page 37 |
||
|
|
|
|||||||
|
|
|
|
|
F1, F2 |
[CHANGE VIEW] |
Page 29 |
||
|
|
|
|||||||
|
|
|
|
|
|
|
|
|
|
|
|
|
|
|
|
|
|
|
|
|
|
|
|
|
|
|
|
|
|
|
|
|
|
|
|
|
|
|
|
|
|
|
|
|
|
|
|
|
|
|
|
|
|
|
|
|
|
|
|
|
|
|
|
|
|
|
|
|
|
|
|
|
|
|
|
|
|
|
|
|
|
|
|
|
|
|
|
|
|
|
|
|
|
|
|
|
|
|
|
|
|
|
|
|
|
|
|
|
|
|
|
|
|
|
|
|
|
|
|
|
|
|
|
|
|
|
|
|
|
|
|
|
|
|
|
|
|
|
|
|
|
|
|
|
|
|
|
|
|
|
|
|
|
|
|
|
|
|
|
|
|
|
|
|
|
|
|
|
|
|
|
|
|
|
|
|
|
|
|
|
|
|
|
|
|
|
|
|
|
|
|
|
|
|
|
|
|
|
|
.:.::.:::SECTION 4

:20:  RETURN TO THE SECTORS,
WHICH INDICATE THE WORLD:::.::.:.
A great deal has happened since an unexpected accident slammed you into a distant and unexplored corner of the universe – that particular region which is known on Earth as the “X-universe”. An incomparable, interstellar civilisation has developed here, covering countless space sectors, made up of many different intelligent species who trade and are more or less on good terms with one another, and whose prosperity spreads life and activity to the sectors of the “X-universe” – like nowhere else in the universe.
In X – beyond the frontier you have made a crucial contribution to combating and restraining the greatest danger, which threatened all life, the fear-inducing xenon, also known as terraformers. In your long search for a way to earth you have built your own growing and flourishing commercial empire. You have made friends with many strange creatures, including the Goners, the descendants of earth people, You could just relax and enjoy you new life.
If it were not for just one problem: at sometimeyou would need to file a report with your superiors . Despite all the fantastic equipment, which the experimental shuttle has acquired, the jump-drive, the only way back to earth, remains damaged and inoperable. With a heavy heart you decide to ask your friends, the Goner and Argons, for help.
Whilst, on Argon Prime, the experimental shuttle is taken apart piece by piece to find the secret of the jump-drive and perhaps to have it repaired. A small spaceship is loaned to you so you seize the opportunity to seek new friends, to find new trade routes and experience new adventures!
YOUR SHIP:::.::.:.
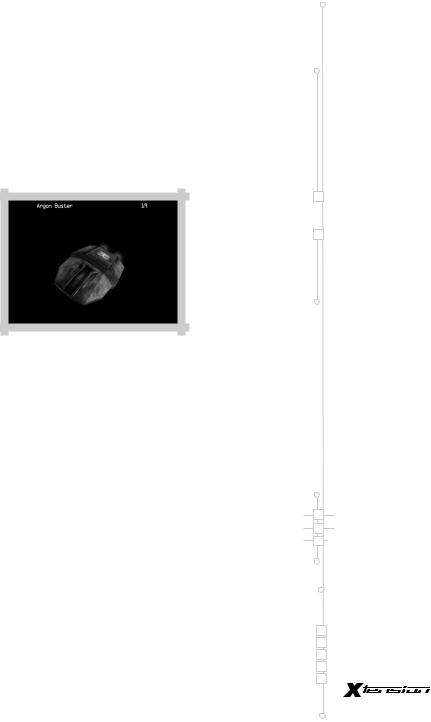
The government of Argon Prime makes available to you an M4 class Argon Buster . The ship is a modern all-rounder suitable For both small scale trading and for limited space combat. Since the Argon military were commissioned with the equipping of your new ship, they, in gratitude for your contribution in defeating the Xenon, have enhanced your Argon Buster with a whole range of extras which will help you in your return to the universe:
.:.::.:::PRE-INSTALLED EXTENSIONS |
:21: |
•Singularity time distortion drive (SINZA)
•32 units hold capacity (17 extensions and 15 unit basic installation)
•2 alpha-impulse ray-emitters
•Tactical navigation system
•1 x 1 MW shield
•8x drive tuning
•15 rudder optimisations
•Turbo-boost
SECTION 5:::.::.:.

.:.::.:::OPERATION OF YOUR SHIP IN DETAIL |
:23: |
Flight and location control:
Although, in X-tension, there are many different types of ship with different Flight properties and you can control them yourselves, there are a few basic principles of control and display that all ships have in common:
With the [ACCELERATION] and [BRAKING] buttons on your joystick or the keys [A] or [Y ] on your keyboard, you can change the thrust of your ship; the automatic thrust begins to react immediately and brings the ship to the speed set by you. Naturally each individual ship responds at a different rate and attains a different final speed; you will find exact information on this in the ship log, which you can call up with the [INFO ABOUT TARGET] button or via the menus. Obviously it is also possible to control the drives of your ships! With the [TAB] key you specify maximum thrust, with [BACKSPACE] you return your drives to zero thrust. You roll of your ship in a clockwise or anticlockwise direction by the [Q] and [W] keys on your keyboard. Although this is not immediately apparent, this is a function essential for navigation and battle.
Automatic and manual cargo control
The cargo control of modern spaceships is largely automatic. Should you dock with a station, everything is now automatic. Cargo is loaded and unloaded automatically. You only have to select the desired item with the arrow keys (up and down) and state the quantity to be loaded and unloaded by moving the arrow keys to the right and left. Confirm your action with [ENTER] or cancel your action with [ESC].
However, if you want to load cargo manually in space, you must first open the bay by initiating the [OPEN BAY] function on the joystick or pressing the [0] key. Note: if your bay is open, your shields are deactivated. You now must fly over a cargo container the cargo will then be drawn into the cargo lock. After a few seconds the cargo is automatically transported into the hold and the bay is closed.
If you want to discard cargo manually, load the cargo lock with the [F] key.
With the arrow keys select the desired item in the cargo menu [page 37].
Open the cargo bay with [OPEN CARGO BAY] or [O]. The cargo is then ejected.

:24: |
Leave and enter ship. |
|
If you want to leave your ship, press [SHIFT+E]. Your space suit is not only fitted with a life-support system but also with a jetpack. Control with the normal functions [ACCELERATE], [BRAKE] as well as [Q] and [W] but be careful: you are now reliant on your own resources and highly vulnerable since your space suit has only minimum shields and no weapons! As soon as you are underway in your space suit, you can enter a locked ship, in your direct vicinity, by pressing [SHIFT + E] – either one of your own ships or one whose pilot has previously agreed to take you onboard. With a separately available “transporter” upgrade [page 65] you can bypass this procedure.
Other control elements and hotkey list.
As a space pilot you know how important it is to be physically and mentally ready for action. For this reason it is essential you keep to the breaks prescribed by the union by, activating [Shift + P] or leaving X-tension for longer breaks with [Shift + Q].
With [Shift + L] you can redeem an insurance contract during game play; this brings the state of your ship as well as your personal belongings back to the state of the previous insurance (load score).
|
|
|
hotkey summary: |
|
|
|
|
A/Y |
speed |
|
|
|
Q/W |
roll |
|
|
|
TAB |
Maximum thrust |
|
|
|
BACKSPACE |
Zero thrust |
|
|
|
J |
SINZA |
|
|
|
T |
Lock on target |
|
|
|
E |
Lock on next opponent |
|
|
|
PAGE UP |
next target |
|
|
|
PAGE DOWN |
Last target |
|
|
|||
|
|
|
O |
Open/close cargo bay |
|
|
|
||
|
|
|
||
|
|
|||
|
|
|
F |
Load/eject cargo |
|
|
|
|
|
|
|
|
|
|
|
|
|
|
|
|
|
|
|
|
|
|
|
|
|
|
|
|
|
|
|
|
|
|
|
|
|
|
|
|
|
|
|
|
|
|
|
|
|
|
 Loading...