


GAME MANUAL
The Ridge, Chipping Sodbury, Bristol BS17 6BN, UK
Tel: 01454 893900
Game Design and Program Copyright © 1995 Chris Sawyer Documentation, Packaging and Logo Copyright © 1995 MicroProse Ltd
This manual, accompanying documentation and disks are copyrighted. The owner of this product is entitled to use this product for his or her personal use. Except for back-up copies of the disks for personal use and the quoting of brief passages for the purposes of reviews, no one may transfer, copy, back-up, give or sell any part of the manual or the information on the disks, or transmit in any form or by any means, electronic, mechanical, photocopying, recording or otherwise without the prior permission of the publisher. Any person or persons reproducing any part of this program, in any media, for any reason, shall be guilty of copyright violation and shall be subject to civil liability at the discretion of the copyright holder.
Made in the UK
MP190239MANR

CONTENTS
CREDITS . . . . . . . . . . . . . . . . . . . . . . . . . . . . . . . . .5 INTRODUCTION . . . . . . . . . . . . . . . . . . . . . . . . . . .6 BACKGROUND/THE GAME . . . . . . . . . . . . . . . . . .8
Sorting the Materials . . . . . . . . . . . . . . . . . . . . . . . . . . . . .9
Installation/Loading . . . . . . . . . . . . . . . . . . . . . . . . . . . . .10
HOW TO USE THIS MANUAL . . . . . . . . . . . . . . . .11
SECTION 1: THE ROLLING DEMOS . . . .13 BEFORE WE BEGIN . . . . . . . . . . . . . . . . . . . . . . .14 ROLLING DEMOS . . . . . . . . . . . . . . . . . . . . . . . . .15
Rolling Demo 1 . . . . . . . . . . . . . . . . . . . . . . . . . . . . . . . . .15
Rolling Demo 2 . . . . . . . . . . . . . . . . . . . . . . . . . . . . . . . . .16
Rolling Demo 3 . . . . . . . . . . . . . . . . . . . . . . . . . . . . . . . . .16
Rolling Demo 4 . . . . . . . . . . . . . . . . . . . . . . . . . . . . . . . . .16
Rolling Demo 5 . . . . . . . . . . . . . . . . . . . . . . . . . . . . . . . . .16
SECTION 2: GAME CONTROLS . . . . . . . .17 THE MOUSE . . . . . . . . . . . . . . . . . . . . . . . . . . . . .18 THE WINDOWS . . . . . . . . . . . . . . . . . . . . . . . . . . .19
Moving Windows . . . . . . . . . . . . . . . . . . . . . . . . . . . . . . .20 Closing Windows . . . . . . . . . . . . . . . . . . . . . . . . . . . . . . .20 The Slider Bar . . . . . . . . . . . . . . . . . . . . . . . . . . . . . . . . . .21 Scrolling around the World . . . . . . . . . . . . . . . . . . . . . . .21 The Map Window . . . . . . . . . . . . . . . . . . . . . . . . . . . . . . .22 Zooming In and Out . . . . . . . . . . . . . . . . . . . . . . . . . . . . .23
Short Cut Keys . . . . . . . . . . . . . . . . . . . . . . . . . . . . . . . . .23
. . . . . . . . . . . . . . .25 BEFORE WE BEGIN . . . . . . . . . . . . . . . . . . . . . . .26 TUTORIAL ONE: A Road Network . . . . . . . . . . . .26
Manager’s Name . . . . . . . . . . . . . . . . . . . . . . . . . . . . . . . .27 Manager’s Face, Company Name and Colour . . . . . . .27
Choosing a Place to Begin . . . . . . . . . . . . . . . . . . . . . . . .30
Beginning Construction . . . . . . . . . . . . . . . . . . . . . . . . . .32 Placing Road Depots . . . . . . . . . . . . . . . . . . . . . . . . . . . .32 Positioning Bus Stations and Loading Bays . . . . . . . . .33 Buying Road Vehicles . . . . . . . . . . . . . . . . . . . . . . . . . . .33 Selling Road Vehicles . . . . . . . . . . . . . . . . . . . . . . . . . . . .34 Assigning Routes to Road Vehicles . . . . . . . . . . . . . . . .35 Saving your Game . . . . . . . . . . . . . . . . . . . . . . . . . . . . . . .37
TUTORIAL TWO: A Rail/Road Network . . . . . . .38
The Main Game Options Screen . . . . . . . . . . . . . . . . . .38
Building a Railway Station . . . . . . . . . . . . . . . . . . . . . . .39
Buying Trains . . . . . . . . . . . . . . . . . . . . . . . . . . . . . . . . . .41
SECTION 4: WORLDS . . . . . . . . . . . . . . . . . .45
Creating Your Own Scenario with the World Editor .47 Generating a Scenario . . . . . . . . . . . . . . . . . . . . . . . . . . .47
Changing the Starting Date of the Scenario . . . . . . . . .47
Generating Land . . . . . . . . . . . . . . . . . . . . . . . . . . . . . . . .48 Generating Towns . . . . . . . . . . . . . . . . . . . . . . . . . . . . . .49 Generating Industries . . . . . . . . . . . . . . . . . . . . . . . . . . . .50 Generating Roads . . . . . . . . . . . . . . . . . . . . . . . . . . . . . . .51 Planting Trees . . . . . . . . . . . . . . . . . . . . . . . . . . . . . . . . . .52 Adding Signs . . . . . . . . . . . . . . . . . . . . . . . . . . . . . . . . . . .52 Saving a Scenario to Disk . . . . . . . . . . . . . . . . . . . . . . . .53 Loading a Saved Scenario from Disk . . . . . . . . . . . . . . .53
Leaving the Scenario Editor . . . . . . . . . . . . . . . . . . . . . .53
Playing the Saved Scenario . . . . . . . . . . . . . . . . . . . . . . .53 Playing a Pre-set Scenario . . . . . . . . . . . . . . . . . . . . . . . .54 Create Scenario Quick Reference Guide . . . . . . . . . . .54
2 |
Contents |
Contents |
3 |
SECTION 5: THE REFERENCE GUIDE . .59
MAIN MENU OPTIONS . . . . . . . . . . . . . . . . . . . . .60
New Game . . . . . . . . . . . . . . . . . . . . . . . . . . . . . . . . . . . . .61 Load Game . . . . . . . . . . . . . . . . . . . . . . . . . . . . . . . . . . . .62 Create a Scenario . . . . . . . . . . . . . . . . . . . . . . . . . . . . . . .62
Play Scenario . . . . . . . . . . . . . . . . . . . . . . . . . . . . . . . . . . .63
One Player/Two Player (Link & Network Play) . . . . . .64 Modem Link Play . . . . . . . . . . . . . . . . . . . . . . . . . . . . . . .66 Game Options . . . . . . . . . . . . . . . . . . . . . . . . . . . . . . . . . .67 Difficulty . . . . . . . . . . . . . . . . . . . . . . . . . . . . . . . . . . . . . .68 Tutorial/Demonstration . . . . . . . . . . . . . . . . . . . . . . . . . .69 Quit to DOS . . . . . . . . . . . . . . . . . . . . . . . . . . . . . . . . . . .69
THE 3D WORLD . . . . . . . . . . . . . . . . . . . . . . . . . .70
The Icons . . . . . . . . . . . . . . . . . . . . . . . . . . . . . . . . . . . . . .70
Windows . . . . . . . . . . . . . . . . . . . . . . . . . . . . . . . . . . . . . . .87
Buildings . . . . . . . . . . . . . . . . . . . . . . . . . . . . . . . . . . . . . .88
SECTION 6: ADVANCED FEATURES . . .93 GAME-PLAYING NOTES . . . . . . . . . . . . . . . . . . .94
SECTION 7: HINTS & TIPS . . . . . . . . . . . .103
SECTION 8: TECHNICAL ASSISTANCE . .109
Virus . . . . . . . . . . . . . . . . . . . . . . . . . . . . . . . . . . . . . . . . .110
Software Fault . . . . . . . . . . . . . . . . . . . . . . . . . . . . . . . . .110
MicroProse Customer Services . . . . . . . . . . . . . . . . . . .111
MicroProse On-line Services . . . . . . . . . . . . . . . . . . . . .112
CREDITS
Game Design and |
|
Programming |
Chris Sawyer |
Graphics and Animation |
Simon Foster |
Original Music |
John Broomhall |
Sound Design and |
|
Programming |
Andrew Parton |
Quality Assurance |
Andrew Luckett |
|
Daniel Luton |
|
Phil McDonnell |
|
Jason Sampson |
|
Darren Kirby |
|
Don Witcombe |
|
Craig Lear |
Manual Author |
Rik Haslam |
Managing Editor |
Alkis Alkiviades |
Packaging |
Sarah Warburton |
Manual Design & Layout |
Sarah Kerr |
Producer |
Mike Rudderham |
Brand Manager |
Adrian Turner |
Publishers |
Rob Davies |
|
Pete Moreland |
4 |
Contents |
Credits |
5 |

INTRODUCTION
Transport Tycoon began life as a vague desire to create an entertaining transport game, in as real a simulated world as possible.
The game was rapturously received by game-players, the software industry and the computer game press. However, those who create games often know of the shortcuts they are forced to take due to development deadlines, publishing schedules and other unavoidable constraints. No game is perfect, but to create a perfect game is the holy grail of all programmers and designers. Transport Tycoon Deluxe represents an enormous leap towards that goal.
It was never our desire to just make an updated version of Transport Tycoon. What we wanted, was to create a new game based upon the successful elements of the first. We wanted to keep the intuitive gameplay and realism, that made Transport Tycoon so playable, while radically improving the game itself. The following are some of the elements that make Transport Tycoon Deluxe a worthy successor to the original game.
•3 new gameplay environments with different climates, environments, topography and industries
•World editor - create unlimited custom made scenarios
•Heliports
•Maglev trains and track
•Buy/Sell Shares and take-over rival companies
•Network play
•More stations and vehicles
•Improved communication of information
•Customise vehicle names/town names/station names
•Re-fit aircraft and ships to carry different cargo types
Transport Tycoon Deluxe sets new standards in the simulation of real world environments. You’ll find that the computer controlled competitors really do give you more than a run for your money. Don’t expect an easy ride, these silicon tycoons are ruthless. They’ll shut down a service in a second if it’s proving inefficient and they are always on the look out for lucrative transportation opportunities. You will have to use all your business acumen to keep ahead of the pack. If you can’t take the pace, don’t worry, you can easily adjust a wide range of settings, and if your computer controlled rivals leave you standing you can always stage a take-over bid.
Another area we felt absolutely vital to the success of Transport Tycoon Deluxe was the inclusion of network capability. Now you can try to defeat your friends and colleagues over a network. Be careful though, you could end up spending your work day laying tracks and delivering goods around the world of Transport Tycoon Deluxe.
The developers of Transport Tycoon Deluxe have gone to great lengths to create a game of the highest possible standards. We sincerely hope you enjoy the game to the absolute maximum. Good luck!
6 |
Introduction |
Introduction |
7 |
BACKGROUND/THE GAME
It’s 1950, you’ve been loaned £100,000 and you’ve got 100 years to prove yourself a Transport Tycoon.
Transport Tycoon Deluxe presents you with a choice of four vast game worlds (each of which will randomly generate a limitless number of gameplay scenario’s) made up of numerous small towns and raw material resources. If you’d prefer, you can even create your own game scenarios using the world editor.
As a budding tycoon you’ve been loaned a large amount of money and you’ve got to prove yourself; to set the wheels in motion to become the wealthiest tycoon in the world.
Matched against a batch of ruthless rivals, you’ll have to act quickly; to build the key routes that will rake in the cash. Build stations, airports, docks and a linking road, rail, air and ship network that will move passengers, mail or goods to the most lucrative destination. As the years roll by you’ll have the chance to buy more advanced and faster vehicles and vessels; if you can afford them!
You’ll build stations, docks airports and make money by connecting areas requiring transport services. You’ll construct complex road - rail -air - sea networks and experience cutthroat rivalry as you try to grab your piece of the action. You’ll deal with characteristic town councils that express individual and varying attitudes, and cope with disasters such as mine collapses, bus, lorry and aircraft malfunctions.
You can even takeover other companies and fund industries which will bring increased profits for your transportation network.
This is your chance to set the wheels in motion, to become the best, to be THE TRANSPORT TYCOON.
SORTING THE MATERIALS
Your Transport Tycoon Deluxe package contains this Manual and a Compact Disc.
Required Equipment
Computer
IBM PC 486, Pentium or a 100% compatible computer.
The computer must have a CD-ROM drive and a hard disk.
Transport Tycoon Deluxe requires a 25 MHz or higher processor and at least 4 Mb RAM and 4Mb of hard disk space to install and 200KB for each saved game
Controls
To play Transport Tycoon Deluxe you require a Microsoft compatible Mouse and a Microsoft Mouse Driver (version 8.2 or higher recommended).
Display
Transport Tycoon requires a colour monitor with a SVGA graphics system. If you are using a compatible graphics card/monitor, it must be 100% compatible with SVGA systems capable of 640x480 in 256 colours. SVGA graphic card must be 100% VESA compatible, or must have a 100% compatible software VESA driver.
DOS
You must have Microsoft MS-DOS version 5.0 or higher.
8 |
Background/The Game |
Sorting the Materials |
9 |
INSTALLATION/LOADING
Installation
An installation program is included on the Transport Tycoon Deluxe CD.
Insert the CD into your CD drive and designate that drive (usually by typing “D: {Return}).
When the new prompt appears, type “INSTALL {Return}”.
Please follow the on-screen text which appears.
The default (pre-set) installation routine places Transport Tycoon Deluxe in a directory named C:\MPS\TTDLX.
Loading Instructions
Switch on your machine and wait until the C:\> prompt appears.
Insert the Transport Tycoon Deluxe CD into the CD drive.
Type “CD MPS\TTDLX {Return}” and then type “TYCOON {Return}” to run the game.
Note: If you have installed Transport Tycoon Deluxe to another directory, you must type “CD {name of your directory} {Return}”, and then type “TYCOON {Return}”.
To play Transport Tycoon Deluxe in Windows™ '95 follow the normal procedure for non Windows™ '95 software.
Sound
Transport Tycoon Deluxe supports Sound Blaster and 100% compatibles; Sound Blaster AWE 32, Gravis Ultrasound, Pro
Audio Spectrum, Sound Canvas, Roland LAPC -1/MT-32,
General Midi sound cards.
HOW TO USE THIS MANUAL
This manual is split into 8 main sections:
Section 1: The Rolling Demos
These are on-screen tutorials to visually guide you quickly through Transport Tycoon Deluxe. This section of the manual briefly details what is happening on the screen. We recommend you watch all the demo’s before going any further with the game.
Section 2: Game Controls
Explains how to move around the world of Transport Tycoon Deluxe, how to open and close game “windows”, and how to make game selections.
Section 3: The Gameplay Tutorials
Designed to get you playing Transport Tycoon Deluxe as quickly as possible. You are recommended to follow each tutorial carefully before you start to play the game on your own.
Section 4: Worlds
Descriptions of the different worlds you can choose to play in and a guide to using the world editor to create your own custom made playing environments.
Section 5: The Reference Guide
Is intended for the player who is familiar with the basics of
Transport Tycoon Deluxe and needs to learn more about particular game features.
10 |
Installation/Loading |
How to Use This Manual |
11 |

Section 6: Advanced Features
Should help the player utilise some of the more complex features of Transport Tycoon Deluxe.
Section 7: Hints and Tips
This section will help you at all levels of play.
Section 8: Technical Assistance &
Customer Service
12 |
How to Use This Manual |
SECTION 1:
The Rolling Demos
13

BEFORE WE BEGIN |
ROLLING DEMOÕS |
|
Install and Load Transport Tycoon Deluxe. |
■ To open the Rolling Demo’s Menu click on the Tutorial/ |
|
You will be taken to the Main Menu. |
Demonstration bar from the Main Menu. |
|
|
|
|
|
|
|
|
|
|
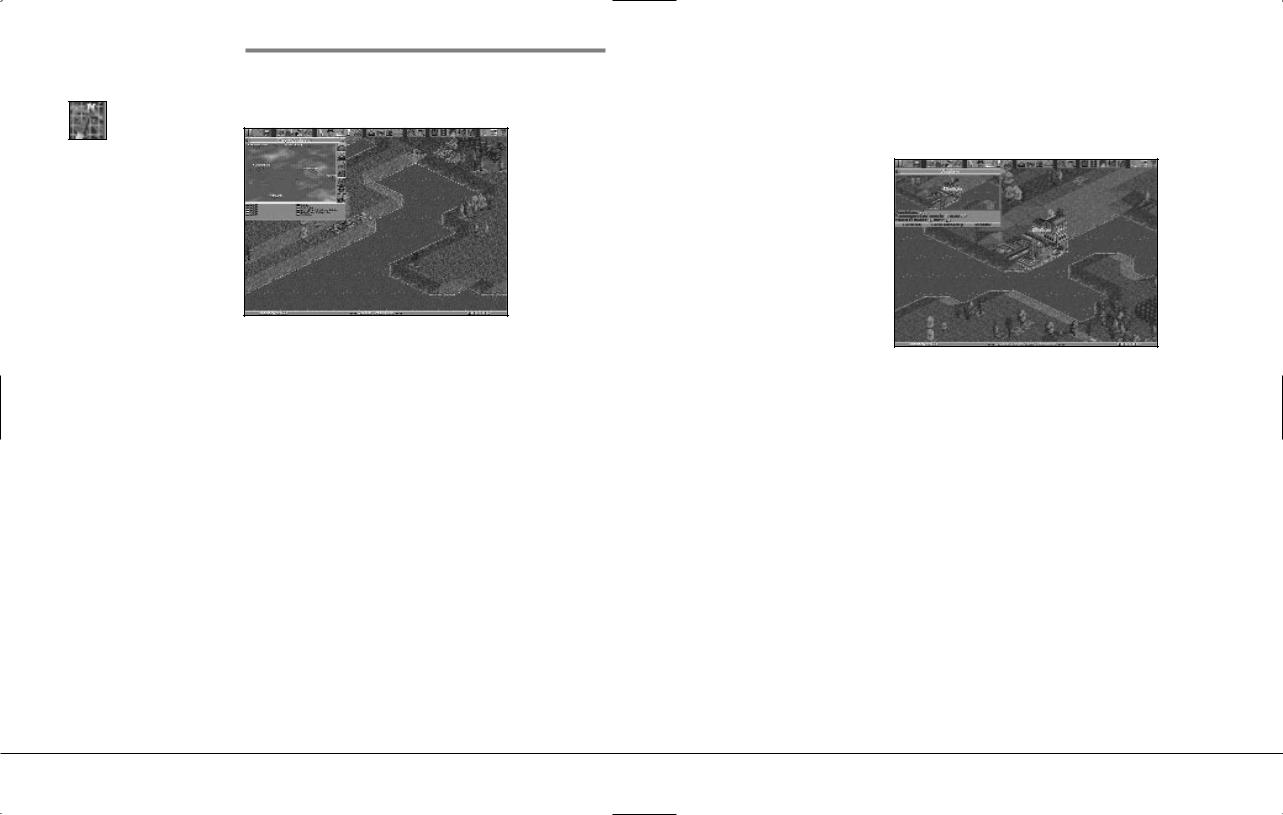
Rolling Demos Menu
Main Menu Screen
■ Then, select the Demo you want to watch.
Remember if at any time you want to leave the Demo and return to the Main Menu, simply press Escape.
Rolling Demo 1:
• How to Raise and Lower Land,
• Lay Roads, Build Depots,
• Stations and Loading Bays.
• How to Buy Road Vehicles and give them Routes.
14 |
Section 1: The Rolling DemoÕs |
Section 1: The Rolling DemoÕs |
15 |
Rolling Demo 2:
•How to lay Railway Track(orientation), Dig Tunnels and Build Bridges.
•Building Railway Buildings and Assigning Orders to Trains.
Rolling Demo 3:
•Airport construction. How to Purchase an Aircraft and give it its Orders.
Rolling Demo 4:
•Positioning Sea Ports, Building Docks, and Assigning Orders to Ships.
Rolling Demo 5:
•Advanced Railway Building.
16 |
Section 1: The Rolling DemoÕs |
SECTION 2:
Game Controls
17
THE MOUSE
You will require a Mouse to play Transport Tycoon Deluxe.
Throughout the manual you will encounter these instructions:
■“Clicking the mouse button”.
Unless otherwise stated this refers to the Left Mouse Button (LMB).
■Point and Click :-
Place the mouse cursor over the icon you wish to use and click the LMB once.
■Click and Hold:-
Some of the twenty six icons at the top of the screen have a choice of several functions. Click and hold the LMB on these icons to display all of the options. Keep the button held down and drag the highlight bar to the option you want. Release the button to select the now highlighted option.
■Point and Drag :-
For example, to move a “Window” around the screen, place the mouse cursor over the “Window” Drag Bar at the top of the “Window”, press and hold down the LMB, then move the cursor/ “Window” where you want on the screen and release the LMB. It will remain open in the new position.
■Help :-
If you don’t know what an icon does, click and hold the right mouse button (RMB) over it and you will be given a brief description.
THE ÒWINDOWSÓ
Transport Tycoon Deluxe’s gameplay centres around a system of Icons and “Windows”. To select options, you use the mouse to click, and click and hold the “Windows” and Icons.
Map Window
Although all of the “Windows” look completely different they all work in much the same way and have common features.
In the top left of a “Window” there is a small ‘X’.
Clicking the LMB on the ‘X’ will close the “Window”.
Most of the “Windows” contain several Icons. When clicked these either show different pieces of information or open another “Window”. Hold down the RMB over any part of a “Window”/ Icon for a brief description of what it does.
If you try to open a “Window” that is already open, a white line will flash around the outside of the “Window” to let you know that you can’t open the “Window” twice.
18 |
Section 2: Game Controls |
Section 2: Game Controls |
19 |
Moving ÒWindowsÓ
You will need to move entire “Windows” around the screen quite frequently.
■To do this, click and hold the “Window” Title Bar (at the top of all “Windows”). With the LMB still held down, drag the “Window” to the position on the screen you want to move it to.
■Release the LMB and the “Window” will remain in the new position.
Closing ÒWindowsÓ
Eventually, you will have to close “Windows” to prevent clogging up of the main 3-D world screen.
■Simply click the LMB on the ‘X’ in the top left of any “Window” to close it.
The Slider Bar
Some of the “Windows” cannot fit in all of their information, so to prevent the “Windows” from getting too big there is a Slider Bar on the right hand side of the “Window” to allow you to scroll up and down. Simply click/hold the slide bar and scroll it up and down or click on the up/down arrows on the slider bar itself.
Scrolling around the World
Probably the most common function in Transport Tycoon Deluxe is moving around the 3-D world. To do this simply place the cursor somewhere in the main game (3-D) view and hold down the right mouse button (RMB). Keep the button held down and move the mouse in the direction that you want to go. The screen will scroll in that direction. When you have moved far enough, release the button.
20 |
Section 2: Game Controls |
Section 2: Game Controls |
21 |
The Map ÒWindowÓ
Within the game, you will encounter the Map “Window”.
The controls for moving around the Map “Window” are exactly the same for the Main 3-D “Window”.
Map Icon
Maximise/Minimise
Icon
Map Window
■Open the Map “Window” by clicking on the Map Icon. Place the cursor in the “Window” and hold down the RMB. With the button held down move in the appropriate direction. Release the button when you have gone far enough. If you now click the LMB in the “Window”, you will be moved to this position in the Main 3-D “Window”.
The icon in the top right of the Map “Window” is the maximise/minimise “Window” icon. Click on this icon and the “Window” will extend to its maximum size, click the icon again and the “Window” will return to its original size.
Zoom In |
Zoom Out |
Icon |
Icon |
Zooming In and Out
To magnify or shrink the view in the Main 3-D “Window” click on either the Zoom In or the Zoom Out icons.
There are three levels of magnification in Transport Tycoon Deluxe. High, Medium and Low.
Short Cut Keys
‘F1’ to ‘F12’ duplicates the function of the icons at the top of the screen. ie. ‘F1’=Pause, ‘F2’=Options, etc.
‘1’ to ‘4’ activates the rail construction icons if the rail construction window is displayed.
‘1’ to ‘2’ activates the road construction icons if the road construction window is displayed.
‘C’ centres the 3-D view on the location under the pointer.
‘Z’ centres and zooms-in the 3-D view on the location under the pointer.
‘Esc’ returns the pointer to ‘normal’ and cancels whatever function it was performing before (eg track construction pointer, etc.)
‘Spacebar’ cancels the current news message window.
‘Delete’ closes all non-vital windows.
22 |
Section 2: Game Controls |
Section 2: Game Controls |
23 |
24 |
Section 2: Game Controls |

SECTION 3:
Tutorials
25
BEFORE WE BEGIN
For extra information on particular game features, see the Reference Guide section on page 59 of this manual.
TUTORIAL ONE
A Road Network
This tutorial will guide you through Transport Tycoon Deluxe’s basic controls and get you up and running with a small road network.
Remember: If you get stuck and don’t know how to do something, hold down the RMB over most icons and “Windows” in the game for a brief description of what they do, or refer to the Reference Guide in this manual.
■Load the game as described in the Technical Supplement.
■Select New Game from the Main Menu. The Game selection window will appear, allowing you the opportunity to select from scenarios and saved games stored on CD, and a ‘randomly generated game’. For the purposes of this tutorial click on ‘randomly generated game’. You will be placed in the centre of the 3-D Isometric World.
The map has randomly placed factories, forests, mills and mines; more will appear as the game progresses and the competition heats up.
On beginning a new game you will be shown a picture of your manager and be prompted to type your name in the Manager’s Name “Window”.
ManagerÕs Name
Type in your name and press <RETURN>, or click on ‘OK’. The “Window” will disappear and your name will appear under your Manager’s face. If you make a mistake, click on the Manager’s Name Bar (third bar from the left, at the bottom of the “Window”) and the Manager’s Name “Window” will re-open. Correct the mistake and press <RETURN>.
ManagerÕs Face, Company
Name and Colour
From the Manager’s “Window” you can also change the face of your manager, the name of your company and the colour scheme for your vehicles.
Your manager’s face is set at random, but you can change it.
■To change it, click on the New Face button (bottom left of the “Window”), this will open the Face Selection “Window”.
26 |
Section 3: Tutorials |
Section 3: Tutorials |
27 |

Face Selection Window
You now have the choice of Male, Female or New Face. Select either Male or Female and click on New Face until you find the face you want, then click on OK.
Company Name
Your company name will default to your Manager’s name followed by the word: ‘Transport’.
■To change it click on the Company name button (bottom right of the “Window”), delete the name by using the Backspace Key, type in a new one and press
<RETURN>/ or click on ‘OK’.
Company Colour
Your company’s colour selection is random.
■To change it, click the Colour Scheme Button (second bar from the left, bottom of the “Window”), this will open the Colour Scheme “Window”.
Colour Scheme Window
To scroll through the available colours, click the up or down arrows on the slider bar (right side of the “Window”), or drag the slider bar up and down. Now select your new colour by clicking on the appropriate vehicle colour (clicking on a bus will automatically close the Colour Scheme “Window”.).
When you have finished close any open “Windows” by clicking on the cross in the top left corner. Now you are ready to begin.
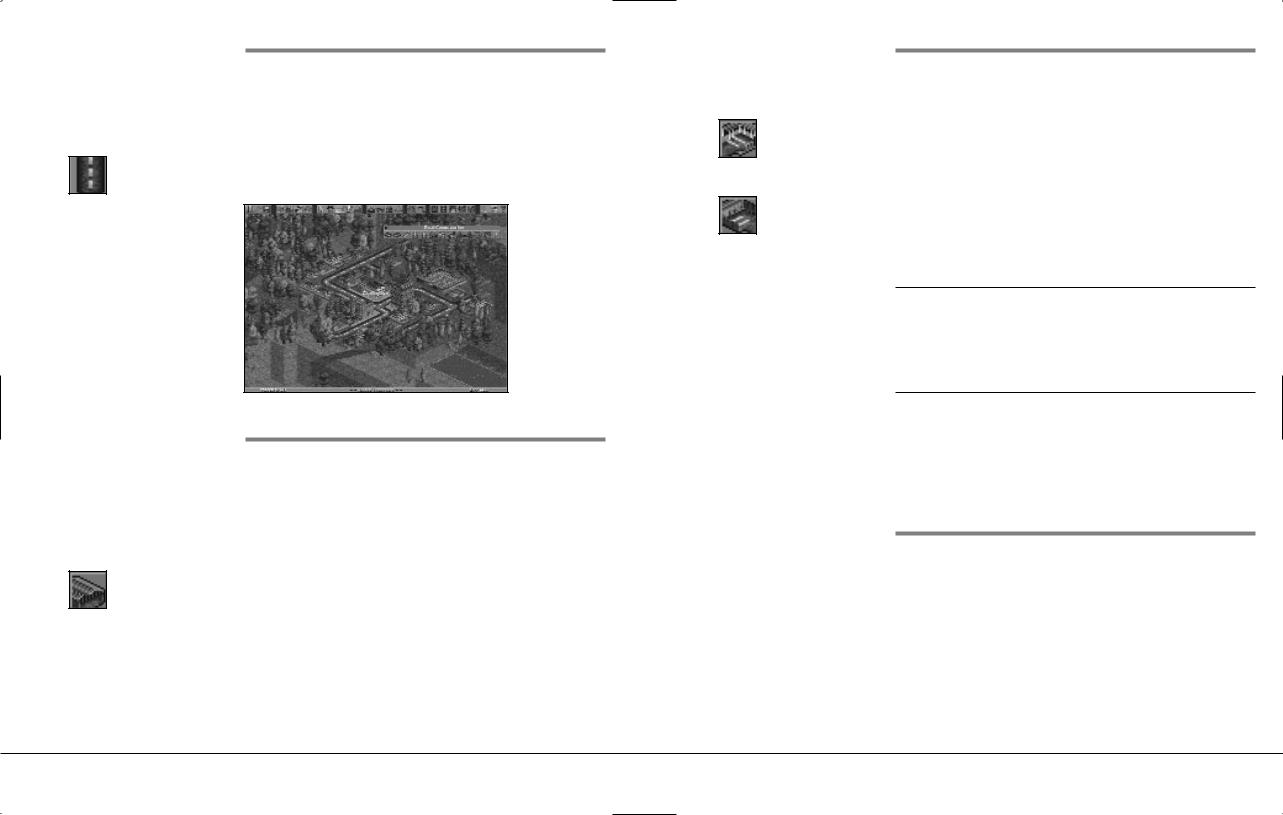
Main Screen
28 |
Section 3: Tutorials |
Section 3: Tutorials |
29 |
Choosing a place to begin
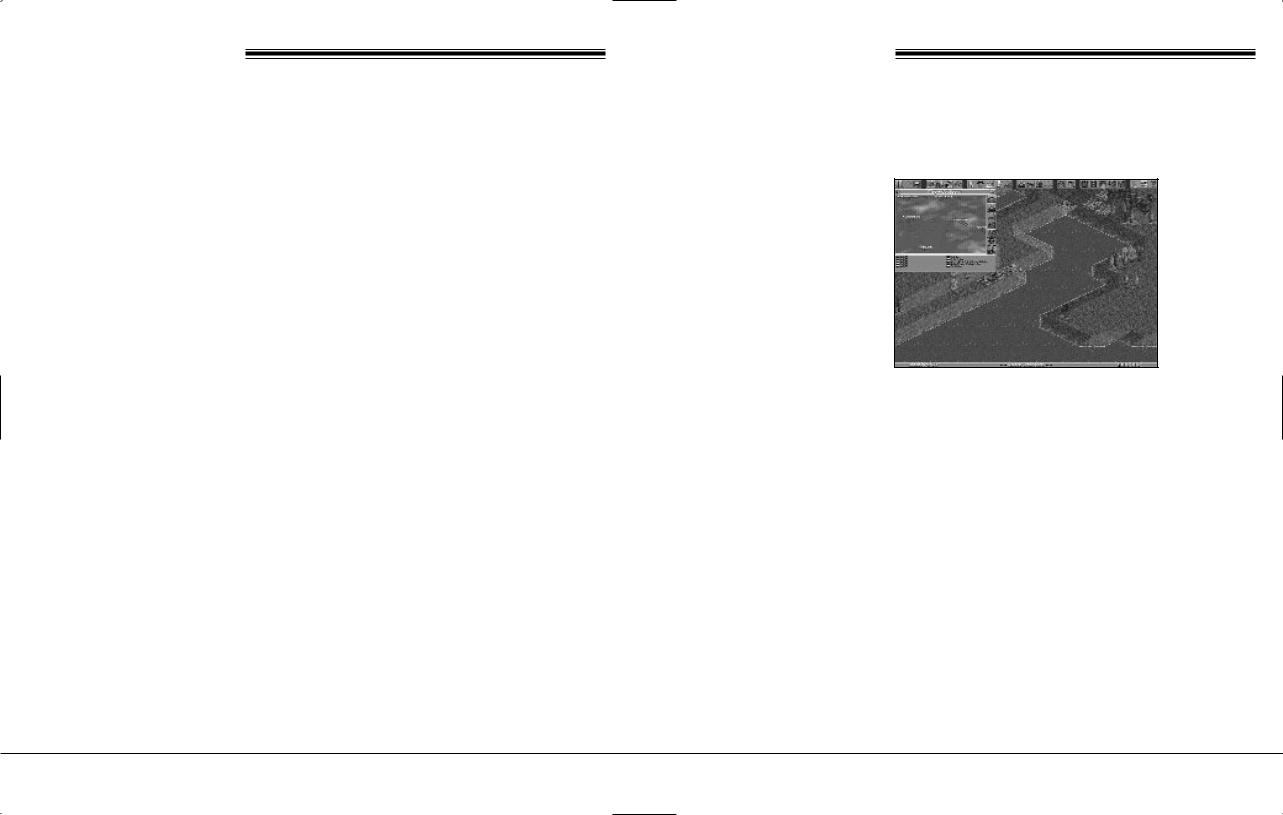
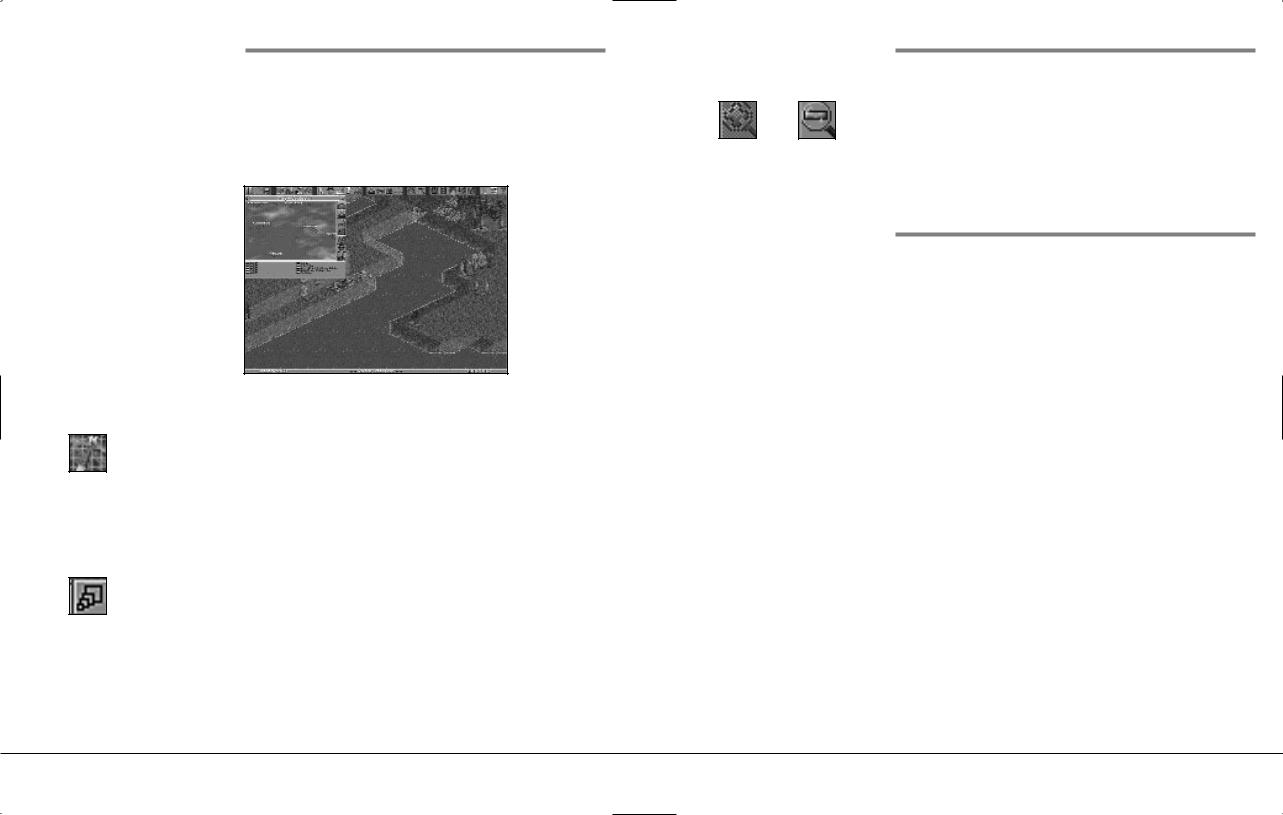
Click on the Map icon and open up the world map.
Map Icon
Map Window
Place the cursor over the Map “Window” and hold down the Right Hand Mouse Button (RMB). Now, while keeping the RMB held down, move the mouse to scan the map quickly for a site to begin your transport operations.
For this tutorial, find a town that already has a substantial road network. Towns show up in the Map “Window” as brown areas with black lines (the roads) marked on them.
When you’ve found a good location:
■Click inside the Map “Window” with the LMB and you will move straight there in the 3-D world (your position is shown on the Map “Window” by the four yellow markers).
Generally the greater the population of the town the better. Try to find a town with a population of at least 300; information is accessed by clicking on the place name bar found near the centre of the town. This will open the Towns Information “Window”.
Town Information Window
You can also rename a town from this information “Window”. To make these tutorials easier to understand we recommend that you rename your choice for this tutorial ‘TOWN ONE’.
■Click on the rename bar at the bottom of the “Window”.
■Delete the old name and rename it Town One.
■Click on OK or press <RETURN>.
30 |
Section 3: Tutorials |
Section 3: Tutorials |
31 |
Road Construction
Icon
Depot Icon
Beginning Construction
■Close all open “Windows” (by clicking on the X in top left corner).
■Open the Road Construction “Window” by clicking the Road Construction Icon in the Construction Group.
Construction Window
Placing Road Depots
Find a central position in the town and place a Vehicle Depot facing one of the roads.
■Click on the Depot icon and again on the point where you want to build. As long as the Depot is built on clear, level ground on the square next to and facing a road it will join the road automatically. Be careful to ensure that you select the correct depot orientation, otherwise vehicles will be unable to enter or leave it.
You are now able to buy road vehicles. Ensure that the depot entrance connects to a road, otherwise vehicles will be unable to leave or enter the depot.
Bus Station Icon
Loading Bay Icon
Positioning Bus Stations and
Loading Bays
You will now need some Stations/ Depots for your road vehicles to call at. They should be placed in highly populated areas of towns or near industrial sites such as power plants, oil refineries and mills which are linked to a town. Now build at least two Bus stations or Loading Bays to begin with so that the vehicles have sites to travel between. This will enable your company to make money on each trip. Don’t forget to select the correct orientation.
Remember: If you click on ‘Show Catchment Area Highlight On’ and drag the cursor over the main 3-D view, the proposed Loading Bay or Station position will be represented by the White hollow box, the Catchment Area by the hollow Blue squares.
Bus Stations only deal with passengers and Loading Bays with all Goods including Mail. You can see the status of any Loading Bay or Station (i.e. what is waiting, what it accepts and its ratings) by clicking on it from the 3-D world.
Buying Road Vehicles
■Click on the Depot you have built. (Depot “Window” will appear).
■Click the New Vehicles Button (bottom left of the “Window”) and a list of all the available road vehicles will appear.
You can scroll through the list of vehicles by clicking the up or down arrows on the scroll bar on the right of the “Window”.
32 |
Section 3: Tutorials |
Section 3: Tutorials |
33 |
 Loading...