


®
INSTALL GUIDE, PLAYGUIDE AND REFERENCE CARD
TABLE OF CONTENTS
Copy Protection Questions and Answers . . . . . . . . . 2
Install and Additional Reference Guide . . . . . . . 3-18
System Requirements . . . . . . . . . . . . . . . . . . . . . . 3
On-Line Help . . . . . . . . . . . . . . . . . . . . . . . . . . . . . 3
Quick Install. . . . . . . . . . . . . . . . . . . . . . . . . . . . . . 3
Installation . . . . . . . . . . . . . . . . . . . . . . . . . . . . . 4-5
Optimizing Your System . . . . . . . . . . . . . . . . . . 6-9
Troubleshooting . . . . . . . . . . . . . . . . . . . . . . . 10-13
ORIGIN Product Support . . . . . . . . . . . . . . . . . . 14
Additions and Changes. . . . . . . . . . . . . . . . . . 14-15
Gauntlet . . . . . . . . . . . . . . . . . . . . . . . . . . . . . . . . 16
Tactical Operations . . . . . . . . . . . . . . . . . . . . . . . 17
Playguide . . . . . . . . . . . . . . . . . . . . . . . . . . . . . . . 19-63 Detailed Contents. . . . . . . . . . . . . . . . . . . . . . . . . 19 Starting the Game . . . . . . . . . . . . . . . . . . . . . . 20-21 Game Options. . . . . . . . . . . . . . . . . . . . . . . . . 22-24 Camera Views. . . . . . . . . . . . . . . . . . . . . . . . . 24-25 Wildcat Base. . . . . . . . . . . . . . . . . . . . . . . . . . 26-31 Cockpit instruments . . . . . . . . . . . . . . . . . . . . 32-39 Flight . . . . . . . . . . . . . . . . . . . . . . . . . . . . . . . 40-41 How to Fly . . . . . . . . . . . . . . . . . . . . . . . . . . . 42-43 Air Combat Tactics. . . . . . . . . . . . . . . . . . . . . 44-49 Practice Missions . . . . . . . . . . . . . . . . . . . . . . 50-52 Reference . . . . . . . . . . . . . . . . . . . . . . . . . . . . 53-62 Credits . . . . . . . . . . . . . . . . . . . . . . . . . . . . . . . . . 63
Reference Card. . . . . . . . . . . . . . . . . . . 64, Back Cover

Strike Commander Copy Protection Questions and Answers
0.What is the name of the tower (Turm) in the Beyoglu section of Istanbul (p. 23)? Galata
1.What is the last name of the author of “Sell and Scramble” (p. 12)?
Duhm
2.What is the last name of the Senior Writer (Serien, Ecrivian) (p. 1)? Austin
3.What is the last name of the man interviewed on page 36? Prideaux
4.Who wrote the first letter to the editor in this issue of “Sudden Death” (p. 4)? Beto
5.What squadron was destroyed when it attacked Clairborne Aerospace (p. 25)? Claws
6.In what province did Janet “Vixen” Page grow up (p. 9)?
Quebec
7.In 2002, what country owned over 20% of the CIS (CEI, GUS) (p. 42)? Japan
8.What company issues the Gold Card (carte Gold) (p. 17)?
Maxima
9.What high school (lycee) did Tex attend in Amarillo (p. 10)? Jackson
10.What company advertises blasting material on page 11? Concorde
11.Who do the Wildcats find at 1113 hours (p. 20)? Guillaume
12.What is the first word in the title of the game advertised on page 38? Strike
13.What former state of the U. S. advertises on page 44?
Hawaii
14.What is the first name of the man who wrote the Wildcat article on page 6? Virgil
15.In 2001, what state was the first to secede from the U. S. (p. 41)?
Texas
16.In 2005, who is president (p. 42)? Guerrero
17.What is the last book listed in the Bibliography (at the middle of the manual)? Wings
18.What is the first word (besides Strike Commander) in the Option Screen pictured on page
48? Configuration
19.What is the last weapon described in the Reference section (p. 81; Fr. p. 82; Gr. p. 85)? Durandal
2

STRIKE COMMANDER CD
INSTALL AND ADDITIONAL REFERENCE GUIDE
See p.18 for Contents.
I N T R O D U C T I O N
Welcome to Strike Commander on CD. This guide tells you how to install your new game. If you have any difficulties, see Troubleshooting (pp. 10-13). To avoid compatibility or memory problems, please take a moment to make sure that your system meets the
system requirements.
S Y S T E M R E Q U I R E M E N T S
Computer. This game calls for an Intel486 or 100% compatible system. Video Card. IBM VGA or compatible video card.
Free RAM. You must have at least 640K of base RAM (memory) to play Strike Commander. Of that 640K, at least 557K (571,000 bytes) of base memory must be available at the DOS prompt to run the minimum game configuration. You must also have at least 2700K (2,765,000 bytes) high memory:
If your CONFIG.SYS contains an EMS driver, you must have 2700K (2,765,000 bytes) of EMS memory available.
If your CONFIG.SYS does not have an EMS driver, you must have 2700K (2,765,000 bytes) of XMS memory available.
Strike Commander won’t run with less than that. See Memory Requirements (p. 6) for more information.
Hard Disk. You must have a minimum of 2 megabytes free on your hard disk to install and play Strike Commander CD.
CD-ROM. MS-DOS CD-ROM extensions 2.1 or higher are required; a CD drive with 350ms or faster seek time is recommended.
O N - L I N E H E L P
Press 1for on-line help during installation.
Q U I C K I N S T A L L
1.Insert the CD-ROM (label side up) into your CD-ROM drive.
2.Change to your CD-ROM drive.
3.Type INSTALL.
4.Follow the instructions at each prompt.
3

I N S T A L L A T I O N
When presented with a menu, press Wand Zto move through the list, then press e to accept the highlighted selection. You may abort the installation process by pressing qor selecting the ABORT menu option.
1.Insert the CD-ROM (label side up) into your CD-ROM drive. Some drives may require that you put the disk into a CD caddy before inserting it in the drive.
2.Change to your CD-ROM drive by typing the letter of the drive and a colon, then pressing e.
3.Type INSTALL.
4.The program prompts you for the letter of the hard drive to which you want your system configuration data and saved games written. Press the letter on your keyboard corresponding to a hard disk with adequate space. If you specify an invalid drive, the program will prompt you again.
5.You are prompted for the sound card you are going to use for music. If you do not have a sound card, you can select NOTHING. Your choices are:
NOTHING
AD LIB
ROLAND / LAPC-1
GENERAL MIDI
ANY SOUND BLASTER
WAVE BLASTER
PRO AUDIO SPECTRUM
ABORT INSTALLATION
6. You are asked for the sound card to use for digital effects. If you do not have a sound card, you can select NOTHING. Your choices are:
NOTHING
SOUND BLASTER
SOUND BLASTER PRO
PRO AUDIO SPECTRUM
ABORT INSTALLATION
7.If you select any of the Blaster cards (SOUND BLASTER, WAVE BLASTER, etc.), you are prompted for the Base I/O and IRQ settings of the card. The install program will initially highlight the default values for these; if you have changed either your cards I/O or its IRQ, select the correct value(s) and press e. Note that older Sound Blaster cards have a default IRQ of 7 (rather than 5). Use Wand Zto highlight each appropriate selection, then press e.
8.You are asked if your system is equipped with a local bus video card. If it is, choose this option for a slight improvement in performance. (If you do not have a local bus video card, choosing this option slows performance.)
9.You are given several installation options at this point. You must always install the primary executable and the current game map, so this is not given as an option. These basic files take less than 2 megs of hard drive space.
4

In addition, you may copy two more sets of files from the CD to your hard drive. Generally, the more files you can store on your hard drive, the faster the game will run. The drawback is that you use more space on your hard drive. Select the installation method that works best for you. The two sets of additional files, along with how much space they would occupy on your hard drive and which systems we recommend them for are:
OPTION |
HARD DRIVE SPACE |
OPTIMAL FOR |
COPY ADDITIONAL EXECUTABLES |
2 MEGS |
SINGLE SPEED CD DRIVES |
COPY TREE |
9 MEGS |
4 MEGS RAM |
Players using double speed CD drives and who have at least 8 megs of RAM might notice slight improvement in performance by copying these additional files to their hard drives.
Of course, it is possible to transfer both sets of additional files. This combination (including basic files) occupies less than 12 megs on your hard drive and is recommended for players with single speed CD drives and only 4 megs of RAM.
Note: It is possible to transfer all files from the CD to your hard drive, but this is not given as an option because doing so fills over 150 megs on your hard drive. If that is really how you want to play the game, install the basic executables using any option given above. Then go to you CD drive prompt, and type:
XCOPY *.* C:\(Strike directory)
This will take quite a while, and we definitely do not recommend it.
10.The install program copies files to your hard drive.
11.When the installation is complete and you are ready to play, go to the Strike directory on your hard drive. (If you accepted our default suggestion, this directory is SC.) Type SCCD to get a menu of games, and select the game you want to play (STRIKE
COMMANDER or TACTICAL OPERATIONS) from this menu.
C H A N G I N G Y O U R C O N F I G U R AT I O N
If you ever add a sound card or change from one card to another, simply re-run the installation program from your hard drive. (You would re-run the install program from the CD only if you were totally replacing the game.)
R E - I N S TA L L I N G
Should you find it necessary to re-install Strike Commander, we recommend that you first delete all the files in the Strike Commander directory except any files with the .SAV or .TO1 extensions (these are your Strike Commander and Tactical Operations saved games, respectively). The install process will not write over them.
5

O P T I M I Z I N G Y O U R S Y S T E M
M E M O R Y R E Q U I R E M E N T S
We have tried to minimize the amount of time you spend configuring the memory in your system, but Strike Commander is the most memory-intensive game in ORIGIN’s history, and adjustments to your memory configuration may be needed.
There are three types of RAM referred to in this manual: DOS (conventional base RAM), extended and expanded. Strike Commander has specific minimum requirements for each of these types of memory. If you are unsure about these different types of memory, consult your DOS manual.
To find out how much DOS, extended and expanded memory your computer has available, type MEM at the DOS prompt. When the memory information is printed on the screen, look for the following listings:
LARGEST EXECUTABLE PROGRAM SIZE
LARGEST AVAILABLE UPPER MEMORY BLOCK
TOTAL EXTENDED OR XMS
BYTES FREE OF XMS
BYTES AVAILABLE XMS
BYTES FREE OF EMS
FREE EXPANDED (EMS)
The Largest Executable Program Size should be at least 557K. (Actually, it can be as small as 527K, if the Largest Available Upper Memory Block is at least 30K.)
You will have only one of the last five listings — Total Extended or XMS / Bytes Free of XMS / Bytes available XMS / Bytes Free of EMS / Free Expanded (EMS) — partially depending on whether or not you have an EMS driver. Regardless of which listing you have, it should show at least 2700K available.
If you are experiencing problems installing or running Strike Commander, it might help to create a separate boot disk or decrease the number of memory-resident programs (TSRs) you have loaded with the suggested configurations listed below.
Do not delete your AUTOEXEC.BAT or CONFIG.SYS files completely, or alter them on your hard drive — without them, your computer will not function.
6

C R E AT I N G A B O O T D I S K
Before you proceed, you should print out the contents of your AUTOEXEC.BAT and CONFIG.SYS files. If you do not have a printer, copy the contents by hand or make backups of the files that you can look at later. To print, at the DOS prompt, type:
TYPE CONFIG.SYS
Use Gto generate a printout of this startup file. Next (while still at the DOS prompt), type:
TYPE AUTOEXEC.BAT
Use Gto generate a printout of this startup file, also.
To create a separate boot disk:
1.Insert a blank high density disk in your A: drive. From the DOS C: prompt, type:
FORMAT A: /S e
2.When the DOS prompt returns and the format is complete, type:
EDIT A:\CONFIG.SYS e
When the new screen appears, type the commands shown below. This configuration is generic and may require additional drivers. Consult your CD-ROM manual for more information.
CONFIG.SYS using EMM386.EXE (EMS with DOS 5.0, 6.0, 6.2, Windows 3.1)
DEVICE=C:\DOS\HIMEM.SYS
DEVICE=C:\DOS\EMM386.EXE 3072 RAM FRAME=E000 /I=B000-B7FF
Use the previous line only for 4-meg systems.
DEVICE=C:\DOS\EMM386.EXE 7168 RAM FRAME=E000 /I=B000-B7FF
Use the previous line only for 8-meg (or larger) systems. Do not include NOEMS in either of the two previous lines.
DOS=UMB
DOS=HIGH
FILES=25
BUFFERS=25
SHELL=C:\DOS\COMMAND.COM C:\DOS /P DEVICEHIGH=C:\(drivers)
Add your CD-ROM driver(s) to the previous line just as they appear in your original hard drive CONFIG.SYS.
DEVICE=C:\MOUSE\MOUSE.SYS
You may need to adjust the path in the previous line, depending on the location of your mouse driver.
DEVICE=C:\DOS\DBLSPACE.SYS /MOVE
Include the previous line only if you are using DoubleSpace with DOS 6.0 or 6.2.
Exit and save this file by typing: aF
X
Y
If you are running under EMM386, you can load other device drivers into high memory with the DEVICEHIGH command.
7

CONFIG.SYS using QEMM 6.0, 6.02 or 7.0 (EMS)
DEVICE=C:\QEMM\QEMM386.SYS RAM DOS=HIGH
FILES=25
BUFFERS=25
DEVICE=C:\QEMM\LOADHI.SYS C:\DOS\DBLSPACE.SYS /MOVE
Include the previous line only if you are using DoubleSpace with DOS 6.0 or 6.2.
DEVICE=C:\QEMM\LOADHI.SYS C:\(drivers)
Add your CD-ROM driver(s) to the previous line just as they appear in your original hard drive CONFIG.SYS.
DEVICE=C:\QEMM\LOADHI.SYS C:\MOUSE\MOUSE.SYS
You may need to adjust the path in the previous line, depending on the location of your mouse driver.
SHELL=C:\DOS\COMMAND.COM C:\DOS /D
Exit and save this file by typing: aF
X
Y
If you are using QEMM, you can also use the Optimize program to optimize your system setup. See your QEMM documentation for more information.
CONFIG.SYS using HIMEM.SYS (XMS with DOS 5.0, 6.0, 6.2, Windows 3.1)
DEVICE=C:\DOS\HIMEM.SYS DOS=HIGH
FILES=25
BUFFERS=25
SHELL=C:\DOS\COMMAND.COM C:\DOS /P
DEVICE=C:\(drivers)
Add your CD-ROM driver(s) to the previous line just as they appear in your original hard drive CONFIG.SYS.
DEVICE=C:\MOUSE\MOUSE.SYS
You may need to adjust the path in the previous line, depending on the location of your mouse driver.
Exit and save this file by typing: aF
X
Y
Note that an XMS boot disk needs only 527K base RAM free to run Strike Commander CD, rather than 557K. However, if you’re using DoubleSpace, you may not be able to free enough base RAM to play. Note that the XMS CONFIG.SYS we recommend does not use DoubleSpace.
AUTOEXEC.BAT
You will also need an AUTOEXEC.BAT file on your boot disk. To create one, type:
EDIT A:\AUTOEXEC.BAT e
8

When the new screen appears, type:
PROMPT $P$G
PATH=C:\DOS C:
C:\(path)\MSCDEX.EXE (all parameters from the original AUTOEXEC.BAT)
If you do not have 557 base RAM free, try changing /M:## to /M:5 in the previous line.
LH C:\MOUSE\MOUSE.COM
Your mouse driver may need to be loaded differently. For example, if it is loaded in your CONFIG.SYS, do not include this line in your AUTOEXEC.BAT. Refer to the printout of your original AUTOEXEC.BAT to see if it is normally loaded there.
Exit and save this file by typing: aF
X
Y
Supporting Your Peripherals
You may need to add lines to the basic boot disk CONFIG.SYS and AUTOEXEC.BAT for Strike Commander to support certain sound cards, game cards and other hardware. Consult your documentation for these products.
U S I N G Y O U R B O O T D I S K
1.Turn your computer off, insert your new boot disk in your A: drive and turn the computer back on. (If your CD drive is external, turn it on.)
2.Insert the CD-ROM disk (label side up) into your CD-ROM drive. (Some drives may require that you put the disk into a CD caddy before inserting it in the drive itself.)
3a. If you haven’t yet installed the game, change to your CD-ROM drive by typing its drive letter followed by a colon (e.g., d:) and pressing e, then continue from Step 3 in Installation (p. 4).
3b. If you’ve already installed the game and you are ready to play, go to the game directory on your hard drive. (If you accepted our default suggestion, this directory is SC.) Type SCCD to get a menu of games, and select the game you want to play (STRIKE
COMMANDER or TACTICAL OPERATIONS) from this menu.
C A C H I N G
Strike Commander uses all available memory for its own internal disk caching. Adding SmartDrive or any other caching utility may actually slow disk access.
I / O A N D I R Q
If the install program reports difficulty finding your sound card, check to make sure you’ve selected the correct I/O and IRQ. Consult your sound card documentation if you continue to have difficulties.
9

T R O U B L E S H O O T I N G
Occasionally, something will go wrong with the installation process. Common error messages are given below, along with some solutions.
Online Help. Some of this information is included in the install program’s on-line help feature, which can be accessed at any point during installation by pressing 1.
M E S S A G E S D U R I N G I N S TA L L AT I O N
The version of DOS on your machine is too old to run Strike Commander.
You need DOS version 5.0 or higher. New versions of DOS can be purchased at almost any computer dealership. Strike Commander has been fully tested with versions 5.0, 6.0 and 6.2.
The CPU detected on this machine is not compatible with Strike Commander. You need an 80386 or better to install and play Strike Commander.
Strike Commander requires a computer with an 80386 or better CPU. Older CPUs do not have the processing power required to play Strike Commander — they can not run the game. (Some players with 386 CPUs are satisfied with Strike’s performance on their systems, but most are not. We recommend that you use at least a 486.)
If you do not have one of these CPUs, you will need a CPU upgrade in order to play Strike Commander. If you do have a 386 or better and receive this error message, try installing again from the beginning. If you still receive this message there may be a defect in your processor.
Could not copy files from the CD to the hard drive.
Although this could mean that your drive is malfunctioning, the most common cause of this message is a read error. Check to make sure the CD is properly inserted in the drive and that the drive is closed completely, then try installing again.
One of the configuration files either could not be located, or could not be created.
An error has been detected with an install configuration file. This usually means one of two things has occurred:
(1)A file needed by the install program to properly determine your computer’s configuration was not found. The file could have been damaged, deleted or moved, or the directory structure of your machine could have been altered since the last installation.
(2)The install program was unable to write a configuration file. The hard disk could be full or could contain undetected errors. Another possibility is that your computer has a memory problem that is stopping the installation. See Optimizing Your System
(pp. 6-9) to remedy this situation.
Make sure you are in the directory in which Strike Commander was previously installed, or in the directory where the install program is.
Could not find treefile.
This means that one of the files necessary to run the game was not available. There are a number of possible causes for this error, including:
•The CD-ROM is not loaded in the drive correctly.
•The CD-ROM drivers are not installed correctly or have been incorrectly modified.
10
• The hard disk where the installed game is located could not be found.
Make sure that all game files on your hard drive are located in the game directory. If this problem persists, attempt reinstalling Strike Commander CD-ROM. If this does not fix the error, please contact ORIGIN Product Support (see below).
Could not create the Strike Commander directory.
A file exists with the same name as the directory, the drive may not have enough free space, or you have attempted to install to a disk that is set to read only. The latter should only be a problem if you are loading onto or with a network.
We do not recommend loading Strike Commander while network drivers are loaded.
T R O U B L E S H O O T I N G D U R I N G P L AY
My mouse is not working with Strike Commander CD. My mouse works with all of my other software applications — why not with Strike Commander?
If your mouse is not working with Strike Commander, you should first check to see if your mouse has been loaded in DOS (in your AUTOEXEC.BAT file) or onto the boot disk you are using to play the game. Windows and many other “multi-tasking” environments load their own built-in mouse driver. These mouse drivers will not operate outside of their shell environment. Loading a mouse driver into the DOS environment can be as simple as typing MOUSE eat the command prompt. For example:
C:\MOUSE e
This command can differ depending on which mouse driver software you are using. Please consult your mouse user’s guide for further details.
You may also experience trouble running Strike Commander with a non-Microsoft (or 100% compatible) mouse driver. If you do, any of the following steps should fix the problem:
1.Replace the mouse driver with a Microsoft mouse driver.
2.Disconnect your mouse and use your keyboard or joystick instead.
3.Remove the mouse driver and use your keyboard or joystick instead.
Why do I get the message: “Sound System Initialization Failed”?
You probably have enough memory to run the game, but not enough to load the sound drivers you selected during installation. You will either have to increase the amount of free DOS memory (see Optimizing Your System, pp. 6-9) or play without sound.
or If your sound card is not one of the cards listed on the box or in the installation program, but is 100% compatible with one of the cards listed, it may need to be configured for Sound Blaster emulation mode. Consult your sound card manual.
When I start, the music sounds very odd on my Sound Blaster Pro.
Early versions of the Sound Blaster Pro require different configurations than later versions. To correct this, run the SET-ENV program that came with your Sound Blaster Pro. This will automatically set the environment variable properly. If this doesn’t work, this variable can be set manually. Consult your Sound Blaster Pro documentation or your hardware dealer for more information.
I don’t have a digital sound card, so I selected SOUND FX (AUDIO Option Screen). However, I can’t hear the engine. What’s wrong?
Without digital sound effects, Strike Commander cannot simultaneously run both music and engine noise. If you want to hear the engine noise, turn MUSIC off.
11

I am having trouble using my joystick.
•Your joystick may be set to “auto fire.” If this is the case, the buttons may not function as you expect. To correct the problem, turn auto fire off. If your joystick doesn’t allow you to turn auto fire off, unplug it and play with a mouse or use the keyboard controls.
•In the event that you experience any joystick calibration problems, be sure that you don’t have more than one active gameport on your system at any time, as they will conflict with Strike Commander’s calibration routine and will affect game performance. This includes gameports present on sound cards, gamecards or I/O cards. You may need to consult the documentation for your system, sound card and game card to resolve any problems.
•If you are using a multi-speed gamecard, be sure that you have performed the software or speed dials tests for your particular gamecard. If you continue to have problems, try adjusting the speed-dial or numeric software settings a little higher or lower than normal. On cards like the Gravis Eliminator game card, we found settings between 4.0 and 5.5 to be well suited for Strike Commander. For other cards, please check your game card documentation to configure the card for different speed settings. If the problem persists, you may have a defective joystick or gameport.
Why does my computer lock up or give me “run time” errors?
On some machines, the CD-ROM drive may be daisy-chained with several other drives on a cable from the SCSI controller card. Because this game needs to have simultaneous access to both the hard drive and the CD-ROM drive, it cannot run on a CD drive that is daisy-chained with other drives. We strongly recommend that Strike be installed to a drive that is not on the same cable as your CD-ROM drive.
I’ve got 16 (or more) megs of RAM and a digitized sound card, so I shouldn’t be having any problems, but speech in the game is full of static.
Because direct memory access (DMA) will not work with memory addresses above 16 megabytes, the digitized speech of Strike Commander may not work correctly on machines with large amounts of memory. If you hear static in the game when speech would be more appropriate, then this problem could be occurring.
The best solution is to remove your memory manager and let the game supply the high memory using its own memory manager.
See Optimizing Your System (pp. 6-9) for more details on memory configuration.
I’ve got a digital sound card, and I’ve turned on DIGITAL FX, but I still sometimes get undigitized sound effects.
With DIGITAL FX turned on, you may run into instances where you will get non-digitized sound effects. This will happen if a digital effect is supposed to be played at the same time as another digital effect. The chip used by most sound cards to produce digitized sound and effects can only play one digitized effect at a time.
When I try to start a new game, it crashes to DOS and gives me Error Code #1910 or #1941.
This is caused by a bad installation or a corrupted file on the original installation. To determine which is the case, boot from a clean configuration that does not load other conflicting device drivers such as a disk cache. See Optimizing Your System
(pp. 6-9) for more information on the proper configuration. Next, delete all files from the Strike Commander directory (default: C:\SC). Finally, re-install Strike Commander and Tactical Operations (while booted from the clean configuration).
12

S P E C I F I C H A R D WA R E A N D S O F T WA R E
DoubleSpace
Strike Commander has been fully tested with MS-DOS 6.0’s DoubleSpace disk compression utility. We cannot guarantee the compatibility of our games with other disk compression utilities. You might want to add the following line to your CONFIG.SYS file to free more DOS RAM (base memory):
DEVICEHIGH=C:\DOS\DBLSPACE.SYS /MOVE
Thrustmaster Weapon Control System
The DIP switch settings on the Weapon Control System for Strike Commander are switches 1, 2 and 6 on. All other switches should be off.
CH GameCard III Automatic
The CH GameCard III Automatic requires a program to be run whenever the machine boots up. This program is called CHJOY3.EXE. Please be sure that this program runs before calibrating joysticks in Strike Commander, or unpredictable results will occur. You may want to add the following line at the end of your AUTOEXEC.BAT:
CHJOY3.EXE
DOS 5.0 SMARTDRV.SYS
Strike Commander does not support the SMARTDRV.SYS that comes with some versions of DOS. It does support SMARTDRV.EXE which comes with Windows 3.0 or better.
Bus Mastering Hard Drive Users
If you’re using a bus mastering hard drive controller card (you’ll probably know if you are), and if the game text and graphics are garbled, add the following line to your CONFIG.SYS:
DEVICE=C:\DOS\SMARTDRV.EXE /DOUBLE_BUFFER
SB16/Wave Blaster and CH Flightstick Combination
Due to a hardware conflict between the joystick port on the Creative Labs’ SB16/Wave Blaster combination and the CH Flightstick, General MIDI music will not be heard when the Flightstick is connected to the SB16/Wave Blaster joystick port. Another manufacturer’s joystick or another joystick port must be used to receive the General MIDI music. Contact the respective manufacturers if you have any further compatibility questions.
General MIDI
Strike Commander CD has joined the next generation of sound quality with its support of the General MIDI standard as defined by the MPU-401 instruction set. At the time of publishing, only a few cards support MPU-401. These cards include the Roland SCC-1 and RAP-10 and the Creative Labs Sound Blaster 16 and ASP 16 (both of the latter with the attached Wave Blaster daughterboard). Other manufacturers have already released, or are planning to release, sound cards that use the MPU-401 instruction set. However, sound cards that use a memory-resident program (TSR) to emulate MPU-401 may not work with this software.
Note that some General MIDI cards offer digitized speech or sound effect capabilities. Strike Commander CD will only use those sound cards that carry the OPL2 FM chip for digitized speech or sound effects. As in the case of the Roland RAP-10, customers will need to use a second sound card, such as a Sound Blaster, Sound Blaster Pro or 100% compatible sound card, for digitized speech and effects. Review your sound card documentation or contact the manufacturer if you have any questions.
13
O R I G I N P R O D U C T S U P P O R T
If, after reviewing Troubleshooting, you are still having a problem with this software, please read this section and call us. We have a staff of customer service technicians ready to help you with any problems you may encounter with the game. ORIGIN Product Support is available at (512) 335-0440, Monday through Friday, between 9 a.m. and noon, and 1 p.m. and 5 p.m. (1 p.m. and 4:30 p.m., Friday afternoon), Central time.
Today’s PCs run with millions of different hardware and software combinations. Because of this, you may also have to refer to your computer dealer, hardware manufacturer or software publisher in order to properly configure their product to run with our game.
When you call, if at all possible, be near your computer. If it is not possible to be near your computer, be sure to have the following information:
•the error message displayed when the problem occurred (if any)
•The DOS version number you are currently running
•your mouse and mouse driver type
•a listing of your machine type and hardware contents
•the contents of your CONFIG.SYS and AUTOEXEC.BAT files
•your CD-ROM drive type and CD-ROM extensions version
•the contents of a CHKDSK and MEM /C statement
A D D I T I O N S A N D C H A N G E S
R U D D E R
Activating RUDDER (FLIGHT Option Screen) allows you to use rudder pedals or a second joystick to turn your fighter, rather than the , or
. keys. Neither of these add anything to what you can accomplish with , or .. (A second joystick can only affect flight with left or right movements.) Note that you cannot use more than one active gameport, but you can use a Y- splitter.
R E A L I S T I C F L I G H T
This option (at the FLIGHT Option Screen) is active only when you are flying an F16. (It can be toggled on when you’re flying the F22, but it will not affect that plane’s flight.) REALISTIC mode, as its name suggests, applies more realistic flight dynamics than in the game’s normal mode. It decreases thrust at every level by 20%, and increases wing drag by 20%. The result is that you cannot fly as fast, especially when pulling a turn.
F L I G H T S T I C K P R O ( F S P R O )
If you select the FS PRO PANNING CONTROL OPTION in the FLIGHT Option Screen, the coolie hat on your FS Pro will control cockpit panning. Selecting FS PRO CONTROL will enable the extra buttons on your FS Pro.
14

H A Z I N G
In the DETAIL Option Screen, the lowest HAZING button (FAR) now produces no hazing at all. (The default for hazing is now the second button, not this first one.) With no hazing, no new objects are revealed, the game is not any faster, and it doesn’t look as good. However, some players prefer to play without any hazing, so this option is now available.
I N V I S I B L E C O C K P I T
It is possible to remove the cockpit from the screen, by pressing cI. Your HUD and any active MFDs remain on-screen, as do any MFDs you subsequently activate. Radar and IR warning lights also still appear.With an invisible cockpit, you can, of course, see more of the sky in front of you, and the game’s frame rate improves slightly. This is a toggle — pressing cI again recalls the rest of your cockpit.
P L AY E R S C O R E
The game keeps a running score of how you’re doing. You can look at it by pressing aS between missions. To maximize your score, play the game with the ACE option (see below).
R A D A R A N D I R WA R N I N G L I G H T S
As missiles get closer to you, the radar and IR warning lights now blink faster.
D A M A G E M F D
The Damage display has an added feature. Systems which are damaged but not destroyed appear in yellow. Only when a system is destroyed does it appear in red.
R O O K I E , V E T E R A N A N D A C E O P T I O N S
The main Option Screen (accessed by pressing aO during flight) allows you to select ROOKIE, VETERAN or ACE difficulty levels. ROOKIE level selects the easier option from each of the following choices; ACE level selects the more difficult option. VETERAN level selects the following options:
ON EASY GUN HITS, MID-AIR COLLISIONS, EASY LANDINGS, STALLS, AUTO TARGETING, 360° LOCK, SMART TARGETING, SUN GLARE, G EFFECTS.
OFF UNLIMITED AMMO, SMART RADAR, 360° RADAR, SMART RAW SCOPE.
ROOKIE level selects ROOKIE ENEMY INTELLIGENCE; VETERAN level selects VETERAN ENEMY INTELLIGENCE; ACE level selects ACE ENEMY INTELLIGENCE.
(After selecting a particular difficulty level — ROOKIE, VETERAN or ACE — you can then change any of the options individually.)
C L A R I F I C AT I O N S
The UNLIMITED AMMO option only applies to gun rounds while playing Strike Commander. It will not give you unlimited missiles or bombs. The only exception are training missions, which do give you unlimited amounts of whichever weapons you are carrying.
Saved Game Limit. Strike Commander will only recognize the first 100 saved games in the game directory. All additional saved games are ignored and cannot be selected in the SAVE/LOAD menu. You may delete unwanted saved games using the DOS delete command.
SHOW WEAPONS (a FLIGHT option) will only show weapons on your own plane and on planes that are viewed through the external camera (6).
15

G A U N T L E T
A new choice has been added to
Strike Commander’s TRAINING
MISSION screen. In addition to
DOGFIGHT and SEARCH-AND-
DESTROY, you can also choose
GAUNTLET.
When you choose GAUNTLET, you immediately find yourself in the air against two SU-27s, two MiG29s and two F-4s. Anytime you eliminate any pair of opponents, another pair flies into action. All pairs will be fighters, but the fighter types will vary from pair to pair. The gauntlet continues until you run out of fuel, are shot down or eject.
Your opponents are always Aces at the highest level of difficulty. You have four -9J missiles and 1000 rounds of ammunition. Enemy fighters have only their standard cannon ammunition rounds, except for F-4s. Each F-4 that appears has its standard cannon ammunition, plus two -9Js. When you finally succumb to the gauntlet, your score is displayed. Good luck!
Your score is based on how many enemies you shoot down, modified by the settings you use (e.g., MID-AIR COLLISIONS, EASY GUN HITS). The more settings you use to make play easier, the lower the value of each kill. The base value for each kill with a missile is 500 points. The base value for each gun kill is 750 points. Each option that you use from the following list reduces the value of your kills:
C O C K P I T |
|
|
G A M E P L AY |
|
|
AUTO TARGETING |
ON -1/2% |
|
UNLIMITED AMMO |
ON |
-99.5% |
360° LOCK |
ON -2% |
|
EASY GUN HITS |
ON |
-5% |
SMART TARGETING |
ON -1% |
|
ENEMY INTELLIGENCE: |
|
|
SUN GLARE |
OFF -1/2% |
|
VETERAN |
|
-5% |
G EFFECTS |
OFF -1/2% |
|
ROOKIE |
|
-10% |
SMART RADAR |
ON -1.5% |
|
F L I G H T |
|
|
360° RADAR |
ON -1% |
|
|
|
|
SMART RAW SCOPE |
ON -1% |
|
MID-AIR COLLISIONS |
OFF -1% |
|
|
|
|
EASY LANDINGS |
ON |
-1/2% |
|
|
|
STALLS |
OFF -1/2% |
|
|
|
|
|
|
|
Note that some of these options (e.g., EASY LANDINGS) have no effect on the Gauntlet. However, this is a close variation of the scoring system that is active during regular gameplay, so if you have EASY LANDINGS or other similar options activated, they will reduce your score, even though they don’t aid your performance in the Gauntlet. Be sure to select the most difficult setting for options like this during a Gauntlet run.
16
T A C T I C A L O P E R A T I O N S
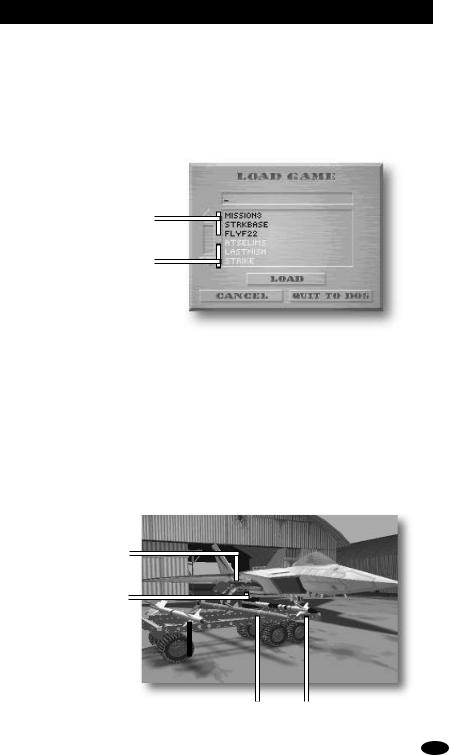
Transferring Your Character from Strike Commander
You can transfer your character to Tactical Operations from any Strike Commander saved game. If you select load game from the startup menu in Tactical Operations, the saved games in white are from Strike Commander. If you select one of these games, your character’s name, callsign and killboard stats will be transferred from the Strike
Commander game you selected to a new Tactical Operations game — the Strike Commander game you selected is not affected. (Your Strike Commander saved games are not available from the Tactical Operations Barracks Option Screen.)
Tactical Operations
saved games
Strike Commander
saved games
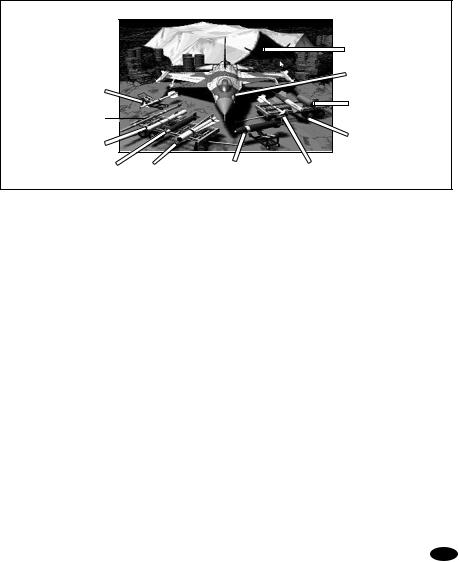
Loading Weapons on the F-22 Lightning II
In Tactical Operations, you will have opportunities to fly missions with the F-22 Lightning II. The F-22 can carry a maximum of two AMRAAMs and two Sidewinders (either -J or -M). No other weapons may be loaded, as this is a dedicated air interceptor. Whenever you fly a mission with this plane, its default loadout is a full load. If you wish to adjust the loadout, you can click on the loaded weapons on the plane, just as in Strike Commander.
Default loadouts are treated just as they are in Strike Commander. If the default weapons are not available in your inventory, they will not be loaded. If you do not use them during the course of your mission, they will be added back into your inventory when you return.
The weapons are loaded under the wing by the intake (see illustration).
Sidewinder
(loaded)
AMRAAM (loaded)
Sidewinder AIM-9J 
AIM-120 AMRAAM |
|
Sidewinder AIM-9M |
|
|
|
17

C O N T E N T S
System Requirements ................................................ |
3 |
DOS 5.0 SMARTDRV.SYS, Bus Mastering Hard |
|
On-Line Help ............................................................. |
3 |
Drive Users, SB/16/Wave Blaster and CH Flightstick |
|
Quick Install .............................................................. |
3 |
Combination, General MIDI |
|
Installation .............................................................. |
4-5 |
ORIGIN Product Support ........................................ |
14 |
Changing Your Configuration ......................... |
5 |
Additions and Changes....................................... |
14-15 |
Re-Installing .................................................... |
5 |
Rudder ........................................................... |
14 |
Optimizing Your System ........................................ |
6-9 |
Realistic Flight .............................................. |
14 |
Memory Requirements .................................... |
6 |
Flightstick Pro ............................................... |
14 |
Creating a Boot Disk.................................... |
7-9 |
Hazing ........................................................... |
15 |
Using Your Boot Disk ..................................... |
9 |
Invisible Cockpit ........................................... |
15 |
Caching............................................................ |
9 |
Player Score................................................... |
15 |
I/O and IRQ ..................................................... |
9 |
Radar and IR Warning Lights........................ |
15 |
Troubleshooting.................................................. |
10-13 |
Damage MFD ................................................ |
15 |
Messages During Installation ................... |
10-11 |
Rookie, Veteran and Ace Options ................. |
15 |
Troubleshooting During Play ................... |
11-12 |
Clarifications ................................................. |
15 |
Specific Hardware and Software................... |
13 |
Gauntlet ................................................................... |
16 |
DoubleSpace, CH GameCard III Automatic, |
Tactical Operations .................................................. |
17 |
|
S T R I K E C O M M A N D E R C D C R E D I T S
PROGRAMMING |
. . . . . . . . . . . . . . . . . . . . . . Scott Biggs, |
PACKAGING |
|
|
|
Paul Isaac, Dr. J. E. Kalan, Peter Shelus, |
Guide . . . . . . . . . . . . . . . . . . . . . . . . . . . . . . |
. Jerrold Harrington, |
|
|
|
Zack Simpson, Jason Yenawine |
Prem Krishnan, Jason Yenawine |
|
|
|
|
Editing . . . . . . . . . . . . . . . . . . . . . . . . . . . . . |
. . . . David Ladyman |
DESIGN . . |
. . . . . . . . . . |
. Adam Foshko, Prem Krishnan, |
Graphic Design . . . . . . . . . . . . . . . . . . . . |
. . . . . Trey Hermann |
|
Rik Packham, Ben Potter, Jeff Shelton |
ADMINISTRATION |
|
|
|
|
|
Jean-Marc Chemla, |
|
ART . . . . . . . . |
. . . . . Tom Evans, David Lawell, Al Perez |
Prem Krishnan, Joye McBurnett, Chris Roberts |
||
AUDIO . . . . |
. . . Randy Buck, Britt Daniel, Jo Olivier, |
VOICES |
|
|
John Tipton, Stretch Williams, Kirk Winterrowd |
A-10 Pilot.................................................. |
Rolf Busch |
||
|
|
|
Tower ........................................................ |
Tom Byrne |
QUALITY ASSURANCE |
C-130........................................................ |
Keith Kelly |
||
Lead Tester ................................... |
|
,Jerrold Harrington |
WC21 Leader ........................................... |
Chris Saver |
Tester . . . . . . . . |
. . . . . . . . . |
. . . Charles Angel, Evan Brandt, |
Surf Dude................................................ |
Jason Tirado |
Dan Orzulak, Scott Shelton, Toby Shelton |
MiG-29 Pilot ............................................ |
Ricky Vega |
||
|
|
|
WC21 Wingman ....................................... |
Paul Wright |
T A C T I C A L O P E R A T I O N S C R E D I T S
PROGRAMMING . . . . . Scott Biggs, Frank Savage,
Peter Shelus, Jason Templeman, Jason Yenawine
AUDIO . . . . . . Laura Barratt, Randy Buck, Jo Olivier, John Tipton, Stretch Williams, Kirk Winterrowd
ART . . . . . . . . . . . . . . . . . . . . . . . Chris Douglas, Tom Evans, Craig Halverson, David Lawell, Bruce Lemons, Sean Murphy, Jake Rogers, Paul Steed
DESIGN . . . . . . . . . . . . . . . . . Prem Krishnan, Ben Potter,
Tim Ray, Jeff Shelton, Peter Shelus
ADMINISTRATION . . . . . . . . . . . Jean-Marc Chemla,
Prem Krishnan, Chris Roberts, Roswitha Shoemake
PACKAGING |
|
Box cover............................................... |
Sean Murphy |
Box design............................................... |
Craig Miller |
Installation guide ................................ |
Prem Krishnan |
Editing .................................................. |
Melissa Mead |
QUALITY ASSURANCE |
|
Lead tester ........................................... |
Charles Angel |
Testing .............................. |
Don Derouen, Forest Yule, |
|
Russell Byrd, Jeremy Mappus |
ADDITIONAL VOICES |
|
Ari, Maxwell........................................ |
Michael Stuart |
Kodiak..................................................... |
Harry Porter |
Ursa-1 ................................................ |
Celso Martinez |
©Copyright 1994 ORIGIN Systems, Inc. Origin and We create worlds are registered trademarks of ORIGIN Systems, Inc. Strike Commander and Tactical Operations are trademarks of ORIGIN Systems, Inc. Electronic Arts is a registered trademark of Electronic Arts. All other trademarks are property of their respective owners.


 ®
®
®
An Electronic Arts® Company
18

P L A Y G U I D E
®
TA B L E O F C O N T E N T S
Starting the Game...................................... |
20 |
Starting a New Game............................. |
20 |
Exiting Strike Commander ..................... |
20 |
Training Missions.................................. |
21 |
Air-to-Ground Missions................... |
21 |
Dogfight Missions ............................ |
21 |
Object Viewer ........................................ |
21 |
Game Options............................................. |
22 |
Option Screens...................................... |
22 |
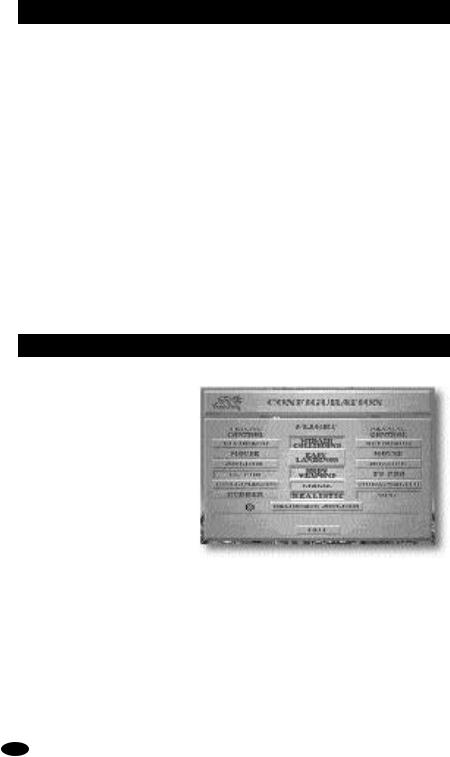
Configuration .................................. |
22 |
Detail............................................... |
22 |
Gameplay ........................................ |
23 |
Cameras.......................................... |
23 |
Flight............................................... |
23 |
Cockpit............................................ |
24 |
Audio............................................... |
24 |
Time Burst and Time Compression ....... |
24 |
Camera Views............................................. |
24 |
Wildcat Base............................................... |
26 |
Loading Your Weapons .................... |
27 |
Barracks ............................................... |
28 |
Loading and Saving Games ............. |
28 |
Virgil’s Office ......................................... |
28 |
Managing the Wildcats .................... |
28 |
Strike Base............................................ |
30 |
Selim’s................................................... |
31 |
Cockpit Instruments.................................. |
32 |
Heads-Up Display (HUD) ....................... |
32 |
HUD Flight Indicators...................... |
32 |
HUD Weapon Modes........................ |
34 |
Multi-Function Displays (MFDs)............ |
37 |
Weapons Display ............................. |
37 |
Damage Display .............................. |
37 |
Gun Camera View ........................... |
37 |
Communication Screen ................... |
37 |
Air-to-Ground Radar ....................... |
38 |
Air-to-Air Radar............................... |
38 |
Threat Warning Indicator |
|
(RAW Scope) .......................................... |
39 |
Aerial Threats.................................. |
39 |
Ground Threats............................... |
39 |
Radar and IR Missile |
|
Warning Lights...................................... |
39 |
Flight ........................................................ |
40 |
Aerodynamics........................................ |
40 |
Lift................................................... |
40 |
Thrust ............................................. |
40 |
Gravity ............................................ |
40 |
Drag ................................................ |
40 |
Pitch, Yaw and Roll................................ |
40 |
G Force ................................................. |
41 |
Pre-Flight Checklist............................... |
41 |
How to Fly .................................................. |
42 |
Flight Controls ...................................... |
42 |
Mouse Control................................. |
42 |
Keyboard Control ............................ |
42 |
Joystick Control .............................. |
42 |
Rudder ............................................ |
42 |
Throttle ........................................... |
42 |
Maneuvers ............................................ |
42 |
Taking Off ....................................... |
42 |
Climb .............................................. |
42 |
Dive................................................. |
42 |
Rudder ............................................ |
43 |
Roll.................................................. |
43 |
Bank ............................................... |
43 |
Stall................................................. |
43 |
Landing ........................................... |
43 |
Air Combat Tactics .................................... |
44 |
Basic Fighter Maneuvers (BFM)............. |
44 |
Combat Geometry............................ |
44 |
Dogfight Maneuvers .............................. |
45 |
Break .............................................. |
45 |
Loop ................................................ |
45 |
Lag Roll ........................................... |
46 |
High Yo-Yo....................................... |
46 |
Low Yo-Yo........................................ |
46 |
Immelmann Turn ............................ |
47 |
Air-to-Air Targeting ............................... |
47 |
Medium Range ................................ |
47 |
Short Range .................................... |
47 |
Guns ............................................... |
47 |
Air-to-Air Evasion.................................. |
48 |
Long Range...................................... |
48 |
Short Range .................................... |
48 |
Guns ............................................... |
48 |
Air-to-Ground Combat .......................... |
48 |
IR-Guided Weapons......................... |
48 |
Cannon and Rocket Pods................. |
49 |
Bombs............................................. |
49 |
Groundfire Evasion ............................... |
49 |
Practice Missions ....................................... |
50 |
Reference.................................................... |
53 |
Weapons................................................ |
53 |
Plane Specifications............................... |
56 |
Credits........................................................ |
63 |
|
19 |

S TA R T I N G T H E G A M E
1.First, install Strike Commander on your hard disk. (For instructions, see the Install Guide.)
2.Select the drive on which the game is installed. (For example, if you installed the game on your C-drive, type “C:” and hit e.)
3.Select your Strike Commander directory. (If you used the default directory, type “CD \SC” and e.)
4.Start the game (by typing “STRIKE” and e).
After a brief animated sequence, your screen will display the startup menu.
Note: If you are starting Strike Commander for the first time, the CONTINUE GAME option will not yet be available. If you have not saved a game, the LOAD GAME option will not yet be available.
Start New Game. To begin the full Strike Commander game, select START NEW GAME with your mouse or joystick cursor.
Training Mission. For instant action, choose TRAINING MISSION. You can use this customizable option to design practice missions against air or ground targets and to continue playing Strike Commander after you have finished the preplotted game. Although practice missions will not affect your status in the game, they are a good way to brush up on your flying and improve your combat skills while getting to know enemy planes and vehicles.
If this is your first flight simulation game, running a few custom missions before you play the main game is a good idea.
View Objects. Selecting VIEW OBJECTS allows you to see three-dimensional views of the planes, tanks, trucks, weapons and other objects you will encounter in the game. Use the object viewer to familiarize yourself with friendly and enemy equipment, or just to enjoy the artwork.
Load Game. To resume any of the games you have saved, choose LOAD GAME. When you select this option, a list of the games you have saved will appear. Select the name of the saved game that you want to continue, and click on the LOAD button. You will then find yourself at the point where you saved — the barracks at the Wildcat base or the tent at the strike base.
Continue Game. To keep track of your progress, Strike Commander will automatically save your position in the game, usually after missions or when you return to the Wildcat base. The auto-save is a backup feature, not a regular save function, and you can not use it to return to a previous series of missions, so be sure to use the regular save option frequently. If you exit without having saved your game, however, selecting CONTINUE GAME from the startup menu will return you to your most recent auto-save position. If you want to return to one of your saved games, use
instead.
STARTING A NEW GAME
After you select START NEW GAME, a “Mercenary Defense License Application” will appear on your screen. Enter your last name, your first name, and your callsign in the spaces provided. Press e or tto move between fields, and Bto correct mistakes.
Once you’ve typed text in all three fields, press eagain to start the game. Your jeep will drive up to the Wildcat base, and your game will begin.
EXITING STRIKE COMMANDER
We recommend that you save and exit using the barracks and strike tent option screens. If, however, you wish to quit your game immediately, press aX to exit. This function does not save your game.
20
TRAINING MISSIONS
After you choose TRAINING MISSION from the startup screen, the dogfight background will appear, and you will be asked to choose either a dogfight mission or an air-to-ground mission. To practice dogfighting with enemy planes, choose DOGFIGHT. To practice ground attack runs, choose SEARCH AND DESTROY.
If at any time you want to return to a previous option screen, select BACKUP. You can backup as far as the first screen. If at any time you want to return to the startup menu, select CANCEL.
Air-to-Ground Missions
After you choose SEARCH AND DESTROY, you will be given a brief statement of your mission objectives and asked to confirm your choice. Selecting ACCEPT sends you to the weapons loading screen. To load weapons, click with the mouse on the weapon you want to add to your plane. The weapon will appear under the wings of your plane on an appropriate hardpoint. Weapons are always loaded onto your plane in pairs. If you click on a weapon already loaded on your plane, it will be removed and returned to the ordnance carts. (For more information on loading weapons, see Loading Your Weapons, p. 27.) Afterwards, select the cockpit to fly your mission or the hangar doorway to return to the startup menu.
Dogfight Missions
After you choose DOGFIGHT, you will be given a brief statement of your mission objective. At the bottom of your screen will be a set of numbered buttons. Choose the number of enemy planes you want in the first group that you will face. You will then be asked to choose the types of planes in that group.
After you choose number and type of planes, you will be given four options. If you only want to fight one group of enemies, select ENOUGH. If you want to add more groups, select MORE and choose the number and type of planes in the next group.
Once you’re satisfied with the selection of enemies and the mission configuration, choose the altitude at which the engagement will begin (5,000, 15,000 or 25,000 feet). After choosing your altitude, choose whether to engage ROOKIE, VETERAN or ACE opponents. Next, you load weapons onto your plane. To do so, click with the mouse on the weapon you want to add to your plane. The weapon will appear under the wings of your plane on an appropriate hardpoint. Weapons are always loaded onto your plane in pairs. If you click on a weapon already loaded on your plane, it will be removed and returned to the ordnance carts. (For more information on loading weapons, see Loading Your Weapons, p. 27.) Afterwards, select the cockpit to fly your mission or the hangar doorway to return to the startup menu.
For a walk-through of a few missions, see Practice Missions, p. 50.
OBJECT VIEWER
When the object viewer appears on your screen, you see an F-16 as it appears in the game. Initially, the plane will be spinning. To change the direction of the spin, click on one of the ROTATE buttons with the right mouse button. To stop the object from spinning, click on one of the ROTATE buttons with the left mouse button. Once the motion is stopped, you can use the left mouse button to manually rotate an object and view it from different angles. Wand Zrotate the object around the horizontal axis of the screen. Aand Srotate it around the vertical axis.
To get a closer look at an object, press the ZOOM up arrow. To zoom back out, press the ZOOM down arrow.
To view other objects from Strike Commander, select the button with the name of the object you’re viewing. The next piece of hardware from Strike Commander will appear on your screen.
21
G A M E O P T I O N S
OPTION SCREENS
Strike Commander has a comprehensive option screen interface that allows you to tailor the visual, audio and flight characteristics of the game to suit your tastes and your hardware. Activate the option screens from the cockpit by pressing aO.
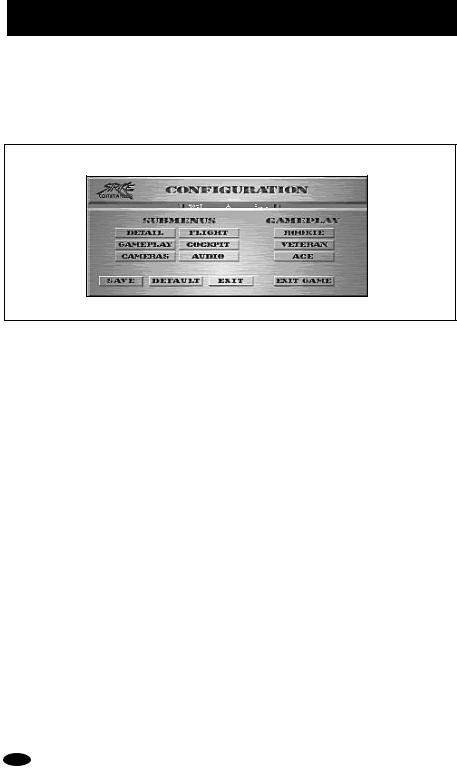
Configuration
Option Screens Screen
The main configuration screen has the following buttons:
•ROOKIE, VETERAN and ACE. Selects the overall difficulty level of the game.
•SAVE. Saves your unique option package.
•DEFAULT. Restores the default setup.
•EXIT. Exits the option screens.
•EXIT GAME. Lets you exit Strike Commander entirely. Selecting EXIT GAME brings up a menu with
the following buttons on it:
•RESTART. Restarts the mission from the beginning.
•ABORT. Aborts your current mission and returns you to base as though the mission had
not been flown yet. This can be used to change your aircraft’s loadout or to listen to the briefing again.
• CONTINUE. Exits the game and returns you to the base as though the mission had been completed at that point. This could be used to exit the game when you know you have completed the mission goals and don’t want to continue the mission to landing. This option will allow you to exit if the mission has not been completed so be sure you mean it!
• EXIT. Returns you to the main configuration screen.
The other buttons are used to select the option screens listed below. For information on speeding gameplay, see Troubleshooting, in the Install Guide. If a certain button is non-functional, it means your system does not have enough memory to make it active, or that you do not have the required hardware.
Once you have configured the options to your liking, and hit SAVE on the main configuration screen, your game will begin with those options active until you choose to change them.
Detail
Your game automatically selects the detail settings that it considers most appropriate for your machine. However, DETAIL gives you fine control over the detail level of the objects and terrain by turning various textures and shadings on and off. The small window in the center of this option screen illustrates in a rough way how your changes will affect the look of the world. The less detail you select, the more rapid the game’s frame rate and the smoother your game will flow (up to a maximum level). Buttons that toggle details on and off include:
22

•TERRAIN
•GOURAUD. The smooth shading of the terrain.
•TRANSITION. The transition texture boundary anywhere terrain color changes (for example,
the transition from water to land).
•INTEREST. The small clumps of trees and rock outcroppings scattered on the terrain.
•RIVERS.
•FIELDS. The square patches of farmland.
•CITIES. The large urban areas.
•RUNWAYS. The textures on the runways.
•OBJECTS
•GOURAUD. The smooth shading on planes and other objects.
•TEXTURE. The texture mapping on the planes and other objects.
•HI-LO. Switch the objects from the highest detail levels to the lowest detail levels. There
are three settings.
•HAZING. The distance at which the terrain hazes out. There are five different settings ranging from NEAR to FAR.
Some options will affect the frame rate (i.e., your game’s smoothness) more than others, depending on your machine. Experiment with different options to get the most desirable balance of detail and speed.
Gameplay
GAMEPLAY changes the difficulty of the game in several specific ways through the following buttons:
•UNLIMITED AMMO. Gives you unlimited amounts of the current munitions you are carrying.
•EASY GUN HITS. Makes hitting enemy planes easier at long range with the gun.
•ENEMY INTELLIGENCE. Controls the level of the enemy artificial intelligence, with ROOKIE selecting
the easiest enemies and ACE the most difficult.
Cameras
CAMERAS gives you control over the cameras in the game with the following buttons:
• AUTO SWITCHING. Automatically switches you back to the forward cockpit view if the plane is in danger of hitting the ground or is hit by enemy fire.
• WEAPON CAMERA. Automatically activates the weapon camera when a mission begins. It can also turn the weapon camera on during a mission.
• VICTIM VIEW. Automatically activates the victim camera when a mission begins. It can also turn the victim camera on during a mission.
• TERRAIN IN GUN CAMERA. Allows the gun camera to display the terrain. This reduces your frame rate, but looks better.
• WINDOW SIZE. Allows you to pick how much of your monitor the game screen will occupy. If you pick SMALL or MEDIUM, the screen will be reduced in size and everything on it scaled appropriately. Note that you do not lose any field of view if you pick a smaller window. The smaller the window the faster the frame rate.
Flight
FLIGHT lets you pick how you want to control the plane, the cockpit panning and other flight related items. The buttons behave as follows:
•CONTROL. Selects the method you use to control your plane. Any buttons that appear flat are not available. You may choose among KEYBOARD, MOUSE, JOYSTICK or THRUSTMASTER.
•PANNING CONTROL. Selects the method you use to control the cockpit panning. (As always, any
buttons that appear flat are not available.) You may choose among KEYBOARD, MOUSE, JOYSTICK, SECOND JOYSTICK, THRUSTMASTER or NONE. The Thrustmaster choice controls cockpit panning through the thumb control on the joystick. You can always pan by pressing the second button on the joystick and moving the joystick, regardless of the control selected.
•MID-AIR COLLISIONS. Allows collisions between your plane and enemy planes if it is on.
•EASY LANDINGS. Is more forgiving to rough landings if it is on.
•SHOW WEAPONS. Shows you the weapon loads of all planes in the game if it is on. This option will
reduce the frame rate (make the game less smooth), especially if many weapons are loaded on the planes.
• STALLS. Controls whether or not the plane can stall. If it is on, stalls are possible.
23

Cockpit
This screen lets you customize the cockpit of your plane. It can also give you tools not available in present-day aircraft, depending upon which buttons you select:
•LADDER. Turns on and off the pitch ladder display on the HUD.
•TAPES. Turns on and off the airspeed and altitude above sea level tape displays in the HUD.
•AUTO TARGETING. If this button is on and no target is currently selected, as soon as a target
comes into range, the computer will automatically select it as a target.
• 360° LOCK. When this button is on, you will not lose your target lock, even if the target cannot be seen by the weapon targeting it.
• SMART TARGETING. When this button is on, you will be unable to target friendly or shotdown aircraft.
•SUN GLARE. Turns on and off the glare of the sun.
•G EFFECTS. Turns on and off the blackout and redout effects associated with pulling too many
Gs.
• SMART RADAR. When this button is on, the standard target blip on the radar is replaced by a series of different shapes depending upon the target’s shot down status and whether or not it is friendly, enemy or neutral. For a description of these different shapes, see Air-to-Air Radar, p.38.
• 360° RADAR. When this button is on, the radar switches to a mode that shows you all targets around your plane, with your plane in the center.
• SMART RAW SCOPE. When this button is on, all radar-emitting targets are shown at all times.
Audio
These buttons control the sound of the game. If a button appears flat, that sound option is not available with the sound card(s) you have installed. The buttons operate as follows:
•MUSIC. Turns music on and off.
•SOUND FX. Turns sound effects on and off.
•SPEECH. Turns speech on and off.
•DIGITAL FX. Turns digitized sound effects on and off.
TIME BURST AND TIME COMPRESSION
tactivates the Time Burst function. Time Burst accelerates time in the game so that everything happens six times as fast. Releasing the tkey takes you out of Time Burst.
st activates 2x time compression. Everything happens twice as fast. Hitting st again doubles the compression again to 4x. Hitting sta third time takes you back to normal time.
C A M E R A V I E W S
In Strike Commander, you can watch cockpit action from many more camera angles than you’ve ever had before. With a little practice, you will be using these camera angles to great advantage.
Most of the camera views use the joystick pan technique. All but one of the camera views replace your HUD, so when using them, you’re flying without instruments. Be advised that some of the camera views are so riveting that the development team crashed more than one plane by staying in an external camera view too long.
Never forget where your aircraft is and where it’s going when you shift your view from the HUD to an external camera, and remember that 1will always snap you back to the cockpit. You will also snap back to the cockpit automatically if you come too close to the ground, take damage or stall, if you have auto-switching toggled on (see Option Screens: Cameras, p. 23).
24

1Cockpit Camera. This key snaps your eyes back to the front of the cockpit. If you are already in cockpit view, 1 zooms the HUD in and out. You can pan (look around) your cockpit in Strike Commander using the joystick (with the #2 button pressed) or your keyboard, second joystick, mouse or Thrustmaster thumb joystick — see Option Screens (p. 22) for instructions on choosing your pan control.
2 Chase Camera. This is an exterior view just behind and above your aircraft.
3, 4and 5 Left, Right and Back Cockpit Cameras, respectively.
6External Camera. Press 6to activate this view, then use the joystick (while the #2 button is pressed) to pan around the exterior of your aircraft. [ and ] zoom in and out. Press 6a second time to see the next closest aircraft. C6 cycles your viewpoint among ground objects in similar fashion.
7Player to Target / Target to Player. This camera viewpoint tracks to keep you and a radarselected target in the field of view. The first time you press 7, you will see your selected target from the point of view of your aircraft. Press 7again to reverse the view, placing your target in the foreground and your own plane in the background.
8Gun Camera. This shows your currently selected target (for guided weapons) or a close-up of your gunsight direction (for unguided weapons). If you have a target in the cross hairs of the gun camera, your chances of hitting that target are excellent. It and the cockpit camera are the only cameras you can use and still read your HUD. The gun camera is particularly useful during combat when used in conjunction with a HUD weapons display, such as DGFT mode. It is also useful in close air support over a contested battlefield, where enemy units are intermingled with your own. It is only available from inside the cockpit.
9Victim Camera. This view allows you to see the damage your weapons inflict on a selected target, by cutting away from your cockpit to a close-up of your kill. You can preset your game (using the Options Screens, pp. 22-24) to automatically cut away to victim camera whenever appropriate. 9toggles this view on and off.
0Weapon Camera. This view follows the weapon you just launched. It is one of the more dramatic camera views. You can preset your game (using the Option Screens, pp. 22-24) to automatically cut away to weapon camera whenever you launch a weapon. 0 toggles this view on and off.
YAuto Target Tracking. If you have a target selected the first time you press Y, the camera automatically pans to keep that target in view. Press Y again to turn this mode off. See Option Screens (pp. 22-24) for more details on managing this camera.
This fluid camera view, more than any other, demonstrates the concept fighter pilots call “situational awareness”— the ability to know what is happening around you at all times. The Auto Target Tracking view lets you make fast visual assessments of the situation.
25
W I L D C A T B A S E
The year is 2011. Your mercenary squadron, the Wildcats, is struggling to survive amidst dozens of units who are as eager to find work as you are. Many of these groups, including the Wildcats, call Istanbul, Turkey, home, but your job will take you around the globe.
The Wildcat base is the center of operations for your squadron. After completing a series of missions, you will return here to purchase weapons, check the status of your squadron and talk with fellow Wildcats. From the base, you can also travel to Selim’s, a bar in Istanbul, where fixers wait to offer you dangerous but lucrative missions.
Hangar Option Screen |
|
|
|
|
|
Truck (to Strike base) (also, Plane, for local missions) |
||||||||
|
|
|
|
|
|
|
|
|
||||||
|
|
|
|
|
|
|
|
|
|
|
|
|
|
|
Jeep (to Selim’s) |
|
|
|
|
|
|
|
|
|
|
|
|
|
|
|
|
|
|
|
|
|
|
|
|
|
|
|
|
|
|
|
|
|
|
|
|
|
|
|
|
|
|
|
|
To Office |
|
|
|
|
|
|
|
|
|
|
|
|||
(Ledger, Catalogs, |
|
|
|
|
|
|
|
|
|
|
|
|
To Barracks |
|
Kill Board) |
|
|
|
|
|
|
|
|
|
|
||||
|
|
|
|
|
|
|
|
|
|
(Load or Save Game) |
||||
|
|
|
|
|
|
|
|
|
|
|
|
|
|
|
Wildcats you can |
|
|
|
|
|
|
|
|
|
|
|
|||
talk with |
|
|
|
|
|
|
|
|
|
|
|
|||
Talking to the Wildcats. You may see other Wildcats standing around the hangar. You can talk to them by selecting them with the cursor. Their conversations usually include mission information or tips on flying, so it’s always wise to stop and chat.
During any conversation, you can move to the next screen by hitting e, z or the left mouse button. You can exit the conversation entirely by hitting q.
Barracks. The door to the right leads to your barracks. The barracks are one of two locations where you can load and save games. It’s a good idea to save as often as possible, especially after completing difficult missions. Select the right hangar door to enter the barracks.
Office. To enter the office, select the door to the left. There, you can receive financial updates or look at the kill board to gauge your progress relative to other Wildcat pilots.
Jeep. When the jeep is in the hangar doorway, you can select it to drive to Selim’s. At the bar, you can obtain missions for your squadron, speak with fellow pilots and meet other interesting people.
Transport Truck. You will be flying a variety of missions. For local missions, you will take off and land at the Wildcat base. For most missions, however, Virgil, your accountant, will make arrangements for a staging base in the vicinity of that series of missions. (Of course, a staging base adds to overhead costs, but it’s a necessary expense.) After you accept a foreign mission, your transport truck will appear in the hangar entrance.
Select the truck to load the Wildcats and their equipment onto a C-130 transport plane to travel to your strike base. From there, you will begin the missions in that series.
Fighter Plane. If you accept a local mission, you will see an F-16 instead of a truck parked in the doorway of the hangar. Select the plane when you’re ready to fly your mission. After selecting the F- 16, you will be informed of your mission targets and flight plans. Listen carefully to any instructions
— missing a rendezvous or a target can result in lost payments, expensive fighter replacement costs, or even the death of a fellow pilot. If the exact locations are unclear, however, don’t worry; you will have a map in your plane’s cockpit that allows you to review current mission objectives.
26
For the first couple of missions, Stern, the commander of the Wildcats, will assign you a wingman. As you become a more experienced pilot, you may choose your own wingman.
After the briefing is finished, the weapon loading screen will appear.
Loading Your Weapons
On the weapon loading screen, you will see your F-16 parked in the hangar (or in front of the tent, if you’re at the strike base) and several racks of weapons. Some weapons won’t become available until later in the game, so don’t worry if there isn’t a wide selection at first. Use this screen to customize the loadout your plane will carry into battle.
To load weapons. Select a weapon from the rack with your left mouse button. Weapons are added to your plane’s inventory in pairs to ensure balance.
To remove weapons. Select a weapon on the plane with either mouse button, or a weapon on the racks with the right mouse button. As with loading, weapons are removed in pairs.
Weapon Loading
Screen
Return to Base
Cockpit
(Begin Mission)
AIM-9J
LAU-3
AIM-120 AMRAAM 
GBU-15
Durandal
MK 82 AGM-65D Maverick MK.20 Rockeye |
AIM-9M |
Loadout Limitations. Your plane has eight hardpoints for carrying weapons. Each type of hardpoint can carry a limited number of weapons. At the tip of each wing is a rail that can carry either a Sidewinder-9J or a Sidewinder-9M. Underneath each wing, closest to the end, is a light hardpoint. Light hardpoints can carry only air-to-air missiles: either a Sidewinder or an AMRAAM. In the center of each wing’s underside is a medium hardpoint. Because they are able to carry both air-to-air and air-to-ground weapons, medium hardpoints are the most versatile. They can each hold:
• |
2 |
AMRAAMs, |
• |
3 |
Mavericks, |
• |
1 |
GBU-15E, |
• |
3 |
Durandals, |
• |
2 rocket pods, |
• 6 cluster bombs (Mk20’s) or |
|||
• |
1 |
Sidewinder (AIM-9J or -9M), |
• |
6 |
Mk82’s. |
The innermost hardpoints are heavy hardpoints. Heavy hardpoints can carry any of the weapons carried by the medium hardpoints except air-to-air missiles.
Returning to the Base. If you decide after the briefing that you need to check your ledger or catalog to purchase more weapons, or even if you just need to hear the briefing again, you can return to the hangar by clicking along the top of the screen.
If you wish to have the briefing repeated at that point, click on the F-16 again, and you’ll go back through the briefing and the weapons loading screen.
Flying the Mission. If you’re satisfied with your loadout and have a clear understanding of your mission objectives, click on the cockpit of the plane to fly the mission.
27
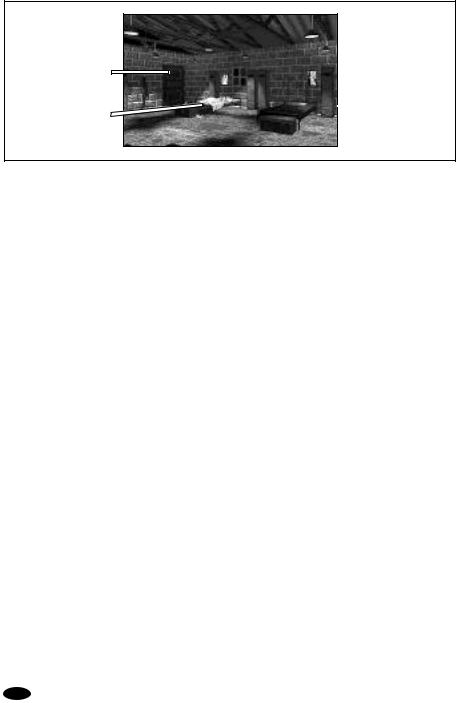
BARRACKS
Loading and Saving Games
When you’re at the Wildcat base, you can visit the barracks to save the game in progress or to load a previous one. The barracks can be reached from the right doorway in the hangar.
Barracks Option
Screen
Exit to Hangar
 Save Game
Load Saved Game
Sleeping Pilot (Loading Games). You’ll notice another Wildcat pilot sleeping in a cot in the barracks. Wake her up (select her) to load a previous game. A screen will appear listing your saved games. Select the game you want to load and click on the LOAD button. If you change your mind and decide not to load a game, click CANCEL to return to the barracks.
Note: If you are using the partial installation option, you may have to re-install portions of the game to return to a saved game.
Empty Bed (Saving Games). It’s advisable to save your game every time you complete a mission. Click on the empty bed to bring up the save game window.
To save the current game under a new name, select the NEW button. Type the name you want to use for the file and press r. The only limit to the number of games you can save is your hard disk space.
If you choose to delete a saved game for any reason, select its name on the list and click DELETE. When the game asks you to verify, click YES to delete the saved game. Select NO to cancel the deletion.
If you want to save using the same name as a previously saved game, select that name and click on OVERWRITE. Once again, you will have to confirm your choice.
To return to the barracks, select RESUME. To exit your game at this point, select QUIT TO DOS.
VIRGIL’S OFFICE
Managing the Wildcats
Virgil is the Wildcats’ accountant and chief whiner. He may be pessimistic, but it’s not wise to ignore him, because he may have valuable information.
In Virgil’s office at the Wildcat base, you can talk to him, check squadron finances by reading the ledger, purchase weapons from the catalog, or view the kill board to compare your progress with other Wildcat pilots.
Talking to Virgil. When Virgil is sitting at his desk, click on him to receive a fiscal update on the Wildcats. Virgil will often have important information concerning the squadron’s financial wellbeing, so check in with him frequently.
Ledger. View the ledger by selecting the open book on the right side of Virgil’s desk. The first page of the ledger shows the financial status of the Wildcats, including overhead costs, fighter plane replacement costs, recent purchases, and net worth. The statistics that are most important to you are your current cash worth and your projected overhead costs. This will be updated when you accept a mission. Remember that the overhead is a cost per mission.
28
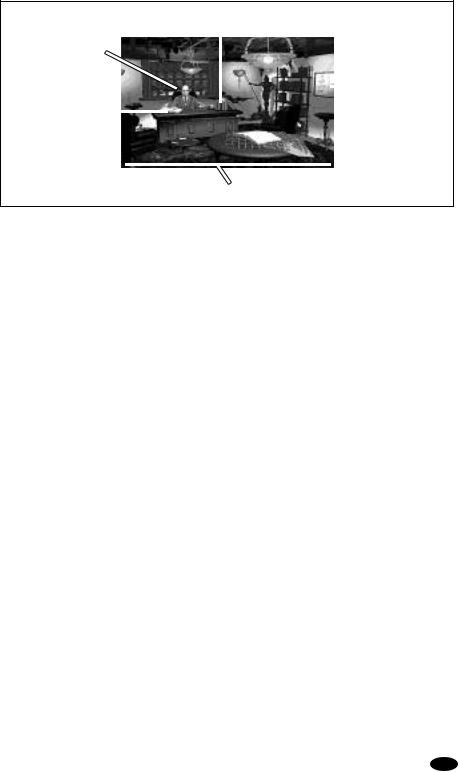
Office Option Screen |
|
|
|
|
|
Catalog |
||||||||||
|
|
|
|
|
|
|
|
|||||||||
Virgil |
|
|
|
|
|
|
|
|
|
|
|
|
|
|
||
|
|
|
|
|
|
|
|
|
|
|
|
|
|
|||
Ledger |
|
|
|
|
|
|
|
|
|
|
|
|
|
|
|
Kill Board |
|
|
|
|
|
|
|
|
|
|
|
|
|
|
|
||
|
|
|
|
|
|
|
|
|
|
|
|
|
|
|
|
|
|
|
|
|
|
|
|
|
|
|
|
|
|
|
|
|
|
|
|
|
|
|
|
|
|
|
|
|
|
|
|
|
|
|
|
|
|
|
|
|
|
|
|
|
|
|
|
|
|
|
|
Exit to Hangar
If your projected cash is ever below zero, make sure you’re successful on your next few missions. Otherwise, you’ll be broke, and the Wildcats will be finished.
Turn the page (by clicking on it) to see a listing of your squadron’s currently available weapons. You won’t order weapons here, though. Check the catalog for purchases.
To return to the office after viewing the ledger, click along the top edge of the screen.
Catalog. Initially, Stern will purchase weapons for the Wildcats. As you gain experience, however, the responsibility for purchasing weapons for the squadron will pass to you.
When it’s available, you will be able to use the catalog to make weapon purchases. View it by selecting the book and calculator on the right side of Virgil’s desk. You’ll be purchasing weapons for all of the Wildcats, so be sure to stock plenty of everything, especially Sidewinders and smaller bombs.
When you select the catalog, it will open to two pages of weapons and prices. Flip through the book by clicking on the top corners of pages.
Buying a Weapon. Click on the weapon with the left mouse button. A receipt will appear on the screen with the weapon type and its price displayed on it. If you buy more of the same weapon, the number on its receipt will change.
If you change your mind and decide not to purchase a weapon, click on it with the right mouse button, or click on the receipt with either button. That item will be subtracted from the corresponding receipt.
Some weapons are available for better prices if they’re bought in bulk. When you select one of the four weapon packages listed in the back of the catalog, you will receive the number of weapons listed in the package description. Weapon packages are a good way to save money and still buy enough weapons for the entire squadron.
As you select weapons and packages, the calculator next to the catalog keeps track of the amount of money in your account (top line), the amount you are spending (middle line) and your account balance (bottom line). You are allowed up to one million dollars in credit to purchase weapons, but remember that you will go bankrupt and lose the game if you return from a mission with no cash.
To return to the office, click anywhere along the top of the screen. When you do this, the weapons you have selected will be purchased, and the correct amount of cash will be subtracted from your account.
Returning to the Hangar. Click anywhere along the bottom of the screen to return to the Wildcat hangar.
29
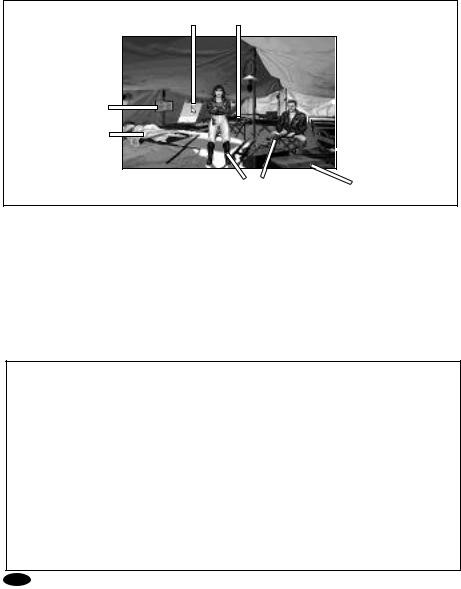
STRIKE BASE
When you fly foreign missions, you’ll need to set up a strike base. Virgil will make arrangements for the Wildcats to use abandoned airfields or old airport facilities for these bases. It costs a bit to set up a strike base, but it enables the Wildcats to fly missions anywhere around the globe.
Tent. The tent is the hub of activity at the strike base. Select the open flap to enter the tent, where you can load and save games, view the kill board, check the ledger and use the catalog. All of these functions are the same as they are at the Wildcat base. After tending to business, you may want to talk to other Wildcat pilots who are relaxing in the tent. They will give you background information, flight tips, and mission reports.
Office. Some of the strike bases include a small office to the right of the runway. Occasionally, you will find Wildcats there to chat with about current missions and strategy hints. Click on the office to talk with them. Press qif you wish to terminate the conversation.
Option Screen |
Exit to Strike Base Save Game |
|
Kill Board
Load Saved Game

 Ledger (Calculator)
Wildcats you can talk with |
Catalog |
Fighter Plane. When you’re ready to begin a mission from the strike base, click on the fighter plane to hear your briefing, load your plane with weapons, and fly your mission. This works the same as it does at the Wildcat base.
Transport Truck. When you’ve completed your work at the strike base, the transport truck will pull up outside the tent. Select it to pack up and head back to the Wildcat base.
30
 Loading...